 |
The instructions in this article relate to Receipt Entry. The icon may be located on your StrataMax Desktop or found using the StrataMax Search. |
Receipts for deposits can be manually created in Receipt Entry. However we recommend that any cheques received are deposited into the bank account using a Print Deposit Form, or for levy payments a Levy Notice or Ledger Card is produced with a deposit slip and deposited via Australia Post, or sent to StrataPay. This way the funds can be correctly reconciled automatically against the appropriate account code or lot.
Manual receipts should only be created when there is a need to take up the deposit using today's date. Manual receipts create an unpresented deposit and will need to be reconciled with the actual funds once it is available in the bank account, and shows up in Bank Reconciliation as an unreconciled item.
The receipt allocation process will include a display of the due date for each transaction including invoices not associated with a levy. This process will pay the oldest debt first based on the due date. Interest and Invoices are allocated appropriately based on the due dates instead of the start or end of the priority order.
Receipt Entry Information
The below information explains the fields of information available in Receipt Entry.

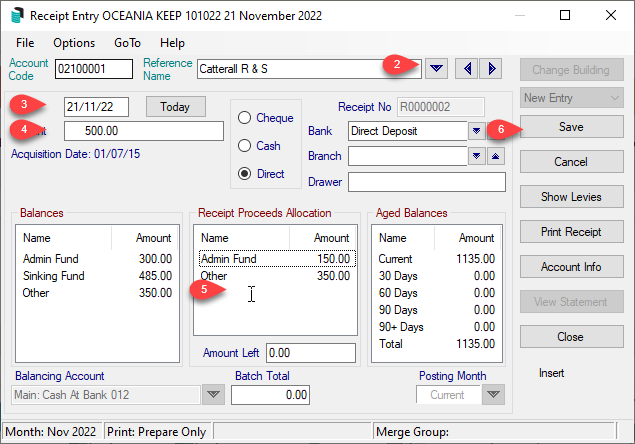
Account Code (1)
The account code number for the owners account.
Reference Name (2)
The name of the lot owner.
Receipt No (3)
Receipt Numbers have the prefix 'R' and will be automatically generated for a New Entry. This will be the reference number for all account entries generated by this transaction. A transaction will be created for each invoice code (e.g. Admin Fund, Admin Discount, Sinking Fund, etc.). Each entry subsequent to the original will have an additional prefix (e.g. R0000123, RA000123, RB000123).
Date (4)
Enter the date of the receipt. Press Shift+2 to insert today's date. The date entered cannot be a date which is later than one month after the last Month End Roll Over.
Amount (5)
Enter the amount of the receipt, which must be greater than $0.00. Do not put a minus or plus sign before the number. If you need to reallocate funds, please use Debtor Adjustment, or if the receipt has not been presented, use the Reverse function.
Payment Method and Bank Details (6)
Cheque, Cash or Direct must be selected to identify the channel in which the payment was received. If a Cheque is received, the Bank, Branch and Drawer Information must be present. Bank and Branch details must be selected, and the Drawer information will populate with the owners details.
Balances (7)
The amounts in the Balances list shows the current balances in each fund.
Receipt Proceeds Allocation (8)
This list shows the proposed postings based on available data to calculate the distribution of payments including discounts (if applicable).
In some cases StrataMax may not be able to accurately define the amounts required for each fund. Click in the middle to open the Receipt Entry Allocation screen to confirm the allocation of the receipt. The 'Receipt Amount' needs to match the 'Allocated Total'. Further information can be found in Allocating a Receipt Manually.
Aged Balance (9)
This list shows arrears position for the account.
Receipt Entry | Configuration
Receipt entry configuration may assist with the processing of receipts and minimising the entries that have not auto processed in Process Bank Statements. Configuration settings are located in Receipt Entry under the File > Configure.
In order to make changes in this menu, you will need the 'Receipt Entry Configuration' permission in Security Setup.
Post over payment to first balance (Global) (global configuration)
If set, when a levy payment is received, any amount that is over the amount due will be posted to the first levy fund based on the Sort Order set in Levy Invoice Code Setup up to the amount set in Maximum Auto over payment to first balance (see below).
If not set, any amount that is received that is above the amount due will be an exception via Process Bank Statements.
Post over payments to first balance (Building Override) (building configuration)
This setting will create a building override and must be set within the building selected. From the required building, set this to Yes or No to create an exception from the Post over payment to first balance (Global) above.
Maximum Auto over payment to first balance (global configuration)
This amount sets the maximum amount that will automatically be posted to the first account as per the above setting. If the amount of over payment is greater than this amount set, the transaction will be an exception the via Process Bank Statements and will require manual receipting.
Post underpayments always (Global) (global configuration)
If set, when a levy payment is received that is below the amount due, it will automatically post the payment based on receipt allocation priority in Levy Invoice Code Setup. If not set, then the payment will be an exception via Process Bank Statements.
Post underpayments always (Building Override) (building configuration)
This setting will create a building override and must be set within the building selected. From the required building, set this to 'Yes' or 'No' to create an exception from the Post underpayments always (Global) above.
Don't Auto Post Over/Under in Sub-groups
If set, any over or underpayments will be ignored if it relates to the Sub-Group, and will be an exception in the via Process Bank Statements and will require manual receipting.
Auto Transfer Credit Interest and Other
If there is a credit in either Overdue Interest or Other for the lot account, this will move the credit to pay for any amounts due before applying any payments made. Not recommended.
Default Receipt Type
This sets the receipt type when a new entry is made. The most common default is Direct as this is a direct entry from the bank.
Minimum Auto Unposted Interest
The amount set will be the minimum amount of interest to be posted, based on the interest settings for the selected building. This amount will automatically post to the lot account for accrued interest due up to the date of the receipt.
Sundry Receipt Search Key
This can be set to either Details or Drawer and is a global setting.
Offer Insurance Claim Matching
Intended for receipts for insurance refunds. When a Premium Account is used in the receipt, you will be prompted to allocate the receipt to the Insurance Claim record and update the amount paid.
Cents Rounding Adjustment Account
If any receipt requires cents rounding, the account set will be used to take up any rounding.
When a receipt is received and the amount paid is a denomination of 0.05 cents (i.e. value ends in 5c or 0c) and the amount received would leave a few cents in advance or arrears on the lot account, cents rounding will apply. The amount will process transactions to balance the account to $0.00. The account which is used to process these small transaction adjustment amounts will be set globally.
Clear Arrears Flag
If enabled, the owner's arrears flag will be cleared automatically when their payment is receipted and their account balance becomes zero, or below the pre-configured tolerance allowance (see below). This is a global setting and will affect all users. When the arrears flag is cleared, it will also create an entry in Log Viewer, in the 'ArrNoticeClr' category.
Clear Arrears Flag Tolerance
This field is only available if the Clear Arrears Flag setting (above) is enabled. Type in the amount that an owner's balance needs to reach in order to reset their arrears flag. For example, if you set this to 50, and an owner's payment leaves them with a balance of $50.01, their arrears flag will not be reset (it is common to set this to match the amount of the first arrears notice criteria).
Allocate to Interest Last
This setting if Ticked will allocate interest last on a per building basis or globally. If active then this will be seen when using Receipt Entry, Receipting via Bank Reconciliation and Debtor Adjustments. Interest will be listed last on the allocation screen.
Please Note: This setting will not override the QLD Interest allocation rule.
Queensland Outstanding Interest Allocation Rule
If this setting is Ticked, and the Building State is Queensland, if Interest is outstanding, then interest will be paid first, then due levies, then the rest in the normal order.
Allocation of receipt will occur in the following order:
• Interest if outstanding will be paid first.
• Due Levies.
• Rest of the amount will post as per the normal order.
Please Note: The building setting will only affect the building that you are currently in. Select the Building Override setting to Use Global, Yes, No.
NSW Building Setting
This global setting will be ticked for buildings that are set to use the New South Wales state and will control the receipting in the following order:
- Levy Contributions, in order of due date.
- Interest
- Expenses of the Owners Corporation in recovering contributions ordered to be paid under section 86(6)-8.
The NSW Overdue Levies Allocation Rule (Building Override), if set to No, will only affect the building that you are currently in.
These settings will be adopted in the following areas:
Receipt Entry, Bank Reconciliation, Debtor Adjustments and Rationalise Sub-Balances (system process)
Example:
If a lot has any outstanding levies due on or before today (computer date), as determined by the Due Date shown in Receipt Entry, levies, including those not yet due, for any NSW building with the configuration enabled will be paid before any interest or recovery costs.
Receipt Entry | Options and Shortcuts
There are other areas in StrataMax that can be accessed via Receipt Entry, which may assist in easily accessing other information. These are as follows:

Transaction History
Opens the Transaction List
screen, containing historical transactions for the property.
Receipt History
For any deposit receipt created this can be reviewed here to validate the totals. This area is recommended to understand a total Owners deposit received versus the ledger card which will be a split across fund types.
Roll Manager
This will shortcut to the Roll to view Owner records.
Bank Slip Report
A Bank Slip report can be produced to send to bank payments received by the office for the selected dates and selected buildings.
Add General Code
When creating receipts there may be instances where a general account code is not available within the property, and needs to be added via the Master Chart. This will provide a short cut to Account Maintenance.
Switch Index
The default index list of what is presented when selecting an Account/Reference Name. This can be set to either Owners, Creditors or All (Accounts) using Switch Index.
Flush All Balances
From time to time if re-receipting between fund types, flushing balances will apply and credit balances sitting in one fund that may be offset by another. This process will review any accounts that have this scenario and can be reviewed prior to accepting the flush. Multiple lots can be accepted by keying 'Shift' and clicking the end record.
Show Levies
For easy reference, clicking 'Show Levies' when a lot account is selected will display the selected lot's levy register for an on screen checkpoint. This area can also assist in updating receipt proceed allocations with options existing to assign.
Account Info
Once an account has been selected, the 'Account Info' button will allow for selections of 'Owner Info' which launches directly to the menu option or to 'Ledger Card', which will be a preview report that can be reviewed in conjunction to completing the receipting process.
Creating a Receipt for an Owner
In most instances a receipt for an owner is not required and allocation of levy payments should be done as part of the banking reconciliation process. At times a manual receipt may be required, and the following instructions can be carried out. However, by creating a receipt without the actual funds being deposited will create an unpresented deposit. Once the funds have been received in the banking, it will need to be matched to this receipt.
When a new receipt is created for an owner, StrataMax will automatically allocate the proceeds of this payment between the amounts owed in this account. Receipting of the payment will be based on the oldest bill first, and if the owner has overpaid, there will be prompts to ask if the extra amount should be allocated to the Admin Fund - in most cases 'Yes' is the appropriate answer. If the owner has asked for the amount to be allocated to a specific fund, then click 'No' and allocate the postings manually.
- Search or select Receipt Entry.
- From New Entry mode, select from the Reference Name drop down list the account that the receipt is to apply to.
- Enter the Date (Shift + 2 to insert Today's date).
- Enter the 'Amount' and check the method of payment and set if required (cheque / cash / direct). If by cheque the details of Bank / Branch / Drawer will need to be completed.
- To review the allocation of the receipt, click in the Receipt Proceeds Allocation box.
- Click Save.
In this example, the Other invoices were due on the 01/11/22 and the 01/12/22 totaling $500.00. The receipt has been applied to these older transactions first based on these older due dates. Receipt allocation will be based on the oldest due date first, and allocate to these debts first. After this, any items that include the same due date, posting priority will take place as per the Levy Invoice Code Setup area.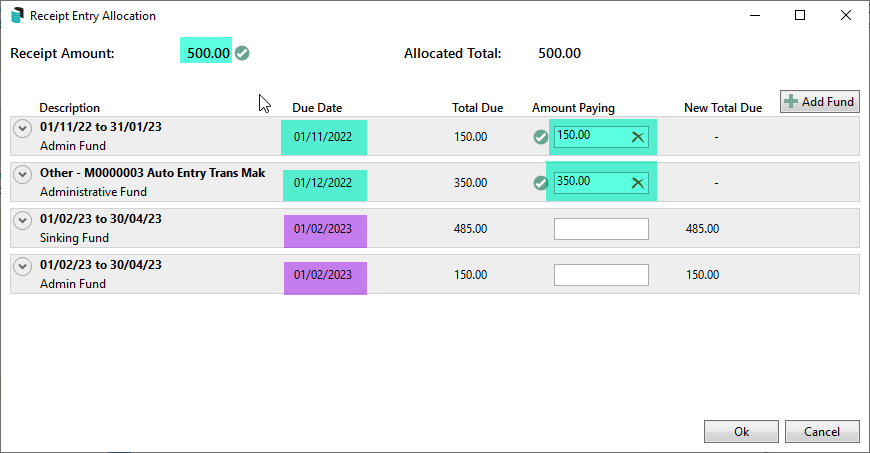


A Note on Unposted Interest
When creating a receipt for payment in Receipt Entry, if an owner has unposted interest accruing on the account, a prompt will appear to ask whether you wish to post unposted interest.
If Yes is selected, transactions will be created at the selection point, this will allow the interest priority to be used after the interest transaction is processed.
If No is selected, transactions will not be added to the total amount in Overdue Interest.
Processing unpresented receipt with received funds
Once the receipt that has been created as per the steps above, and the funds are available in the Bank Reconciliation, this physical entry will need to be matched to the unpresented receipt.
- Search or select Bank Reconciliation.
- Select the unprocessed line and expand the arrow, noted with a red question mark exception.
- Click Match to Unpresented.
- From the list of unpresented items, tag the receipt(s) that make up the balance of the deposit / and click Select.
The allocation for the receipt will be available on the right side of the line item. Click the blue (i) to review the allocation. - Click Auto Process to finalise the statement.

Processing One Deposit To Multiple Accounts
These instructions can be applied when a deposit has been received in the bank for multiple lots. An example of this could be a payment from a Developer to pay the levies for multiple lots. The receipts must be created first before they can be matched off to the single deposit.
- Search or select Bank Reconciliation.
- Select the line item for the multiple lot deposit to expand the information, noted with a red question mark exception.
- Click Create Receipt and select the Account to create the first receipt. Review the receipt entry screen including applying the Amount for the selected account, and Allocations to adjust/ review the allocation of receipt. Click Save.
- The unallocated amount will be displayed next to the Amount field in preparation for the next receipt(s). Click Create Receipt and create any further receipts for any other accounts included.
- Once all receipts have been completed and all other exceptions have been dealt with. Click Auto Process to finalise the Bank Reconciliation.

A Bank Slip Report can be used to deposit into the bank a lump sum amount from multiple cheques received, the reference numbers on this report can be used to identify the individual lots/payments. Or a Merge Levy Notice Setup if completed before sending the Levy Notice will include a single payment reference number for all merged lots and on receipt will allocate to each of these lots accounts.
Processing manual entries with a finalised Bank Reconciliation
In the event of the Bank Reconciliation being finalised and there is an unpresented receipt that requires tagging off to balance the bank balance, the below steps can be followed.
- Search or select Process Bank Statements.
- From the list unreconciled accounts, select the building with the Variance (red question mark exception).
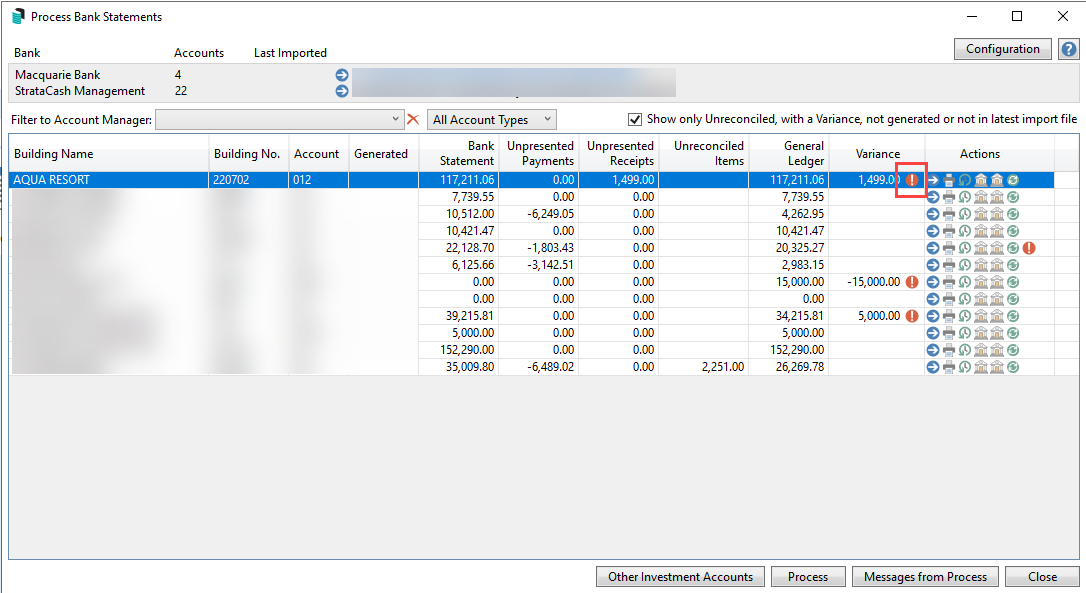
- From the table of unpresented items, refer to the Difference: field and tag the unpresented receipt(s) that make up the total of the difference. This will bring the Difference: field back to Nil.
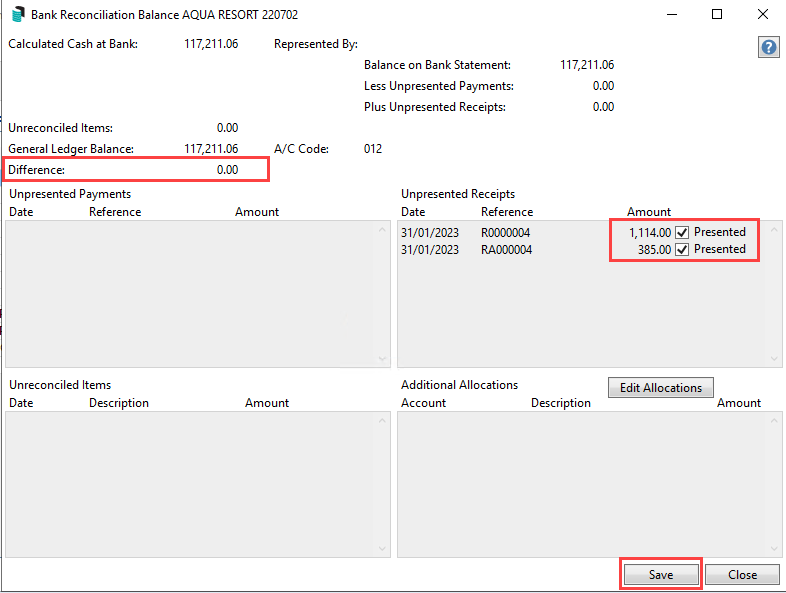
- Click Save and Close. Click Process to finalise the Process Bank Statement window.


Returned Cheque
The 'Returned Cheque' option in Receipt Entry should no longer be used.

Instead, use the 'Reverse Receipt' process in the Bank Reconciliation screen in these instances. See the 'reverse receipt' online help section for further details.
Editing a Receipt
When a receipt is created within the current month and needs to be edited, the below process should be followed. If outside of the current month, proceed to 'Reversing a Receipt' below.
- Search or select Receipt Entry.
- From New Entry mode, change this to 'Edit'.
- Select from the 'Reference Name' drop down list the account that the receipt that was originally created to.
- From the 'Receipt History' window select the receipt that was created in the current month, then click OK.
- Edit the applicable information which includes either 'Date' and or 'Amount'.
- Note: Receipt amount cannot be $0.00. If you need to reallocate funds, please use Debtor Adjustment, or if the receipt has not been presented, use the Reverse function.
- Click Save.
Reversing a Receipt
If a deposit has been received in a previous month and needs to be amended or reversed, the receipt must be reversed first using the reverse option before any adjustments can be made. When reversing, the receipt's details will not be active so they cannot be edited. This process is a complete reversal of the original receipt.
If reversing a receipt is for the purpose of reallocating funds, please use Debtor Adjustment to apply.
- Search or select Receipt Entry.
- From New Entry mode, change this to 'Reverse'.
- Select from the 'Reference Name' drop down list the account that the receipt that was originally created to.
- From the 'Receipt History' window select the receipt that was created then click OK (if prompted to Edit - select No).
- There will be an 'Enter Date' window to confirm the date of the reversal. This will be the date of the original receipt.
- Click Yes if you receive the message 'This receipt has been marked as presented at the bank. Are you sure you want to Reverse it?'.
- Click Save.
Reversing a Receipt in the Old Year
If a receipt has been applied to an account code in error in the Old Year, or was never presented and requires reversing, the below instructions can apply. The Current Year is where this process is applied from and will create reversal transaction records in current year.
- From New Entry mode, change this to 'Reverse'.
- Select from the 'Reference Name' drop down list the account that the receipt that was originally created to.
- From the 'Receipt History' window select the receipt that was created in a prior year then click OK.
- There will be an 'Enter Date' window to confirm the date of the reversal. This will need to be adjusted and a date entered within the current year.
- Click Yes to the message 'This receipt has been marked as presented at the bank. Are you sure you want to Reverse it?'.
- Click Save.
Allocating a Receipt Manually
While entering or editing a receipt in Receipt Entry, there will be an automatic posting to fund types based on the balance owing on the owner's account.
The allocation to interest, debtor invoices and fees are in accordance with their appropriate due dates. Meaning interest will charge according to charge date, debtor invoices (Invoices only, not credit notes) will charge according to the due date, except for invoice codes that have a levy, whilst Directs (charges only) will charge according to transaction date, except for invoice codes that have a levy.
This allocation is displayed within the 'Receipts Proceeds Allocation' box in the middle of the window. StrataMax uses the account balance and levy data to calculate discounts (if applicable) and the amount which should be posted to each account fund.
If 'Interest Allocation Priority' has not been ticked in File > Configure, there may be a balance in the 'Amount Left' field to draw attention to the 'Receipt Proceeds Allocation' so the appropriate allocation of funds can be done.
Its important to ensure that the posting allocations are correct before saving.

- Search or select Receipt Entry.
- From New Entry mode, select from the 'Reference Name' drop down list the account that the receipt is to apply to.
- Enter the 'Date' (Shift + 2 to insert 'Today's date) / 'Amount' and check the method of payment and set if required (cheque/ cash/ direct). If by cheque the details of 'Bank' / 'Branch' / 'Drawer' will need to be completed.
- Click in the 'Receipt Proceeds Allocation' box to open the 'Receipt Entry Allocation' window.
- Any unpaid amounts will appear in the 'Receipt Entry Allocation' window, including any overdue interest, arrears fees, or other invoices, and this will automatically be allocated to the appropriate fund based on the due date. If the amount paid is less than what is owed, then this is where adjustments can be made to pay certain funds. The red cross can remove any allocated amounts, and the wand will allocate the maximum amount for that fund. You can also manually add another fund if needed, by clicking the Add Fund button in the top right.
- Click OK, then click Save once the proceeds have been allocated.
Receipt Entry Allocation Screen Overview
The below explains each field in the receipt allocation screen above.

- Receipt Amount is the amount of the receipt that will be distributed.
- Description displays any levies, arrears fees, interest, or invoices with outstanding amounts will be displayed and the period identified.
- Due Date is the due date of the levy.
- Discount check box will apply or remove the discount portion of a levy.
- Total Due is the amount due and will update for a levy based on the Discount check box.
- Amount Paying is the amount that is being paid for the fund can be entered here. If there is a green tick, this indicates that the full amount for this levy period has been allocated. The red cross will clear this field.
- New Total Due displays any amounts allocated and unallocated. The total amount allocated must equal to the Receipt Amount before the postings can be saved.
- Add Fund to add another fund to enter any other unallocated funds from the deposit.
- Magic Wand can be clicked to automatically allocate the correct amount to the balance.
Allocating or Cancelling Discount
If the levy is paid within the discount period, then the discount will be applied automatically to the lot. Receipt of levies will be based on the date that the bank received the funds. If a payment has been receipted to a lot and the discount has not applied (as it was not paid on time and passed the Grace Days for Discount), the discount can be manually applied through Debtor Adjustment. This is assuming that the discount has been granted to be applied to the lot. Please refer to our Debtor Adjustment article for details on how to allocate or cancel Discount.
Discount Grace Days
StrataMax can also allow for some grace days to be set to allow a grace period for discounts, which will treat a payment made within this grace period as a payment being paid within the discount period. In Building Information set the 'Grace Days for Discount' to the number of days to include for discounts to apply > Save.
If the due date falls on a Saturday, the grace period is extended by two days. If the due date falls on a Sunday, the grace period is extended by one day.
Rationalise Sub Balance
There are often occasions where a levy account requires rationalisation. For example, different funds may have a credit and debit on the same lot account due to an incorrect allocation of funds during the receipting of a deposit, journals, crediting interest when reallocating funds using Debtor Adjustment.
This process will transfer any money for an invoice for a lot account that is in credit. The funds will be allocated using the same order of allocation as the Receipt Entry menu, which is determined in Levy Invoice Code Setup, and will include all lots in a Merged Levy Notice.
Various scenarios within a property can be affected by accounts that have contra balances. Levies in Advance and Levies in Arrears on the Financial Statements will reflect incorrectly, as this looks at the by fund balance of an account rather than by total balance. Interest is calculated on the outstanding balance of standard funds, with the arrears notices that are issued is based on the outstanding amounts within an account.
Existing credits and debits are automatically rationalised at the start, and at the end of the Levy Generation / Create Transactions & Notice process. This process creates journal entries if any and are suppressed from reports such as those produced in the Transaction List / Ledger Card.
Rationalise will not occur when generating levies if the 'Suppress Rationalisation for current building' setting has been enabled in the Receipt Entry / File / Configure. When Rationalise Sub Balance is selected, transactions will post immediately.
This rationalisation process will consolidate credits in the Admin Fund Balance.
- Search or select Receipt Entry.
- Click GoTo > Rationalise Sub Balance.
- Click Proceed.
Rationalise will move money between account groups in two stages.
- Reallocate balances within a fund & account group.
- Reallocate balances to anywhere else.
