 | This section of our guide covers how to run a meeting in Meeting Hub, including the management of attendees and motions. If you have not had previous experience with Meeting Hub, we recommend starting with the Meeting Hub basics and learning how meetings are created and managed. The icon for Meeting Hub may be located on your StrataMax Desktop or found using the StrataMax Search. |
Commence the Meeting
If a meeting has a status of 'Notice Issued' or 'Meeting Adjourned', the Meeting Overview screen will open whenever a meeting is selected in the Meeting Hub main screen. At this point you will then see a 'Commence Meeting' button at the top of the screen, which you can click to get the meeting started. This can be done at any point - before or after the scheduled date of the meeting.

Starting at the Commence screen, if In Meeting Voting is enabled, a yellow notification will appear at the top of the screen.
You will first need to confirm the Meeting Open Date and Time, which doesn't need to be the scheduled date and time originally set when the meeting was created.
You will also need to select the Meeting Chairperson, which will display a list of existing attendees from the Attendance Register, but you may also add a New Attendee. You can also amend the In Meeting Voting option if required.

The quorum is calculated by comparing the number of eligible voting attendees (attendance count) against the quorum requirements for the meeting (as entered when the meeting was created). If the number of attendees is greater than or equal to the required quorum, then quorum has been reached. The Quorum gauge provides an estimation as to whether or not the required quorum has been met, so the Quorum Present tick box should be ticked if you determine that quorum has actually been met.

If quorum has not been met, you can still proceed with the meeting without the required numbers, but will be required to add a Quorum Reason with optional Quorum Statement. You can also choose to adjourn the meeting by clicking the Adjourn Meeting button.

Once you have clicked the blue Proceed button, the meeting status will change to 'Meeting In Progress', and attendees can join the meeting via VoteMax to cast and declare their votes. The meeting can be rolled back to any previous status in the Meeting Overview screen. You can also navigate between the different meeting screens by clicking their buttons at the top of the window, or the arrows on the sides of the screen.

In Meeting Voting
This section of the article covers how to proceed through the meeting, specifically how to collect votes for the different types of motions, as well as how they can be ruled out of order, how motion outcomes can be overruled, how they are moved/seconded, and and how to close the meeting.
Each motion is managed separately, and all relevant information is displayed on-screen, such as the motion name, resolution type, no proxy flag, whether or not unfinancial attendees can vote on the motion, and who the motion was submitted by. These screens are also refreshed automatically every minute to update the screen with any votes that have been cast by attendees via VoteMax.

- Back takes you back to the Meeting Overview screen.
- Refresh manually refreshes the current motion's screen. This can be used when an attendee has cast their vote for this motion in VoteMax, but it hasn't refreshed on this screen yet. The automatic refresh happens every minute, and a countdown timer will appear on this button 5 seconds before an automatic refresh.
- The group of buttons at the top of the screen are used to navigate between the in-meeting screens.
- A motion that has not been resolved will continue to be light grey.
- A motion that has been passed (carried or qualifying) will be green.
- A motion that has been defeated will be red.
- A motion that has been withdrawn will be struck through.
- A motion that is in focus will continue to be solid blue with a grey border.
- The 'Last Refresh' displays the date and time of the last automatic refresh.
- Show Votes opens the 'Attendee Vote Collection' portion of the screen. See Collecting Votes and Motions Outcomes below.
- Vote by Tally: See Vote by Tally below.
- Rule Motion of Order: See Rule Motion Out of Order below.
- Manage Agenda & Motions: See the Manage Agenda & Motion Details article.
- Move/Seconded by: See Move/Seconded by below.
- Show Attendance will display or hide the list of attendees, which have already been added previously, where you can also toggle them as arriving or leaving. This information is logged in the background for audit purposes. The small drop-down arrow on the right of the button also lets you add more attendees and navigate to the Attendance Register screen.
Vote Calculation
These tables explain how the votes are calculated in Meeting Hub, according to state, legislation, building type, etc:
Attendee Vote Collection and Motion Outcomes
Once you have clicked the blue Proceed button on the Commence screen, the first motion will appear on screen. Clicking the Show Votes button will open the 'Attendee Vote Collection' part of the screen, where you can view votes and also cast votes for each eligible attendee. This screen provides information about attendees, including their name, lot number, entitlements, and their voting method. It has been designed to allow an attendee’s individual response to a motion or committee election to be recorded, updated or withdrawn. If the attendee is representing several lots the strata manager has the option to capture the same or different votes for each lot.
Attendees who are attending the meeting in person can be marked as having left the meeting. Votes are unable to be collected for these attendees while they are marked as being away from the meeting.

- Use the Filter to type to filter the list of attendees by Given Name or Surname, and tick the Save box to apply this filter as the default for this screen, for this user.
- The voting buttons Yes, No, or Abstain indicate what each attendee has voted if their voting method is 'VoteMax Pre-Meeting' or 'VoteMax at Meeting'. For attendees that are attending as 'In Person' the strata manager must record their votes by clicking the appropriate button - Yes, No, or Abstain.
- Hover your mouse over the small triangular warning icons to display important messages; In this case this attendee is ineligible to vote due to being a 'Non-Voting Attendee' and is why there are no Yes, No, or Abstain buttons for them.
- This area indicates how many votes have been collected for each voting method as well as the total.
- Change how many attendees are displayed with Items per page.
- Click Show/Hide Ineligible To Vote to display or hide attendees who are ineligible to vote.
- Click Show/Hide VoteMax at Meeting to display or hide attendees who have used the voting method of 'VoteMax at Meeting'.
- Click Show/Hide Pre-Meeting Attendees to display or hide attendees who have used the voting method of 'VoteMax Pre-Meeting'.
- Set all remaining votes to is a quick way of changing all the votes for those attendees whose votes have not already been collected to Yes, No, or Abstain. For example, if 10 out of 50 attendees have voted 'No', you could use this option to save time and set the remaining votes to 'Yes'.
- Vote calculation type is used to select either 'Standard' or 'Poll'. A Poll will based the outcome on entitlements.
- Click Determine Outcome to save the current collection of votes and proceed to the motion outcome screen.
Vote by Tally
Voting Tally button has been designed to record a show of hands for each voting option. Totals include pre-meeting votes of all attendees that are not present in person at the meeting. The strata manager will be alerted if the number of votes entered via the Voting Tally exceeds the number of attendees who are eligible to vote.
The Voting Tally cannot be used for poll voting or motions by Special Resolution.

- The warning appears when in meeting voting has been enabled, and means that votes must be collected in person.
- Hover your mouse over the small 'i' icon to display tooltips.
- You can click the Yes, No, or Abstain buttons to add a vote.
- You can click the plus or minus buttons to add or remove votes, or simply type the total number of votes into the field.
- Displays how many votes have been collected out of the number of attendees.
- If the number of votes collected exceed the number of attendees, this yellow warning box appears.
- Click either Determine Outcome to save the collected votes and proceed to the motion outcome screen, or click Cancel to close the Voting Tally window (if you have already collected votes, you will be asked whether or not to save).
Secret Vote and Secret Ballot
Secret vote or secret ballot motions cannot have votes captured per attendee. Instead, you will need to click the Show Votes button.

After clicking the Show Votes button, the 'Secret Vote' or 'Secret Ballot' window appears where you choose one of the options, depending on your requirements; 'By Secret Voting Tally' or 'By manually entering the outcome'.

By Secret Voting Tally
If you select 'By Secret Voting Tally', use the vote tally functions (see the 'Vote by Tally' section above).

By manually entering the outcome
If you select 'By manually entering the outcome', enter the Motion Decision and Reason, then click the Submit Outcome button.

Manage Agenda & Motions
At any time during the meeting, this button can be clicked to be taken to the Manage Agenda & Motion Details screen where you can amend or withdraw motions. Please refer to Manage Agenda & Motion Details for more information.

Amended Motions
If a strata manager has amended a motion and selected ‘Vote to Accept Amendment’ during the process, attendees will be required to vote on the ‘Motion to Accept Amendment’ before voting on the amended motion. The ‘Motion to Accept Amendment’ will visible and voting can be completed as per other motions.
Amended and withdrawn motions will not appear in VoteMax.

Use the 'Toggle' button to switch between horizontal and vertical layout of the Original and Amended motions.

If the ‘Motion to Accept Amendment’ is carried, the amended motion will be visible at the top of the screen, ready for attendees to commence voting on it. The original version of the motion will still be viewable further down the screen.

If the ‘Motion to Accept Amendment’ is defeated, the original motion will be visible at the top of the screen, ready for attendees to commence voting on it. The amended motion will still be viewable further down the screen.

If a strata manager has amended a motion and selected 'Vote Not Required' during the process, the amended motion will be be visible at the top of the screen, with the original motion still visible further down.

Amended Motion Outcome
Once all votes have been submitted on an amended motion, the Motion Summary screen will be displayed showing the outcome of the voting. Just like any other motion, the voting can be reopened, the result can be overruled, etc. You can also select which parts of the amended motion are to be included in the minutes, and change the resolution bodies of both the amended motion and motion to accept amendment.

If all components are selected the amended motion will be output as per below in the meeting minutes.
Please note that the below formatting enhancements to the minutes will only be available once OTS templates version 3.1 have been released, and you have manually changed the Templates Groups for the minutes.

Group of Same-Issue Motion
Each of the motions within the group will need to be voted on separately, and will be represented in the meeting with the motion number, followed by a letter; a., b., c., etc., and can be observed along the top section of the meeting screen (you can click on each of these to see the details of each motion before collecting the votes if necessary).

Each motion will have its own 'Motion Outcome' screen, and once all motions within the group have been voted on, the final 'Motion outcome' screen for the group will appear with the 'Qualifying' and 'Defeated' motions.

If there are multiple qualifying motions, you will need to select the motion that the body corporate decides on by chance.

Motion With Alternatives
Each voting button will be labelled "Yes - A", "Yes - B" (and more depending on how many alternatives there are), "No", or "Abstain". Click the Submit Votes button once all votes have been collected, and the 'Motion Outcome' screen will appear.

Vote on Options Only
Each voting button will be labelled "Yes - A", "Yes - B", etc. depending on how many options are available. Click the Submit Votes button once all votes have been collected, and the 'Motion Outcome' screen will appear.

If there are multiple winning options, the 'Motion Outcome' screen will prompt you to select the motion that the body corporate decides on by chance.

Rule Motion Out of Order
Motions can also be ruled out of order if required. Simply click the Rule Motion Out of Order button, then either select a Common Reason from the drop-down list, or type in your own into the Reason text box. After clicking Proceed, the Motions Outcome screen will appear and reflect that the motion is 'OUT OF ORDER'. Any motions that are ruled out of order will be reflected on the 'Close Meeting' and 'Meeting Overview' screens.

Move/Seconded by
By clicking this button the user can select an attendee who moved and seconded a motion. This information will then be stored against the motion and displayed when viewing the motion. Simply select an attendee in the Motion Moved by and Motion Seconded by fields, then click the blue Update button.
Motion Outcome
After clicking the Submit Votes or Determine Outcome button, either via Open Voting or Voting Tally, or if the motion was ruled out of order, the 'Motion Outcome' screen will appear. This screen provides an overview of the number of different votes, both from pre-meeting and in-meeting attendees. The result of the motion is decided using calculations based on state and building based legislation.

- Reopen Voting will remove the outcome of the motion and you will be taken back to the motion details screen again, where you will need to click the Open Voting or Vote Tally button again to record the votes and submit them.
- Click Next to proceed to the next motion.
- Click the Show Attendance button in the top left to display or hide the list of attendees which have already been added previously, where you can also toggle them as present or not. The small drop-down arrow on the right of the button also lets you add more attendees and navigate to the Attendance Register screen.
- Upon clicking Overrule Result, users will be able to change the Motion Decision (Carried, Defeated, Carried - Alternative A, B, C, etc.) along with a Reason before clicking Proceed.
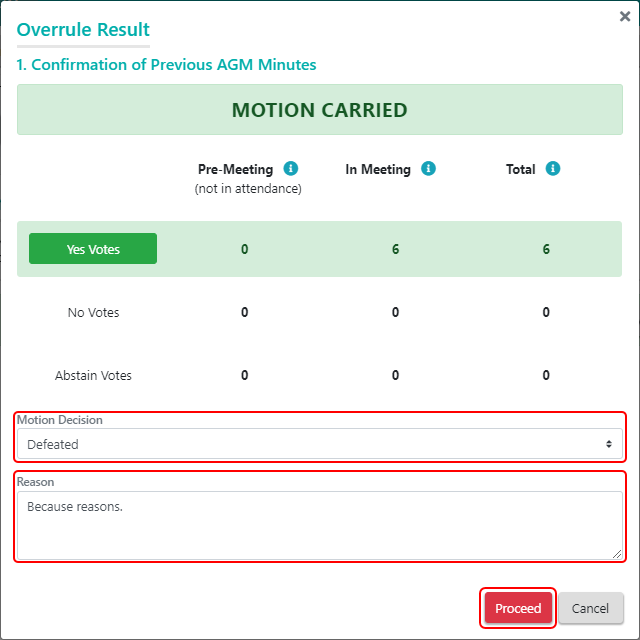
- Hover your mouse cursor over the small, teal "info" icons to display tooltips for each motion type and Total.
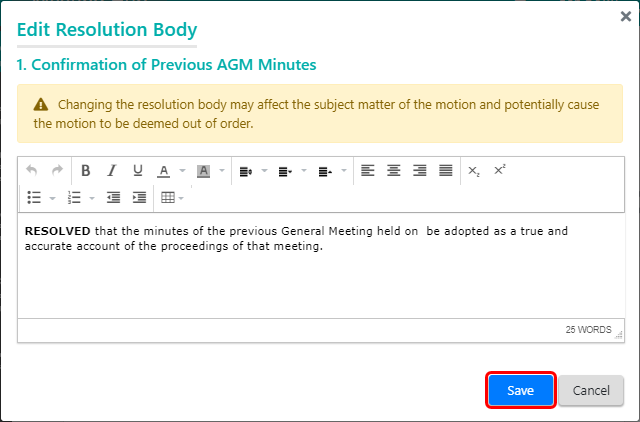
- The Resolution Body can be edited, supports "copy & paste", and includes some basic formatting options. Note that merge fields are not available in this screen. It is the final text that will be included in the meeting minutes for a motion, and is able to be automatically updated with the motion outcome. Click Save when done.


Committee Election
Each of the position within the committee will need to be voted on separately, and the strata manager has the ability to manage the nominations, including adding new ones, and withdrawing and reinstating existing ones.
Committee Election | Add New Nomination
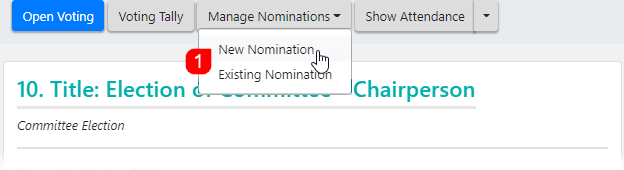
Note that the Manage Nominations button will not be visible if the voting has been opened for the motion - you will need to click the Hide Voting button if this is the case.
- Click the Manage Nominations button and select New Nomination.
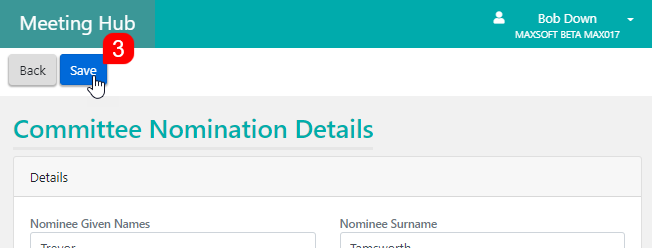
- The 'Committee Nomination Details' screen will open where you can add the details of a new nominee (Given Names, Surname, Lot number, additional info, attachments, etc.), and tick the boxes for the required positions. If the nomination was received from the floor, you should click the 'hand' button on the right. This will also be reflected in the 'Committee Election' motion screen and in the meeting minutes document.
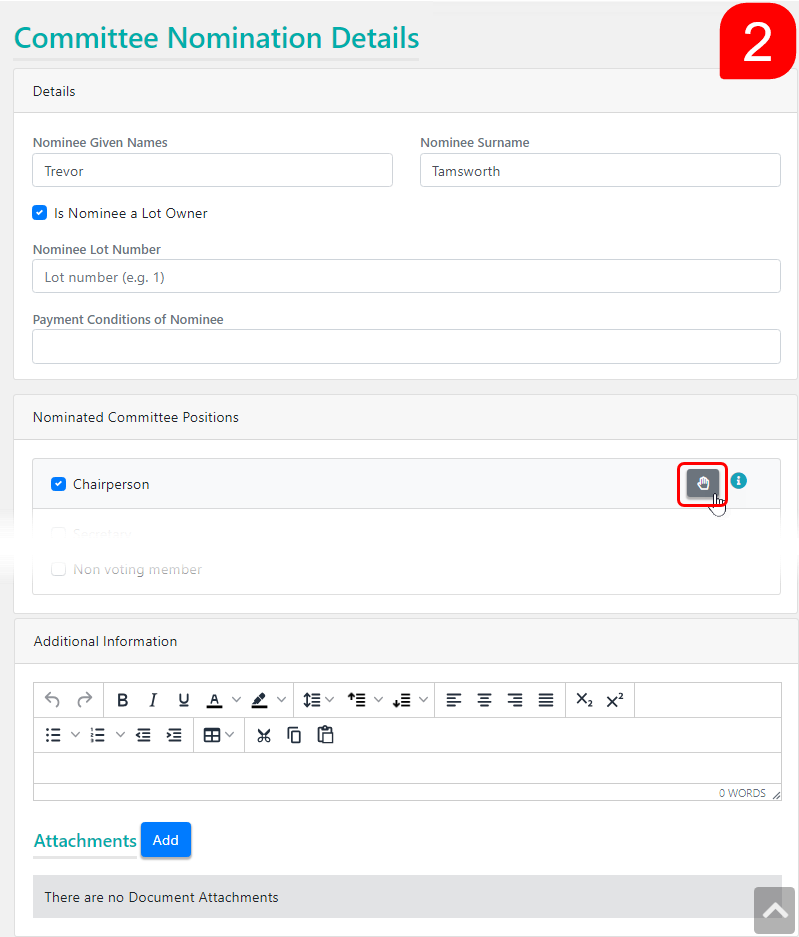
- Click the blue Save button in the top left, once all details have been added.
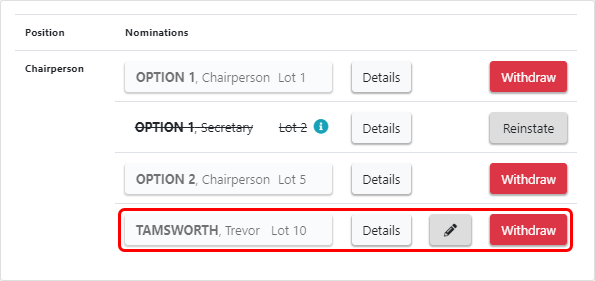
- Once a new nominee has been added, they will appear in the list of nominations with an Edit (pencil) button, which can be clicked to open the 'Committee Nomination Details' screen again if necessary.


Committee Election | Add Existing Nomination
Note that the Manage Nominations button will not be visible if the voting has been opened for the motion - you will need to click the Hide Voting button if this is the case.
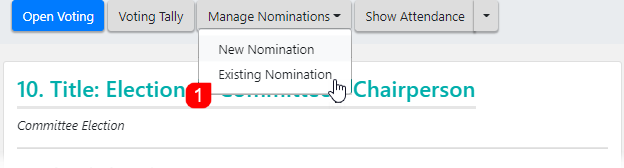
- Click the Manage Nominations button and select Existing Nomination.
- The list of existing nominations will open where you can click the Add button to add them as a nominee for the current position that's in focus on screen (in this screenshot, it's for the position of Chairperson).
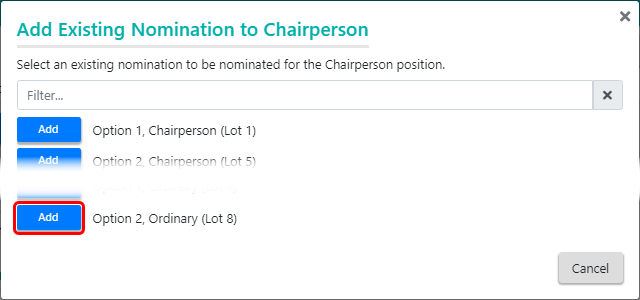
- Once a new nominee has been added, they will appear in the list of nominations.


Committee Election | Withdraw or Reinstate Nomination
To withdraw a nominee for the current position in focus:
- Click the red Withdraw button, and click 'Yes' when prompted to confirm.
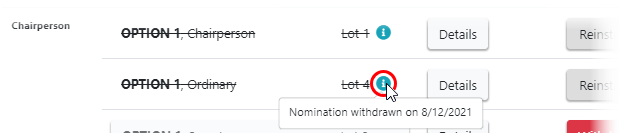
- The nominee's name will then have a strikethrough on it and button will change to a grey Reinstate button.
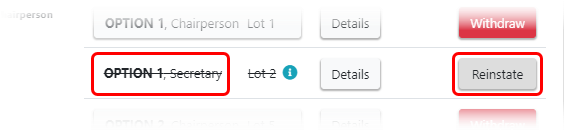
- There will also be a small, teal coloured 'info' icon, which you can hover your mouse over to display the date of withdrawal.


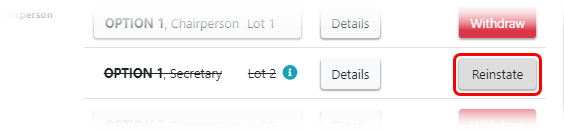
To reinstate a nominee for the current position in focus:
- Click the grey Reinstate button.
- A confirmation will then appear:
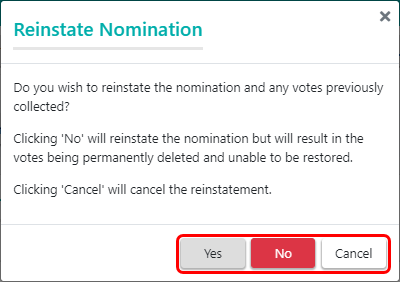
- Click 'Yes' to reinstate the nominee along with any previously collected votes.
- Click 'No' to instate the nominee but delete any previously collected votes.
- Click 'Cancel' not proceed to reinstate the nominee.


Committee Election | Vote Collection
In the Committee Election motion, each position is voted on separately, and each button is labelled with the Surname for each nominee. Simply click the button for the elected nominee for each attendee, then click the Submit Votes button.

The 'Motion Outcome' screen will then appear for that particular position, notifying you of how many positions are required to form the committee, and need to be voted on. If there are multiple winning nominations, you will need to select the nomination that the body corporate decides on by chance.

After the nomination is selected, the elected nomination will be displayed, and with a button to Overrule Result if required. Use the blue Next button in the top left to proceed to the next position in the committee election.
When all nominees for an ordinary position have been elected to an executive position, the Proceed button will appear as 'Proceed with No Nominations'.
'No Nominations' will display on the Motion Result slide and the Close Meeting slide for any ordinary members who have been elected to an executive position.
Closing the Meeting
Once all motion outcomes have been determined, the final screen of meeting is the 'Close Meeting' screen.

- A Meeting Summary list of all the meeting's motions and their outcomes (Defeated, Carried, Not Determined, Out Of Order) are displayed, and each of these can be clicked to bring the motion into focus.
- If any motions don't have an outcome, an alert will be highlighted in red at the top of the screen, and the motions in question will be highlighted in yellow with 'NOT DETERMINED' on them.
- If there aren't enough voting members to form a committee, this will be highlighted as a warning at the top of screen as well.
- The Meeting Open Date and Time can be amended by clicking the grey Change button. And the Meeting Close Date and Time can be entered as well.
- Clicking the Close Meeting button will change the status of the meeting to 'Meeting Held' and you will be taken back to the 'Meeting Overview' screen.
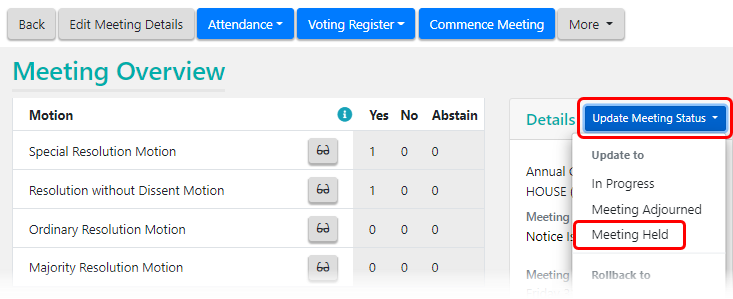
Close the Meeting Early or Without Commencing
In certain circumstances you may not wish to Commence the meeting or Close the Meeting once it is in progress without finalising the outcome of all the motions, but you would still like to issue the Minutes. In which case you just need to:
- Click the blue Update Meeting Status button in the Meeting Overview screen, then select 'Meeting Held'.
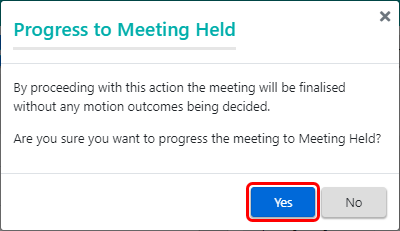
- Review the prompt and click 'Yes' to proceed.
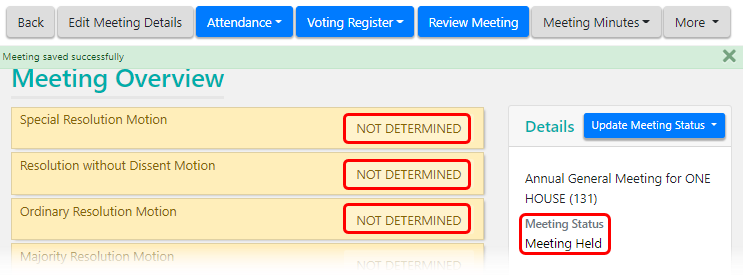
- If the meeting wasn't commenced or if any motions outcomes were not determined after it was commenced, then all or remaining motions will be finalised as 'NOT DETERMINED'.


Reopen Voting for a Closed/Finalised Meeting
After the meeting has been closed (or finalised if a 'Ballot Only' meeting), the voting for motions can be reopened so that voting can be recalculated.
- From the Meeting Hub main screen select the required meeting.
- In the Meeting Overview screen, click the Review Meeting button at the top of screen.
- Select the motion number at the top of the screen.
- Click the Reopen Voting button in the top left, and then 'Yes' to the prompt that appears.
- Click either the Open Voting or Voting Tally button and proceed to amend the votes as required before clicking the Submit Votes button.
