This article covers the functions within the Documents tab, except Work Queues and Online Portal Uploads, in the navigation pane on the left side, within the Documents tab of DocMax.

We also offer a completely free 'DocMax Basics' online course, which you can enrol in here! Please see the StrataMax Online Courses page for more details, including the coupon code required to enrol for free.
Documents Ribbon
When in the Documents tab, these icons are available in their relevant menus. They are contextual, so they will not appear in every menu. For example, the 'Save as a Saved Search' icon is only available from within the Advanced Search menu, and some icons are not active until a document is selected. All documents added to DocMax will build history which log's the changes made to the document properties, and can be a tool to identify document property updates with Username and Dates.

Results Layout: This is available in all Search types, but not in Work Queues. Allows users to switch between the options 'Show Results With Properties' and 'Show Results Detail Grid'. 'Show Results With Properties' will display the list of documents with a tick box next to each one. This allows users to update multiple documents simultaneously.
Preview Pane: Adjust the position and layout of the document preview pane or remove the preview pane.
Show Superseded Documents: Will list and show documents that have been superseded by another document. Superseded documents are documents that have had other documents appended to it, or where a more current version of the document has replaced it. For example when a meeting notice is generated again from Meeting Hub. This setting is not stored – once a different view is selected or DocMax is closed the setting will automatically change back to hide superseded documents.
View Document: This option opens a separate window with the currently selected document. The document will be previewed including properties; changes can be applied before selecting ‘Save and Close’.
Open: Will open the document file in the appropriate applications. The default application must be installed to view the document in its original file format.
Delete Document: Will delete the document from DocMax. This option can be restricted via Security Setup.
Append Other Document: Adds another DocMax document to the document currently being viewed.
Append External File: DocMax will allow for external files to be appended to existing DocMax documents. To append an external document, select ‘Append External File’ and navigate via the file explorer window to the external file and click ‘Open’. This action will display the ‘Document View’ window with both files combined. Click ‘Save and Close’. To view the appended document, select the ‘Refresh’ button to view.
Print: Will print the selected document. Please note that you can only print one document at a time.
Email: To email documents from DocMax, select the required document or multi-select documents by holding the Ctrl key down. Click the ‘Email’ button and send documents to recipients from the StrataMax ‘Compose Email’ screen.
Note: You can multi-select to email documents that belong to multiple buildings. This can be useful if needing to send several invoices or documents to a creditor or internally.
View History: This feature will give a ‘Document History’ of the selected document. It will detail the date, user and basic information about what was changed to the document.
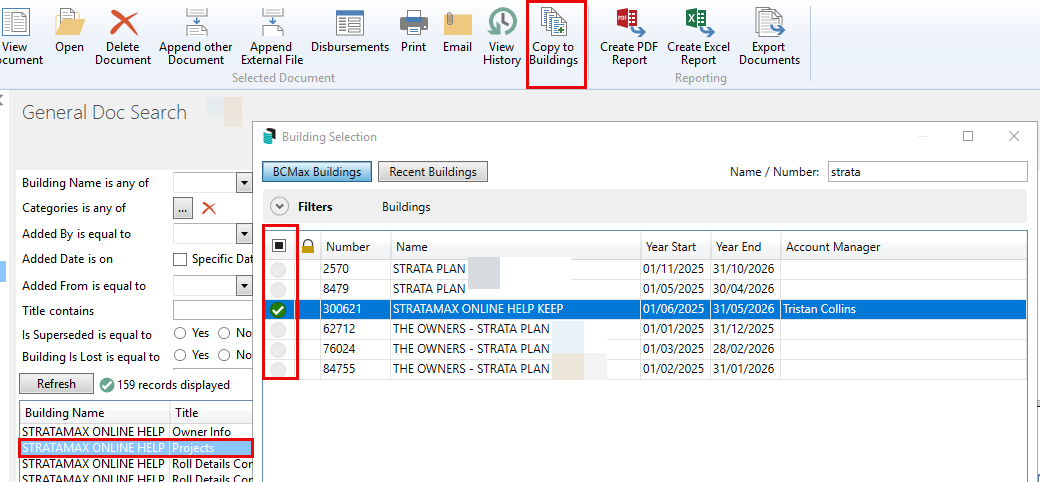
Copy to Buildings: If there is a document that needs to applied to all buildings, this feature will allow a single document to be copied across to all or selected Buildings. One of the benefits of this feature is that it allows generic documents that may apply to more than one building to be copied to some or all buildings and potentially uploaded to the Owners Portal for viewing. Certain document properties will be copied to the new document/s and the name of the building will be added.
These fields will not be copied to each document:
- Lot or Debtor Owner
- Creditor
- Expense
- Insurance policy
- Insurance claim
- Links to other documents or to StrataMax records will not be copied
- Locate the document in DocMax.
- Highlight the document and click Copy to Buildings.
- Tag the Buildings the document is to be copied to (Ctrl A =Tag All).
- Click Select to copy the document to the selected buildings.
Save as Saved Search: This is only available in the Advanced Search screen, and will create a Saved Search based on the specific criteria that has been set. See the DocMax | Advanced Search and Saved Searches article for more info.
Create PDF Report: This feature is only available in ‘Advanced Search’ and ‘Saved Searches’ screens. Once these searches have been created, click ‘Create PDF Report’ to generate the search into a PDF Document. This will preview in a StrataMax ‘Preview’ Report window and can be emailed, saved or printed.
If too many columns have been included in the search, the report may not fit correctly on the page.
Create Excel Report: This feature will allow the user to create Excel reports. This function is available in all sections except Work Queues. Select ‘Create Excel Report’ to open Excel and display the search results. Use Excel features to create enhanced reports.
Results Layout must be ‘detail grid’ format to use the reporting to Excel feature.
Export Documents: See DocMax | Export Documents for more info.
Search
The Search function provides a quick and easy way of finding a document by entering a search word or phrase. The search may be limited to a particular building, or can be run across all documents that are stored in DocMax. The search will start automatically when a building is selected or when search words are entered.
If the desired document does not appear in the list, further text may be added in order to refine the search results. The search will be automatically re-run when the additional text is entered, or when the building selection is added or changed.
Selecting a Building first is recommended before entering search terms, as this will speed up the search results and provide more accurate results.
- Click in the Building drop-down menu, and start typing the building name or number to locate the required building.
- Enter a search criteria to narrow down the search results even further.
If the desired document does not appear in the list, further text may be added in order to refine the search results. The search will be automatically re-run when the additional text is entered, or when the building selection is added or changed.
In order to maximise the performance of searches, the search results are not sorted in a particular way. If sorting is required, the results can be exported to excel, or the same search can be performed using the Advanced Search.
Search Icon and Definitions and order of search
When a search is performed, a status is displayed above the search results, like in this screenshot:

There are four statuses that can appear:
| Status | Meaning |
 Searching… Searching… | The search is in progress. Search performance depends on the individual system and the number of search results. Wait for results to appear before changing search criteria to conserve system resources and optimise performance. |
 First <x> records displayed First <x> records displayed | The search has been completed and more than <x> results were found. The results that are listed are restricted to the first <x> documents. (Note: results are restricted in order to maximise performance). The following restrictions apply to different types of searches: Quick Search: 20 documents Other predefined searches: 100 documents Online Portal Uploads: 1000 documents Advanced Search, Saved Searches, Work Queues: 1000 documents |
 <x> records displayed <x> records displayed | The search has been completed and all records found have been listed. |
 An error has occurred. An error has occurred. | A system error has occurred that has prevented the search from completing. |
Also, when using the Search, the results are limited to the first 20 results, and searches in the following order:
| Building | (selected) |
| Title | (any text found within this field) |
| Building Number | (must match whole number) |
| Building Name | (must match whole number) |
| Creditor Account Code | (must match whole number) |
| Creditor Name | (any text found within this field) |
| Categories | (must match whole name of one category) |
| Description | (any text found within this field) |
| Email Recipient | (any text found within this field) |
| Email Sender | (any text found within this field) |
| Email Subject | (any text found within this field) |
| Document Text | (any text found within the text extracted from the document) |
| Invoice Number | (must match whole entry) |
| Search Words | (must match whole entry) |
| Lot Account Code | (must match whole entry) |
| Notes | (any text found within this field) |
| Owner Name | (any text found within this field) |
Multiple Search Terms
Search text may be entered which contains separate words, phrases, dates or numbers separated by spaces. This will search for documents which match all text entered.
For example, the following search will locate documents containing the text ‘statuses':
- Select the Search menu in the navigation list and enter text into the Search field based on the title description to return results.
- To refine results, enter more text.
- For building specific searches, select a building from the Building (Recommended) drop-down menu. This will also assist for quicker search results

Searching for a phrase
A particular phrase may be found by enclosing the text in quotation marks. This will search for the entire phrase rather than the individual words.
- Select the Search menu in the navigation list, then enter the phrase based on the ‘Title’ description with quotation marks. For example “AGM Minutes”.
- If the building is known, apply a ‘Building’ filter by selecting from the Building List. This will also assist for quicker search results.

Browse By Building/Category
The Browse by Building/Category search shows up to 100 documents that relate to a particular building. The search may also include one or more categories and when this is selected, it should be noted that the documents that are listed will contain all these categories. If this does not return the desired search result, it would be recommended to refine the category selection to a minimum.
- Select Browse by Building/Category.
- Select the building from the Building drop-down, then the category from the Category drop-down. Additional categories can be selected at the same time.
- To remove categories, click the red X to remove category.

- To remove categories, click the red X to remove category.
- Click the Refresh button.
- If you cannot locate the document you need, try using the Advanced Search.

Advanced Search and Saved Searches
See the DocMax | Advanced Search and Saved Searches article for more information.
Recently Added
Sorted by Added Date, is list of documents that has been Recently Added to DocMax. This will list documents added by all users. The first 100 results will be displayed. There are filters that can be applied which includes ‘Added By’ and ‘Added From’ which will assist in filtering results.
Processing Recently Added
- Select the Recently Added section.
- Use the Added By or Added From drop-down menus to narrow down the list of displayed documents, then click the Refresh button.
Work Queues
See DocMax | Work Queues for more info.
My Assigned
Documents can be assigned to a single user or a user group that are have been set up in the Security Setup screen in StrataMax. Once a document has been assigned to you or a group that you are in, the document will appear in this menu. The number of documents that can displayed in this view are limited to 100.
In order to remove the document from this view, you will need to use the Assign To field to assign it to another user or group, or remove your username. You must click the Save Changes button in order to apply the change.

Documents that have been assigned to a User will allow any of the document fields to be updated:
- Document Profile’s to be applied.
- Assigned To can be updated.
- Status to be reviewed and updated if required.
- Action Dates can be applied.
- Document Details (all properties within this area) can be updated.
- Online Portal status can be updated.
- References can be applied.
Online Portal Uploads
See the DocMax | Online Portal Uploads article for more information.
