 |
The instructions in this article cover the various functions available in Certificates. The icon may be located on your StrataMax Desktop or found using the StrataMax Search. |
When a property is sold, the purchaser requires a certificate containing details of the property based on each state and their legislation requirements. These could include levies, current insurance policies, exclusive use areas and other documents, as specified for each state.
StrataMax automatically selects the certificate which is appropriate for the building type based on the state in which the building resides and its legislation. For example, a Queensland building using the type B.F.P., StrataMax will print a Body Corporate Certificate, or a New South Wales type using an S.P., a Section 184.
To create the certificate, StrataMax merges info from various areas within the system to produce a Strata certificate. For example, Office Bearers, Contracts Register, Common Property Register, Insurance, Levy Management, and balances for a specific lot.
An optional cover letter may be printed automatically with a certificate.
The certificate can be included as a report set and have other reports and documents available as a standard report using Report Distribution.
Certificates | Frequently Asked Questions
Q) Will the current cover letter text be retained in the new interface?
A) Yes, the currently configured cover letter text will be retained in the new interface, and includes a character limit of 4000 characters. A Merge Letter may suit for larger amounts of text if required.
Q) In preparation for the new interface, how can we determine if the CMS has been attached in Building Information for all of our buildings?
A) We have run a report to help with this. You will find the Excel file has been saved to BCM\Reports\LinkedCMSDocuments.xlsx. It shows the Doc ID, Document Title, and Added Date for buildings with the CMS Document field filled in.
Q) Where there is a requirement to include financial statements, however, sometimes the financial statements for the Current Year or the Old Year are not applicable, how can we ensure that what is included is what we want?
A) From Report Distribution, you can include the Financial Statements, using the cogwheel to control the template and Old/ Current Year information. If you have a saved draft of financials that you want to attach, use the attachment button in Report Distribution to navigate to where this document is.
Q) In Queensland, on the settlement day of a lot, we are often requested for new levy and outstanding balance figures; how can we produce this information?
A) Another Certificate can be produced for the required lot, or as an alternative, a Ledger Card and/or Levy Registercould be provided. Another option is to provide access to online certificates and include the access ID in the cover letter accompanying the initial certificate.
Q) Old levies are appearing in Levy Management and on Certificates; how can these be removed?
A) In Levy Management, select Options and then Set Current Levies and untag any levies as required. The levies will still be available to report on and display in Levy Management by ticking Show Historical Levies.
Q) Where does certificate information merge from?
A) Certificate content can merge from building information, roll records, office bearers, insurance, levy and other configured data areas, depending on the certificate type and state. Use the Certificate article and Info Editor for the relevant state.
Q) The wrong certificate is produced, what can I check?
A) Certificates are selected automatically from the State, Type and Module recorded in Building Information. There is no option to choose the certificate template at the time you produce it. If the certificate produced is not the one you expect, for example a Form 18 where you expect a Form 33, check the Building Information State, Type and Module for the building.
Q) I need a Certificate for the Sub-Group, how do I produce this?
A) Ensure you adjust from the Main group and select the Sub-Group, such as Marina, from the Sub-Group drop down menu on the StrataMax toolbar.
Certificates | Distribution
To distribute a certificate, follow the steps below.
- Search or select Certificate.
- If the certificate is included for a Report Set type, select this from the list or use the certificate.
- If an applicant is requesting this information, select the Accounts and tag the lot. From the Recipient Type, tag the applicant.
- If for an Owner, change the Recipient Type to Owner and tag the required lot.
- Check the Distribution Method. It is recommended to use a profile with the DocMax Save Report option. It will allow for a category to be assigned and to be saved to DocMax and on the Roll.
- Click Proceed.
- From the preview of the certificate and other attachments, click Proceed to finalise sending the certificate in StrataMax or click the Save icon and save to a preferred folder location to attach in Outlook as an email.

Certificates | Email Template Manager
The Email Template Manager will be available to set a global or building-specific template and includes merge fields for selection. Once the Subject and Body of the email have been set, click Save and close the window.

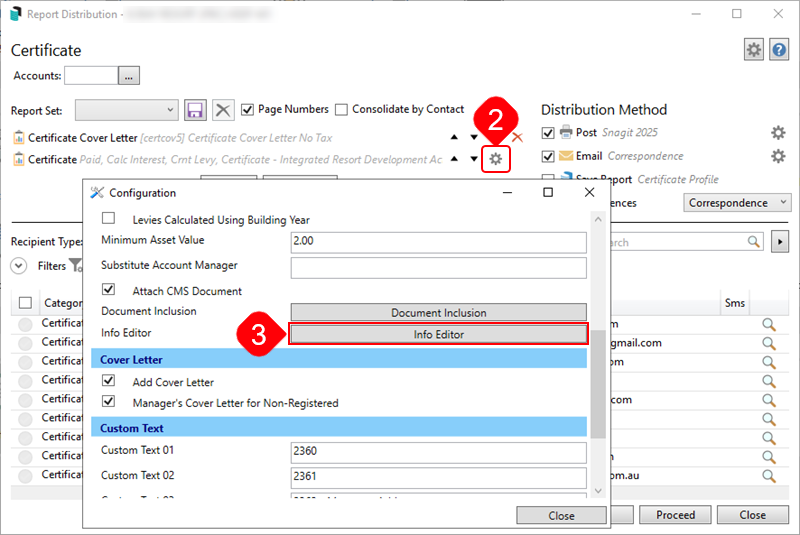
Certificates | Configuration
Using the cogwheel for the certificate template will provide configuration options across multiple areas that can be set for each building, including the Applicant Fee and paid status, which reports on the Cover Letter.
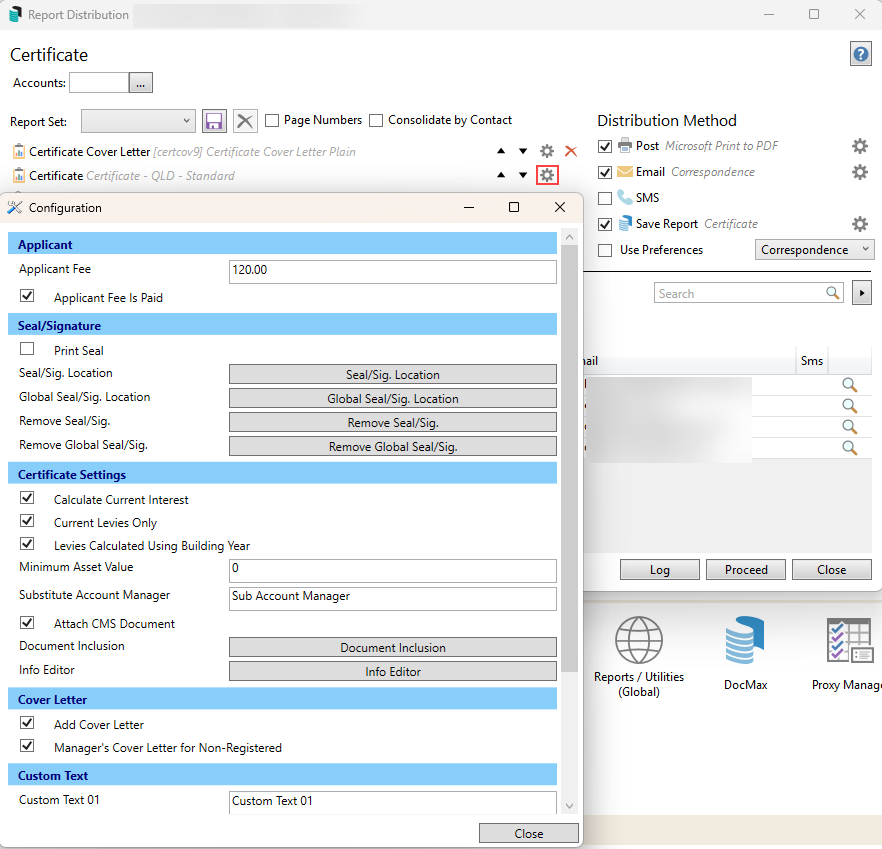
Applicant
Applicant Fee
This is where the state-specific fee can be entered to output into the cover letter. No transactions are created using this area, and the additional Disbursements area can be set to make an automated charge for the administration of issuing a certificate, where needed.
Applicant Fee is Paid
This will control the paid status on the Certificate cover letter.
Seal/Signature
All of these settings are global and will affect all users running a certificate.
Print Seal
This controls the common seal output for those that require it. This will either print or not print by ticking the Print Seal option.
Global Seal/Sig. Location
Use this option to move the seal/sig into the appropriate area for output in that section of the certificate. This can be done per building or globally, with the options included.
Remove Seal/Sig.
This will remove any saved seal/sig documents either per building or globally.
Certificate Settings
Calculate Current Interest
This will calculate the current interest as of the date when the certificate is produced.
Current Levies Only
Selecting this option will include the current levies only for the financial year for each building. This can assist if the levy year is older and contains more than the current year. Completing a Levy Year End Rollover is also recommended to keep the levy year within the financial year.
Levies Calculated Using Building Year
Setting this will calculate the levies based on the Building Financial Year and will show the amount on Certificates where the terminology 'Current Financial Year' is applicable. This is per building setting.
Minimum Asset Value
To control the output of the Asset Register items, set a value threshold to output into the relevant area.
Substitute Account Manager
If there is a substitute Account Manager to be included on the certificate, enter the details into this field.
Attach CMS Document
For those states required to include the registered CMS, if attached using the CMS field in Building Information, this will enable the output of that document.
Document Inclusion
This is where additional documents can be added to a certificate and is available for this building or global options. See the Document Inclusion section below for more information.
Info Editor
Use this area to control field output. This will vary for each question and answer from state to state. See the Info Editor section below for more information.
Cover Letter
Add Cover Letter
Use this option to use the cover letter available. The text for this cover letter is included in the Certificate Cover Letter template. Payment information to settle the lot balance is below. There is a maximum of 40000 characters available for this option. If there is a large amount of text, consider Merge Letter as an alternative.
Note: The Applicant Fee is Paid setting in the Certificate cogwheel - controls the paid status on the Certificate cover letter.
Manager's Cover Letter for Non-Registered.
Custom Text
This is where custom text can be entered, with each field available. If the state-specific template allows for this additional information, it will output where required. As an alternative, if there is custom text, a document could be added using Document Inclusion to affix a permanent document or + Attachment for a one-off document.
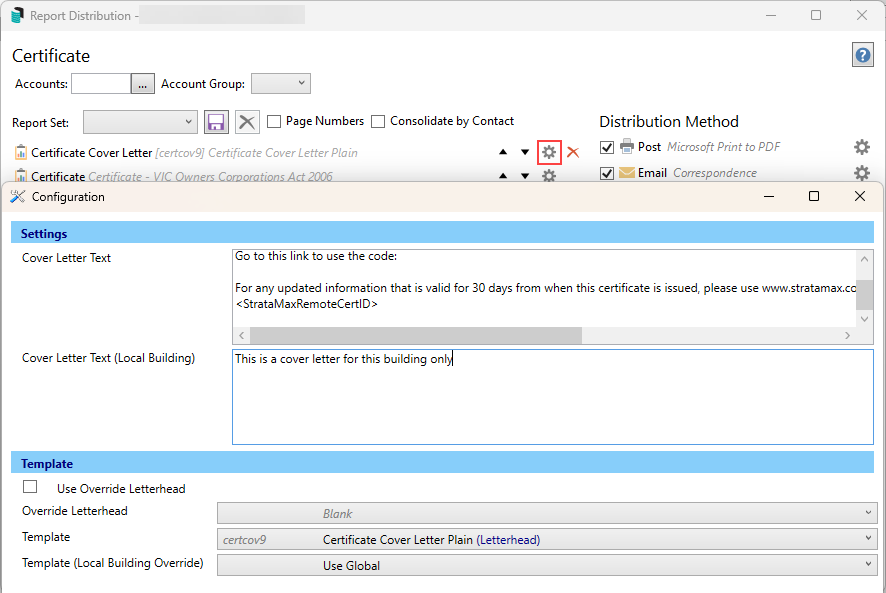
Creating the Cover Letter text, including Pexa / Online Payments
To create the cover letter text, this must be enabled from the Certificates cogwheel with the 'Add Cover Letter' option. This will allow the template and text to be set within a 4000 character limit, with an option to include the Pexa/ Online payment option. A building-specific cover letter is also available to be set.
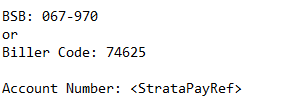
The cover letter can also include the StrataPay Reference Number for the associated Lot Account. This will enable payments to be made using the individual unique StrataPay Reference Number and the StrataPay Biller Code or BSB, and the transaction will reconcile automatically through the Bank Reconciliation. If the bank account information is supplied, this will mean manual reconciliation when the funds are received and is not recommended.
- Search or select Certificates.
- Click the cogwheel on the cover letter template.
- Enter the text into the Cover Letter Text field for a global cover letter. Use the Local Building area if for the selected building only.
- If using the Pexa/ Online Payment option, enter text for the cover letter, including the BSB/Biller Code and StrataPay Reference special text <StrataPayRef>.
- Adjust the template and letterhead if required.
- Click Close.

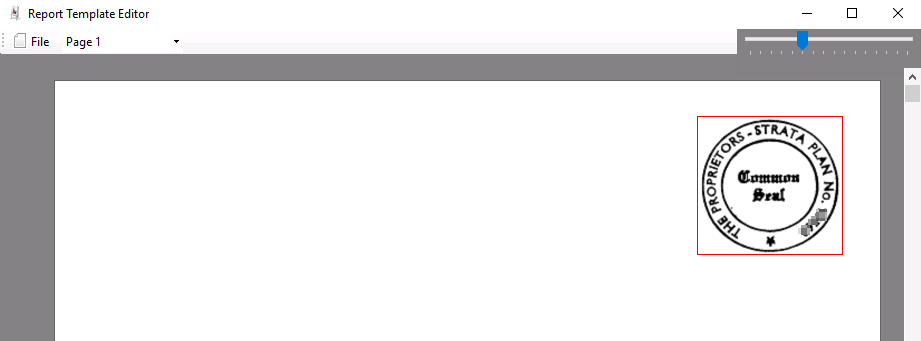
Creating an Electronic Seal/Signature
The Common Seal and the signature (separately if needed) for a building can be scanned and added to Certificates. When a certificate is produced, the seal and signature are automatically affixed. The seal and signature are first saved onto a Word document and can then be imported into StrataMax. This file can be saved as a .docx or .pdf.
Once this has been done, the configuration should also be set to print the Seal/ Signature.
When the seal/signature is added to the Certificates menu, the document with the Common Seal and signature is automatically saved in DocMax for that building. The title will be 'Certificate Seal', which can be used in a Search to locate these documents. However, no category will be allocated; more details can be added to the document properties if required.
Scanning and editing the Common Seal/Signature
- Scan the building's common seal and the account manager's signature, or just the signature for those states that require it, making sure they are scanned in an image format. This should be .png or .jpg.
- Open the image in an image editor program like MS Paint, 3D Paint, Adobe Photoshop Express, Adobe Illustrator, etc.
- All the open space around the seal and signature needs to be removed.
- The image size needs to be adjusted so that the height is no bigger than 130 pixels.
- Once the image has been cropped to remove all the white space around the seal and signature, and the height is no bigger than 130 pixels, save the image and then insert it into a Word document.
- In Word, use the Insert tab and insert a Picture. Navigate to where the image has been saved and insert this.
- Save the document, and make a note of the folder where it was saved - this will be needed in the following steps.
Adding an Electronic Seal / Signature to the Building
- In Certificates, click the cogwheel on the Certificate template.
- Click the Seal/Sig. Location button.
- Navigate to the saved document containing the scanned seal and signature, or the single signature, and click the Open button.
- Click the Seal/Sig. Location button for a per-building option. Or use the Global/ Seal Sig Location button to set this globally (recommended for signature only). Check the position of the seal/signature, and adjust if needed. If this needs to be moved, click the image and drag it into position.
- Produce a Certificate to check the placement and repeat step 4 if the position needs to change.
- Produce a Certificate to check the placement and repeat step 4 if the position needs to change.

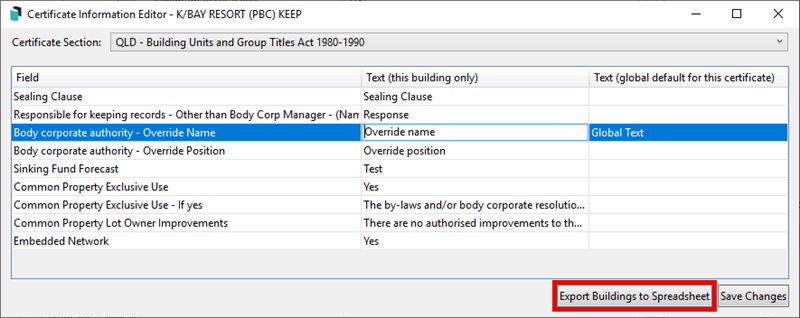
Certificates | Information Editor
Each state has specific questions, statements and answers within the certificate itself. This information can be modified using the Certificates Information Editor screen in Certificates, or in the Building Information screen, under the 'Certificate Info' section.

- Search or select Certificates.
- Click the cogwheel next to the certificate template.
- Click the Info Editor button to open the Certificate Information Editor screen.
- The Certificate Section drop-down will automatically select the appropriate state act, according to the building's state and type, set in Building Information.
- The drop-down can be changed to another state and act, and the text fields will change accordingly, but only the fields under the Text (global defaults for this certificate) column will be active to be edited.
- Double-click a field under the Text (global default for this certificate) for all buildings or Text (this building only) column and adjust text as required. When entering large amounts of text, use the scroll bar to navigate up and down that field. In some fields, there will also be a drop-down menu to select predefined text if more appropriate.
- Click Save Changes once complete.


Certificates | Export Information
This section describes how Building Certificate Information can be exported to an Excel spreadsheet for a single, multiple, or all buildings across a StrataMax portfolio.
- Search or select Certificates.
- Click the cogwheel next to the certificate template.
- Click the Info Editor button to open the Certificate Information Editor screen.
- Click the Export Buildings to Spreadsheet button, and the Building Selection window will open.
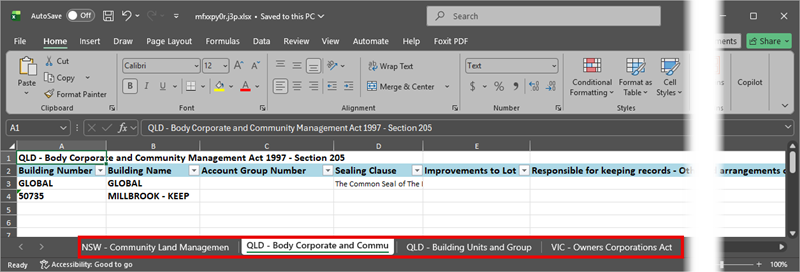
- After tagging the required buildings, click the Select button.
- Excel will open with a tab at the bottom for each state and type (if applicable in the portfolio).


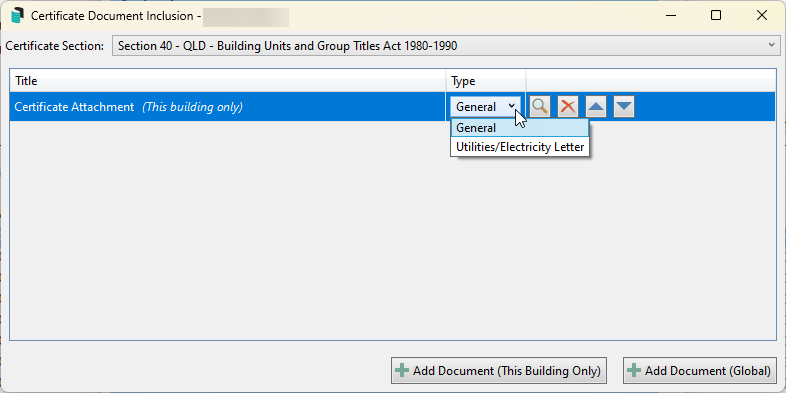
Document Inclusion
Document Inclusion allows documents to be added to a list so that when a certificate is produced, these documents are automatically printed as an addition to the certificate. Documents can be added locally (for this specific building) or globally (for this certificate for all buildings).
For QLD CMS document attachment requirements, use Building Information - CMS field to attach the Community Management Statement.
It's important to note that the documents added to Document Inclusion will not be available via Online Certificates.
Lots with Utility Subgroup
If the subject lot is in a Body Corporate, which is bulk-billed for electricity. Individual meters for each lot are read periodically and bills are sent by the Body Corporate manager either to the owner or the tenant. In any event liability for unpaid electricity charges rests with the owner.
If bills are sent to the owner, the attached certificate will include amounts owing up to the last meter reading. For settlement, allowance must be made for any amount owing pursuant to a final reading.
The new owner will be responsible for any unpaid electricity charges. It is therefore recommended that a sum be withheld at settlement.
Adding the Document to the Document Inclusion List
- In Certificates, click the cogwheel on the Certificate template.
- Click Document Inclusion. The Certificate Section will be set. If this needs to be adjusted, click the drop-down arrow and select the required certificate type.
- Click Add Document, This Building Only or Global.
- This will open the DocMax Select Document screen.
- If the document is already in DocMax, navigate to it and click Select Document.
- If the document is not in DocMax, you can either navigate to it using the Add New Folder Location option (in the list to the left) and click Select Document.
- If this is for a Utilities/ Electricity Letter, select the document type using the drop-down list.
- Repeat if more documents need to be added.
- Use the navigation buttons to view, remove or move the order of the document.
- Close by clicking the X at the top of the Document Inclusion window.

Deleting the Document from the Document Inclusion List
- In Certificates, click the cogwheel on the Certificate template.
- Click Document Inclusion. The Certificate Section will be set. If this needs to be adjusted, click the drop-down arrow and select the required certificate type.
- Highlight the document to be deleted.
- Click the red X and then click Yes to confirm deleting the attachment.

Creating a Report Set
You can include additional reports and attachments with the certificate. When saved as a report set, it will contain the state-specific certificate along with any selected reports and attachments. For Queensland clients who need to attach the CMS, this is done in Building Information using the CMS Document field.
- Search or select Certificates.
- The state-specific Certificate will be in the list.
- Click +Report to add StrataMax Reports. For example, the Financial Statements or the Roll New Owner form. These will need to be selected one at a time. Repeat for each one.
- Use the cogwheel on each report to configure any desired options.
- If the report sort order needs to be adjusted
- Click the Attachment button to add an attachment from DocMax. Repeat for each one.
- Click Save and enter a Report Set name.

Accessing Generated Certificates
After the certificate has been sent, it will be accessible in a few areas.
When the original is sent, using the Save Report (DocMax) with a profile allows it to be viewed using a DocMax search or directly in the Roll via the Lot section.
Original certificate using Save Report

- Available in the Roll

- Available in DocMax

- Available from Communications / File / Search Logs or View Log

- Available from Stored Reports

Search Certificates Issued
A report of all issued Certificates can be generated by using the Search Certificates Issued function. This report includes details on how each Certificate was delivered, indicating whether it was Printed or Emailed and for which lot and the date.
