 | The instructions in this article relate to Search Creditor Invoice Items. The icon may be located on your StrataMax Desktop or found using the StrataMax Search. |
Search Creditor Invoice Items can be used to review any warnings or balance issues as well as find a specific invoice and mark the Creditor Invoice On Hold or to Tag Paid Invoices. Searches can also be completed and data can be extracted into a report used for analysis. An example of using the data to analyse expenses by Contractor Industry is at the bottom of this page.
This menu can be used by team members that are responsible for moving invoices from Ok to Pay to On Hold between payment runs, and can also be used to report all invoices that are marked as On Hold. There is also an option to add an Invoice Hub Status column as well as the Payment Reference which can be helpful for Auditors / Committee to validate the invoices included in a payment.
Searches can be saved for continuous use, which can then be optionally exported to Excel or produced into a PDF-style document.
Search Creditor Invoice Items | Security
To access Search Creditor Invoice Items screen, the user must have the permission set to 'Allow' for 'Search Creditor Invoice Items' under the 'Menus' category in Security Setup.
Search Creditor Invoice Items
Search Creditor Invoice Items can be used to search Creditor Invoices that have been created based on set values; each column can be clicked on to sort, and results can be exported to Excel. Regularly used searches can be saved, such as 'All Invoices On Hold' and 'All Unpaid Invoices'. Search Creditor Invoice Items will search individual Creditor Invoices rather than Creditor accounts. Search Creditor Invoice Items will show Paid Date, Paid, on Hold status, plus Invoice Hub Status for each Creditor entered against a building. There is the option to include the Payment Reference column showing the Payment the Invoice was made by.
- Search or select Search Creditor Invoice Items.
- Adjust search criteria as needed to locate invoices.
- The 'Invoice Date' field is used to select a specific date or date range, including an old or historic year. Or by removing (click the red 'minus' button) or changing the 'Invoice Date' field to a different field, it will display the full history of transactions.
- To add another field, click the green plus button, then select the Field by clicking the drop-down menu.
- The 'Expense Code', 'Creditor Code', 'Master Chart Code' and 'Bill To Lot Code' fields, when set with the Condition 'is any of', will allow for multiple accounts to be selected for the Field. To remove the code selection, click the red cross on the set of codes.
- Based on the selected Field, the Condition can be changed if required, and then you can change/select the required Value.
- Click the Advanced button to display additional tabs down the left side:
- Columns to add, remove, or change the order of the columns.
- Sort Order to change how the data in the table is sorted (by column, A-Z, etc.).
- Advanced to change the maximum number of records to display in the table (10000, 1000, etc.).
- Click the Refresh button to search for the records.
- If you would like to, you can export the data to an Excel sheet by clicking the Export button.

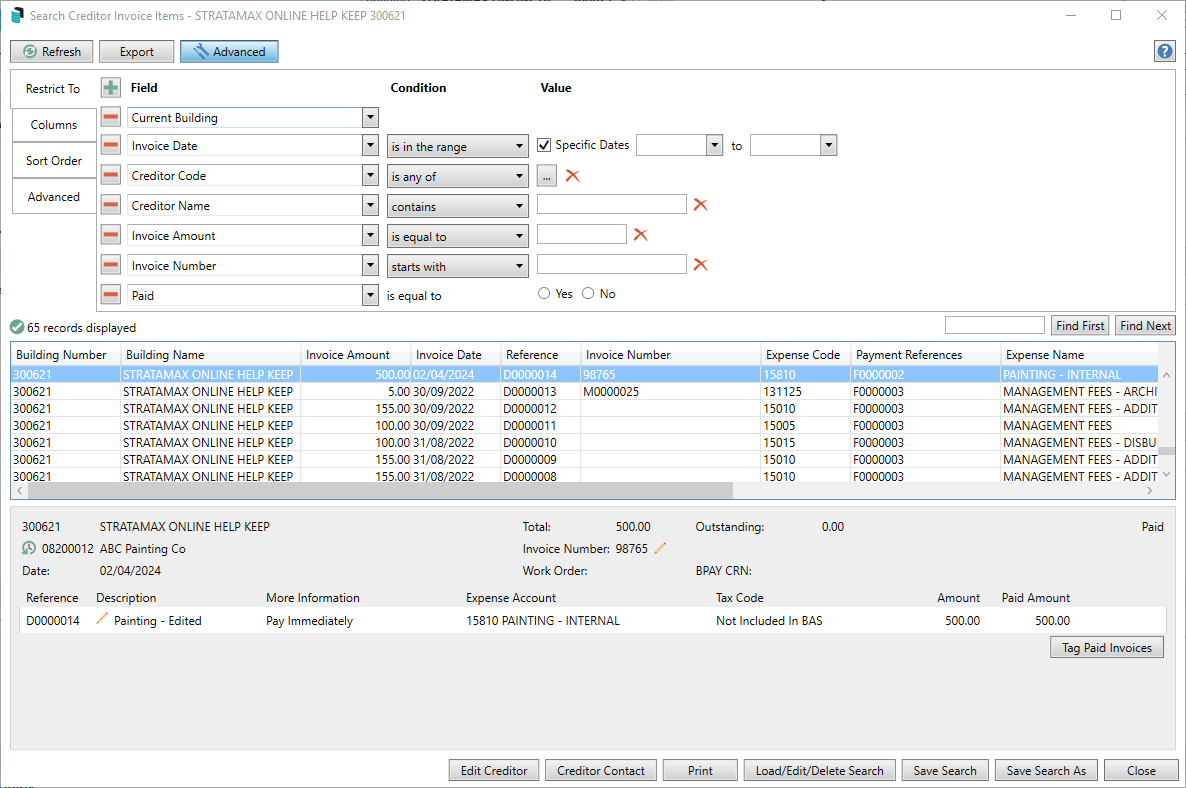 Example with Payment References column included showing the Payment Reference for each I
Each column can be clicked on to sort the order of records.
Search Creditor Invoice Items | Edit Creditor
The Edit Creditor button will become active once a transaction is selected in the list of results. Clicking the button will open the 'Creditor Details - Edit' screen, where the creditor's details can be managed. See Creditor Details - Edit for more information.
Search Creditor Invoice Items | View Creditor Contact
The View Creditor Contact button will become active once a transaction is selected in the list of results. Clicking the button will open the 'Contact Details' screen where the creditor's contact details can be managed.
Search Creditor Invoice Items | Place Creditor Invoice On Hold
To place an invoice on hold or take it off hold, locate the invoice in Search Creditor Invoices Items and then mark it as Hold or untick Hold to remove the invoice from Hold.
Please note that the Hold tick box is controlled by a permission in Security Setup called 'Hold Creditor Invoices'.

- Search or select Search Creditor Invoice Items.
- Use Fields to locate required invoice.
- Click on the Creditor Invoice record to list any Creditor Invoices for the Creditor Account in the lower half of the screen. Click 'Hold' to add the tick so that the Creditor Invoice is added to Hold and excluded from any payment process.
Search Creditor Invoice Items | Move Creditor Invoice off Hold / OK to Pay
Creditor Invoices can be removed from Hold and made available for payment with a single button click from Search Creditor Invoice Items.
Please note that the Hold tick box is controlled by a permission in Security Setup called 'Hold Creditor Invoices'.

- Search or select Search Creditor Invoice Items.
- Locate the Creditor Invoice record by adjusting the Fields as required.
- Click Refresh if changes to Fields are made.
Tip: Create a Saved Search for On Hold Creditors. - Click on the Creditor Invoice record to list any Creditor Invoices for the Creditor Account in the lower half of the screen. Click 'Hold' to remove the tick so that the Creditor Invoice is removed from Hold ready for the payment process.
- If you need all Creditor Invoices for this particular Creditor Account in the building to be on Hold or off Hold, click on the ‘Hold All’ and UnHold All’ to collectively set the status.
- If the Building is configured for Invoice Hub approval, the On Hold will not be able to be adjusted until the Invoice has been approved via the Invoice Hub. Refer to the Hub field.

Search Creditor Invoice Items | Change Transaction Code
This section covers how to change the expense code of creditor invoices. A permission in Security Setup called 'Change Transaction Code'.

Please be aware that the system automatically enters the last code that was used in the 'Change To' field for ease of use, so that changing multiple codes can be done more quickly.
- Search or select Search Creditor Invoice Items.
- Locate and select the creditor invoice by adjusting the fields as required, then clicking Refresh.
- In the bottom section of the screen, in the 'Change To' field, start typing the name of the expense code you'd like to change this transaction to, and the 'Account Code List' window will appear where you can continue typing the name.
- Please be aware that the system automatically enters the last code that was used in the 'Change To' field for ease of use so that changing multiple codes can be done more quickly. Simply remove the existing code if you need to select a different code.
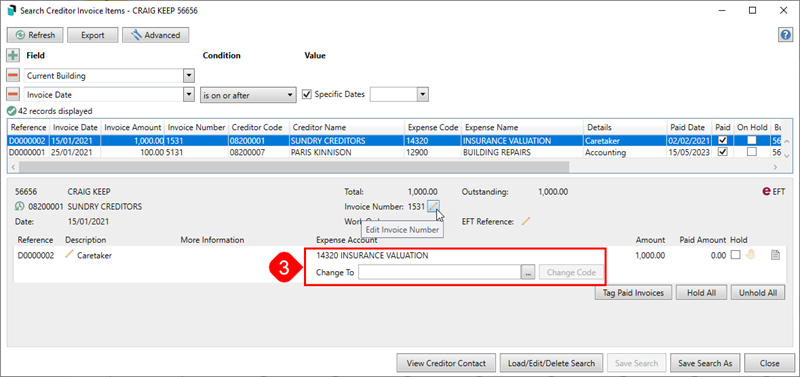
- Please be aware that the system automatically enters the last code that was used in the 'Change To' field for ease of use so that changing multiple codes can be done more quickly. Simply remove the existing code if you need to select a different code.
- Select the code you'd like to change this transaction to and click OK, which will take you back to the 'Search Creditor Invoice Items' screen.

- The 'Change To' field will now have the new code in it, so click the Change Code button, then Yes to the confirmation.
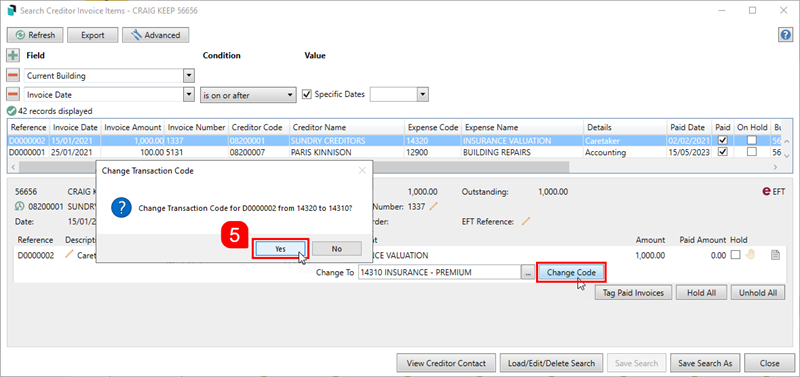
- The new code will be reflected immediately for the transaction.
Search Creditor Invoice Items | Edit Description
In order for this function to be available, the permission called 'Transaction entry edit reverse' under the 'Data Entry' category, must be set to 'Allow' in Security Setup.

- Search or select Search Creditor Invoice Items.
- Locate and select the creditor invoice by adjusting the fields as required, then clicking Refresh.
- In the bottom section of the screen, click the Edit Description button (small pencil button under the 'Description' header).
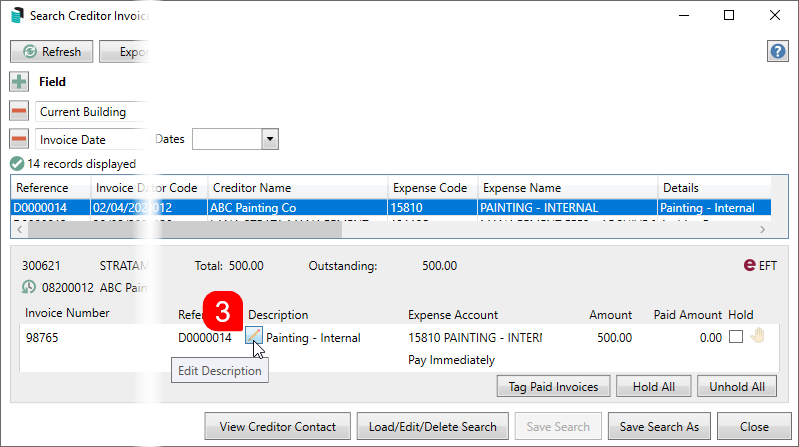
- The 'Change Description' window will appear, and the Description field can be edited. Click Save when done.
- The 'Change Description' window will close, and the change can be observed immediately.
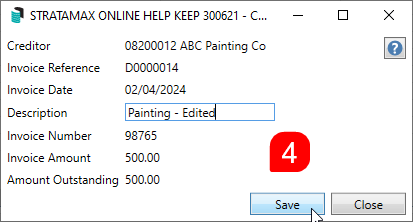
- The 'Change Description' window will close, and the change can be observed immediately.
Search Creditor Invoice Items | Edit Invoice Number
This section covers how to edit the invoice number of creditor invoices. This can also be done in the Global Transactions and Local Transactions screens.
- Search or select Search Creditor Invoice Items, Global Transactions, or Local Transactions.
- Locate and select the creditor invoice by adjusting the fields as required, then clicking Refresh.
- If you are using the Global Transactions or Local Transactions screens, you will need to click the Details button to display the 'Transaction Details' window.
- When the transaction details of the transaction are displayed, click the Edit Invoice Number button (small pencil button next to the 'Invoice Number').
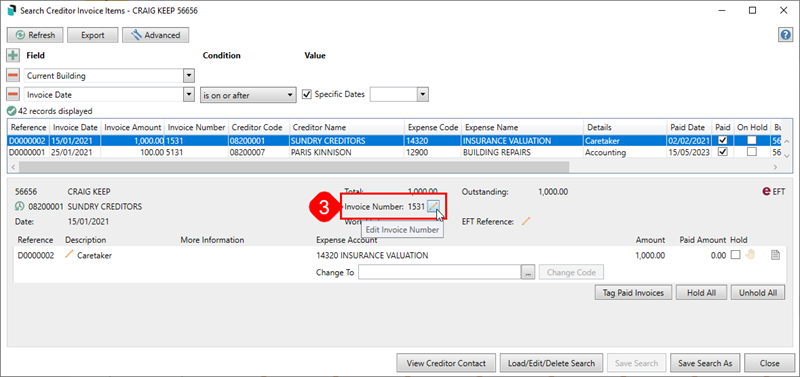
- The 'Change Invoice Number' window will appear, and the Invoice Number field can be edited. Click Save when done.
- The 'Change Invoice Number' window will close, and the change can be observed immediately.

Search Creditor Invoice Items | Edit Tax Code
This section covers how to edit the tax code on individual transactions that may be in the current or prior period, or the Old Year. This can also be done in the Search Creditor Invoice Items or Local Transactions screen.
The GST and GST Clearing Tax Codes are system-only and used for GST transactions created by StrataMax on the Income/Expenses and the GST Clearing Account. These options will be selectable in areas such as Local Transactions and are designed to facilitate reporting. When adjusting a tax code, use only the standard tax codes.
Tax code changes, for the current period, can also be edited in the Business Activity Statement.
- Search or select Local Transactions or Search Creditor Invoice Items.
- Locate and select the Income / Expense code for the tax code adjustment by adjusting the fields as required, then clicking Refresh.
- If you are using the Local Transactions screen, click the Details button to display the 'Transaction Details' window.
- When the transaction details are displayed, click the Edit Tax Code button (the small pencil icon next to the 'Invoice Number').

- The 'Change Tax Code' window will appear, and the Tax Code field can be edited. Click Save when done to process the adjustment transactions..
- The 'Change Tax Code' window will close, and the updated tax code can be observed immediately.
- Close the Transaction Details window and select Refresh to show the adjusted transactions.
The adjusting GST transactions will be dated the original Posting Date; this can be amended if required before saving.
The Change Tax Code process can be changed on the following:
- Receipts not posted to a debtor.
- Journals with tax code Not Included on BAS (excludes GST, Brought Forward, Opening Balance and where the chart of accounts tax code is not 'Not Included on BAS', including Generated Levies Billed Not Due, Generated Levies Paid In Advance, Account Type is not Equity, Other or Surplus/Deficit or Account Default Tax Code is not any of Not Included on BAS.
- The building is registered for GST.
- Transaction reference starts with MA, F, C, B, R or J.
- BAS, PAYG Withholding (Wages), PAYG Instalment or PAYG Withholding (No ABN).
This is to assist where GST is activated after transactions have been recorded.
For example, the tax code for receipts posted to non-debtor accounts can now be changed.

Search Creditor Invoice Items | Tag Paid Invoices
If there is a Creditor Invoice that is on Hold and not paid that matches a Credit Note entered, the Creditor Invoice can be tagged as paid. Once tagged as paid, the Creditor Invoices will no longer display in any Unpaid Invoice searches or reports.
Please note that the button Tag Paid Invoices is controlled by a permission in Security Setup called 'Creditor Balance / Tag Paid Invoices'.

- Search or select Search Creditor Invoice Items.
- Locate the Building/Creditor record by adjusting the Fields as required.
Tip: Click Refresh if changes to Fields are made. Or use a Saved Search for On Hold . - Select the Creditor Code and view the details in the grid in the lower half of the screen.
- Untag to remove from Hold any Creditor Invoices which match the Credit Note balance.
- Click Tag Paid Invoices to view all available unpaid Creditor Invoices for the selected Creditor code.
- Tag/tick the Credit Note and Creditor Invoice, the Difference must equal 0.00 to be able to click Save.
Search Creditor Invoice Items | Tag Paid Invoices - Convert Journal Balances to Invoices
Use Tag Paid Invoice to correct Balances journaled to creditor accounts. This tool will convert a journal to a Creditor Invoice as these are the only types of transactions available for making a creditor invoice. An example includes an ATO adjustment, which has been entered via a journal, totalling the correct balance but not all invoices. If the creditor is set to be paid by BPay, the CRN number will be entered using the process outlined below.
Please note that the button Tag Paid Invoices is controlled by a permission in Security Setup called 'Creditor Balance / Tag Paid Invoices'.

- Search or select Search Creditor Invoice Items.
- Locate the Building/Creditor record by adjusting the Fields as required.
- Tip: Click Refresh if changes to Fields are made. Or use a Saved Search for On Hold.
- Select the Creditor account and view the details in the grid in the lower half of the screen.
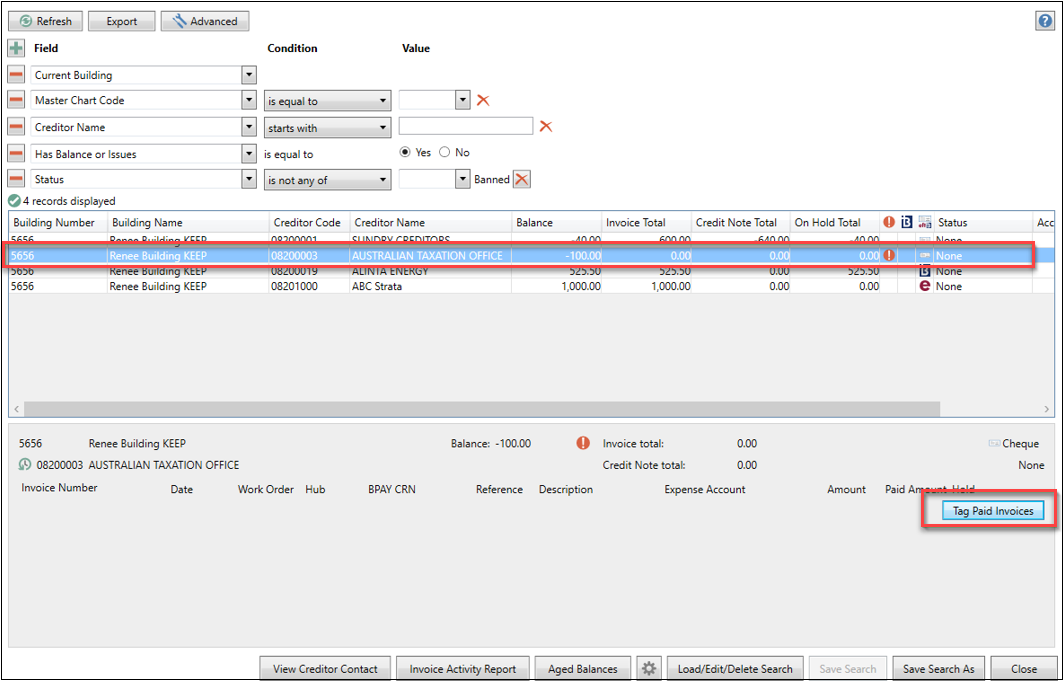
- Select Tag Paid Invoices.
- The lower half of the screen will have 'Convert journal balances to invoices', ensuring that the date is the current year.
- Click Add.
- Enter the details into the fields for the Creditor Invoice to be created.
- Click Save.
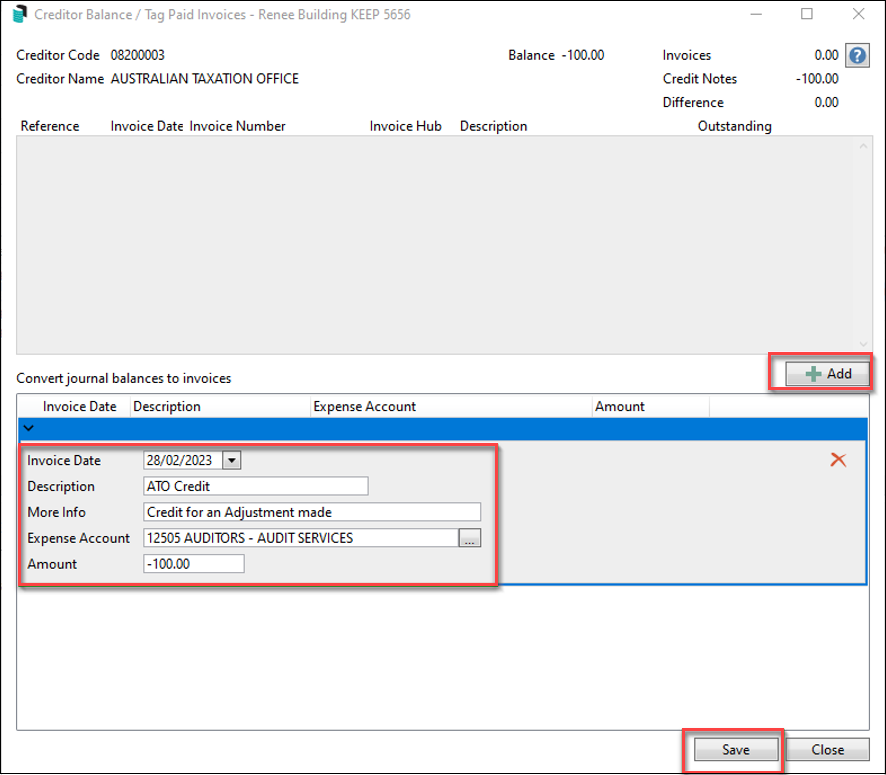
- Click Refresh to see the newly created invoice in the top part of the window. If this creditor is set for BPay, click the pencil icon on the new invoice and enter the CRN. Click Save.
- Tip: Select the drop down arrow to select the previously used CRN number.
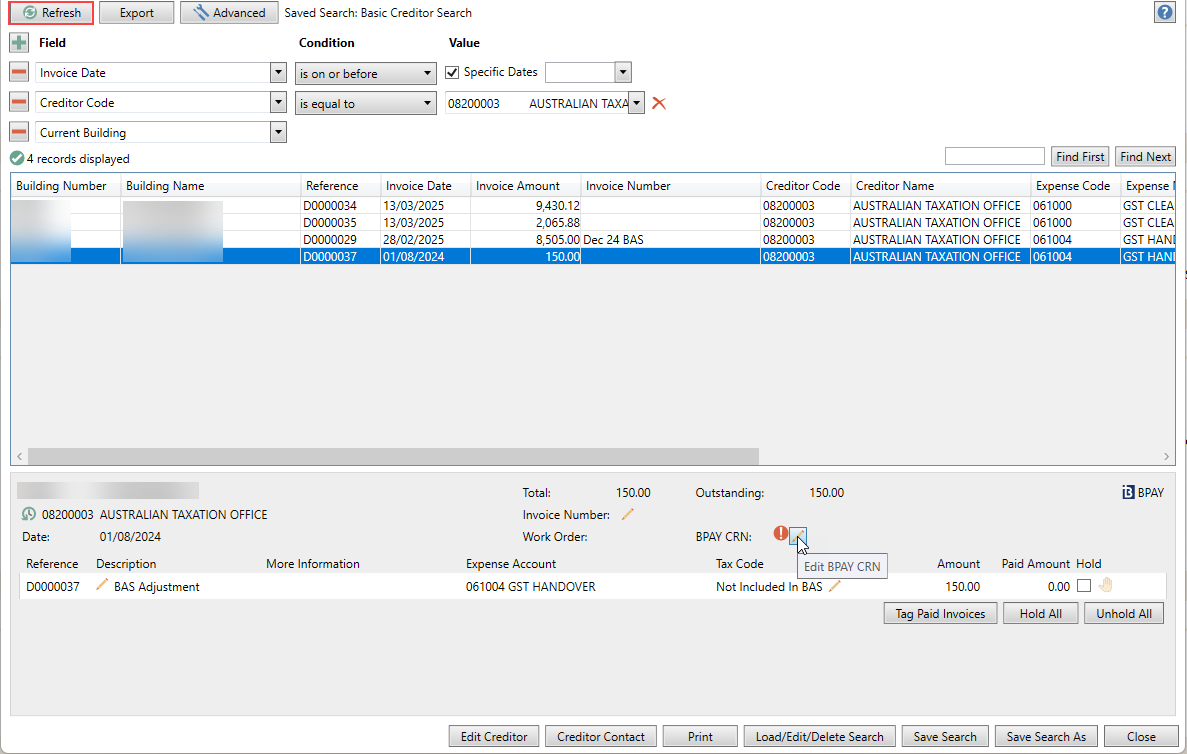
- Tip: Select the drop down arrow to select the previously used CRN number.
Search Creditor Invoice Items | Saved Searches
'Saved Searches' are designed for convenience so that you can save a selection of fields, columns, and a specific sort order so that it can be loaded later. There is also a tool to assist with quick-finding fields of text information. Use the top right corner and enter text into this field to search. Click Find First or Find Next to locate results.
'Saved Searches' can also be set as the 'default' search for the selected screen. This means that the selection of fields, columns, and specific sort order will be the one chosen whenever the menu screen/icon is selected.
'Saved Searches' can be saved for the current user, globally (accessible to all users), or for a specific user group.
If a Saved Search is loaded/opened this will be noted at the top of the search screen.

Saved Searches | Security Setup Permissions
A security permission will either allow or deny individual Users or User Groups access to create or delete a search. The permission is called ‘Save Group and Saved Searches’ under the 'Menus' category in Security Setup. You can also type the word ‘Search’ into the filter field and click the Filter button to see the permission.

If the User or User Group do not have the permission set to 'Allow', then the ability to save a search for all users or a user group will be inactive.

Saved Searches | Set up a new Saved Search
- Configure the required fields and click the Refresh button to display the required data.
- Optionally click the Advance button to also configure the displayed columns, and specific sort order.
- Click the Refresh button to display the data.
- Click the Save Search As button, and the 'Save Search' window will appear.
- Enter a 'Name'.
- Select one of the three radio buttons, depending on your requirement:
- Available to current user only will save the search for the current user only.
- Available to users in security group will save the search for the User Group selected from the drop-down (this radio button is only available if you have the right permission, and the User Groups available in this list are limited to the User Groups that you are a member of).
- Available to all users will save the search for all StrataMax users (this radio button is only available if you have the right permission).
- Optionally tick the Save as default box to load this 'Saved Search' whenever the menu screen / icon is opened.
Saved Searches | Load or Delete a Saved Search
- At the bottom of the screen, click the Load/Delete Search button.
- In the 'Load Search' window, click the blue Load button to load the Saved Search, or click the red cross button to delete the Saved Search.
- If you click the Load button, the 'Load Search' window will disappear, and the screen will refresh automatically and load the Saved Search data.
- If you click the Delete button, a confirmation pop-up will appear; Click Yes to confirm the deletion.
When a Saved Search is loaded/opened, the Saved Search name will be noted at the top of the search screen.
Saved Searches | Edit a Saved Search
- If the Saved Search you want to edit has been set as the default search, it should be on screen already, and you can proceed to the next step. Otherwise click the Load/Delete Search button.
- In the 'Load Search' window, click the blue Load button.
- Now make any changes required to the required fields, and optionally click the Advance button to also configure the displayed columns, and specific sort order.
- Click the Refresh button to display and check the data.
- Click the Save Search button to save the applied changes.
Saved Searches | Add To My Dashboard
There is the option to add certain searches to your own Dashboard. This is limited to your own Dashboard only (you cannot add it to the Dashboard of another user or group), and only available in these specific 'Search' screens:
- Search Office Bearers
- Search Bank Accounts
- Search Creditor Invoice Items
- Search Work Orders
- Search Quotes
- Search Building
- Search Inspections
- Search Levies
- Management Fees Report
- Follow the steps to set up a new Saved Search, or edit a Saved Search (see the two relevant sections above).
- In the 'Save Search' window, click the Add To My Dashboard button.
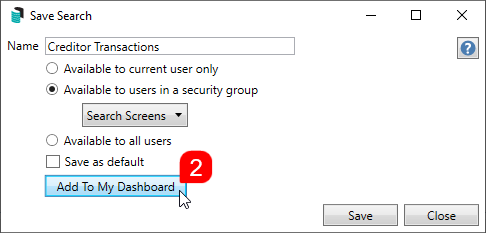
- The 'Dashboard Configuration' window will then appear.
- The Report drop-down menu cannot be changed from 'Saved Search'.
- The Display Title can be changed to whatever is required.
- Choose the Display Type that is preferred. See Display Types for more information.
- Tick Show On Desktop if preferred.
- Depending on which Display Type was chosen, the fields for the different number values will change. Observe the Preview to assist with picking the right number values suited to the Display Type.
- Click the Save button.
- Back in the 'Save Search' screen, there are now buttons to Edit Dashboard and Delete Dashboard.
- Click the Close buttons on any remaining screens.
Export and Print
Each search can be exported to Excel or produced as a PDF-style report, and the column display for these reports will be included.
- Export - If there are more than 1000 results, Check the Advanced tab / Advanced area to report the maximum. Click Export for an Excel report.
- Print - Check the cogwheel from the Report Distribution screen to change fonts and set the letterhead style. This print style will produce the report based on the column width. Click Print for a PDF-style report.

Examples of Searches for Dashboard
The below are some examples of saved searches that can be used as a dashboard to either prompt based on particular dates or to provide quick access to information & reporting. Examples are reliant on fields being populated with data and information as part of your processes, and your particular setup of Restrict To, Display Columns and Sort Order may vary to suit your requirements.
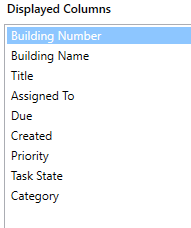
All Overdue Tasks (Search Tasks)
Restrict To:

Displayed Columns:
Last AGM where minutes have not been sent (Search Buildings)
Restrict To:

Displayed Columns:

Assigned Team Members (Search Buildings)
Restrict To: No requirements, however you may filter by Account Manager for example.
Displayed Columns:

Term Deposits maturing in next 30 days where no instruction has been provided (Search Bank Accounts)
Restrict To:

Displayed Columns:

Creditor Invoices Awaiting Invoice Hub Approval & dated more than 1 month in the past (Search Creditor Invoice Items)
Restrict To:

Displayed Columns:

Creditor Invoices on hold & dated more than 1 month in the past (Search Creditor Invoice Items)
Restrict To:

Displayed Columns:

Inspections due in next 30 days (Search Inspections)
Restrict To: setting the category to specific values allows dashboards specific to inspection types.

Displayed Columns:

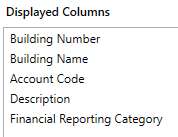
Identify expense account codes without a category (Search Global Accounts)
Useful for ensuring the NSW State of Key Financial Information is accurate; this relies on account codes having a category set in Account Maintenance.
Restrict To:

Displayed Columns:
Analysing Expenditure by Contractor Industry or Expense
The Search Creditor Invoice Items allows data from the building or across the portfolio to be exported to excel based on columns and date ranges you configure. This data along with tools in excel can be useful for analysing expenditure and producing reports for internal and external use.
- Search or select Search Creditor Invoice Items.
- Configure the search based on your requirements using the 'Fields'. The example below is based on exporting information for a building for the date range of 01/08/2021to 31/07/2023.
- Click the 'Columns' tab and ensure any required columns are added. In the example below the 'Contractor Industry' column has been added.
- Click the 'Advanced' tab and change the maximum number to 'Unlimited' (note that Excel may restrict the number of lines available to report).
- Click the Refresh button to display the results.
- Click the Export button.
- Use Excel functions such as Pivot Tables and Charts to present data in suitable ways based on your requirements. See this Microsoft Office website article for instructions regarding Pivot Charts.

Example using Pivot Tables and Charts:


