 |
The instructions in this article relate to Security Setup. The icon may be located on your StrataMax Desktop or found using the StrataMax Search. |
Security in StrataMax is based on the Microsoft Windows security model, using Users, Groups, and inherited permissions. Permissions control access to menus and system functions and can be assigned to individual Users, Groups, or specific buildings. Access to Security Setup is restricted to Users who belong to the Administrators group or have been explicitly granted the Allow access to Administration permission.
Security Setup is also used to configure access to the StrataMax Portal or Meeting Hub, and to manage individual User profiles, including email addresses and aliases.
Due to the increased incidents of hacking and invoice fraud, we would like to highlight a very important StrataMax permission that every business should review and implement: 'Add and edit contact bank account'. This is in order to limit the staff that are involved in this particular task, and should be incorporated into your own in-office processes for manual independent verification of account and BSB changes. See this Email Invoice Fraud Article for important information around this topic.

Security Setup | Overview

When Security Setup is opened, a list of the current Users and Groups appears:
- This icon
 represents an individual User.
 - This icon
 represents a Group that contains Users.
 - This icon
 represents a User that has been disabled, and will be visible in the list if the 'Show Disabled' box is ticked.
 - The 'Email' column shows the user's email address, which is used for their StrataMax account, including access to the StrataMax Portal and Meeting Hub.
- The 'Full Name' column is used to identify the user when the Username is generic or ambiguous, such as 'User 1'.
- The 'Portal' column indicates the User's access level in the StrataMax Portal; it can be 'None', 'User', or 'Administrator'.
- The 'Meeting Hub' column indicates the level of access the User has in Meeting Hub; this can be 'None', 'User', or 'Administrator'.
- The 'Show Disabled' box can be ticked to display disabled Users, identified by an
 icon.
icon. - The Add User button allows you to create a new StrataMax User. To learn how to create a new user, see Creating a new StrataMax User Account.
 represents an individual User.
  represents a Group that contains Users.
 represents a User that has been disabled, and will be visible in the list if the 'Show Disabled' box is ticked.
 icon.
icon.Security Setup | Log
To identify who has made changes to Security Setup, use the Log Viewer. The Log Viewer allows you to review all changes made to Users and Groups.
When the Log Viewer opens, set the Category field to Security by selecting it from the Value drop-down list, then click Refresh (top left) to display the relevant entries. You can further refine the results by adjusting the available filters. For example, you can enable Specific Dates in the Date/Time field or select a predefined time period from the drop-down list.

Security Setup | Export to Excel
StrataMax includes a function that allows all security information to be exported to an Excel workbook. The workbook contains multiple worksheets, each detailing User access to menus in StrataMax, DocMax, and GLMax, the features available to each User, and the buildings they can access. It also includes a summary of permissions assigned to each Group.
This export is particularly useful when reviewing and configuring staff permissions, helping ensure Users have the appropriate access to the menus and functions required for their role.
To export the security information, right‑click on any User or Group and select Export to Excel from the context menu.

Security Permissions Explained
To simplify permission management, the StrataMax security model uses a hierarchical structure with inherited permissions. In this model, some permissions override others. The examples below illustrate this hierarchy, listed from lowest to highest priority.
Users may need to close StrataMax by right-clicking the StrataMax icon in the Windows System Tray (bottom right of the screen) and selecting Exit, then reopening for new permissions to take effect.

Inherit (Lowest Level)
- Shown as no icon in Security Setup.
- Means 'use the other setting to decide access.'
- How it works:
- If a user is set to Inherit, StrataMax looks at the group permission.
- If a group is set to Inherit, StrataMax checks the individual user's setting.
- If both are set to Inherit, the system gives no access.
Allow
- Gives access to the menu or function.
- Higher than Inherit, lower than Deny.
Deny (Highest Level)
- Completely blocks access.
- Overrides everything — even if another group or the user is set to Allow.
Hierarchy Examples
Example 1 — Allow wins over Inherit
- Group: GLMax = Inherit
- John (User): GLMax = Allow
John can access GLMax (Allow beats Inherit).
Others in the group cannot (because they inherit 'no access')

Example 2 - Deny overrides anything
- Group: TaskMax = Inherit
- John (User): TaskMax = Deny
John cannot access TaskMax (Deny is highest)

Example 3 - Highest setting wins across multiple groups
- Group A: GLMax = Inherit
- Group B: GLMax = Allow
John can access GLMax (Allow is the highest value).

Example 4 - Double Inherit = No Access
- Group: Inherit
- User: Inherit
John has no access.

StrataMax Groups
By default, StrataMax includes two Groups: Administrators and Users.
A User can belong to multiple Groups. When assigning Group memberships, permissions should be reviewed carefully to avoid conflicts that may result in unintended access to menus or functions.
Adding or removing a User from a Group can change their access to menus and functions. The specific access granted depends on the Group’s configured permissions and any permissions applied directly to the User.
Group membership also affects the following:
- Visibility of StrataMax desktop icons: See Creating a New Desktop Group for more info.
- Dashboard icons.
- Visibility of DocMax Work Queues and Saved Searches.
'Users' Group
By default, each new User is added to the Users Group. This Group is pre‑configured with permissions that provide access to the core menus and functions of StrataMax, including GLMax and DocMax.
This Group should be reviewed and configured as early as possible to ensure staff members have the appropriate level of access for their role.
'Administrators' Group
Any User who belongs to the Administrators Group has full access to Security Setup and unrestricted permissions across StrataMax, including GLMax and DocMax. This Group should be reviewed and configured as early as possible to ensure that only appropriate staff members have this level of access.
It is not recommended to modify the permissions of the Administrators Group. Instead, remove any Users who do not require administrator access and create a separate Group with the appropriate permissions.
Users in the Administrators Group should be added to additional Groups with care. Conflicting permissions can result in restricted or unexpected access to menus and functions. For example, adding an Administrator to another Group to grant access to a specific DocMax Work Queue or a set of Dashboard Items may unintentionally limit their overall access.
Create New Group
Creating multiple Groups with different permission sets provides greater control over which menus and functions are available to staff members, external or third‑party users, and specific roles or teams. For example, you might create a Group for third‑party users, such as auditors or search agents, with access limited to specific DocMax Saved Searches only.
To create a new Group:
- Search for or select Security Setup.
- Right‑click any existing User or Group and select New Group.
- In the Edit Security Group window:
- Enter a Group Name (for example, Accounts Payable or Account Managers).
- Add members by selecting the checkbox next to each required User.
- Click Save.
Once the Group has been created, you can configure its permissions to define the menus and functions available to its members in StrataMax. For more information, see the Edit Permissions section.
External Parties/Users Group
When external parties require access to specific areas of StrataMax or DocMax—most commonly to view documents via DocMax Saved Searches—it is recommended that you create a dedicated Group with tightly controlled permissions.
Before you begin
Before creating a Security Group for external users, you must contact your IT technician or consultant to create Windows user accounts on the StrataMax server. This applies when external users log in remotely.
These accounts should:
- Have usernames and passwords assigned
- Include an email address
- Use easily identifiable, generic usernames (for example, extuser01)
Using generic usernames allows the accounts to be reused by different external parties. When access is no longer required, your IT technician or consultant can simply reset the password.
Create the external users Group
Once you have received the usernames and passwords, complete the following steps as a StrataMax Administrator:
Note: You should perform these steps from a different PC or a separate remote desktop session. Log in using the external user credentials to test access after the account has been set up.
- Search for or select Security Setup.
- Right‑click any User or Group and select New Group.
- In the Edit Security Group window:
- Enter a Group Name (for example, External Users, Auditors, or Search Agents).
- Add the external users by selecting the checkbox next to each User.
- Click Save.
- Edit the Group’s permissions to Allow granting access only to the specific menus and features required by external users.
For more information, see the Edit Permissions section.
Edit Group Members
This option is only available when right‑clicking a Group.
To edit Group members:
- Search for or select Security Setup.
- Right‑click the required Group and select Edit Group Members.
- The Edit Security Group window opens.
- Add or remove members by selecting or clearing the checkbox next to each User.
- To rename the Group, enter a new name in the Group Name field at the top of the window.
- Click Save to apply the changes and close the window.

StrataMax Users
This section details what Users are in StrataMax, how they are created, and how the permissions can be changed.
Create New Users
StrataMax Security Administrators can create new Users for staff members who require access to StrataMax. For more information, see the Accessing StrataMax article.
New Users are automatically added to the 'Users' Group, but they can also be added to other Groups and have their permissions set.
Edit User / Group Permissions
By configuring Groups with appropriate permissions, you can control which menus and functions are available to staff members, external parties, roles, or teams.
- Start by setting all User permissions for menus and functions to Inherit.
- Configure the required permissions at the Group level for menus and functions.
- If specific members of a Group require access to additional menus or functions that are otherwise restricted, assign permissions directly to those Users or add them to another Group that provides the required access.
When viewing permissions for a User or Group, a coloured icon indicates that the permission has been explicitly set for the selected User or Group.
When viewing permissions for an individual User, a grey icon indicates that the permission is inherited from a Group. To identify which Group the permission is inherited from, hover your mouse pointer over the permission icon.

- Right-click any Group and select Edit Permissions.

- In the Permissions window, select the required tab: BCMax, GLMax, or DocMax. Each tab displays its own set of permissions.
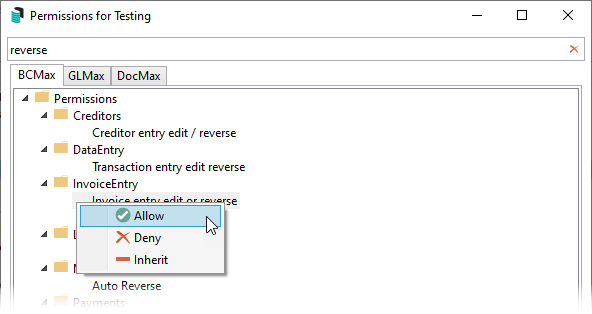
To locate a specific permission, you can:- Expand folders by clicking the plus icon to the left of each folder.
- Enter part of the permission name in the field at the bottom left and click Filter (for example, reverse).
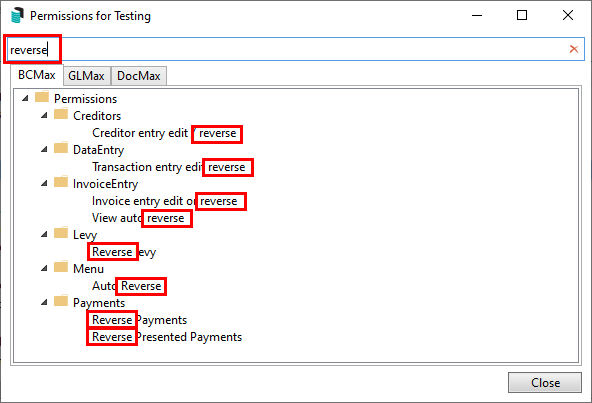
- Once you have located the required permission, right-click it and set it to Inherit, Allow or Deny.
- See Security Permissions Explained for more info on each permission.


Edit Building/Company Permissions
This setting allows you to grant access to specific buildings in StrataMax or to specific companies in GLMax. Select either the BCMax or GLMax tab, as required.
User access to GLMax itself is controlled by a permission within StrataMax. This permission is located on the BCMax tab, under the System section, and is called Access to GLMax.
The Company Permission setting determines whether a particular GLMax company is accessible to the selected User or Group.

Edit User Profile & Manager Account
User Profile and Manager Account define the user’s username, which is used to access StrataMax, and store the primary email address used for login. This section also controls the 'Sender' email address, which can be different to the login email address for sending emails.
The Key field is used to assign the User as an Operator in TRMax. This area also controls User access to the StrataMax Portal, Meeting Hub, and AI DocQuery.


- When configuring this screen for the first time for a new user, the First Name and Surname fields are combined and copied to the Sender Name field in Communication > Options > Communications Setup.
- When configuring this screen for the first time for a new user, the email address in this field will be the user's address that was used to register the StrataMax account and is copied to the Email Address field in Communication > Options > Communications Setup.
- If a different sender email address is preferred, enter it in the 'Sender' email address field. This field is synchronised with the Email Address field in Communication > Options > Communications Setup.
- The Key field is used to add the User as an Operator in TRMax.
- Use the Portal drop‑down list to grant access to the StrataMax Portal and assign the appropriate access level. See StrataMax Portal | Getting Access.
- Use the Meeting Hub drop‑down list to grant access to Meeting Hub and assign the appropriate access level. See Set Up Access to Meeting Hub.
- Use the StrataMaxAI DocQuery drop‑down list to grant access to the AI DocQuery functionality (coming soon).
Sender Email Address
This section explains how you set the email address used when sending emails, which can be different from your login email. Emails will appear to recipients as coming from the selected Sender address, and any replies will be directed to that inbox.
This is useful when you want communications such as Levy Notices or Levy Arrears to come from a shared or role-based address rather than an individual user.
Example: You can use a shared address like accounts@abcstrata.com for levy or arrears processing, so recipients see that address as the sender and all replies are managed through the shared mailbox.
Note: Make sure you have access to the sender mailbox if you need to view or respond to replies.
- Search or select Security Setup.
- Locate and select the User.
- Right-click and select User Profile & Manager Account.
- In the Sender email address field, enter the email address preferred. This field is synchronised with the Email Address field in Communication > Options > Communications Setup.
- Click Save.
Delete (Disable) Users or Groups
This option allows you to delete (disable) a User or delete a Group. When a User account is deleted, it is disabled rather than permanently removed. Disabled Users are no longer available in drop‑down lists or pick lists throughout StrataMax, including DocMax; however, they remain visible in reports and audit logs.
Disabled Users are hidden by default in the Security Setup screen. To view them, select the Show Disabled checkbox. Disabled Users can be identified by a dedicated  icon. If required, a disabled User can be reinstated by logging a case with the Support Team.
Deleting a Group does not delete the Users assigned to it. Instead, it removes all permissions associated with the Group, including DocMax permissions and any desktop configurations applied through that Group.
- Select the User or Group.
- Right-click and select Delete.
- Review the message, then select Yes to delete the group/user or No to cancel and leave the group/user in place.

Copy User Settings
Use this option to copy User settings from one User to another, and across drives if your StrataMax environment includes multiple drives. This tool helps streamline the setup of new staff and ensures consistent User configurations across departments, with the exception of Communication settings.
This feature will allow settings to be replicated to other users and across drives.
All configuration settings that show ‘User Setting' are in:
- BCMax
- GLMax
- TaskMax
- TRMax
- DocMax
- Search or select Security Setup.
- Right-click the user whose settings need to be copied.
- Hover the mouse cursor over User Settings and click Copy.

- Right-click the user who needs the settings applied, hover over User Settings, and click Paste.
- Click Yes to confirm to override this user's settings.
- The settings will be copied to the selected User, and an entry will be written to the StrataMax log to indicate which user had their settings replaced.

Preview Features
As we develop new versions, for nominated areas that can be transitioned between the newest and legacy versions, there will be a security setup option to assist with toggling between the two.
To enable this option for users, in Security Setup, search for Change Preview Features and enable it.

- Search or select Security Setup.
- Referring to the User, right-click and set Preview Features.
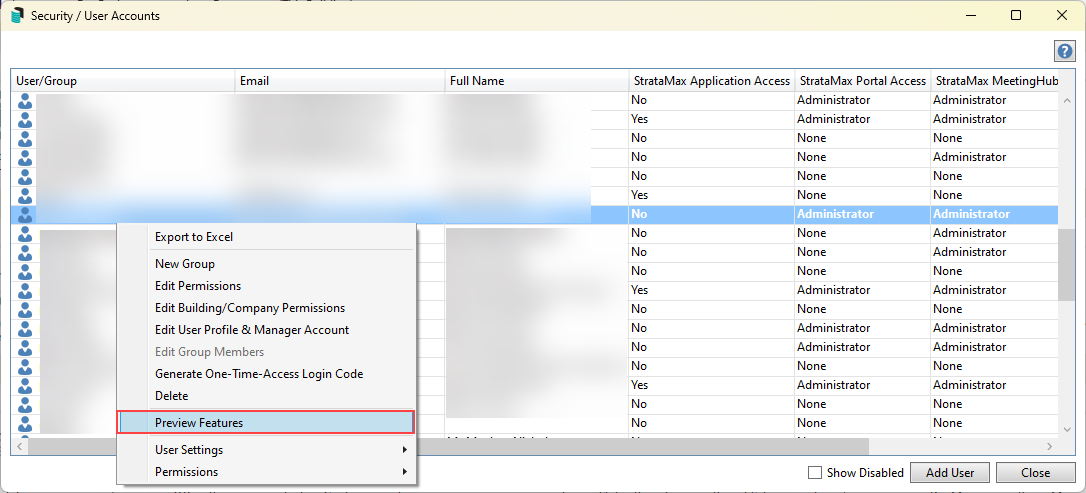
- This will open the User Preview Features screen, which can be selected for the areas included in a version toggle.
- Click Close.

For the individual user, this can be toggled from the Desktop as shown below.

Preview Features are updated periodically. The Coming Soon area provides a snapshot of upcoming enhancements.
To explore the full StrataMax Roadmap and active development projects, please review our Timeline Article.

