This article covers the Administration tab within DocMax. To open this menu, click the Administration button in the bottom left.

We also offer a completely free 'DocMax Basics' online course, which you can enrol in here! Please see the StrataMax Online Courses page for more details, including the coupon code required to enrol for free.
This article does not, however, cover Work Queues or Saved Searches. Due to their size and complexity, each of these topics are covered in their own articles, and a video:
- DocMax | Work Queues
- DocMax | Advanced Search and Saved Searches
- DocMax Work Queues and Saved Searches video
DocMax Categories
Categories are just one of the document properties that can applied to a document and can be searched by. In order to aid in searching for documents, it is recommended that every document has a category. Several categories can be applied to a single document if required.
Categories can be added, edited and deleted. However, categories can only be deleted by merging it into an existing category using the Merge and Delete function.
DocMax utilises some default categories that are used to link documents within various areas and modules in StrataMax. When adding further categories, these should be and uniform where possible. For example, 'Invoice' versus 'Invoices' or 'Insurance' versus 'Insurances'.
Having categories that are consistently uniform, will provide clearer results when searching.

Adding a Category
- From the Administration tab, click the Categories menu.
- Click Add New from the ribbon.
- Enter the name of the category (maximum 40 characters).
- Click Save Changes to add the new category or Discard Changes to cancel.
Edit a Category
- From the Administration tab, click Categories.
- Highlight the category to be edited, then click Edit.
- Amend the category name (maximum 40 characters).
- Click Save Changes to update the category name.
All documents, Saved Searches & Work Queues that had the category that was edited, will have the category name updated.
If the Discard Changes button is clicked, the changes will not be saved and the category will revert to the original name.
Merge and Delete a Category
It is recommended to create an Advanced Search or use an existing Saved Search with the Category before completing a merge, to ensure the correct action is being taken.
- From the Administration tab, click Categories.
- Highlight the category to be deleted.
- Click Merge and Delete from the ribbon.
- A list of categories will be displayed. Select the category for the deleted category to be merged into, then click Merge.
- All documents containing a category which was deleted, will be replaced with name of the category that it was merged into.
Categories used by other areas of StrataMax cannot be deleted. These categories are Building Plans, Building Photos & Management Fee Contracts.
If the wrong category is accidentally merged / deleted, use the ‘Edit’ function to rename back to the deleted category.
DocMax Statuses
Document Statuses can be configured which describe the various stages of document processing. Statuses are designed to be used in conjunction with Work Queues to assist with the document workflow.
Once created, Statuses can be renamed or deactivated but cannot be deleted.

Add a Status
- From the Administration tab, click Status.
- Click Add New from the ribbon.
- Enter the name of the Status (maximum 40 characters)
- Click Save Changes to add the new status or Discard Changes to cancel.
Edit a Status
- From the Administration tab, click Status.
- Highlight the status to edit, then click Edit.
- Amend the status name (maximum 40 characters).
- Click Save Changes to update the status name.
All documents, Saved Searches & Work Queues that had the Status that was edited, will have the Status name updated.
If the Discard Changes button is clicked, the changes will not be saved and the status will revert to the original name.
Deactivate a Status
Deactivating a ‘Status’ will ensure that it can no longer be set for a document. Any document that was previously set with the ‘Status’ will be retained.
- From the Administration tab, click Status.
- Highlight the status to deactivate, then click Edit.
- Tick the Deactivated checkbox.
- Click Save Changes to update the Status.
A 'Status' can only be deactivated if it is not included in any profiles or work queue actions.
If the status is currently being used within a profile or work queue action, the following message will appear when the ‘Deactivated’ checkbox is checked and the Save button will be disabled.
The profile or work queue that uses this status will need to be amended to allow the status to be updated.

DocMax Custom Properties
Create additional property fields that can be used in profiles, searching and work queues. These properties cannot be deleted; however they can be hidden or deactivated. Custom Properties allow configuration of additional Document Properties to suit their specific needs. If a Custom Property has been deactivated (but not hidden) it will still be shown in the Document Properties with any value that was set previously, but it will not be able to be changed to a new value. If a Custom Property has been hidden it will not appear within the Document Properties.
Add a Custom Property
Care must be taken when choosing a data type for a Custom Property as it cannot be changed. The following data types are available for selection:
- From the Administration tab, click Custom Property.
- Click Add New from the ribbon.
- Enter the name of the Custom Property (maximum 40 characters).
- Select the Data Type to ensure that the correct data will be entered for each document.
- Click Save Changes to add the new custom property.

Deactivate a Custom Property
Deactivating a custom property ensures that it can no longer be set for a document, but any value that was set previously will be retained.
- From the Administration tab, click Custom Property.
- Highlight the custom property to edit, then click Edit.
- Tick the Deactivated checkbox.
- Click Save Changes to update the custom property.
Once a custom property is deactivated, it will still appear throughout the system showing any values that were set previously, but a new value cannot be set for a document. The custom property will still be listed in the custom property configuration screen and may be reactivated in the future if required.
Hide a Deactivated Custom Property
A deactivated custom property can also be hidden so that it no longer appears anywhere in the system. Hiding a custom property ensures that any values that were set previously may still be accessed in the future by displaying the custom property again.
- From the Administration tab, click Custom Property.
- Highlight the custom property to edit, then click Edit.
- Amend the ‘Name’ or 'selection boxes' as required.
- Click Save Changes to update the custom property.
A custom property can only be hidden if it is also deactivated. It may also be restored by editing the entry and un-ticking the Hidden and Deactivated boxes.
DocMax Profiles
Profiles can be added, edited or deleted, based on setup of security permissions. As profile applies document properties such as statuses, categories and text in fields, it is possible to delete profiles without changes to the document properties. A document profile may be selected when adding or updating the document properties for a single document.
A document profile can only be selected and applied to a single document. The document profile selection field will be unavailable when multiple documents are selected.
A document profile can be used to:
- Populate document properties with certain values based on the document type.
- Set certain document properties to be mandatory, to ensure that information is entered before changes can be saved.
- Set certain document properties to include a Tab Stop at required fields, to assist in bulk document processing.
- Determine which sections are expanded or collapsed, making it easier to go straight to the document properties that are most relevant.
- Provide consistent control of what documents are uploading to the Online Portal and fixed time periods.
Once a profile is selected, the profile settings will be applied to the current document properties. These document properties may include a set of properties that can populate directly to a Work Queue. Some document properties can replace the existing properties if they are already set, and some will add to existing properties.
Categories can be set to ‘Replace Existing Categories’ or ‘Add to Existing Categories’ in the Profile. ‘Search Words’ and ‘Notes’ will add to existing properties, whilst all other properties will replace any existing properties.
DocMax Profile Merge Fields
In DocMax merge fields can be applied in the Title, Description & Notes fields from within the Profiles screen. By using these fields, the data from within StrataMax will populate into those merge fields.
A few important things to be aware of with DocMax merge fields:
- The merge fields need to be manually typed in (can be copied & pasted from this article).
- For building specific merge fields to populate, the building must be selected prior to selecting the profile.
- For creditor and invoice related merge fields, the data won't be merged until after the Invoice Details section has been populated and then the profile with merge fields has been applied. This is also true when using DocMax Work Queues with Action Buttons to process invoices; the Invoice Details section should be filled in whilst the invoice document is being added to DocMax and places it into the first Work Queue. Then each Action Button in that Work Queue should include the creditor and invoice related merge fields.

Specific fields that can be used are:
- Building Name / Company Title: {BuildingName}
- Document Date {DocumentDate}
- Financial Year Start: {FinancialYearStart}
- Financial Year End: {FinancialYearEnd}
- Creditor Name: {CreditorName}
- Invoice Number: {InvoiceNumber}
- Invoice Amount: {InvoiceAmount}
- Invoice Date: {InvoiceDate}
- Today - computer date: {Today}
- Current Username: {CurrentUser}
- Action Date: {ActionDate}
Example of Merge Fields being used: Document Date, Creditor Name & Invoice Number:


Formatting for Date Merge Fields
By default, any date field will be presented as DD/MM/YYYY (29/08/2022 for example). However, date fields can be formatted by manually typing some characters within the merge field as follows:
{InvoiceDate: yyyy-MM-dd}
This will result in the date being displayed as 2022-08-29.
The components that can be used in the formatting are as follows (note that these are case sensitive):
- YYYY = Year (e.g. 2022)
- YY = Year (e.g. 22)
- MM = Month (e.g. 08)
- MMMM = Month (e.g. August)
- DD = Day (e.g. 29)
The formats can be used on their own or together, as seen in the following examples for the {InvoiceDate} merge field.
| Field and Formatting | Display Example |
| {InvoiceDate: yyyy} | 2022 |
| {InvoiceDate: yyyy-MM-dd} | 2022-08-29 |
| {InvoiceDate: dd/MM/yy} | 29/08/22 |
| {InvoiceDate: MMMM yyyy} | August 2022 |
Add a Profile
- From the Administration tab, click Profiles.
- Click Add New from the ribbon.
- Enter the name of the profile. Make the name relevant to the document type the profile will be used for. For example 'Meeting Minutes'.
- Enter a description which explains what the profile will do.
- Review document properties and set as necessary.
- Tick the check boxes to determine whether a document property is mandatory and must be completed.
- Tick the check boxes to determine whether a document property has a tab stop. When the tab key is used, it will go to or skip that document property.
- Click Save Changes to save the profile.
Entry of mandatory document properties is only enforced when the profile is manually selected by the user. Mandatory document properties are ignored when the profile is applied via automatic channels such as a drop box, or the Outlook add-in.
When any of the following document properties are marked as mandatory, the building selection will also become mandatory, and the document will automatically be marked as a property document:
- Lot selection
- Creditor selection
- Expense account selection
- Upload to Portal (Y/N)
For example, by making the Lot Details field mandatory, the Building field will also automatically become mandatory and the Document Applies To field is automatically set to ‘Property Document’.
Edit a Profile
Editing a profile will allow the document properties to be changed for documents being currently filed. It should be noted that any changes applied to the profile will not retrospectively update any documents that have used this profile in the past.
- From the Administration tab, click Profiles.
- Highlight the profile to edit, then click Edit.
- Amend the document properties of the profile as required.
- Click Save Changes to save the amended profile.
Delete a Profile
- From the Administration tab, click Profiles.
- Highlight the profile to delete, then click Delete.
- When prompted select Yes to delete the selected profile.
Once a profile is deleted it cannot be reactivated at a later stage, it can be recreated if required.
DocMax Drop Boxes
A Drop Box allow documents to be added to DocMax quickly and easily by placing the document file into a Windows folder. This can either be on your own PC, or on the StrataMax server.
A Drop Box can be configured with two different methods of adding documents to DocMax:
- It can be added to DocMax with a profile applied to the added document.
or - It will prompt the user to enter the details of the document manually, via the 'Add Document' window.
Multiple Drop Boxes can be set up, and they can be edited or deleted based on the user's security permission. Once the Drop Box has been added, the user needs to be have StrataMax open for the Drop Box to become monitored. This is a user setting and will need to mapped by the individual user to move documents into the Drop Box. If a staff member is the primary user of a commonly used Drop Box and does not have StrataMax open, the Drop Box will not be monitored and therefore not add documents to DocMax.
It is very beneficial to set up a Drop Box for the network folder where a scanner has been configured to store newly scanned documents.
When setting up a Drop Box within DocMax, it is recommended to use UNC pathing, rather than a drive letter for the path to the Drop Box. The reason for this is if the drive letter were to change or differ depending on the device where it has been set, this can cause the Drop Box upload functions to fail.
The Drop Box is commonly set up for the network folder which receives the outputs from an office scanner, but may be configured for any network location which is accessible by the user.
To do this, it is recommended to setup a base Drop Box folder as an application share for example:
\\Servername\Dropbox\Name_of_dropbox
If you were to have a server named “Office”, you would create a new folder share called “Dropboxes” and within this “Dropboxes” folder, create the required dropboxes, i.e.
\\Office\Dropboxes\Invoices
\\Office\Dropboxes\Filing
Add a Drop Box with a Profile
- From the Administration tab, click Drop Boxes.
- Click Add New.
- Use the Browse button to locate the folder where DocMax will monitor.
- Select the with Profile radio button, then in the drop down list, set the appropriate profile.
- Click Save Changes to save.
If a profile is used to apply document properties, any mandatory fields will be ignored and the document will be removed from the drop box. This ensures that the process runs behind the scenes without any interruption to the user.
Add a Drop Box via Add Document window
- From the Administration tab, click Drop Boxes.
- Click Add New.
- Use the Browse button to locate the folder where DocMax will monitor.
- Select the via Add Document window radio button.
- Click Save Changes to save.
If the Drop Box is configured to add to DocMax via Add Document Window, DocMax will display the ‘Add Document’ window as soon as there are documents detected in the Drop Box folder.
Edit a Drop Box
- From the Administration tab, click Drop Boxes.
- Highlight the drop box to edit, then click Edit.
- Use the Browse button to locate the folder where DocMax will monitor.
- Select the either the with Profile and select a profile, or via Add Document window radio button.
- Click Save Changes to save.
Delete a Drop Box
- From the Administration tab, click Drop Boxes.
- Highlight the drop box to delete, then click Delete.
- When prompted select Yes to delete the selected drop box.
A Drop Box can only be edited by the user the Drop Box belongs to or by Administrators with privileges to edit another user’s Drop Box.
DocMax Import
There is a function that allows importing DocMax documents. The import function allows a collection of documents to be copied from a network folder into DocMax, including Document Properties, which are set from a user-defined CSV file. This process can be delicate in its execution, and any errors should be reviewed, as the process must proceed without errors to ensure a successful import.
- Only documents that are supported by DocMax will be added via the import process.
- All files to be imported must be in the same network folder.
- The import.csv file must be in the same folder location.
- Each data field/column must be separated by a ‘,’ (comma) to ensure that the mandatory fields are in the import.txt file.
- Merge and Delete Categories if required to ensure that the categories remain consistent.
- Review Online Portal Groups after import and amend if necessary.
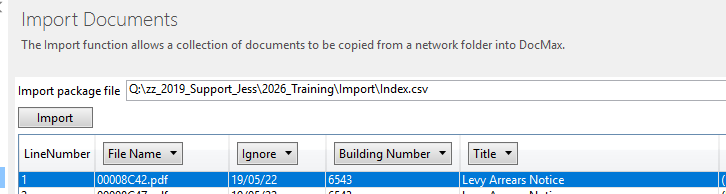
Document Import Setup
- Locate the folder where the import files are saved.
- Open Excel to create the import.csv file. If the files to be imported were originally exported from DocMax, the index file can be used to create part of the import file.
The following are the mandatory fields, and also the other fields that can be imported:
- Building number (mandatory).
- Title (mandatory).
- Filename (name and file extension) (mandatory).

Sample File

If using Excel, save the file as a *.csv format in the same directory as the documents.

Document Import Process
- In DocMax, select the Administration tab.
- Click the Import menu in the left-side navigation pane.
- Click the Browse... button on the right side.
- Locate the folder where the Import.csv file and documents are saved.
- Select the file, then Open. Check that the column name matches the data below, and amend if necessary. Choose Ignore if not required for import.
- Click the Import button once the column headers match the data (see below if any errors are found in the import.csv file).
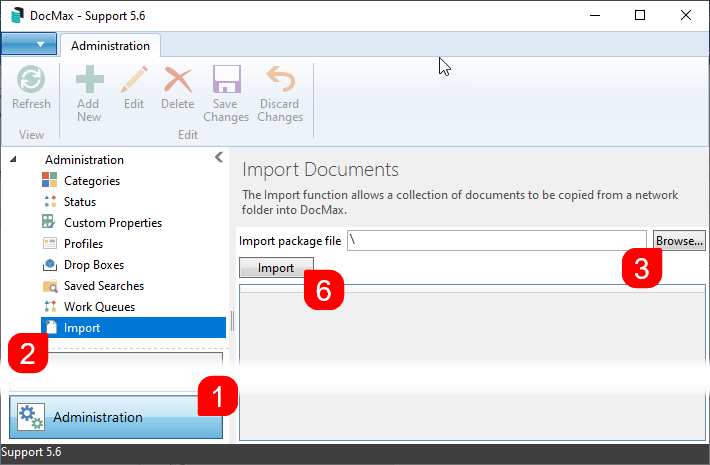
- Review the imported files to verify the import has been successful.

Review

DocMax Import Errors
If there are errors within the import.csv file, you may need to review the file and amend it. The import process will not run until all errors are rectified.
| Error | Explanation |
|---|---|
| Error | Meaning |
| Building number is required | Building Number is not selected as a column heading |
| Title is required | The Title is not selected as the column heading |
| FileName is required | The FileName is not selected as a column heading |
| Invalid building number(s) | The Building Number specified is not found in DocMax |
| Missing title on these lines | A row is missing a value in the Title column |
| Invalid file formats | A non-supported file type was found in the FileName column |
| File not found | The File specified in import.txt is not in the directory |
