 |
The instructions in this article relate to Payment Entry. The icon may be located on your StrataMax Desktop or found using the StrataMax Search. |
Payment Entry provides an easy method to manage outgoing one-off payments, reimbursements/ refunds to owners and Agents and part payments, and includes the ability to add Internal and External Notes on the Remittance Advice.
Payment Entry | Security Setup
The security permission for Payment Entry can be found in Security Setup by filtering Payment Entry.
There is an additional security permission for 'Allow Entry of EFT/BPAY Details in Payment Entry (except Creditors)', which users must have set to 'Allow' to be able to enter a change details.
If using the Bank Account Approval Dashboard it is important to note that bank account details entered into Payment Entry for a one off payment will not require approval therefore it is recommended to not allow the permission to 'Allow Entry of EFT/BPAY Details in Payment Entry (except Creditors)' where appropriate.
Payment Entry | Overview
Payment Entry is a central interface for users to effectively manage a one-off payment. From this menu users can create either an EFT or BPay for several invoices for the same creditor account, or for owner / agent for reimbursements or refunds.
These are the different payment methods available:
Pay by EFT
This option will create a record ready to be processed from Payments. Review the BSB and Account Number populated from the Contact, this can be edited if Security Permissions allow (select Pay Immediately to create payment and proceed to EFT Manager).
Pay by BPAY
This option will create a record ready to be processed from Payments. Review the Biller Code and CRN populated from the Contact, this can be edited if Security Permissions allow (select Pay Immediately to create payment and proceed to EFT Manager).
External direct debit, periodic payment, internet transfer
This option is for when a payment has been made outside of StrataMax. Any invoices selected will be included and no cheque or EFT is sent to the bank. The payment is "processed/printed" in Payments and will be visible on the Bank Reconciliation until presented at the bank.
Cheque book
As cheques are phased out of the banking industry, issuing of cheques from StrataMax is no longer available. Please contact support@stratamax.com if you have any queries.
Pay Immediately
The option is for immediate payment when the payment method is either EFT or BPAY. Payments created using ‘Pay Immediately’ are created and added to an separate EFT batch. For all SCM (StrataCash Management Accounts), the payment will automatically be submitted to SCM online for authorisation, all other supported banks, the EFT Manager screen will appear to manually authorise the payment.
To use the 'Pay Immediately' option, check the permission called 'Submit or Export EFTs in EFT Manager' is required. The Pay Immediately radio button will not be active if permission is not allowed.
Also the BPAY option is only available in StrataMax - GLMax only has the Pay by EFT or Pay by Cheque radio buttons.
Payment Entry | Configuration
The configuration for the Payment Entry screen is located in the Payments screen. See Payments | Configuration.
Urgent Creditor Payment
These brief steps will assist with the most efficient option for making a one-off payment to a creditor, which is not being paid as part of the normal global processing.
- Enter the Creditor Invoice.
- Use 'Save and Pay' to open Payment Entry screen.
- Check EFT / BPay details plus any other required information.
- Select either of the below options:
- 'Pay Immediately' to skip 'Payments' and open EFT Manager (non-SCM accounts), or submit directly to SCM for authorisation, or
- Save to make the payment to be completed in EFT Manager and then authorised.
NOTE: The above options may depend on the security permission of the user, for 'Pay Immediately' as outlined below.
Creditor Payments
Users can use the Payment Entry screen to pay a single creditor invoice by selecting a creditor account, view unpaid invoices and either pay all amounts to pay or part pay. This is for EFT/BPAY only. Users must have ‘Authorise Payment’ permission allowed in Security Setup. Payments created using ‘Pay Immediately’ are automatically marked as printed and added to their own EFT batch, and therefore, do not need to be processed in Payments. For all SCM buildings, the payment will automatically be submitted to SCM online for authorisation; for all other banks, the EFT Manager screen will appear to authorise the payment manually.
- Search or select Payment Entry.
- This screen will also automatically open if you choose the Save & Pay button in Creditor Invoices.
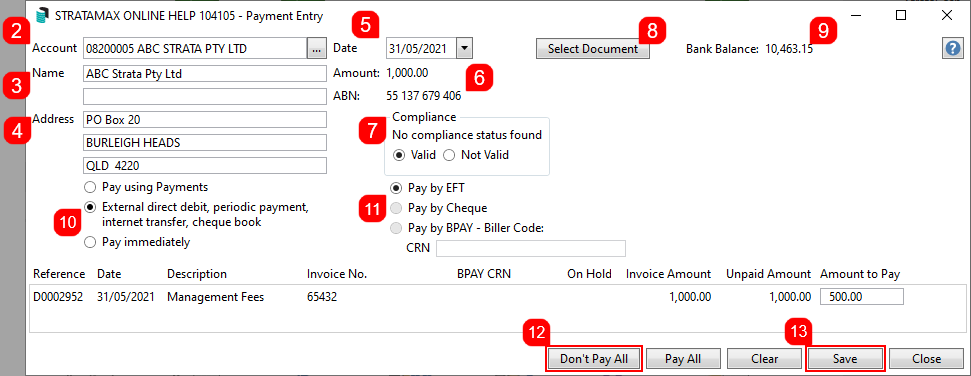
- In the Account field, either start typing the name of the creditor's name or click the ellipsis button [...], and select the required creditor.
- The Name field should automatically populate with the creditor's name.
- The Address field will populate if there is an address for the creditor in Creditor Maintenance.
- The Date field will automatically observe the Working Date in StrataMax.
- This date must be in the current month.
- The Amount is the full balance owing to the creditor, and the ABN is populated from the creditor in Creditor Maintenance.
- If compliance is being used in the Compliance screen, creditors will be checked and reflected here. There may also be a yellow warning box in the bottom left indicating the compliance status. In some cases you will need to select either the Valid or Not Valid radio button.
- Click the Select Document button to open DocMax and choose a document (most likely an invoice) for the payment.
- When an invoice is attached, it will be available to view this document attachment via Creditor Invoices > Options > Transaction History or in DocMax.
- The Bank Balance of the building is displayed for convenience for you to check, and if split banking has been enabled in the building, an additional box will display the balances for each fund as well.
- Tick the Pay Immediately box to immediately process the payment in EFT Manager (if not selected the payment can be processed from EFT Manager after clicking Save).
- The correct payment method should be selected automatically ('Pay by EFT', 'Pay by BPAY,), based on the creditor's settings in Creditor Maintenance, however in some cases, you may choose a different radio button manually.
- If the creditor uses BPAY and invoices entered have different CRN numbers, a CRN is required to be entered manually to match the invoices that are being paid. For invoices that have different CRN, they will need to be paid separately. Any CRN manually entered in this screen will override the CRN for any invoices paid.
- BPay payments utilise the StrataPay Payables service that have associated fees and charges, including a 0.55 cent transaction fee unless otherwise agreed. Please see the StrataPay Payables article for more info.
- To pay the invoices in full, do not change the amounts under the Amounts to Pay column.
- Click the Save button, and the payment will be processed, and depending on whether the building uses StrataCash or another bank:
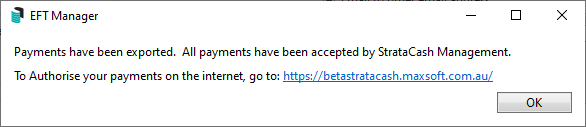
- If with StrataCash, the payment will be submitted and if accepted you will be informed that the "payments have been exported. All payments have been accepted by StrataCash Management. To authorise your payments on the internet, go to https://secure.stratacash.com.au/" . The payment will then be visible in EFT Manager in the Completed Batches.
- For any other banks, the payments will be created and EFT Manager will open, displaying the payments in a new batch.
- The transactions can be reviewed in Payments Management, in Local Transactions or Global Transactions. The Description of a one-off non creditor payment or Sundry EFT Payment can be edited in Local Transactions.
Internal & Remittance Advice Notes can be included on payments created from Payment Entry.

Part Payments
Invoices can also be part-paid in Payments Entry. This is for EFT/BPAY only. Users will need to have ‘Authorise Payment’ permission allowed in Security Setup. Payments created using ‘Pay Immediately’ are automatically marked as processed and added to their own EFT batch, and therefore do not need to be "printed" in Payments. For all SCM buildings, the payment will automatically be submitted to SCM online for authorisation; for all other banks, the EFT Manager screen will appear to manually authorise the payment.
- Search or select Payment Entry.
- In the Account field, either start typing the name of creditor's name, or click the ellipsis button [...], and select the required creditor.
- The Name field should automatically populate the with creditor's name.
- The Address field will populate if there is an address for the creditor in Creditor Maintenance.
- The Date field will automatically observe the Working Date in StrataMax.
- This date must be in the current month.
- The Amount is the full balance owing to the creditor, and the ABN is populated from the creditor in Creditor Maintenance.
- If compliance is being used, creditors will be checked and users will need to select either the Valid or Not Valid radio button.
- Click the Select Document button to open DocMax and choose a document (most likely an invoice) for the payment.
- When an invoice is attached, it will be available to view this document attachment via Creditor Invoices > Options >Transaction History or in DocMax
- The Bank Balance of the building is displayed for convenience for you to check, and if split banking has been enabled in the building, an additional box will display the balances for each fund as well.
- Select the Pay Immediately radio button to process the payment to EFT Manager stage immediately, or deselect to move to the EFT Manager stage when ready.
- The correct payment method should be selected automatically (EFT, BPay), based on the creditor in Creditor Maintenance.
- If the creditor uses BPAY and invoices entered have different CRN numbers, a CRN is required to be entered manually to match the invoices that are being paid. For invoices that have different CRN, they will need to be paid separately. Any CRN manually entered in this screen will override the CRN for any invoices paid.
- BPay payments utilise the StrataPay Payables service that have associated fees and charges, including a 0.55 cent transaction fee unless otherwise agreed. Please see the StrataPay Payables article for more info.
- Click the Don't Pay All button.
- Type in the required amount that needs to be paid for each line item.
- Review 'Pay Immediately' option and if selected click the Save button, and the payment will be processed, and depending on whether the building uses StrataCash or another bank:
- If with StrataCash, the payment will be submitted and if accepted you will be informed that the "payments have been exported. All payments have been accepted by StrataCash Management. To authorise your payments on the internet, go to https://secure.stratacash.com.au/" . The payment will then be visible in EFT Manager in the Completed Batches.
- For any other banks, the payments will be created EFT Manager will open, displaying the payments in a new batch.


External Payments
This option is for when a payment has been made outside of StrataMax. The payment is processed in Payments and will be visible in Bank Reconciliation until presented at the bank.
- Search or select Payment Entry.
- In the Account field, either start typing the creditor's or lot owner's name, or click the ellipsis button [...], and select the required creditor or owner/debtor.
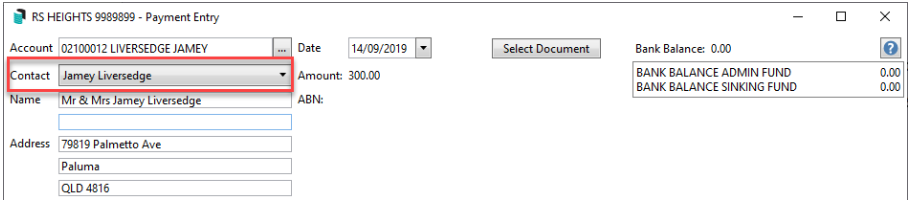
- If a lot account was selected, then from the Contact drop-down menu, a specific contact can be selected from that account, if there are multiple owners or an agent appointed.
- The Name field should automatically populate the with creditor's name.
- The Address field will populate if there is an address for the creditor in Creditor Maintenance.
- The Date field will automatically observe the Working Date in StrataMax.
- This date must be in the current month.
- The Amount is the full balance owing to the creditor, and the ABN is populated from the creditor in Creditor Maintenance.
- If compliance is being used, creditors will be checked and users will need to select either the Valid or Not Valid radio button.
- Click the Select Document button to open DocMax and choose a document (most likely an invoice) for the payment.
- When an invoice is attached, it will be available to view this document attachment via Creditor Invoices / Options / Transaction History or in DocMax.
- The Bank Balance of the building is displayed for convenience for you to check, and if split banking has been enabled in the building, an additional box will display the balances for each fund as well.
- Select the External direct debit, periodic payment, internet transfer, book radio button.
- The only payment method available for this type of payment is Pay by EFT.
- If you don't want to pay the full balance owing to the creditor, click the Don't Pay All button, then type in the required amount that needs to be paid for each line item.
- Click the Save button.
- A transaction type of Direct will be written to the general ledger, and the payment is "printed" in Payments. In Payments Management, the payment transaction will be recorded as a "DD” and shown as unpresented on the Bank Reconciliation.

Owner / Debtor / Agent Reimbursements
If the owner would rather receive a credit on their lot account, please create and save a credit invoice in the Invoice Entry screen.
This option should be selected when a lot owner or their agent has paid for goods or services and is owed money from the building. This option should NOT be used if an owner has overpaid their levies - please follow the steps in the Owner / Debtor Refunds section.
This section covers how owner reimbursements can be processed as one-off payments. Multiple line items can be entered under the same invoice number to accommodate multiple expense codes and provide more accurate financial reporting. If the payment requires approval prior to payment, then first set up the owner as a creditor in Creditor Maintenance, then create and save an invoice in Creditor Invoices to upload to the Invoice Hub.
- For the owner or agent to be reimbursed by EFT, their bank details should be entered in their contact card.
- Search or select Payment Entry.
- In the Account field, either start typing the owner's name and ensure the Lot A/c is selected, or debtor account code, or click the ellipsis button [...], and select the required account.
- From the Contact drop-down menu, a specific contact can be selected from that lot account, if there are multiple owners or an agent appointed.
- If the building is a Multi OC, then an Account Group drop-down menu will be visible to select the OC from, located in the top left of the Account Code List window.
- If the building is a Multi OC, then an Account Group drop-down menu will be visible to select the OC from, located in the top left of the Account Code List window.
- The Name field should automatically populate with the Contact name.
- The Address field will populate with the Contact address.
- The Date field will automatically observe the Working Date in StrataMax.
- This date must be in the current month.
- Optionally, you can click the Select Document button to open DocMax and choose a document related to the reimbursement.
- When an invoice is attached, it will be available to view this document attachment via Creditor Invoices > Options >Transaction History or in DocMax.
- The Bank Balance of the building is displayed for convenience for you to check, and if split banking has been enabled in the building, an additional box will display the balances for each fund as well.
- If the owner's bank details have been entered in the Roll, then the Pay by EFT radio button will automatically be selected.
- If you tick Pay Immediately the payment will process to EFT Manager or the SCM website if banking with SCM.
- Click the Add Reimbursement button, and additional fields will appear for this item.

- Select the Expense Account.
- The Date field will automatically be set to the same date as the Date field at the top of the Payment Entry screen, but can be changed if needed.
- Type in the Amount for this one item, and tick the No GST box if GST doesn't apply to this item. Otherwise the GST component will be displayed.
- The Description will automatically be populated with "Reimbursement", but can be changed if needed.
- The Invoice Number is for the number on the invoice paid by the owner.
- You can either click the Add Reimbursement button to add more invoices or line items to the same invoice number, or click the Save button to commit the payment.
- Continue to EFT Manager.


Owner / Debtor / Agent Refunds
If the owner would rather receive a credit on their lot account, please create and save a credit invoice in the Invoice Entry screen.
This section details how owner refunds can be processed as one-off payments using Payment Entry when a lot owner has overpaid their levies and has requested a refund from the building. This method can also be used if the refund is owed to an agent that is appointed to the lot in the Roll.
This option should NOT be used if an owner is owed money for goods or services that they have paid for - please follow Owner Reimbursements for that purpose.
If the payment requires approval on the Invoice Hub prior to payment, then Payment Entry should not be used. The owner or agent will first need to be set up as a creditor in Creditor Maintenance. Then enter an invoice in Creditor Invoices to upload to the Invoice Hub.
- In order for the owner or agent to be reimbursed by EFT, their bank details should be entered in the Roll in their contact card.
- Search or select Payment Entry.
- In the Account field, either start typing the owner's name or debtor account code, or click the ellipsis button [...], and select the required account.
- From the Contact drop-down menu, a specific contact can be selected from that lot account, if there are multiple owners or an agent is appointed.
- If the building is a Multi OC, then you will need to select the OC from the Account Group drop-down menu, located in the top left of the Account Code List window.

- If the building is a Multi OC, then you will need to select the OC from the Account Group drop-down menu, located in the top left of the Account Code List window.
- The Name field will automatically populate with the Contact name.
- The Address field will populate with the Contact address.


- The Date field will automatically observe the Working Date in StrataMax.
- This date must be in the current month.
- Optionally, you can click the Select Document button to open DocMax and choose a document related to the refund.
- The Bank Balance of the building is displayed for convenience for you to check, and if split banking has been enabled in the building, an additional box will display the balances for each fund as well.
- If the owner's bank details have been entered from the contact card, then the Pay by EFT radio button will automatically be selected, and you will have the choice of ticking Pay Immediately to proceed to EFT Manager once saved or the SCM website if banking with SCM.
- Click the Add Refund button, and additional fields will appear for this item.
- The Account field will populate automatically with the account that was selected at the top of the Payment Entry screen.
- The Date field will automatically be set to the same date as the Date field at the top of the Payment Entry screen, but can be changed if needed.
- Type in the Amount for this one item, and tick the No GST box if GST doesn't apply to this item.
- Select the Invoice Code, corresponding to the required levy fund (Admin / Sinking/Cap Works/Maint, etc.).
- You can click the Add Refund button to add more invoices or line items to the same invoice number or click the Save button to commit the payment. Continue to EFT Manager.
The Description of a one-off non-creditor payment or Sundry EFT Payment can be edited in Local Transactions.
Reverse Owner Refund or Owner Reimbursement
Use this process if an Owner Refund or Reimbursement has been processed and needs reversing. Remember if payment is still required, the transaction will need to be re-created after following the below steps.
- Search or select Payments Management.
- Using the filters, apply a date range if required. The Filter field can also be used to locate the debtor record (021) if needed.
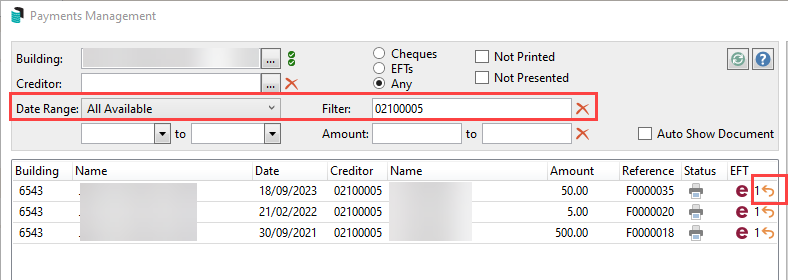
- From the list of records, select the appropriate transaction and click Reverse. The Payment and Invoice information will be available to reverse. Review and check this information and click Reverse to confirm.
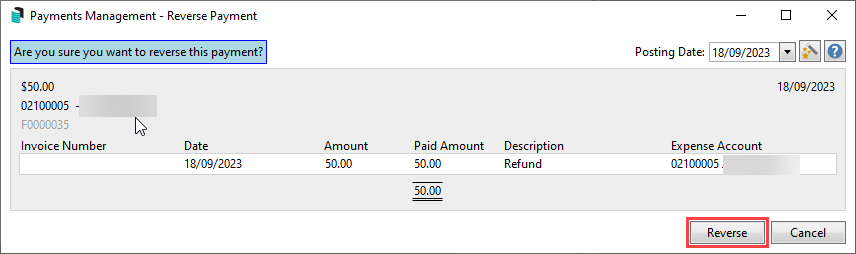
- This has now removed the payment, and either the Owner Refund or Reimbursement transaction can be created again if needed.


