 |
The instructions in this article relate to Insurance. The icon may be located on your StrataMax Desktop or found using the StrataMax Search. |
The Insurance screen is where you can keep a record of all the insurance policies the building has. Insurance claims are managed in Insurance Claims.
The insurance webinar, which covers Insurance and other features and functions in StrataMax that are used to manage a building's insurance, can be watched here.
It is recommended to setup the Dashboard to monitor expiring Insurance policies.
It is recommended that the details for insurance policies are up to date at all times since as this information is required for Certificates in all states.
Master Chart Insurance
Whilst each building has its own set of local policies, the Master Chart Building contains all the policies that have ever been created in StrataMax. Once new policies have been added to the Master Chart Building, they can then be added to the Base Building.
- Open the Building Selector and select the Master Chart Building link at the bottom.
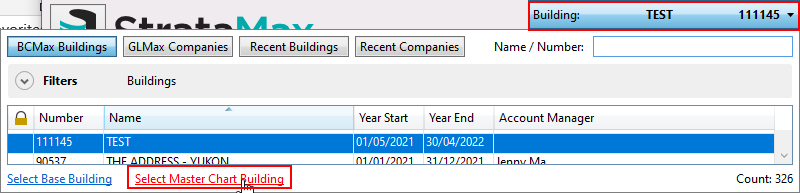
- Search or select Insurance.
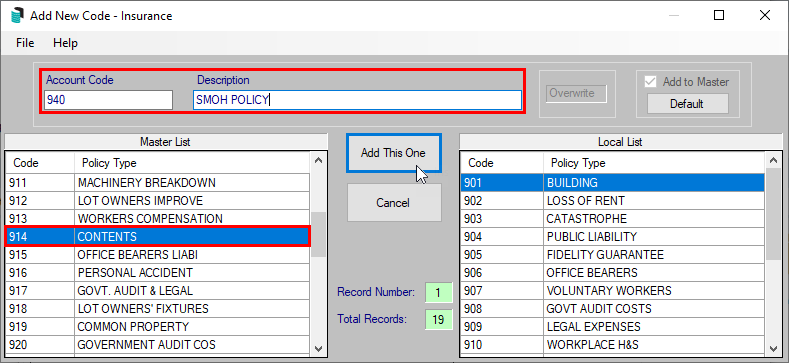
- Click Cancel when the insurance code selection screen appears and in the new screen, click New.
- The Add New Code window will appear.
- Type in a new Account Code and Description, and click Add This One.

Base Building Insurance
The insurance policies that are in the Base Building will be the default policies that appear in any new building that is created. When a new policy is added to the Base Building only new buildings created manually from that point onwards will include the new Base Building policies automatically.
- Open the Building Selector and select the Base Building link at the bottom.
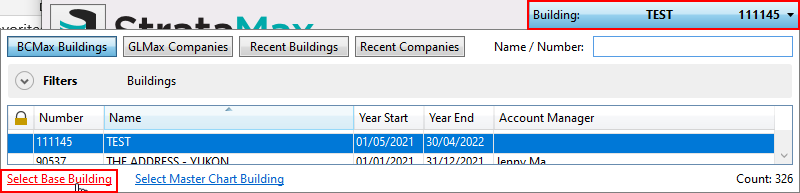
- Search or select Insurance.
- Click Cancel when the insurance code selection screen appears and in the new screen, click New.
- The Add New Code window will appear where you can either:
- Select a policy from the Master List on the left side and click Add This One.
- Type in a new Account Code and Description, and click Add This One.

Insurance | File Menu
Show Users
See Insurance Claims.
Customise
Use this menu to change the background colour of the Name column in the Insurance screen.
Change Building
Displays the Building List window so you can quickly get to the Insurance screen in that building.
View Edit Log
Displays a log of all the changes that have been made to the insurance policies in this building.
Exit
Closes the Insurance screen.
Insurance | Configuration
General
Always show code selection list at start
If ticked, the existing list of policies will always appear when the Insurance screen is opened.
Insurance
Insurance Expiry Test
Select which insurance policy the system uses to compare against the Working Date, and if the insurance has expired, a notification will be displayed on the top StrataMax banner when the building is selected. The default main policy is 901 BUILDING.
Note: Days Until Insurance Due to Expire as a Dashboard can assist with monitoring Insurance Due Dates.

Insurance Claims Register
Show Paid Claims
If set, paid claims will be listed in Insurance Claims and Insurance Claims Special.
Add an insurance broker and/or company (Certificate Applicants)
There are two ways you can add an insurance company or broker. Either whilst you are adding an insurance policy through the Insurance screen, which is covered below, or in Certificate Applicants, which is detailed in the corresponding article under the section 'Creating a new applicant'.
- Search or select Insurance.
- The Insurance Schedule will appear with all existing insurances if insurance policies have been set up previously or if they were set up in Base Building.
- Click Cancel, and in the new window, click the Ins. Companies button.
- When the Applicant Maintenance window appears with all the existing insurance companies, click the Cancel button.
- In the new window click the New button, then enter at least the following information:
- 3 Description: The company name.
- 4 Salutation 1: This will copy the contents from the cell above, but you may need to click the Switch button to re-arrange the text.
- 5 Address (1): This should be the name of the insurance broker.
- 6 Address (2): This is the first address line of the insurance broker.
- 7 Address (3): This is the second address line of the insurance broker.
- 13 Business Category: Double-click the cell then click the drop-down arrow, which displays a list. Double-click the Insurance option.
- Click the Save button.
- Click the Exit button.
Add an Insurance Policy to a Building
Follow these instructions to enter a new Insurance Policy on an existing building, or for a brand new building just taken over.
- Search or select Insurance.
- The Insurance Schedule will appear with all existing insurances if insurance policies have been set up previously or if they were set up in Base Building.
- Click Cancel and in the new screen, click New.
- The Add New Code window will appear where you can either:
- Select a policy from the Master List on the left side and click Add This One.
- Type in a new Account Code and Description, and click Add This One.
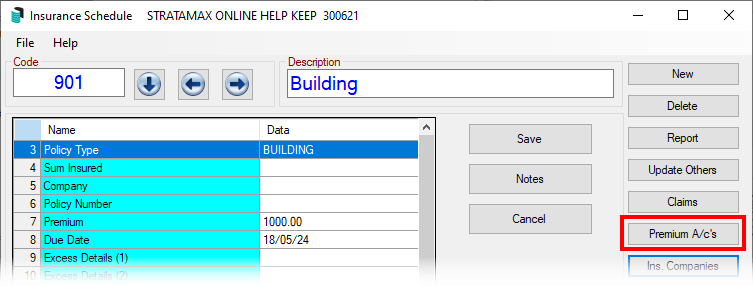
- Back in the Insurance Schedule window, you will need to enter the details for at least fields 5 Company and 8 Due Date, but for reporting and certificate purposes it's recommended to enter any details available on your insurance documents:
- 3 Policy Type: This will update automatically with the details from the Description field.
- 4 Sum Insured: This is a free text field with a 30 character limit.
- 5 Company: Double-click the field to open the Select Applicant window and chose the insurance company.
- 6 Policy Number: This is a free text field with a 30 character limit.
- 7 Premium: This will be a different $ amount for each policy type.
- 8 Due Date: Double-click and you can either type in the date, or click the drop-down arrow to select the date from the calendar.
- 9 Excess Details (1): This is a free text field with a 60 character limit.
- 10 Excess Details (2): This is a free text field with a 60 character limit.
- 11 Broker/Agent: A free text field with a 30 character limit, which may be populated automatically if the company already had these details inserted.
- 12 Broker Agent Address (1): A free text field with a 30 character limit, which may be populated automatically if the company already had these details inserted.
- 13 Broker Agent Address (2): A free text field with a 30 character limit, which may be populated automatically if the company already had these details inserted.
- 14 Telephone: A free text field with a 15 character limit, which may be populated automatically if the company already had these details inserted.
- 15 Facsimile: A free text field with a 15 character limit, which may be populated automatically if the company already had these details inserted.
- 16 Last Date Paid: Double-click and to either type in the date or click the drop-down arrow to select the date from the calendar. This can be updated automatically after Premium Accounts have been set up, and a creditor invoice is saved with that premium account as the expense code.
- Bear in mind that this may not always be the date the insurance premium was paid, but merely the date the invoice was processed. This could vary depending on the timing and frequency of processing of payments in your office, especially if payments are subject to approval on the Invoice Hub.
- 17 Comments: A free text field with a 30 character limit.
- 18 Account Group: This field can only be edited if Account Groups have been set up for this building. Double-click and use the drop-down arrow to display the current available account groups, and select the one you need.
- Once all details are entered, click Save and Exit.

Insurance | Notes
As with many other areas of StrataMax, the Insurance screen also has this feature for individual policies. Notes can be added, edited, or deleted creating a new policy or editing an existing one. Each policy will have its own file bearing the account number with a .NOT extension (e.g.: 901.NOT for BUILDING insurance) containing the text, which may be viewed and printed in Notepad.
To learn more about the Notes screen, check out our main Notes article.
If a policy has any notes, the Notes button will have an icon on it.

Insurance | Update Others
This button enables you to copy the details from the building's primary insurance policy/account (901 BUILDING by default) to any or all of its other policies. The intention behind this features is to save time on data entry by effectively copying information from certain fields in the main policy to the same fields in the other policies.
By default, 901 BUILDING is the primary insurance account for every building. This means it's the insurance policy that the system observes when using the Update Others function. However, it can be changed if you prefer:
- Search or select Insurance, and click Cancel if the list of policies appears.
- Click the Update Others button.
- In the Insurance Link window, in the Linked Accounts section on the left, select the account you want to be the primary.
- Click File > Set Selected Account as Primary.

Not every field in the policy can be linked, purely because some of the fields need to be unique. The fields that aren't available for linking are:
- Policy Type: Building, Machinery Breakdown, Public Liability, etc.
- Sum Insured: This will be different for each policy type.
- Premium: This will be different for each policy type.
Once policies have been updated with the Update Others feature, it cannot be reversed automatically. You will need to edit each of the policies manually.
To use the Update Others feature, follow these steps:
- Update the BUILDING insurance policy with all the necessary details and save (see the above section for instructions).
- Click the Update Others button.
- In the Insurance Link window, in the Linked Accounts section on the left, check that all policies you want to update are present.
- The policy at the top of the list should be the BUILDING policy, containing all the necessary details to copy the other policies.
- We recommend clicking File menu at the top and selecting Set Selected Account as Primary to ensure that the BUILDING policy is retained and used for the updating.
- You can add or delete any policies from this list by clicking the appropriate buttons at the bottom.
- In the Linked Fields section on the right, tag each of the fields you want to update.
- Click the Update Linked A/c's button, then Close.

Set up a Premium Account
Premium accounts in the Insurance screen are designed to link any creditor invoices for insurance to an insurance policy. This link can be set globally for your entire portfolio, or locally per building, and you can have multiple links between different policies and expense codes. The results of this link are:
- A notification within the Creditor Invoices screen, which appears whenever the linked insurance expense or refund code is used. The notification will prompt you to confirm the insurance premium amount, date paid and due date.
- When receipting an insurance refund through the Bank Reconciliation, a notification appears, prompting to chose an insurance claim to finalise.
- Search or select Insurance.
- Click the Premium A/c's button on the left side.
- Select the Global or Local radio button.
- Global is selected by default.
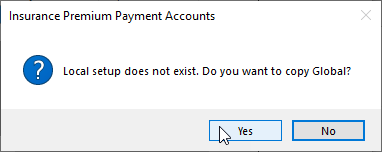
- If selecting Local for the first time in the building, you will see this notification. You can chose whichever you prefer:
- In the Insurance Premium Payment Accounts window, click the Add button.
- A new window will appear with a red background, containing a list of all the insurance policies. Double-click the policy to link.
- Another window with a teal background will appears and has a list of all your account codes. Double-click the expense account you want to link to the insurance policy.
- The final window with a green background will appear, containing all your account codes again. Double-click the income code that refunds will be posted to.
- Continue to add more links by repeating the above steps, or close the Insurance screen.


Insurance Premium Creditor Invoices
- Search or select Creditor Invoices.
- Enter all required details as usual, ensuring you use the expense account that is linked in the Insurance > Premium A/c's menu, then click Save.
- When the prompt appears:
- click Replace Premium if you want to replace the existing premium amount with the one in this creditor invoice.
- click Add to Premium if you would like to add the paid figure to the existing premium amount.
- click No Action if you do not want to update the insurance.
- If the Insurance Update window appears, modify the information if required and click OK.
Now if you open Insurance, and look at the corresponding policy, you will notice that the Premium, Due Date, and Date Last Paid cells have all been updated with the info from the creditor invoice.
Insurance Refunds
Now that the Premium Account link has been set up, you can receipt and link insurance refunds to insurance claims. Check out this article to learn how.
Attach an insurance document (policy or certificate of currency)
From within the Insurance screen, a policy document can be added for easy reference. This can be any insurance related document like, and need to be added through DocMax first. You can also have a separate document for each insurance policy type if required - one for building, contents, etc., and another for Public Liability, for example.
- Add the insurance policy document to DocMax, ensuring that the correct building is selected and the Category is set to ‘Insurance’ .
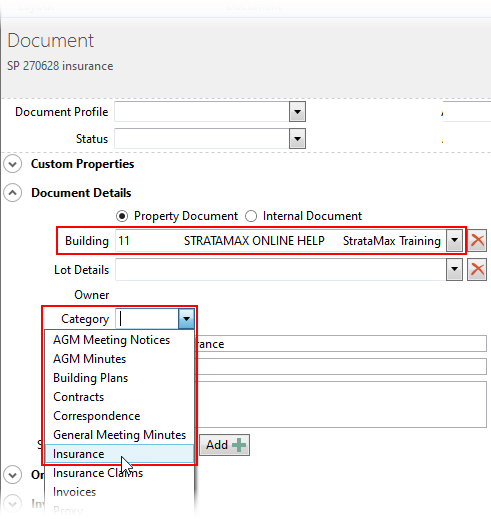
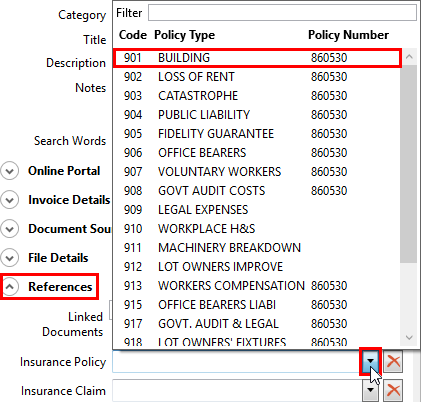
- And Under the References section, select the 901 BUILDING policy (or other policy of choice) from the drop-down.


Viewing the Insurance Policy
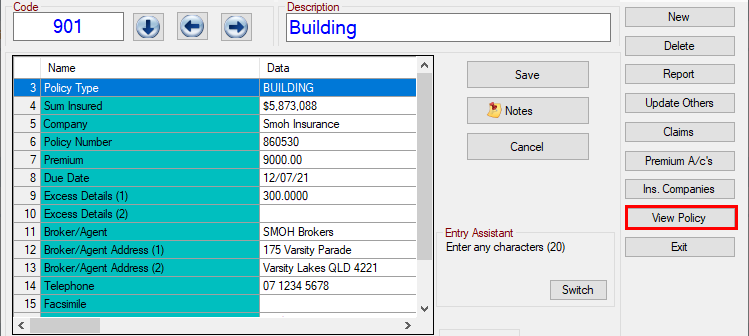
- Search or select Insurance and double-click the required policy.
- In most cases the 901 BUILDING policy is the main policy for the building, but it can be any policy that has a document attached to it.
- Click the View Policy button.
- The DocMax Document View window will display all of the DocMax details entered and a preview of the document.

Edit or Delete Insurance Information
Edit (Update Insurance Policy)
- Search or select Insurance.
- Select the required policy and click OK (choose code 901 for updating all policies).
- Make any changes required (see the above section for details) and click Save and then Exit.
- If this insurance policy is linked to others, click the Update Others button.
Delete
- Search or select Insurance.
- Select the required policy and click Delete.
- Click Yes to both confirmations.
Insurance Reports
In StrataMax, there are two insurance reports that can be produced. The local insurance report and the report produced from the Search Insurance screen, both are available in either PDF or Excel format. The report produced in the Insurance screen is limited to the building selected however the extract produced in Search Insurance has the option to include several or all buildings. The insurance report also has multiple templates to chose from.
Local Insurance Report
- Search or select Insurance.
- The Insurance Schedule will appear with all existing insurances if insurance policies have been set up previously or if they were added from the Base Building when the building was created. Click Cancel.
- In the top left of Report Setup screen, there are three radio buttons to chose from:
- Screen: Produces an on-screen preview of the report.
- Printer: Prints the report without any preview.
- Excel: Exports the report to Excel.
- In the top right, you can chose the template you want by clicking the top ellipsis [...] button next to Template.
- Under the Template selection ellipsis, there is also an ellipsis button to chose a Printer, how many copies of the report you would like to print, and the paper source.
- Under the Limits section, double-click the blank cell under the Limit Data header, and in the Tag as Required window, tag the required insurance policies to include in your report, and click OK.
- Each policy tagged will appear on the report, even if it doesn't contain any data.
- Click OK, and depending on your selection in step 3, the report will either appear on screen, or print.
Global Insurance Report
Use the Search Insurance instructions to create a global report.
