 |
|
Using Journal Preparation ensures that your journals balance and that you have a clear audit trail and offers a simple method of entering debits and credits in one journal set. An archived record is available for all journals done through Journal Preparation along with the 'Reason', 'Description', 'User Name' and the 'Date' posted. Note that each journal entry will be allocated a reference number, which will assist in keeping a clear audit trail. This number will appear in the general ledger's 'Extra Details' column.
Creating journals maximises multi-window functionality, and any newly created or added accounts that are added via Account Maintenance will be available to use whilst also having Journal Preparation and processing.
If there are journal entries that are posted to the general ledger and require a description change, this can be done via Local Transactions.
To view the Journal Preparation video, including alternative options, click here.
The Journal Preparation icon is available in the Current Year only. To enter journals to the Old Year, use a date from the Old Year Financial Year.
Adding a Journal Set
004/005/ 401/402 entries are systematically updated when creating a set therefore posting to these account will cause issues.
When posting a journal between two balance sheet accounts in Journal Preparation, the Transaction Fund Breakup will be created with the fund set to the first fund (usually Administrative). If entering journals to an investment account or other adjustments which require a different fund, this can be adjusted by setting the relevant fund in the field titled Fund. Profit and Loss accounts will automatically display the fund required as the fund associated to the account code. For example 101 will default to Administrative Fund. Assigning the fund when selecting a balance sheet code will cause an error if there is a fund mismatch.
- Search or select Journal Preparation from the Current Year.
- Click Add Journal Set.
- Enter the Date and Reason for the journal set. (Enter Old Year Financial Date if journal required to post to the Old Year - once an account is selected, the balance of the selected account will appear reflecting the Current Year's balance or the Old Year's balance, depending on the journal date).
- Tick Auto Reverse if applicable.
- Auto Reverse allows reversal journals to be created automatically in the next month, creating opposite entries. The transaction will be written to the general ledger on the first day of the following month. Auto Reverse is commonly used in the current month or old year (depending on when the building's year-end is) to assist with Financial Year End adjustments for accruals and prepayments.
- Click Add, then select the account code.
- Enter the amount into the debit (DR) or credit (CR) field. If the building is registered for GST, tick No GST as required and from the drop-down list, select the appropriate GST status.
- If selecting a balance sheet code, select the Fund the transaction relates to.
- Enter the details and explanation, which will be reported on the transaction list.
- Click Add and repeat the above steps to complete and balance the journal. The New Account Balance is a helpful way of checking that the two sides of the journal have been entered correctly.
- Click Save. Saving will allow you to return to the journal set later. Once the journal set balances to 0.00, the Process button will be available to process the transactions.
Account balances depend on the GST style selected. GST charges will not be reflected in the account balance where the Gross style is set.

If you receive the message 'Processing failed. See error log for details, ' you can refer to the Log Viewer.
Re-occurring Journals
A Journal Set can be created for recurring transactions by setting a Frequency, ensuring the journal is processed automatically at the specified interval.
For example, if Common Property Lawn Mowing is completed by Lot 1 each quarter and agreed to offset their levies, a journal can be entered to process on a nominated date, such as the 10th of each quarter.
The Journal Set will be processed overnight during the scheduler tasks. A Journal Set can also be triggered to process when Financial Statements are produced with Post Standing Journals ticked or manually processed via Journal Preparation by clicking Process.
If a journal should be skipped for the next scheduled period, ticking Hold in Journal Preparation will prevent the Journal Set from being posted.
- Search or select Journal Preparation from the Current Year.
- Click Add Journal Set.
- Enter the Date and Reason for the journal set (enter Old Year Financial Date if journal required to post to the Old Year - once an account is selected, the balance of the selected account will appear reflecting the Current Year's balance or the Old Year's balance, depending on the journal date).
- Locate the Frequency dropdown and select one of the following options:
- Once Only
- Weekly
- Fortnightly
- Monthly
- Month End
- Quarterly
- Half Yearly
- Annually
- Enter a Process Until date.
- Click Add, then select the account code.
- Enter the amount into the debit (DR) or credit (CR) field. If the building is registered for GST, tick No GST as required and from the drop-down list, select the appropriate GST status.
- If selecting a balance sheet code, select the Fund the transaction relates to.
- Enter the details and explanation, which will be reported on the transaction list.
- Click Add and repeat the above steps to complete and balance the journal. The New Account Balance is a helpful way of checking that the two sides of the journal have been entered correctly.
- Click Save. Saving will allow you to return to the journal set later. Once the journal set balances to 0.00, the Process button will be available to process the transactions.

Process a Single Journal Set
Once a journal set has been entered and saved and the balance returns to $0.00, it can be processed. To process a single journal set, complete the following.
- This screen will confirm ‘Debits’ and ‘Credits’ from the summary screen. This can be a simple way of identifying the balance of a singular journal set.
- From the saved records, highlight the required journal set. From the ‘Status’ column, click on the ‘Single Process’ (blue arrow) button.
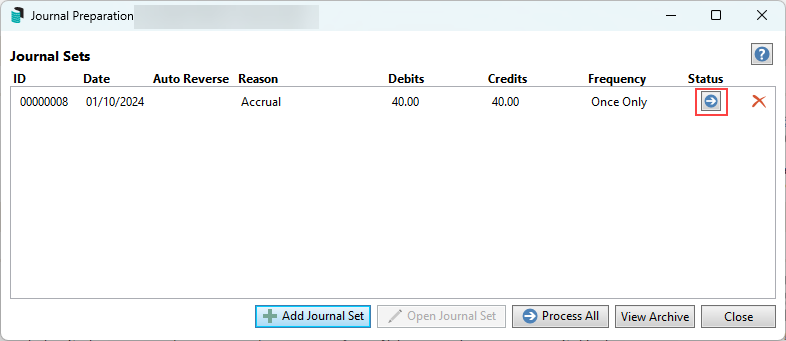
- To check the entries, click View Archive if required or go to Local Transactions to confirm the posted transactions.

If you receive the message 'Processing failed. See error log for details, ' it refers to the Log Viewer.
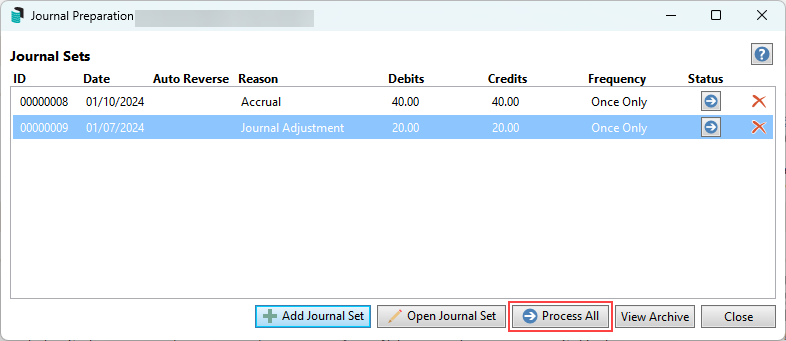
Process All Journal Sets
If multiple journal sets are available for processing and all entries have been reviewed and are ready for processing, this can be completed with one action.
- Search or select Journal Preparation.
- This screen will confirm ‘Debits’ and ‘Credits’ from the summary screen and can provide a simple checkpoint if the journal sets are ready for processing. If they have been checked and ready to process, from this window click Process All.

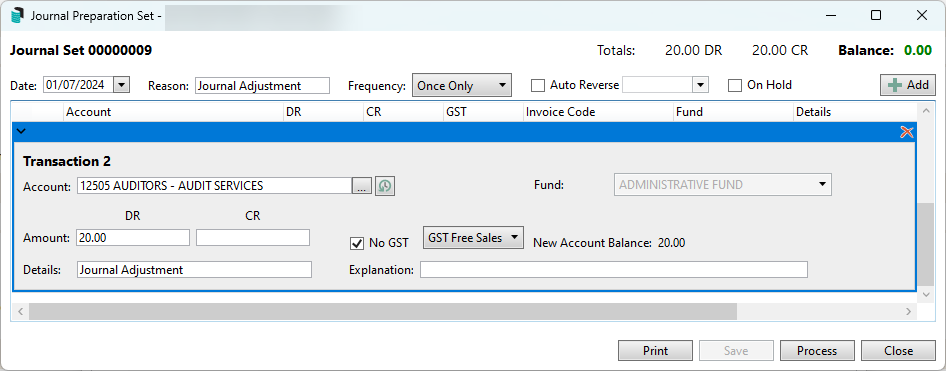
Edit a Journal Set
Any journal set that has been saved but not yet processed can be opened and edited as necessary. However, suppose the journal set has already been processed, and you later find it was incorrect (wrong description, not the right GST setting, wrong amount, etc.). In that case, you will need to process another journal set to undo the transactions of the previous journal set first, then process a new journal set with the correct details this provides transparency and a full audit trail and enhanced reporting. Once opened, the journals can be added, edited or deleted.
- Search or select Journal Preparation.
- From the existing saved journals, click Open Journal Set.

- Click + Add to the existing journals to add to the set, select a transaction and click the red cross to delete an entry or highlight an existing entry to edit and amend the information as needed. If the set needs to be a recurring journal, set the Frequency. It can also be set to Auto Reverse (date should only apply for specific date posting) and placed On Hold if required.
- Once the journal set balances to $0.00 the journal set will be available for processing by clicking Process. Alternatively, the journal set can be re-saved with Save or Print to print a copy of the journal set.


Deleting a Journal
If the unprocessed journal set is no longer required or needs to be deleted, this can be managed by Journal Set or by single entry items. The below information will detail both methods.
Deleting or reversing a processed journal is not possible. If a journal was processed in error, then a new journal will need to be processed to correct that.
Delete a Journal Set (Unprocessed)
- From the summary screen, highlight the required journal set and click Delete (red cross button).

Delete a single journal entry
- Search or select Journal Preparation.
- Open the required Journal Set from the summary window by highlighting it and clicking Open Journal Set.
- From the entries, review and highlight the entry that needs to be removed, then click Delete (red cross button).
- Based on the requirement for deleting the entry, re-enter as required.
- Click Save to save the entry for later or Process if the journal set balance comes to $0.00. If the set needs to be held for later processing, tick On Hold, which will prevent the set from being posted.

View Archive
Using Journal Preparation allows for archives of each set to be available via this area. The archive will include columns of information confirming the posted entries and details relating to the 'Journal ID', Reason, Posting Date, Auto Reverse and User Name information. The archive window will give all sets of transactions for a building, which can be printed off in selected batches or all entries, depending on requirements.
- Search or select Journal Preparation.
- From the summary screen, select View Archive.
- Using the tag column, tag the required entries by selecting or Ctrl +A to tag all.

- Click Print Selections. From the Report Setup window, ensure the output method is set correctly. If necessary, select Excel to export, Screen for a PDF version, or Printer to print to the printer set in this window.
- Click OK to report the archive. If multiple sets were included, these will be included in one report.


Auto Reverse entries
Using Journal Preparation, the Auto Reverse function can occasionally assist with recording transactions in the year that they apply to. For example, an accrual entry will expend an item in the old year, and a prepayment will remove the expense from the old year. Managing Insurance Premiums is a typical process that can also be done using the Pro-Rata option in Creditor Invoices. The other common type is accrued income, which will assist in creating transactions for forecasted income not yet received and that belongs to the prior year. The result of these entries will include an entry to the income or expense account (most common), with the opposite entry sitting on the balance sheet for either the prepayment or accrual. It will also create the opposite entry in the current year and post it to the same account codes.
This can also include a specific date if the entry must be posted on that date. If the date used is on or before the current month, the system will post the batch of auto reverse entries simultaneously, but may still require the Financial Statements / Post Standing Journals option to be ticked (as outlined below)
Example: If a building has a year-end of 28/02, and today is the 28/01, the auto reverse entry will occur on the 1st of the next month. Use the date field to set this to 01/03 to allow it to reverse in the current year.
Accrual
- Search or select Journal Preparation from the Current Year.
- Click Add Journal Set.
- Enter the Date (Old Year date) and Reason, and select Auto Reverse. If there is a specific date that the auto reverse entry should post, enter the date field.
- Click Add and select the Account from the list. Enter the Amount into the debit (DR) column to adjust the balance. Adjust the GST setting if needed.
Recommended to select the expense item and enter a debit entry first. Check the New Account Balance field to ensure the balance is correct.
- Enter some Details for the transaction list and an Explanation if desired.
- Click Add again to add the balance sheet entry. Enter the opposite entry.
Recommended for a liability account. - If multiple entries are required, click Add to repeat and select / enter the required field information.
- Click Save to save the set, and click Process to post the transactions to the accounts. Or, if needed, tick On Hold to place the set on hold for later processing. This will need to be removed when ready to process.
- Click Close, then Close to exit. These entries will remain in the Journal Preparation window until the Standing Journals are processed with the below.
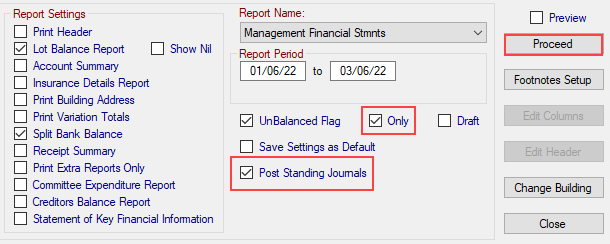
- From within the Current Year, run Financial Statements tick Post Standing Journals and Only, clicking Proceed.


Example:

Prepayment
- Search or select Journal Preparation from the Current Year.
- Click Add Journal Set.
- Enter the Date (Old Year date) and Reason and select Auto Reverse.
- Click Add and select the Account from the list. Enter the Amount into the credit (CR) column to adjust the balance.
Recommended to select the expense item and enter a credit entry first. Check the New Account Balance field to ensure the balance is correct.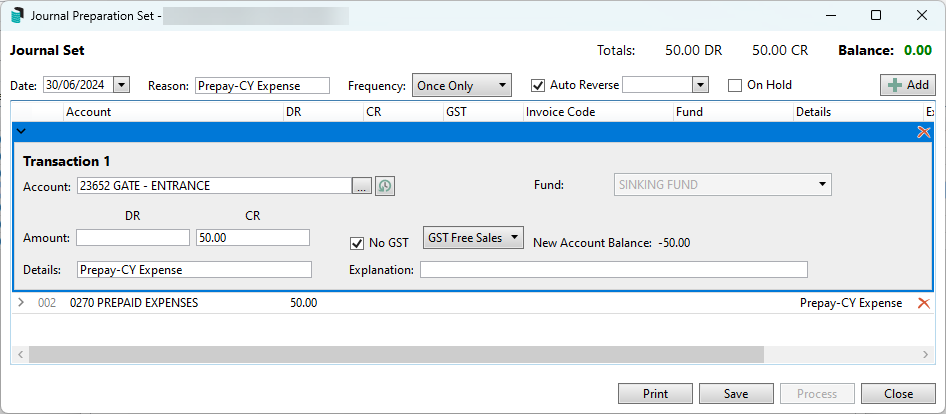
- Enter some Details for the transaction list and an Explanation if desired.
- Click Add again to add the balance sheet entry. Enter the opposite entry.
Recommended for an asset account. - If there are multiple entries required, click Add to repeat and select/ enter the required field information.
- Click Save and click in the large white box area to activate the Process button and click.
- Click Close, then Close to exit.
- From within the Current Year, run Financial Statements and tick Post Standing Journals and Only and select Proceed.


Example:


Journal Preparation | FAQ
1. The Journal Preparation icon is available in the Current Year. To enter journals into the Old Year, access Journal Preparation from the Current Year and enter a date within the Old Year Financial Year.
If Audit Done is ticked in Building Information for the prior year, journals will not post for an Old Year Date.
2. Can a journal be edited once it has been processed?
There is no longer an edit function for a processed journal. Another journal set will need to be entered to cancel the original journals or further journals can be entered to make adjustments. This allows for transparency on the accounts and an audit trail. We are in the process of assessing the development of a full reversal function and will notify via release notes. If the Tax Code or Details require editing this can be completed using Local Transactions.
