 | The instructions in this article relate to Work Orders in TaskMax. The icon may be located on your StrataMax Desktop or found using the StrataMax Search. |
When a work order is required to be issued and the contractor to do the work is known, the job can be entered and issued immediately. This article covers how to create, issue, and finalise Work Orders.
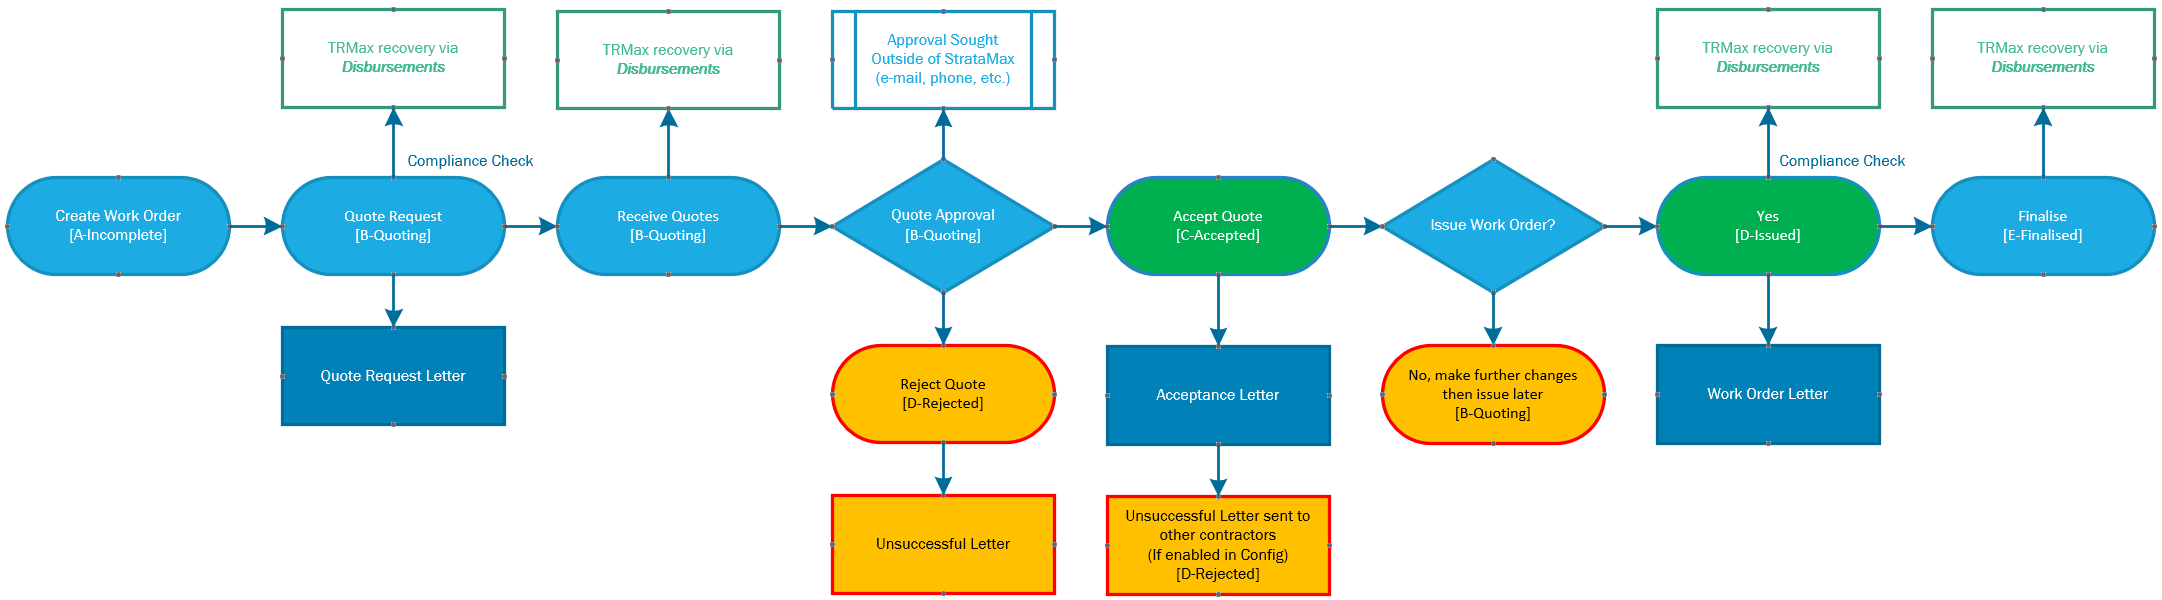
TaskMax Work Order Lifecycle
Create and Issue a Work Order
This section covers the different areas of the work order entry screen, each area with it's own header below.
- Remember to set up your templates first before creating and issuing Work Orders.
- We recommend checking that Preview Orders is ticked under the File menu. This will allow you to review the content of the Work Order before printing or sending.
- Search or select TaskMax and click the New button.
- Select a building from the building list, and click OK.
Originator
This is the person who has logged the maintenance call, or if it is the Committee it can be left blank. This can be their physical address, email address or both. TaskMax will print the letter if the physical address is selected, as long as the System Setting 'Use Letter for Originator' is ticked.
- When the Job Entry screen appears, enter the Originator details. This can be done in various ways:
- Manually type the appropriate details in each field: name, address, phone numbers, fax, email.
- Click the List button and select an Originator from the table. These are Originators that have been entered and used previously.
- Click the Roll button and select a lot owner.
- Tick the box next to the preferred contact method for the Originator.
Contact
This is the person the contractor can contact whilst on site.
- Enter the Contact details using one of these options:
- Click the Originator button to copy the Originator details above.
- Manually type the name in the top field and phone numbers in the other fields.
- Click the List button and select an Contact from the table. These are Contacts that have been entered and used previously.
- Click the Roll button and select a lot owner.
- Tick the preferred contact method, which will be the only one that displays on the work order.
Invoice
It's not recommended to fill in any details in this section if you are using DocMax to enter invoices, and then processing them via the Creditor Invoices screen.
Job
- Type in the Subject field in the Job section, or select from the subject list by clicking the ellipsis [...] button. These will be the details for the invoice.
- In the large field beneath the Subject, type in the job details.
- Click the Property Affected field and the Common Property or Select Lot Account button.
- The Edit Property List button will open the Property Details screen.
- Manually type the Location at Site if required, and tick the Urgent box if the work order should state the job is urgent.
- Start and Finish dates can be typed in manually, or by double-clicking each field, a calendar prompt will appear for selection.
Contractor
If quotes need to be requested, these steps should not be done yet. Please read the TaskMax Quotes article for more info.
- When ready, click the List button in the Contractor section to open the Account Code List.
- Show Preferred Creditors Only tick box can be ticked only to display preferred creditors.
- Click the Master Chart button to display all creditors in the StrataMax Master Chart.
- Click the green + button to add a new contractor contact.
- The contractor's contact can have a separate email address if required to send the work order. If this is not needed, the email address for all purposes will be used.
- The contractor's contact can have a separate email address if required to send the work order. If this is not needed, the email address for all purposes will be used.
- Click the Issue Job button.
- The work order will be issued depending on the preferred contact method (emailed, faxed, or printed).

Other
- Insurance Claim: If this box is ticked after clicking the Issue Job button, the Insurance Claims Register will appear, automatically creating a new insurance claim. See How to create an Insurance Claim for more info.
- Service Fee: Tick to automatically enter the configured amount into the Service Fee field in the Invoice area. See the Invoice section above.
- Bill Lot Owner: Tick to select the owner who will be charged the Service Fee.
- Notify Manager: When ticked, the account manager will also receive a separate copy of the work order via email. The email address used will be whatever is entered into the Account Manager Edit screen.
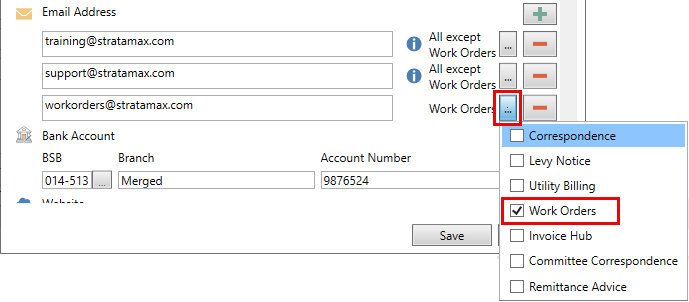
- Email Copy to: Click the field to add any additional recipients who need to receive a copy of the work order. Please note that the Email Copy to field is available for Work Orders only.
- Tag the recipient, then click OK to select that recipient.
- Click the New button to add a new recipient.
- Click Add Office Bearer to select a committee member in the building.
- Tag the recipient, then click Contact to open a window with various contact methods (email, phone, SMS).
- Tag the recipient, then click Edit to edit the recipient's details.
- Tag the recipient, then click Delete to remove the recipient.
- Don't Print Order on Issue: Tick to not print or email the work order when the Issue Job button is clicked.
- Extra Attachments: Click to add additional files from Windows or DocMax.
- The attachment is just for the purposes of sending files with a quote request or work order, so the extra attachments will not display when opening the work order record again, and will need to be attached each time.
Issue Job
- Click the Issue Job button.
- If the work order appears on screen in a preview window, you must click the Printer button in order for the work order to be issued correctly, and for the status to update. It will also ensure the contractor receives the work order according to their contact preferences, in their Creditor Maintenance record. If the order is previewed and closed this will not finalise the sending process for creditor.
Change the Job Manager
- Click the ellipsis [...] button next to the Job Managed By field in the top right.
- In the new window, select the Job Manager, then click the Edit button to enter the email address.
View Issued Jobs
Please note that work order that have a status of D-Issued cannot be amended or changed. In these cases the work order should be cancelled, where you will be prompted whether or not you would like to make a new order from the cancelled one.
- Search or select TaskMax.
- In the Options section, mark the required settings:
- All to show all buildings or This Building to show records for the current building.
- All to show all jobs for all users or Mine to show only jobs logged by the user.
- In View Status, choose the required view status.
- Current to view all active jobs – Incomplete, Quoting, Held Payment, Issued.
- Periodic to view periodic work orders.
- Finalised to view completed jobs.
- Future to view jobs setup for future dates.
- Cancelled to view cancelled jobs.
- Current & Finalised to view all active and complete jobs.
- The jobs for the selections that have been made will appear. Further filtering can be done and reports can be printed if required.
- In the list of work orders click in the column to filter.
- Right-click the record:
- Select Filter By: (your selection).
- Repeat filter steps as required.
- Right click on any record, and click Quick Report.
- A report will then be generated with the filter settings that are in place. The filters can then be removed.
- Right click on any record and select Clear Filter.
Please note that for work orders issued with attachments, the Communication Log will confirm both the work order and the attachment(s) sent to the contractor.
Work Order Notes
Notes can be added to any work order for internal reference only, so these notes will not print on any work orders or reports. When notes are added to a work order, they can be flagged as a major issue by clicking the Toggle Major Issue button.

Back in the main TaskMax screen, the View Major Notes will be displayed at the bottom, beneath the list of Work Orders or Quotes.

Finalise Work Order
Once the job has been completed and the invoice is received, the job can be finalised. If invoice details are required to be entered to create creditor invoices via TaskMax, then follow the below steps. However, if creditor invoices are first saved to DocMax, then processed in Creditor Invoices, you can select and finalise the Work Order there; see the information in the Select Work Order (ellipsis) guide.
- Search or select TaskMax.
- Click the Change Building if required.
- Select the job and click Open.
Creditor invoices can be configured to automatically be created from TaskMax once the invoice details have been entered in the job. Invoice Date for finalised Work Orders are not restricted to being within the current or next month's only (i.e. backdated entries are OK). However, now the invoice date is optionally restricted to being less then the Next Current Month End. This is to prevent any accidental data entry of incorrect future dates.
This can be disabled as an optional System Setting. The two system settings that should be reviewed and selected include Restrict Invoice Date when Finalising WorkOrder <=Current Month End +30 days), and Auto Create Creditor Commitments. Review the below steps to include the Invoice details.
- In the invoice section, click the box and select the expense code. Click OK (single entry).
- If a multi-expense item, right-click > Set to multi expense code and choose the first expense code.
- Enter the amount - if a quoted job, compare the quoted amount > OK (for all entry types).
- If selected for multi-expense, repeat for the next expense code and enter the amount and details.
- Enter the Invoice Number (for single entry).
- Enter the date (for single entry).
- The details will be copied from the Subject field of the job - edit as required (for single entry).
- Enter Y to the question OK to Pay (for all entry types).
- Click Save and Yes or Finalise.
- If Auto Create Creditor Commitments is ticked in File > Configure, the balance will be waiting in Payments.
- The status of the job will now be E-Finalised.
Finalise Old Work Orders
There may be instances where Work Orders or Quotes have been started, but not completed or sent. These old jobs can be closed.
- Search or select TaskMax.
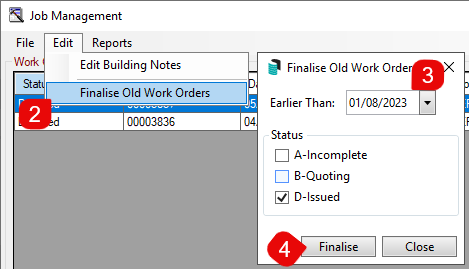
- Select Edit > Finalise Old Work Orders.
- Select a date, only jobs that fit the status criteria below and are older than this date will be finalised.
- Click Finalise.
- A message will appear to indicate how many jobs will be affected - click Yes to confirm.
- If there are no outstanding jobs that match the criteria, a pop-up will indicate that.

Understanding Finalised Work Orders and Service Fees
Please be aware that the below service fees will only be processed if the appropriate settings have been configured in File > Configure > Service Fees Setup for TRMax and GLMax processing.
We recommend using Disbursements to set up recoveries for work orders and quotes.
The account code that is selected should be the same as the code that the recovery code is linked to, so when the month end process is undertaken the amount is contra’d off. The following transactions are processed in the general ledger when the work order is finalised:
| Creditor Account | CR Amount of invoice |
| Expense Code | DR Amount of invoice |
| Service Fee Code | CR Service Fee amount |
| Expense Code | DR Service Fee amount |
When a TRMax recovery is recorded, the following transactions are processed in the general ledger:
| Strata Manager Creditor | CR Service Fee amount |
| Service Fee code | DR Service Fee amount |
Cancel Work Order
Only jobs that have a status of B-Quoting or beyond can be cancelled. Jobs with a status of A-Incomplete can be deleted.
When a work order is cancelled, TaskMax is designed to automatically send cancellation letters to contractors. Therefore, we recommend enabling the Preview Orders setting under the File menu.
- Search or select TaskMax.
- Locate the job in the list and click the Open button to open the job details.
- Click the Cancel Order button.
- Depending on the status of the job, a prompt will appear asking you to confirm the cancellation.
- After clicking 'Yes' to the confirmation, you will need to type in a reason, and then click OK.
- Depending on the status of the job, a variety of cancellation letters will be displayed on screen.
- For example, if quote requests have been sent to 3 different contractors, and none of them have been received, 3 different 'Quote Cancel-Sent' letters will be displayed.
- You may choose to not send these letters by simply closing the preview window, or click the printer button to print or email the letter (this depends on what option is selected for each contractor in the Issue Work Orders by field in Creditor Maintenance).
- You will then be asked 'Do you want to make a new order from this one?'.
- If you click Yes, a new job will be created with a status of A-Incomplete, retaining all the details from the original job, except without any contractors assigned to it.
- The job will now have a status of G-Cancelled.
Retrieve Cancelled Work Orders/Jobs
- Cancelled jobs can be viewed by selecting 'Cancelled' from the View Status drop-down menu, in the bottom right of the main menu of TaskMax.
- You can then open the job and request more quotes or issue the work order again.
- If you request quotes, the status of the job will change to B-Quoting.
- If you issue the job, the status of the job will change to E-Finalised, and can be 'unfinalised' to change the status to D-Issued.
Work Order Disbursements/Recoveries
In Disbursements, charges can be configured for TaskMax work orders and their related quotes, and can be set up to create records for the following items in TRMax, which can then be processed in Process Recoveries:
- Requesting Work Order Quote
- Receiving a Work Order Quote
- Issuing a Work Order
- Finalising a Work Order
When quotes are requested or received and work orders are issued, the details will be displayed in the TRMax notes field on the main screen, as well as TRMax reports:
- TaskMax Job Type
- Building Number
- Reference of the TaskMax Request/Job
- Contractor Number
- Contractor Name
- Subject of the TaskMax Job
