 | Instructions in this article relate to Creditor Invoices. The icon may be located on your StrataMax Desktop or found using the StrataMax Search. |
A preview version of the Creditor Invoices feature is currently being rolled out gradually. The information below remains accurate for now, but these instructions will soon be superseded by the new interface, which offers expanded functionality. For guidance on the updated experience, refer to the Creditor Invoices Work Queues and Creditor Invoices (Preview) pages.
New Creditor Invoices
There are several steps that are required from when receiving an invoice from a creditor, to authorising the payment on the StrataCash website (or other banking websites). Creditor Invoices is only one of those steps, so we recommend referring to the Payments Process article for the full overview of the entire payment process.
Processing New Invoices
This section steps the user through the process of entering and saving a creditor invoice into Creditor Invoices.
- Search or select Creditor Invoices, and select a creditor from the list, then click OK.
- If the creditor list doesn't appear, click the down arrow in the Creditor Name field, select the creditor in the list, then click OK.
- If the required creditor is not in the list, it can be added quickly using the green Plus button in the top right. See the Add Creditor Account section below.
- Select the expense code then click OK.
- If the Compliance window appears, click Confirm Usage to use the creditor, or View Details to view the details of the creditor first.
- If the required account code is not in the list, it can be added quickly using the green Plus button in the top right, refer to Account Maintenance.
- Enter the Date, enter the Amount and select whether it's an Invoice or a Credit Note.
- Enter in the Details (limit 20 characters). This will appear in Transaction History and Reports.
- Enter the Invoice Number (limit 25 characters).
- The system automatically checks this for duplicate invoice numbers for the same creditor.
- Review the No GST tick box if applicable (this option will be disabled if the property is not GST Registered).
- Once all details have been entered, you can either:
- Click the Save button, and proceed with the process in Payments. See Payments for more info.
OR - Click the Save and Pay button, and Payment Entry will open where you can choose to pay the amount immediately. See Creditor Payments for more info.
- Click the Save button, and proceed with the process in Payments. See Payments for more info.
Processing Invoices from DocMax Work Queues
This section steps you through the process of saving a creditor invoice, which has first been added to a DocMax Work Queue. There are additional settings that need to be configured in order for the saved invoice to appear on screen. See Document Attachment for more info.
- Search or select Creditor Invoices, and if an invoice doesn't appear automatically, click the 'Play' button (green arrow) to start the Work Queue.
- If the Compliance window appears, click Confirm Usage to use the creditor, or View Details to view the details of the creditor first.
- Check that all the details in the invoice are correct:
- The Date and the Amount.
- The Details (limit 20 characters). This will appear in Transaction History and Reports.
- The Invoice Number (limit 25 characters).
- The No GST check box if applicable (this option will be disabled if the property is not GST Registered).
- The OK To Pay box.
- Once all details have been entered, you can either:
- Click the Save button, and proceed with the process in Payments. See Payments for more info.
OR - Click the Save and Pay button, and Payment Entry will open where you can choose to pay the amount immediately. See Creditor Payments for more info.
- Click the Save button, and proceed with the process in Payments. See Payments for more info.
Additional On-Screen Buttons
Select by ABN
You may select the Creditor by ABN Number, simply click Select by ABN, and click in the ABN field and start typing the ABN, select OK once you have found the correct creditor.
Account Info
The Account Info button opens a separate window with with all the creditor's details; handy for checking account balance, EFT active, contact details, etc.
- After a creditor is selected and the expense code if prompted, click the Account Info button.
- Click OK to close the window and proceed with the creditor invoice.
- Click the Edit button to open Creditor Maintenance to update the creditor's details.
Ledger Card
The Ledger Card is used to view past transactions for a creditor, and is useful to check the current invoice against previously loaded invoices to avoid duplication.
- After a creditor is selected and the expense code if prompted, click Ledger Card.
- Click OK or Cancel to exit.
Multi Expense Invoices
If your office uses DocMax Work Queues, then there is a good chance that all the details of the invoice have been entered already, including all the separate line items within the invoice that need to be allocated to their own expense code.
There is however, still the option to enter multiple line items using Creditor Invoices, when each line items need to be allocated to different expense codes.
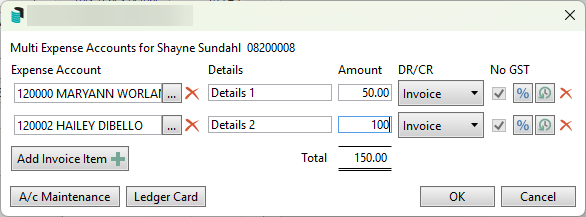
- Whilst entering the details of an invoice in Creditor Invoices, click the Multi Expense Entry button.
- Use the Expense Account drop-down menu to select the required expense code.
- In the Details field, enter the details of the line item.
- This will appear in the general ledger/transaction history.
- It is limited to 20 alphanumeric characters.
- Enter the amount of that specific line item into the Amount field.
- Use the DR/CR drop-down menu to choose between Invoice or Credit Note.
- For any non-GST expenses, tick the 'No GST' check box.
- Review the 'Total' to ensure it matches the invoice, then click OK.
- Click 'Set the total invoice amount to the total entered' once confirmed correct.
- Once all details have been entered, you can either:
- Click the Save button, and proceed with the process in Payments. See Payments for more info.
OR - Click the Save and Pay button, and Payment Entry will open where you can choose to pay the amount immediately. See Creditor Payments for more info.
- Click the Save button, and proceed with the process in Payments. See Payments for more info.

Pro Rata and Prepayments
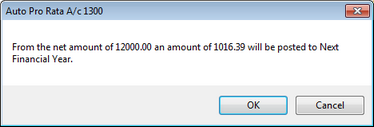
There is functionality to allocate an expense amount on a pro rata basis, which basically transfers the 'Pro Rata' amount to the next financial year from the current year when the Save button is clicked. This is used when:
- The expense covers a period which is spread over the building's current financial year and the next
and - There is a requirement to record the actual amount applicable to a specific period.
This in essence creates a prepayment for the portion of the invoice that covers a period in the following financial year. However, if the full amount is for the next financial year, the Pro Rata feature shouldn't be used, and the payment will need to be entered in full. A journal set will need to be processed in Journal Preparation to move the amounts from the Expense Code to a Prepayments Balance Sheet code, with the Auto Reverse box ticked (for both the Credit and Debit Journals) to create Auto Reverse Journals. These journals will automatically take up the expense in the following financial year.
The Pro Rata tick box button is located in the centre of the screen, next to the Details field and Shorthand button.

For example:
- Financial Year is 01/04/2020 to 31/03/2021.
- Insurance Premium is for 01/05/2019 to 30/04/2021.
- Premium Amount is $12,000.00.
- So $11,016.39 belongs to the current Financial Year (336 Days) and $983.61 belongs to the next Financial Year (30 Days).
- Whilst entering the invoice, tick the Pro Rata box.
- When the Save button is clicked, a screen will appear with two options, which will determine how the prepayment will be allocated. Depending on which is selected, one of the two screens below will appear:
- This Year and Next Year Only is a daily breakdown.
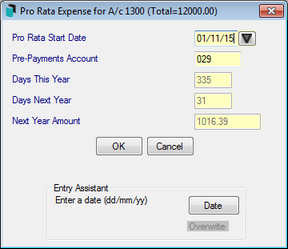
- If the Pro Rata Start Date is changed, click OK and this will updated the pro rata days.
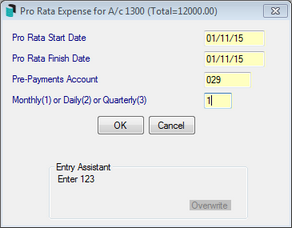
- Spread Over a Period is spread over a number of months, days or quarters.
- This Year and Next Year Only is a daily breakdown.
- Enter the necessary details and click OK and the Pro Rata Transactions will appear.


The GST on pro rata invoices to a GST account, use the original entered Creditor Invoice to claim the GST. The ongoing prepayment adjustments back to the expense as not GST transactions, as the GST is all claimed on the original invoice.
Add Purchase to Asset Register
This setting, if checked, will allow the details of the Invoice to be entered to the Asset Register.
- Search or select Creditor Invoices.
- Enter invoice details and tick Add Purchase To Asset Register.
- When all invoice details have been entered, select Save. The Pick List screen will appear where you can select the type of Asset; Furniture & Fittings, Office Equipment or Plant and Machinery.
- Enter the Details of Supplier of Asset and click OK.
Payment Authority
Payment Authority are payment instructions that can be set in Building Information. When entering a creditor invoice, an icon will appear on this button if instructions have been set in the building, .
- Click the Payment Authority button to access payment conditions for this building.
- After clicking the Payment Authority button, the following will display where more information can be added.

OK to Pay Setting
When the OK to Pay box is ticked, the balance for the creditor will be displayed in Payments, ready for the payment to be processed. When not ticked, the payment/balance will remain on hold. This can be reviewed in Creditors Management or Search Creditor Invoice Items.

The default setting for this box is to be ticked, so that any saved invoices immediately are ready to be processed in Payments. However, this can be changed per individual building in Building Information by changing the setting of the Auto OK to Pay Creditors field to unticked 'No'. This is typically done when a building uses the Invoice Hub. See Invoice Hub article for more info.
History
View the invoice number history, which is useful when entering an invoice for a creditor and checking if the invoice number is a duplicate (although StrataMax has built-in checking to prevent invoice duplication).
Attaching Work Orders
You can also attach a work order relating to the invoice being entered, and Finalise the Work Order. There are also a couple of settings in File > Configure that relate to work orders as well. See the TaskMax Work Orders article for more info.
- Show TaskMax Jobs is a User settings and will automatically display the Work Order Lookup screen after the creditor has been selected for the invoice. It will only display any work orders for the creditor selected in the creditor invoice. This is so the work order can be finalised and connected to the invoice.
- Require Work Order For Each Creditor Invoice is a Global setting, and results in a prompt appearing on screen for all users whenever they try to save a creditor invoice without a work order attached.
- If the TaskMax jobs list doesn't appear automatically, click the button at the end of the Work Order field to manually view any open jobs in TaskMax for this creditor.
- Click the Change Status Filter button to display work orders with different statuses. For example, to display work orders that have already been finalised in TaskMax , but don't have any invoice details.
- If necessary, click the View Job Details button to review some of the specific details that were entered for the work order.
- Click the Finalise button if the work order wasn't already finalised previously.
Add Creditor Account
- Search or select Creditor Invoices.
- If the creditor list doesn't automatically appear, click the down arrow next to the 'Creditor Name' field.
- Click on the + sign next to the Master Chart button.
- The Creditor Master Chart - Edit window will appear.
- Click on the Create / Select Contact option and either select or create the new Creditor Contact.
- Click Save.

BPay Creditor Invoices
If a creditor needs to be paid by BPay, make sure in Creditor Maintenance that BPAY is set, and the Biller Code is entered correctly. There is also a tick box for BPAY CRN is Different on Each Bill, which determines whether the BPAY CRN number is retained when entering invoices in Creditor Invoices. If each payment to this creditor has a different CRN each time, then tick this checkbox.
BPay payments utilise the StrataPay Payables service that have associated fees and charges, including a 0.55 cent transaction fee unless otherwise agreed. Please see the StrataPay Payables article for more info.
When a BPay invoice is entered, a small amount of time is required to validate the CRN detail. It is recommended to wait up to 10 minutes before processing the payments in Payments.
- Search or select Creditor Invoices, and when a list of creditors appear, tag the required creditor and click OK.
- If the creditor list doesn't appear, click the drop-down arrow in the Creditor Name field, tag the creditor and click OK.
- Select the expense code then click OK.
- If the Compliance window appears, click the Confirm Usage button to use the creditor, or the View Details button to view the details.
- To select a document from DocMax, click the Select button in the top right (skip steps 3 and 4 if no document is being attached).
- Navigate to Add New Document in DocMax and locate the document to add. Once the document has been located, select it and click the Select Document button.
- Enter the Date, enter the Amount, and select whether it's an Invoice or a Credit Note.
- Enter in the Details (limit 20 characters). This will appear in Transaction History and Reports.
- Enter the Invoice Number (limit 25 characters).
- The system automatically checks this for duplicate invoice numbers for the same creditor.
- Review the CRN field and review invoice, if the CRN is different; update with the information provided on the invoice. Enter all leading zeros and do not enter with any spaces or hyphens.
- If all correct, you can either:
- Click the Save button, and you will need to process the payment in Payments. See Payments for more info.
OR - Click the Save and Pay button, and Payment Entry will open where you can choose to pay the amount immediately. See Creditor Payments for more info.
- Click the Save button, and you will need to process the payment in Payments. See Payments for more info.
EFT Reference
The EFT Reference can be set per Creditor code and per Building in Creditor Maintenance. The EFT Reference field is also available in Creditor Invoices, Payment Entry as well as the Payments icon for any Creditor code set to EFT payment method, where it can be edited. The EFT Reference will also appear on the Remittance Advice for the creditor. EFT References can be added for individual Creditor codes that require a specific EFT Reference. The reference is noted on the EFT Payment record when sent to the bank. This setup is always required for payments made to the ATO by EFT.
It is recommended to pay the ATO via BPay with a CRN number to ensure that the funds are correctly allocated when received by the Australian Taxation Office.
Edit Creditor Invoices
Please be aware of the following restrictions where editing invoices is concerned. These restrictions are in place to protect data integrity and for audit purposes. Changes can be made in Local Transactions to the expense code, tax code, details and the CRN. A Creditor Invoice cannot be edited to zero, the Reverse option will need to be used to remove from the Current Year, or enter a Credit Note to cancel a Creditor Invoice entered in the now Old Year.
- Only an entry created in the current month can be edited, and only details from the date onwards.
- If a creditor invoice has been paid or part paid; the invoice cannot be edited or reversed. A new credit note or creditor invoice should be entered to reflect the required change in creditor balance. Alternatively, you may also edit the 'Description' and 'More Info' details using the Payments Management screen.
- If the expense code used for the invoice is incorrect, use Change Transaction Code in Local Transactions. If a Change Transaction Code is completed to a transaction, the Tax Code should be reviewed at the same time due to the creation of new transactions using the tax code applicable to the account code being selected, to ensure the GST is applied correctly.
- If the invoice has been saved in the wrong building or against the wrong creditor, this will need be to Reversed and re-enter and save it again with the correct creditor.
- Creditor invoices can be edited in the current year to amend the BPay CRN and details, but can’t amend amounts for prior months or dates - this information can also be edited in Local Transactions.
- Search or select Creditor Invoices.
- In the top left, there is a drop-down menu, which has New Entry by default. Click this and select Edit.
- Click the Creditor Name drop-down menu then select the creditor in the list and click OK.
- From the transaction list, select the transaction to edit, then click OK.
- Edit the invoice details, then click Save once complete.
You can also change the current posting month to post a creditor invoice to that period (see Edit Posting Month). Current Posting Month is always determined by the most recent month end rollover for a building. If the month end is February, then the current posting month is March.
Edit Description &/or More Info of a Paid Invoice
To amend a description to a paid invoice, which is printed on the transaction list and other reporting areas, please use the below method. The security permission 'Creditor Invoice - Edit Description' is required.
- Search or select Payments Management.
- Adjust the Date Range if needed and select Any for all payment types (if not presented in the list).
- Find the creditor record, and use the Filter area if needed.
- At the bottom of the screen, click the Pencil icon and amend the description as needed, then click Save.

Reverse Creditor Invoices
If an invoice was entered and now needs to be reversed or deleted, the below instructions will apply. If the payment for this invoice has been attempted and is not presented, it will first need to be reversed in Payments Management.
If the creditor invoice was saved in the building's prior/old financial year and requires reversing (check with auditor); journals will be required using Journal Preparation using the last date of the old financial year in the Date field:
- Debit (DR) the Creditor 082XXXXX Account Code.
- Credit (CR) the Expense A/c or a Prior Year Adjustment A/c.
Alternatively, a credit note (see the Create Credit Note section below) can be entered in the current year (if appropriate) to remove the balance of the previous creditor invoice.
- Search or select Creditor Invoices.
- In the top left, there is a drop down box, which has New Entry by default. Click this and select Reverse.
- Select the Creditor from the Creditor Name drop down list then click OK.
- If there are any configured checks for compliance, click Confirm Usage or work orders lookup, click Cancel.
- From the transaction list, select the invoice to reverse then click OK.
- Review the details. The 'Date' field can be changed if required. All of the other field will be greyed out as this is creating a reversal of the original entry.
- Click Save once checked.
- If there has been a document attached to the original invoice, there will be a prompt to confirm: This document is already attached to an invoice. Are you sure you wish to continue? Click Yes.

Current Posting Month is always determined by the most recent month end rollover for a building. If the month end is February, then the current posting month is March.
Delete Creditor Invoices
If the creditor invoice is required to be reversed or cancelled and was entered in this Current Year, then the user will need to use 'Reverse' mode and follow the steps above in 'Reverse Creditor Invoices' to delete the creditor invoice.
If the creditor invoice was saved in the building prior/old financial year and requires reversing from the Old Year (check with auditor); journals will be required using Journal Preparation:
- Debit (DR) the Creditor 082XXXXX Account Code.
- Credit (CR) the Expense A/c or a Prior Year Adjustment A/c.
Alternatively, a Credit Note (see the Recording a Credit Note from a Creditor section below) can be entered in the current year (if appropriate) to remove the balance of the previous creditor invoice.
Create Credit Note
A Credit Note can be used to remove the balance of the previous creditor invoice in the Old or Historical Year. If a credit note is required to a creditors account, for example if there was an over payment, then this can be entered using Creditor Invoices and selecting the Credit Note option. This will create a debit transaction and the credit note will offset against any further invoices until the value of the credit note is met.
When entering a credit note to bring the creditor balance to $0; ensure all invoices are not on hold. When the credit note is saved the unpaid invoices will automatically be marked as processed and therefore will not report on the Unpaid Invoices Report.
By completing the credit note, this allows StrataMax to complete the transaction with the appropriate Reference Type (D) to the Creditor Account Code.
- Search or select Creditor Invoices.
- Select the expense code then click OK.
- If the Compliance window appears, click Confirm Usage to use, or View Details to view the details of the creditor.
- Enter the Date, enter the Amount and select Credit Note.
- Enter in the Details (limit 20 characters). This will appear in Transaction History and reports.
- Enter the Invoice Number (limit 25 characters).
- The system automatically checks this for duplicate invoice numbers for the same creditor.
- Click Save.
- Open the Transaction List to confirm the credit note has applied as intended.
Options after saving a Creditor Invoice
There are several options where you can complete various processes to add saved creditor invoices to different areas in StrataMax for the year to date transactions.

- To access these functions after saving the the invoice, whilst in Creditor Invoices click Options > Transaction List.
- When the Transaction List window opens, the following can be performed:
Reverse
Reverse will contra the original entry and all fields except the date field will be greyed out.
- Highlight the Creditor Account' (082) that needs to have the transaction reversed then click Reverse.
- This particular Account Code will display all transactions entered for the current year, select the transaction and click OK.
- If the entry was done in the current month, a prompt will advise that you can edit the transaction. Click Yes to edit now? then make the necessary changes.
- Click Save to confirm.
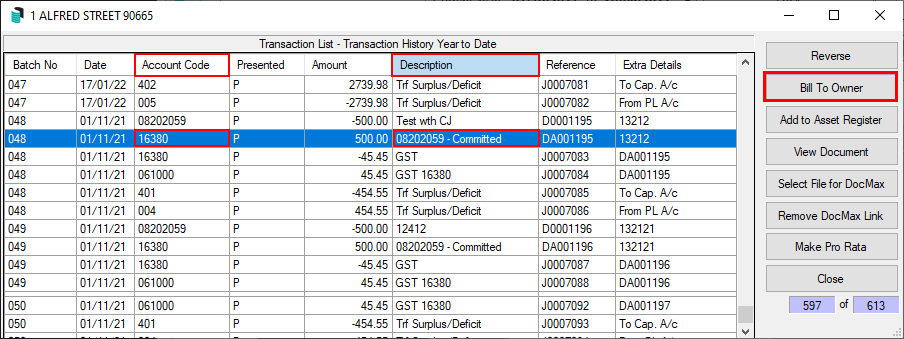
Bill to Owner
There may be instances where an Invoice that has been paid by the Strata is to be on charged to an Owner, for example, Legal Fees or Key/Fob Charges. In these instances, Bill to Owner can be used to move the expense from the Expense Code to the Owner's account. The initial Creditor Invoice must be entered first.
- Search or select Creditor Invoices.
- Go to the Options > Transaction History.
- Highlight the transaction which has an expense code in the 'Account Code' column and the creditor code in the 'Reference' column, then click the Bill To Owner button on the right.
- When the 'Account Code List' window appears, select the lot to charge and click OK.
- Then the 'Invoice Codes' window will appear; select Invoice Code '18 / Other' and click OK.
- To confirm the charge has been added to the lot, produce and check a Ledger Card or a Transaction List.
- A separate Invoice can be printed for the Lot A/c to send if required.

Add to Asset Register
A creditor invoice that was entered to pay for an asset can have the expense side added to the Asset Register.
- Highlight the expense record required and click Add to Asset Register.
- Select from the Pick List the type of asset the purchase is and click Select.
- The Details of the Supplier will be confirmed. Check these details and click OK or update if required.
- Check the Expense has been added to the Asset Register.
View Document
View the document that is attached to a creditor invoice, select the row with the Creditor Account Code (082) record and click the View Document button.
Select File for DocMax
This is how to add or replace a document to a creditor invoice after it has been processed. For example, if the wrong invoice document was used in DocMax and it now needs to be replaced with a different document.
- Search or select Creditor Invoices.
- In the top left of the window, click Options > Transaction History.
- Locate an entry that has the creditor code (starting with '082') and select it, then click the Select File for DocMax button on the right.
- In the DocMax 'Select Document' window use either the Advanced Search to locate the invoice document, or use the Browse by Building/Category or Add New Folder Location to add a network folder location.
- Once located, click the Select Document button in the ribbon at the top.
- Click Close. To check if the invoice image successfully attached, click the View Document button.
Add or Append another Document
It's possible to add an additional document to an existing invoice, using the Append Other Document or Append External File functions in DocMax. See Append Other Document for more info.
Remove DocMax Link
If a document has been added to a creditor invoice and it needs to be removed;
- Search or select Creditor Invoices / Options / Transaction History.
- Highlight the Creditor Account Code (082) record with a 'D' reference and click the Remove DocMax Link button.
Make Pro Rata
To retrospectively make a payment pro rata, highlight the row with the creditor account code (082) in the Account Code column and a 'D' reference number in the Reference column and click the Make Pro Rata button, then follow the steps detailed above in the Pro Rata and Prepayments section.
