| The instructions in this article relate to Budget Update. The icon may be located on your StrataMax Desktop or found using the StrataMax Search |
Budget Update is where the budget for the property is entered for the current and next financial year.
If the building’s budget was entered in the most immediate prior year, then the budget figures will be carried forward. The prior years 'Budget Next Year' figures will be transferred to the 'Budget This Year' column and the 'Budget Next Year' budget column for this year will be cleared to zero. However, if an Annual Increase % has been set, then it will be calculated and populated instead.
StrataMax provides for budgeting of income and expenditure and comparison with actual expenditure. Budgets also show the annual rate for levies per unit of entitlement for both income and expenditure.
The normal procedure is to enter data in the Current Year as a 'Next Year Budget'. This is done during the course of the year in consultation with the committee members responsible for budget preparation. After year end rollover, adjustments in the Old Year can be made to the 'Next Year Budget' and this is immediately reflected in the Current Year’s ‘Budget This Year’ field.
Budget Update Video
Budget Update Configuration
- Search or select Budget Update.
- Select File > Configure.

Update Brought Forward Balance [User setting]
Will automatically update the brought forward figures (195 and 295) at year end rollover. If required to manually update any Opening Balances for either 'This Year' / 'Next Year' or 'Actual's' relating to last year, ensure this setting is not ticked. Retain Budget Amount in Next Year - User setting - Will retain the budget amount in the 'Next Year' column on year end rollover.
Retain Budget Amount in Next Year [User setting]
Activating this setting will copy the amount being entered into 'Next Year Budget' during entry from Old Year to the Current Year’s 'Next Year Budget' as well as 'This Year Budget'.
Manage Monthly Budget [User setting]
Monthly budget columns will show in Budget Update. Refer to Financial Statements menu. When activating or deactivating this configuration setting, the Budget Update screen will need to be restarted to apply. If this area is configured, enter the amount into the monthly column to populate the 'Budget This Year' totals.
Auto Calculate GST [Global setting]
This setting will calculate GST on the budget figures, depending on the GST style.
GST on Budgets
Depending on the style of reporting that the building is running, will dictate if the information is entered Gross or Net of GST. The style of reporting can be confirmed at the bottom of the Budget Editor screen.
If the building is reporting Gross, the information should be entered gross of GST into the Budget Update screen (refer to the File > Configure setting for Auto Calculate GST).
If the building is reporting Net, the information should be entered net of GST for all items entered into the Budget Update screen. If the Budget figures offer Net style reporting, when completing the Levy Year End Rollover process, use the 'Add GST to Budget Amounts' option to ensure that the levies are inclusive of GST.

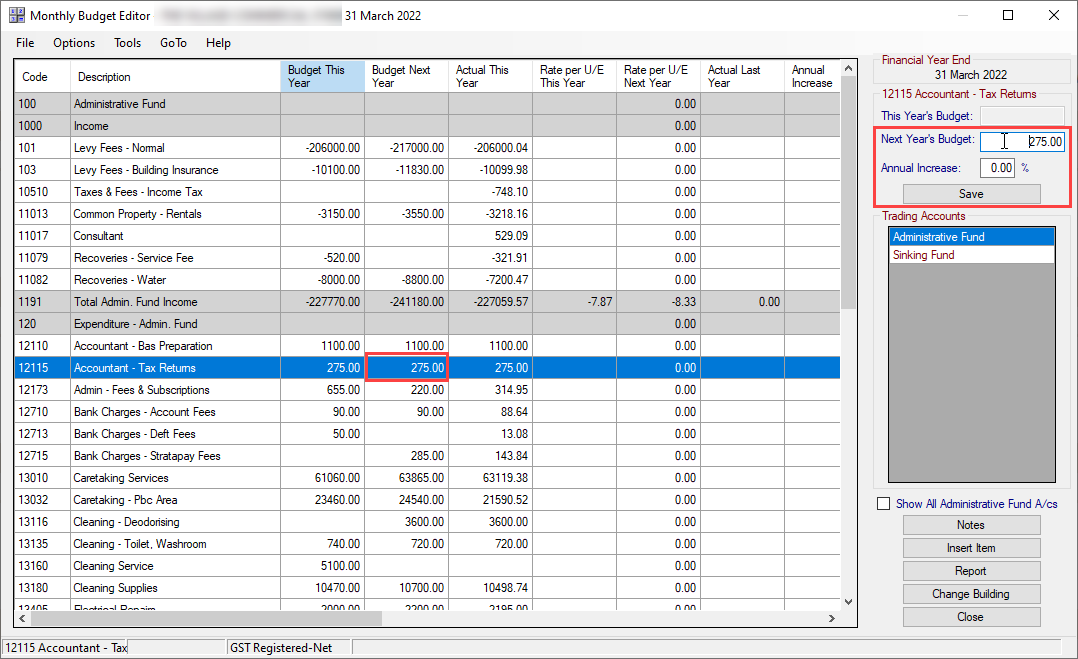
Budget Update Screen

- Budget This Year and Actual This Year column refer to the Financial Year End available in the top left of screen. The Budget Next Year column refers to the next Financial Year End.
- Trading Accounts are the available funds to select and prepare a budget for each.
- Show All Administrative Fund A/c's when ticked will display all local account codes in the building.
- Notes when selected on a Budget Item will allow for notes to be entered against this item.
- Insert Item will allow for an account code to be inserted from the local account codes in the building.
- If you are in a Multi OC building, you must ensure that the A/c code has an Account Group set up in Account Group Setup.
- Report will shortcut through to the Financial Statement window and pre-select the 'Proposed Budget Report' as the Report Name.
- Change Building to access a different building in the Budget Editor window.
- Close will close the Budget Update screen.
Entering Budget Items
Using the Old Year to access the Budget Update screen and focusing on the Budget Next Year column is recommended, to allow use of the additional Lot Budget Summary report, and having this report offer the correct year for the proposed budget. It is not critical but something to note when using the the additional report settings available in the Budget Report window.
- Search or select Budget Update.
- Referring to the items in the list, select the appropriate account code and enter the figure required. This can be done by double clicking in the cell or using the top right corner and clicking 'Save' on each entry. To confirm the account code ranges please see this article.
If the account code does not exist, click Show All Administrative Fund A/cs to display all local account codes.
If the account code needs to be created, select Options > Add New Account and complete the process to create a new account. - Once all expenditure items have been included, select the 189 Total Admin Expenditure cell for the year required / Tools / Income Calculator.
- Check the Total Expenditure is correct and include any additional surplus / deficit required to adjust the income for calculation. If there is discount, these fields should be populated with the rate and discount A/c code / OK to the calculator screen.

Options
There are shortcut areas in the Budget Summary window that will offer shortcuts to other areas as described below.
- Add New Account - This area will shortcut to Account Maintenance to add an existing account from the Master Chart or to create a new account if needed.
- Report - Open's the Financials Statements window directly.
- Split Bank Balances - This area will launch directly to Bank Balances and confirm the bank balance split across funds, and include any term deposit information (if setup).
- View Overdraft Limit Entries - Any overdraft limit that may have been configured is available for viewing in this window.
- Transaction List - Accessing the Transaction List can be done easily from this area.
- Last Year Budget Copy - This function will copy the figures in the 'Budget Next Year' column from the building's old year, into the 'Budget This Year' column in the building's current year. This can also be performed for multiple or all buildings using the Last Year Budget Copy menu/icon.
- View Edit History - Reviewing any entries made or changes to the line items within the Budget Update screen is available here, with a time and date stamp and the operator (User) included.
- Show in Excel - Exporting the Budget Information to Excel can be done by selecting this option.


Tools
- Optimise View - This will adjust the each of the column width to try and fit within the screen to allow for easy view of each column.
- Income Calculator - Using the income calculator is a handy tool to calculate the desired levies, and allows for a surplus/ deficit to be entered, and will automatically calculate any discounts (if configured). To use this function, you must be selected on 189 Total Expenditure line item in the Budget This Year column. When selected, the income and expenditure account will be noted with a value reporting for the 'Total Expenditure'. Enter any surplus/ deficit figures required to reach for that financial year, and review the discount rate and account if needed. This will populate the income into the Budget Update screen based on the income account setup.
- Clear Next Year Budget - If the Budget Next Year column is needing more attention than updating the current account codes, it may be easier to clear the Budget Next Year' column and this option will allow that column to be deleted. This can be done from the Old and Current year. If completing from the Old year, please note it will clear that information from the Current year Budget This Year column also.
- Copy This Year to Next Year - This function will allow Budget This Year column to be copied across to Budget Next Year column. This can be done from either year.
- Add GST - This will add GST to any selected item. Please note that you can only add, not subtract with this function.

GoTo
- Sinking Fund Forecast - Selecting this option will allow for any large sinking fund expenses to be added to a register which includes the amount of years, the cost with a breakdown of the per annum value. The start date of this expected expenditure item can also be added. Within this screen, via the File menu; the Sinking Fund Report can also be added to DocMax and viewed within this screen.
- Levy Maintenance - This is a shortcut to get to the Levy Management window directly.
- Lots and Entitlements - For an onscreen conformation of the Lots and Entitlement schedule, select this option.
- Budget Summary Setup - Please read the below section, Budget Summary Setup.

Budget Reports
All of the budget reports are run from within Financial Statements, but there is a button in Budget Update, which opens the menu with the 'Proposed Budget Report' selected in the Report Name field. See Financials Statements for more info.
These are all the budget reports available in Financial Statements:
- Budget Report
- Proposed Budget Report
- Actual Budget Report
- Special Budget Report
- Budget Only Report
- Budget This Year Report
- Budget With Balance Sheet
When a Budget Report is selected in the Report Name field, the tick boxes under the Report Settings section on the left of the screen will change.
Lot Budget Summary Report
This is a tick box under the Report Settings section that only appears when a Budget Report is selected in the Report Name field in the Financials Statements screen. This produces an extra page when the report is run, listing all the lots and how much each will pay for each period. Other details are displayed as well, but will vary depending on what other tick boxes are selected when running the report. For example, if "4" is entered into the 'Number of Instalments:' field in the Report Settings section, then the amounts will be quarterly.
It's important to be aware that the Lot Budget Summary Report will display figures for next year's budget. If you would like the report to display figures for the current year budget, you will need to run the report from the old year.
There are some setup options and configurations that should be reviewed, and are explained in the sections below.

Budget Summary Setup
The purpose of this function is to allow any additional levies to calculate on the Lot Budget Summary report (see below). For example, an insurance levy that is raised under its own levy / income account (normally in the Administrative Fund) in StrataMax, and to be reported in the total calculation for the selected fund on the Lot Budget Summary Report.

Other examples include any custom levy schedules. It should be understood that the amount to raise will be correct, but the entitlements may differ when combined in the Lot Budget Summary Report. This Summary Setup also needs to be applied after each Year End and applied to the current budget.
- Search or select Budget Update.
- Click GoTo > Budget Summary Setup.
- Click 'Insert' to select the income account, from the next screen select the entitlement schedule that is to be applied for this levy.
- If there is a discount included, from the next screen, click 'OK' and select the discount code. If there is no Discount click 'Cancel'.
Lot Budget Report Consolidation
When a budget report is selected from Financials Statements under File > Configure there is a drop down which provides output options for Consolidated Reports. This is used when the Lot Budget Summary box is ticked when producing budget reports for a Multi OC property.
- One Line Per Lot: Calculations will be consolidated into one line per lot.
- One Line Per OC Per Lot: One Line for each OC in Lot Order. The lot total will be output.
- All OCs Printed in Order: Will output all OCs as though each was selected and printed. There will be an OC Total and each OC output will start on a new page.

Proposed Budget Template options
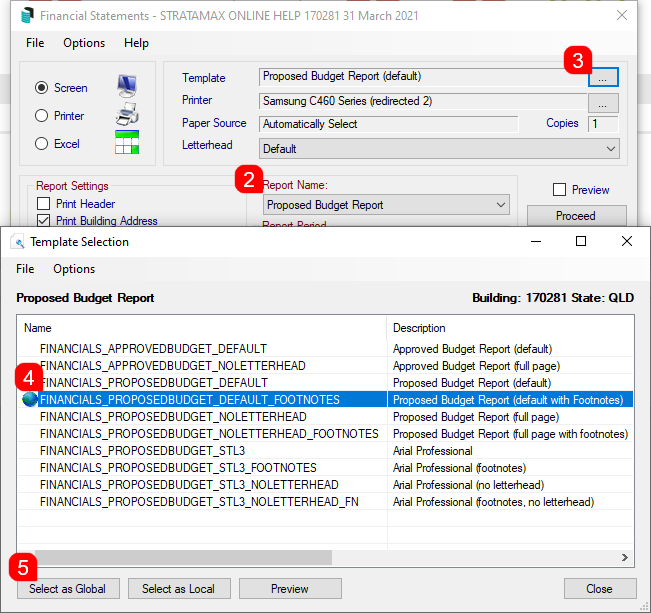
- Select 'Proposed Budget Report' from the Report Name drop-down list.
- Click the ellipses in the Template field to review template options.
- Select the required template from the list of templates.
- Click either Local or Global, and click Close.
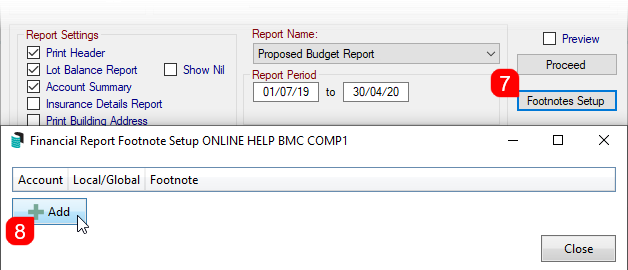
- To add footnotes for a specific code, in the Financial Statements menu a template type with footnotes should be selected.
- Once the template that uses the Footnotes area, and the 'Proposed Budget Report' has been selected, click the Footnotes Setup button on the right, and the Footnotes Setup screen will appear.
- Click the Add button.
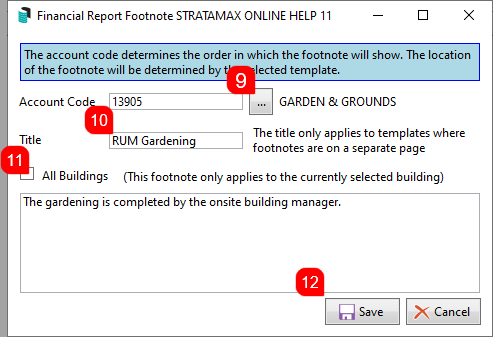
- Click the ellipsis button to the right of the Account Code field to select the required account code.
- Enter a title in the Title field.
- Tick All Buildings if the footnote should be applied across all properties under management.
- Enter the details to display under the footnotes section on the report, then click the Save button.
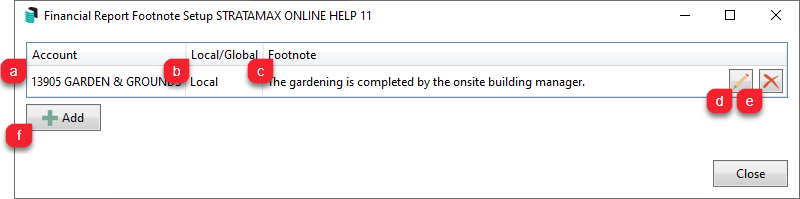
- The account code will now be listed in the Footnote Setup screen.
- a. Account: The Account Code configured with a footnote.
- b. Local/Global: If the footnote will report for the individual property selected or globally across the portfolio.
- c. Footnote: Details entered to display under the footnote section.
- d. Pencil: Click to edit the details of the footnote.
- e. Cross: Select to delete the footnote.
- f. Add: Click to add additional footnote records.