 |
The instructions in this article relate to Account Maintenance. The icon may be located on your StrataMax Desktop or found using the StrataMax Search. |
Account Maintenance is where you create, manage and delete account codes, such as income and expense codes. To create creditor codes, check out our Creditor Maintenance article.
Codes can be added to the local building from the Master Chart using the Add From Master Chart button. Any new account codes created in a building will automatically be created in the Master Chart so the new code can be added to other buildings.
This area is also where you manage the tax code for an income or expense code, whether the code is a non-mutual account code, review if an account code is part of an Account Group, and set the Account Category (for the Statement of Key Financial Information applicable to NSW and the WA Provision of Information Annual Return).
To clean up any account codes locally or globally, Search Local Accounts and Search Global Accounts can assist with reporting codes that are different from the Master Chart or not in the Master Chart. For the not recently used accounts, there is an option to restrict access, which will prevent them from being displayed in the relevant areas where an account code can be processed.
Security Setup
Access to this menu is held within Security Setup under the "Account Maintenance" menu category.
Account Maintenance Video
Account Code Explanation
Each account code in the chart of accounts is assigned a name and a unique number by which it can be identified. Account codes can have up to 8 digits. The number of the account code will determine the reporting position on the Financial Statements and if it is a Balance Sheet code, an Administrative Fund or a Sinking (Capital, Maintenance or Reserve) Fund code.
Account codes are organised into the following ranges:
Balance Sheet |
001 - 099 |
Capital Account |
001 - 009 |
Assets Debtors |
010 - 0598 021 prefix |
Liabilities Creditors |
0599 - 098 082 prefix |
Income and Expenditure |
100 - 399 |
Administrative Fund Admin Fund Income Admin Fund Expenditure |
100 - 199 100 - 1191 121 - 189 |
Sinking (Capital, Maintenance or Reserve) Fund Sinking Fund Income Sinking Fund Expenditure |
200 - 299 200 - 2191 221 - 289 |
Additional Funds Additional Funds Income and Expenditure |
300 - 399 31100 to 39199 |
Appropriation |
400 - 410 |
| Additional Funds | 300 - 399 |
| Income | 301 - 3199 |
| Expenditure | 321 - 3299 |
Code numbers do not need to be consecutive. For example, Repairs and maintenance codes may be broken down into many codes, and will depend on how you want the account names to appear on your financial statements. You may use up to eight numbers for an account code to ensure that it will be in alphabetical order, as financial statements are sorted into code number order.
Note: Account code numbers appear on Management Financial Reports only, they do not appear on Presentation Financial Reports.
For example, one building has the following codes for repairs and maintenance:
150001 |
R & M - Air-Conditioning |
150002 |
R & M - Building |
150007 |
R & M - Electricity |
1500075 |
R & M - Elevator (Note the code number of this one. It needed the extra ‘5’ to appear alphabetically after "R & M - Electricity" and before "R & M - Fire Equipment". You can use up to 8 Digits to do this.) |
150008 |
R & M - Fire Equipment |
150009 |
R & M - Gardens and Grounds |
150010 |
R & M - Keys and Locks |
Another building may have only:
150001 |
R & M - Air-Conditioning |
150002 |
R & M - Building |
150007 |
R & M - Electricity |
150009 |
R & M - Gardens and Grounds |
Configuration
Below are the settings within Account Maintenance that must be considered when creating a new account code, as these will affect how the account codes function. The advanced settings in the next section are not essential for the account codes to function, but are additional configurations.
Type (H/P/1-9X)
The Code Type field indicates the type of account code and how StrataMax will treat it.
Posting
Indicates that the account code is a 'Posting' account to which transactions can be posted.
Calculated
This will report a total of postings accounts based on system flags.
Debtor Main
The financial statements will show the total of primary debtors.
Second Debtor Main
The financial statements will show the total of the second debtors.
Creditor Main
The financial statements will show the total of the creditors.
Main (Other)
The financial statements will show the total of account codes, which start with the same three characters and are marked as System Flag 'Other Sub Account'.
Header
Transactions cannot be posted to this account. Header account codes will appear in bold on the financial statements and can also be set to be underlined.
Header (Report Group)
The Financial Statements will show as a header, but with the total of the posting accounts defined with the same report group.
Total 1-9
These numbers are used for designating accounts to hold the totals for reporting on the balance sheet, and income and expenditure statements. In most cases, these have been preset and will not require any adjustment. If changes do need to be made, take note that the totalling system works on the following basis:
- All accounts preceding the type number will be added to the following previous same type number.
- To see an example of how this works, export a copy of the Chart of Accounts from Account Maintenance to see the occurrences of the numbers.
Header and Total 1-9
The Header and Total accounts, with the same number, can be used to define a section or group of accounts on the income and expenditure statement, and include a total of these accounts. It is recommended that the numbers used are higher than the numbers used by the system for totalling - i.e. greater than 3. These are header type account codes and will always report on the financial statements, even if there are no accounts with balances in-between, be mindful of this when adding these types of accounts.
Example - Header and Total 5
Account Maintenance

Financial Statements

Account Type
This field will control where this account reports on the Financial Statements.
Capital (equity) - Balance Sheet
Asset - Balance Sheet
Liability - Balance Sheet
Income (Revenue) - Income and Expenditure Statement
Expense - Income and Expenditure Statement
Surplus / Deficit - System Account Codes
Other / Appropriation - System Account Codes
System Flag
This flag should systematically be set and will only require adjustment to align an account for a specific purpose.
None
GST Gross
Withholding Tax
GST Clearing
PAYG Clearing
Rounding Adjustment
Capital Balance
Brought Forward
Overdue Interest
Appropriation
Levies Billed Not Yet Due
Generated Levies Billed Not Yet Due
Generated Levies Paid in Advance
Other Sub Account
Trading Fund
This field assigns which fund the account code will report to, as a standard, this fund will be systematically set based on the number convention of the account code.
- Administrative Fund
- Sinking Fund / Capital Fund / Maintenance Fund
Tax Code
The Tax Code field controls the type of tax for the account code and may create transactions to assist with GST and Tax reporting. Tax codes are normally assigned to an account code as the account is created and added to the master chart.
A GST Registered Building (in Building Information) will have the default tax type of:
- GST 10% on all Income and Expenses.
- Not Included on BAS for all Balance Sheet account codes.
If an account code is not to calculate GST, the Tax Code field may need to be set to GST Free Expenses/Sales. See below for other tax codes types.
Usually, there will be only one instalment tax account, one wages excluding tax account and one tax on wages account (or one wages account).
Within each account code is the functionality to update the tax code and how StrataMax will treat these account codes.
- GST on Sales.
- GST Free Sales.
- GST on Expenses.
- GST Free Expenses - No GST included but will report on the BAS totals (Tax-Fee - Stamp duty on Insurance).
- GST on Capital Purchases.
Other Tax Codes
- PAYG Instalment Tax - (fixed or percentage for income tax instalments).
- PAYG Withholding (wages tax) - employee income tax payable.
- Wages (Gross) - Wages expense account.
- Tax on Wages - Set automatically on Tax transactions from Pay Employees.
- Non Claimable Items.
- Not Included in BAS - Account codes with this tax code will not be reported on the BAS (Superannuation, Depreciation, tax expense).
- Export Sales.
- GST (system code used for income and expense GST Transactions)
- GST Clearing (system code used for transactions in the GST Clearing Account)
Withholding Tax 49% - ABN Withholding Tax – to be remitted to the ATO if no ABN is quoted on Creditor Invoices over $82.50.
Non Mutual Income
Non mutual income refers to any income the building receives from activities other than levies; for example, interest on investments or renting out some common property. If the Non Mutual Income box is ticked, the code will be flagged as non-mutual income, and will be used to calculate the payable tax on the Business Activity Statement. Refer to our Non Mutual Income article. A Non Mutual Income Report can be exported to list all Non-Mutual Income account codes for the building.
Income Tax Category
Lodging income tax with the registered accountant can be done by categorising the accounts as required using these instructions here.
Comments
This field is a free type field and will allow comments to be added to an account code. An example may include a comment for a GST-free account versus a GST account for Bank Charge type expenses.
Report Group
This field is used with the Type-Header Report and configured with a user-defined numbering system, to assist with grouping similar-type expenses under a heading. This can be useful for buildings that like to see similar expense accounts together, and this can also be done on a per-building basis, however will require individual configuration for each account code that wish to include this setup.
For example, account code 121, called 'ADMINISTRATION' is set as the Header Report Group in Account Maintenance, and any other account codes to report under this header will require the Report Group set as 121.

Example of Financial Statements:

Restrict Access
Restricting account codes prevents certain codes from being used in example areas like Journal Preparation or Creditor Invoices. The account code will not appear in the selection list. This can be useful in maintenance examples to ensure that the account code is no longer available for selection in the Master Chart and/or specific buildings. The Building Transfer process will also automatically hide any account codes that have no actual or budget line item for the current or hold years.
This tick box is controlled by a permission in Security Setup called 'Edit restrict access'.
To review these Hidden/Restricted accounts, tick 'Show Hidden/Restricted'.

The below instructions allow you to hide account codes where needed.
- From either the Master Chart building or the selected building, search or select Account Maintenance.
- Locate the account code that must be restricted and click the pencil icon to edit.
- Tick the Restrict Access box. If the restriction is to apply to the Master Chart and Buildings, include this option too (recommended).
- Click Save.

Account Group
The Account Group field is not editable in Account Maintenance if transactions already exist for the account code. New Account Codes can be set up in Account Group Setup. This field will display the account group to which the account code belongs. This is designed for properties with multiple layers within a registered scheme (primarily Victoria with Multi Owners Corporations registered).
Category
This field applies to New South Wales strata plans, specifically for the Statement of Key Financial Information. The legislation was introduced in 2016, requiring it to report expenditure breakdowns to the Administrative and Capital Works Funds, identifying Administrative and Capital Works expenses and the income gained from bank interest.
Administrative expenses, Capital Works expenses, and bank interest are the three categories to select from in this field. The Account Categories are set in the relevant account codes, and synchronisation will apply based on the code number and description, updating this field where the account is used in buildings, including the Old Year. This will ensure that the Statement of Key Financial Information is correctly reported.
Apply Changes to Master & Buildings
This tick box will ensure that any changes made in the Master Chart building or a local building update the account in all areas. It will be controlled via Security Setup for access. Please note that buildings that may use specific account codes when completing Budgets or specific code descriptions will update this in all areas if this setting is applied.
Take care when using this setting.
Add New Account Code
When adding a new account code, review the Master Chart to determine the account code number to use, and the description that will be created. Remember that the account code number will dictate the position where the code will appear on Financial Statements.
When adding a new code to a local building, the code will also be added to the old year, for the purpose of processing journals and adding codes in Budget Update.
The following instructions include creating a new account code, '14210 Insurance Premium'.
- Search or select Account Maintenance.
- Click Add New.
- In the Code field, enter the nominated number, and the description of the account code capitalisation on the description should be applied.
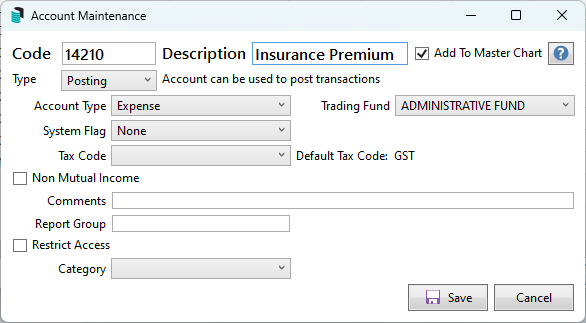
- Enter any other information as required, and the critical fields to check include the Tax Code and Non-Mutual Income. For NSW buildings, use the Category field. For further information, review the configuration areas above if they are required.
- Click Save.

If adding the account code from the Master Chart building, additional Default Update Codes for Sub-Groups are available. Further information on this type of setup is available here.
Copy an Account Code from the Master Chart to Buildings
This section covers how to copy an account code from the Master Chart to either a single or multiple buildings - the process below can be applied. Security Setup will apply to this area.
- Select the Master Chart Building from the Building Selector, and then search or select Account Maintenance.
- To locate the required account, use the Search field at the top of the screen to enter either the name or number of the required account code.
- Select the Copy Account to other Buildings icon (two sheets of paper), located on the far right.
- In the 'Building Selection' window, tag the required buildings.
- To select all buildings, use the keyboard shortcut Ctrl + A, or tick the box at the top of the tagging column.
- Click Select.

- A confirmation will appear to confirm that the account code has been copied to the selected buildings.

Adding an Account Code to a Building from the Master Chart
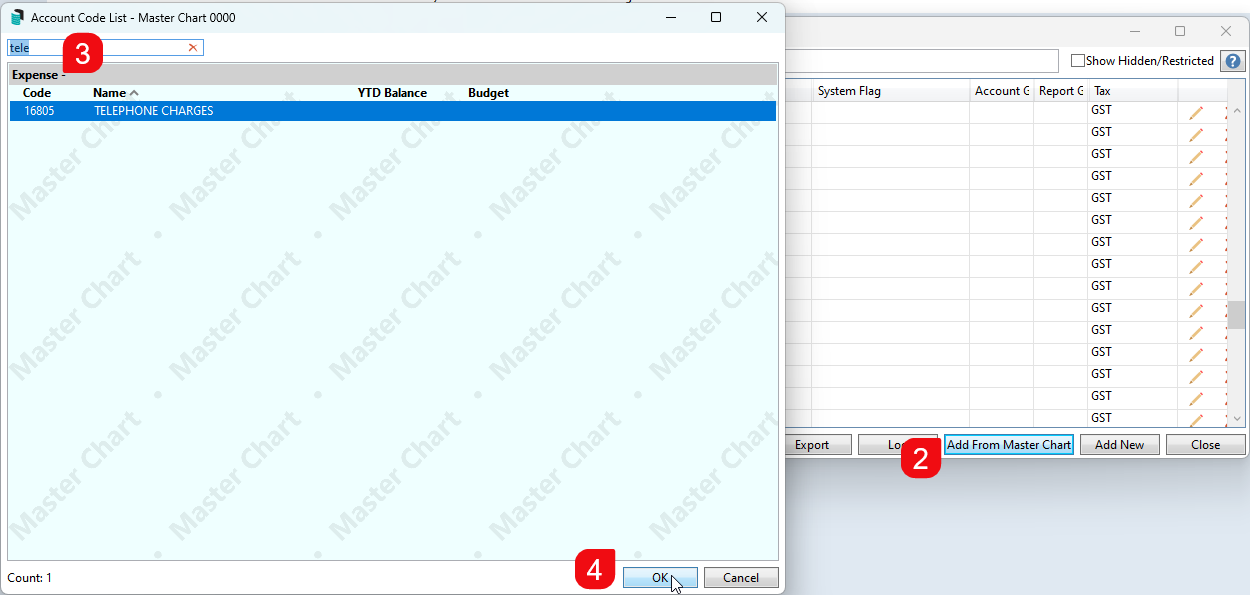
The following instructions will show you how to add an account code that already exists in the Master Chart to a single building.
- In the building to which you wish to add the account code, search or select Account Maintenance.
- Click Add From Master Chart.
- Use the Search field from the Account code list to enter either the description or number of the required account code. If unsure, scroll through the list to find the account code.
- Select the account code and click OK.

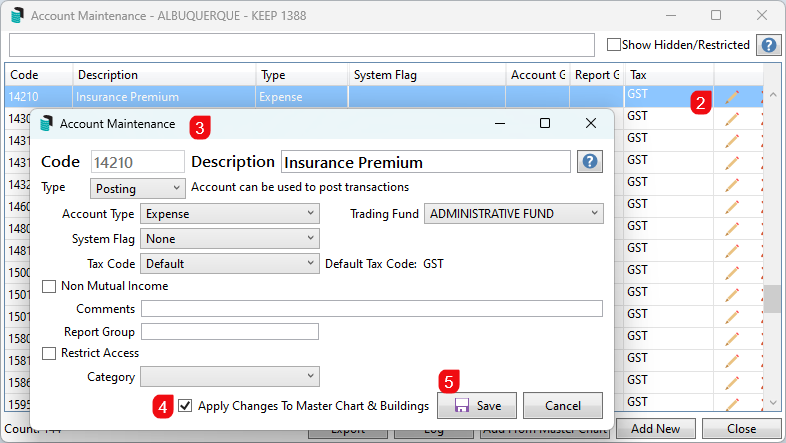
Editing an Account Code
StrataMax allows you to edit the description, type, account type, comments, tax code, non-material item, restricted access, account group, and account category of an account code. Editing an account code should be done with extreme care, as this will be updated in both the Master Chart building and any building that may be using this account code.
- From either the Master Chart Building or the local building, search or select Account Maintenance.
- From the Account Maintenance window, use the Search field from the Account code list to enter either the description or number of the required account code. Click the pencil icon to edit the account setup. Note the number cannot be changed.
- Review the fields of information and adjust as required.
- Apply Changes to Master Chart & Buildings will be ticked by default. This setting should be considered and unselected if the change should not affect the Master Chart or other buildings.
- Click Save.

Deleting an Account Code
An account code can only be deleted if there has never been any transactions posted in the selected building. If the account has previous transactions then the restrict access option can be used as an alternative.
If there are multiple entries for the same or similar account codes, Change Code Number can merge two codes and all respective transactions within those codes will be merged into the same account code.
The instructions below show how to delete an account code.
- If you wish to delete the account code in the building, search or select Account Maintenance.
- Use the Search field from the Account code list to enter either the description or number of the required account code.
- Click Delete on the account code that needs to be removed.
- Click OK to message: Are you sure you want to delete account XXXX from this building.

Account Codes that cannot be deleted due to existing transactions will receive the below message:

Deleting Account Codes that include Levy Income Accounts
If an account that requires deletion is an income account, it may be assigned in the Levy Invoice Code Setup area. In that case, this area will need review, and the account code will be removed before being allowed to delete the income account.
- Save this adjusted setup after deleting the income account's non-used Levy Invoice Code Setup line. Close out of this window.
- Search or select Account Maintenance.
- Use the Search field from the Account code list to enter either the description or number of the required account code.
- Click Delete on the income account code that needs to be removed.
- Click OK to message: Are you sure you want to delete account XXXX from this building.

Account Codes that have not had the Levy Invoice Code Setup update applied first will receive the below message:

Second Debtor Main
Secondary Debtors are used for billing purposes outside of a standard owner and levy billing scenario. This Second Debtor Main type is generally set at the install stage, and the Master Chart will contain this balance sheet for the Second Debtor Main account type. This type of account is used to create individual debtor accounts, total these accounts, and report on the Balance Sheet. A Secondary Debtor Setup is no longer required.
If existing second debtor codes exist, the local code cannot be changed, and the total balance will be reported using the Second Debtor's Main account.
When processing a Building Transfer, if no second debtors are included, the Master Chart balance sheet Second Debtor Main account can be added to the local building using the Add From Master Chart button, and second debtors can be added as needed.

Export
To export the Account Maintenance table into an Excel report from either the Master Chart or the local building, apply the below. The Master Chart will include all codes, and the local building will include the ones for the specific building;
- Search or select Account Maintenance.
- Click Export.
- This will export the information into an Excel worksheet, including any Hidden or Restricted account codes.
Search Global Accounts / Search Local Accounts
Search Global Accounts and Search Local Accounts is a function designed to be similar to all other search screens. This search replaces the account compare tools previously available, and allows codes to be consistent between the Master Chart (0000) and local buildings. It has its own article located here.
Log
To review log information around changes made to account codes, this area will offer a search screen using the Category: GeneralLedge. This can be set to look at a building or the Master Chart (0000) type. Any recent search, including the advanced settings, can be saved to load as a saved search for future use.

