 | The instructions in this article relate to Creditors Management. The icon may be located on your StrataMax Desktop or found using the StrataMax Search. |
The Creditors Management icon is for previewing Creditor Invoice details and will assist with checking important information such as the balance, invoice totals, any outstanding balances, credit notes, payment held status and BPay Reference information. There is also the option to include Master Chart Status to assist with Creditor account cleanup and checking if the Creditor account is in the Master Chart, or has a different account code to the Master Chart. Reports can also be produced to Excel on a global basis.
The creditor invoice activity report, which can be used for the StrataMax Online Portal can be set to upload for a configured period as outlined below.
Creditors Management | Security Setup
To access Creditors Management screen, the user must have the permission set to 'Allow' for 'Creditors Management' under the 'Creditors' category in Security Setup.

Creditors Management
On accessing the Creditors Management screen, default fields will be applied: Current Building, Master Chart Code, Creditor Name, Has Balance or Issues 'Yes' and Status to allow for quick searching of Creditor Invoices. Regularly used searches can be saved for future use or saved as a Dashboard item for quick access. Each Creditor account listed in the results can be selected, and all the information available for the Creditor account will be displayed in the bottom grid allowing for BPay CRN details to be edited, any document attached to be viewed, and the Creditor Invoice to be placed on hold or removed from hold as well as being tagged as paid if appropriate. There is also the option to include Master Chart Status to assist with Creditor account cleanup and checking if the Creditor account is in the Master Chart, or has a different account code to the Master Chart.
- Search or select Creditors Management.
- Use any of the 'Fields' to narrow down the results to what you would like displayed, then click the Refresh button to display the results.
- The Refresh button needs to be clicked each time any of the 'Fields' are changed to display a new list of results.
Creditors Management | Edit BPay CRN Details
If a Creditor has a warning alert details can be viewed in the bottom grid once the Creditor account is selected. If it is noted that the BPay CRN is missing, you can click the pencil icon to edit the details or select from the dropdown to correct the issue prior to moving into the Payments icon.
- Search or select Creditors Management.
- Use any of the 'Fields' to narrow down the results to what you would like displayed, then click the Refresh button to display the results.
- The Refresh button needs to be clicked each time any of the 'Fields' are changed to display a new list of results.
- Select the Creditor account with the warning alert and view the details in the bottom grid.
- Click the pencil icon and adjust the BPay CRN as noted on the invoice from the supplier.
Creditors Management | Place Creditor Invoice on Hold
Creditor Invoices can be placed on Hold with a single button click from Creditors Management. Placing a Creditor Invoice on Hold will withhold the balance from payment until released from Hold.
Please note that the Hold tick box is controlled by a permission in Security Setup called 'Hold Creditor Invoices'.

- Search or select Creditors Management.
- Use any of the 'Fields' to narrow down the results to what you would like, then click the Refresh button to display the results.
- The Refresh button needs to be clicked each time any of the 'Fields' are changed to display a new list of results.
- Click on the Creditor record to list any Creditor Invoices for the building and creditor account in the lower half of the screen. Tick the 'Hold' box to place the creditor invoice on hold.
- If you need all invoices for this particular Creditor in the building to be on Hold or off Hold, click on the ‘Hold All’ and 'UnHold All’ to collectively set the status.
- If the Building is configured for Invoice Hub approval, the On Hold will not be able to be adjusted until the Invoice has been approved via the Invoice Hub.

Creditors Management | Move Creditor Invoice off Hold / OK to Pay
Creditor Invoices can be removed from Hold and made available for payment with a single button click from Creditors Management.
Please note that the Hold tick box is controlled by a permission in Security Setup called 'Hold Creditor Invoices'.
- Search or select Creditors Management.
- Locate the Building / Creditor record by adjusting the Fields as required.
Tip: Click Refresh if changes to Fields are made. - Click on the Creditor record to list any Creditor Invoices for the Building and Creditor Account in the lower half of the screen. Click 'Hold' to remove the tick so that the Creditor Invoice is removed from Hold ready for the payment process.
- If you need all invoices for this particular Creditor in the building to be on Hold or off Hold, click on the ‘Hold All’ and 'UnHold All’ to collectively set the status.
- If the Building is configured for Invoice Hub approval, the On Hold will not be able to be adjusted until the Invoice has been approved via the Invoice Hub. Refer to the Hub field.

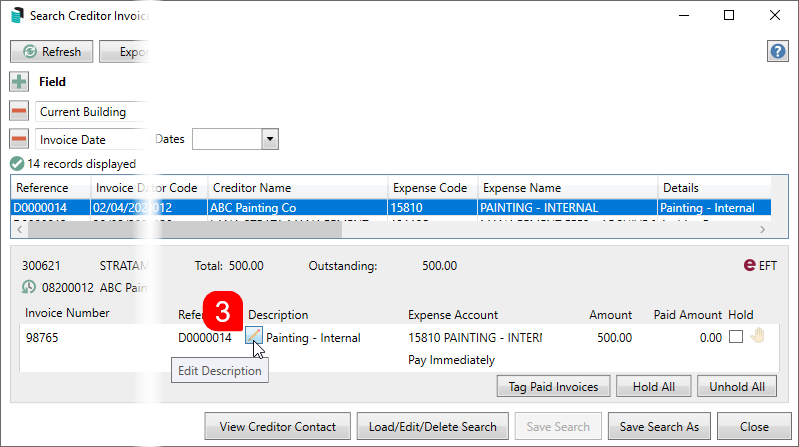
Creditors Management | Edit Description
In order for this function to be available, the permission called 'Transaction entry edit reverse' under the 'Data Entry' category, must be set to 'Allow' in Security Setup.

- Search or select Creditors Management.
- Locate and select the creditor invoice by adjusting the fields as required, then clicking Refresh.
- In the bottom section of the screen, click the Edit Description button (small pencil button under the 'Description' header).
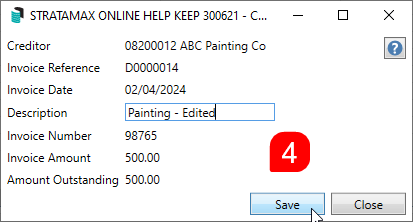
- The 'Change Description' window will appear, and the Description field can be edited. Click Save when done.
- The 'Change Description' window will close, and the change can be observed immediately.
- The 'Change Description' window will close, and the change can be observed immediately.


Creditors Management | Tag Paid Invoices
If there is an Invoice that is on Hold and not paid that matches a Credit Note entered, it can be tagged as paid. Once tagged as paid, the Creditor Invoices will no longer display in any Unpaid Invoice searches or reports.
Please note that the button Tag Paid Invoices is controlled by a permission in Security Setup called 'Creditor Balance / Tag Paid Invoices'.

- Search or select Creditors Management.
- Locate the Building/Creditor record by adjusting the Fields as required.
Tip: Click Refresh if changes to Fields are made. Or use a Saved Search for On Hold . - Select the Creditor account and view the details in the grid in the lower half of the screen.
- Untag as Hold any Creditor Invoice which matches the Credit Note balance.
- Click Tag Paid Invoices to view all available unpaid Creditor Invoices for the selected Creditor account.
- Tag/tick the Credit Note and Creditor Invoice, the Difference must equal 0.00 to be able to click Save.
Creditors Management | Tag Paid Invoices - Convert Journal Balances to Invoices
This tool is used to assist if the message "Creditor balance does not match". This message means the creditor account balance does not equal the total of outstanding invoice and credit notes available for payment. When this happens, the payment run may not be able to process the creditor until the mismatch is reviewed.
A common cause is a journal posted to the creditor account, often in an old year. The creditor balance may be correct, but the outstanding invoice and credit note documents do not add up to the same amount.
To draw a payment a Creditor Invoice is required. Use Tag Paid Invoice to correct Balances that have been journaled to Creditor accounts, this tool will convert a Journal to a Creditor account to a Creditor Invoice. A journal may have been entered to a Creditor account to adjust the balance, such as an ATO adjustment, however Creditor Invoices are required for any balance to a Creditor account, so this tool will assist with moving the journal and creating a Creditor Invoice.
Please note that the button Tag Paid Invoices is controlled by a permission in Security Setup called 'Creditor Balance / Tag Paid Invoices'.

- Search or select Search Creditor Invoice Items.
- Locate the Building/Creditor record by adjusting the Fields as required.
- Tip: Click Refresh if changes to Fields are made. Or use a Saved Search for On Hold .
- Select the Creditor account and view the details in the grid in the lower half of the screen.
- Select Tag Paid Invoices.
- Convert journal balances to invoices will be available in the lower half of the screen.
- Click Add.
- Enter the details into the fields for the Creditor Invoice to be created.
- Click Save.
Please see the example below of a balance on the Australian Taxation Office ATO Creditor account due to a Journal being entered to make an adjustment to the Creditor account balance. The Convert Journal Balances to Invoice tool will create a Creditor Invoice for the balance.


Journals can only be entered to a Creditor account from the Old Year, use Creditor Invoices and create a Creditor Note if required in the Current Year.
Creditors Management | Log
To check when a Creditor Invoice was moved to or from Hold, this can be viewed from the Log Viewer with a Category of 'InvoiceHold'.
- Search or select Log Viewer.
- Adjust the Category field to InvoiceHold.
- Click Refresh.

Creditor Invoice Activity Report
The Creditor Invoice Activity Report will display all invoices, paid or unpaid, for a specific period (using the Creditor Invoice date), based on the number of days set and is not limited to current and old year - the date range can be entered for historical year invoices also. This report can also be viewed on the StrataMax Portal and is refreshed each night during the upload process. There is a separate configuration for the Invoice Days for both the standard report and the StrataMax Portal version of the report.
- Search or select Creditor Management.
- Click on the Invoice Activity Report button.
- The Report Distribution screen will open with the Creditor Invoice Activity Report selected.
- Check the Building and Distribution Method and click Proceed.
The period date range is displayed in the top right hand corner and if the Creditor Invoice date falls in this range the invoice will report.

Creditor Invoice Activity Report | Configuration
There is a separate configuration for the Invoice Days for both the standard report and the StrataMax Portal version of the report.
- Search or select Creditors Management.
- Click on the Invoice Activity Report button.
- The Report Distribution screen will open with the Creditor Invoice Activity Report selected.
- Click on the cog wheel to access the Configuration menu.
- Update the Invoice Days as required. Click Close to save and exit.


Creditor Invoice Activity Report - StrataMax Portal | Configuration
The Creditor Invoice Activity Report is available for upload to the StrataMax Portal. The configuration for the StrataMax Portal report days differs from the standard Creditor Invoice Activity Report.
- Search or select Creditor Management.
- Click on the cog wheel at the bottom of the Creditor Management screen.
- The Invoice Days for Invoice Activity Report can be set for the StrataMax Portal.
- Click Close to save and exit.

Creditors Management | Report
A Creditors Management Report can be created into Excel from Creditors Management. The current data displayed in the Creditors Management menu will be reported on, so if you require specific buildings or creditors you can adjust the Fields in Creditors Management, such as removing 'Current Building' to report across the portfolio globally. Alternatively filters can be applied to Excel once the report has been produced.
- Search or select Creditors Management.
- Adjust any fields as required or Load a Search.
- Click Export to open an Excel report version of the Creditors Management information.