 | The instructions in this article relate to Ledger Card. The icon may be located on your StrataMax Desktop or found using the StrataMax Search. |
The Ledger Card displays a full history of an owner's account, including details of all debits, receipts, and discounts with the most recent transfer and last certificate issue date. The Ledger Card or Statement may be issued to owners and authorised contacts who have been configured in the Roll to receive information.
Preview Features
If access has been configured for users via Security Setup, this screen can be toggled between the legacy and new versions.
For the individual user, this can be toggled from the Desktop, as shown below, by clicking your username / Preview Features. Tick Ledger Card to use Report Distribution.

Produce a Ledger Card
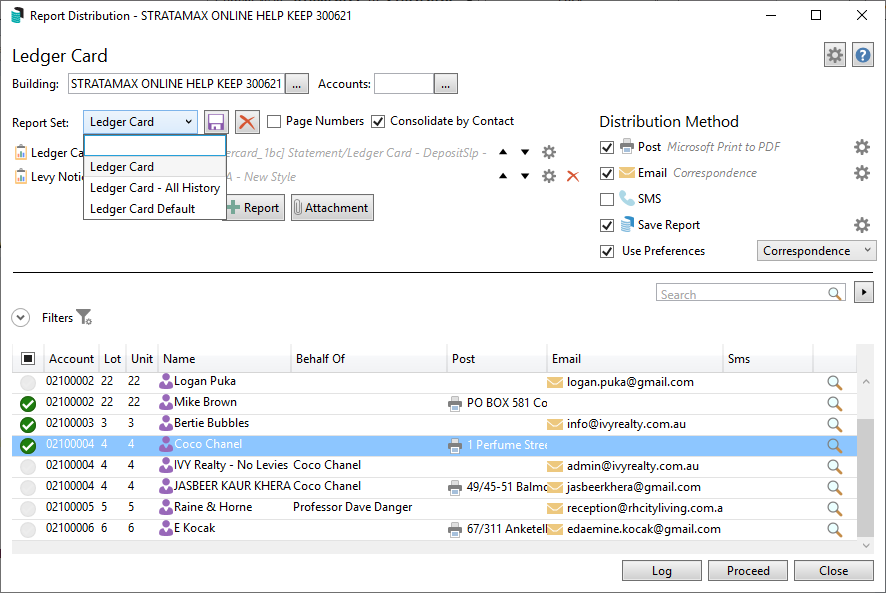
This option is designed to produce the information for the Roll contact. If the Ledger Card is being produced for internal purposes or requires multiple accounts to be included in one PDF file, use Report Set to select an internal or other recipient type.
- Search or select Ledger Card.
- Select from either a pre-configured Report Set from the drop-down selection, or click the configuration cog wheel to review the configuration - this is where you can set:
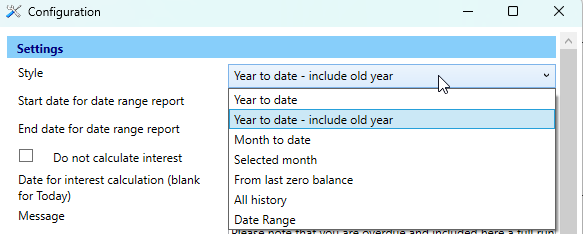
- The Style: this defines the statement period that the ledger card will produce.
- Start date for date range report and End date for date range report (use for a specific date range).
- Do not calculate interest.
- The Date for interest calculation (blank for Today).
- The Style: this defines the statement period that the ledger card will produce.
- Tag the account/s required from the table of owners or click the Magnifying Glass (single-contact selection).
- Include any additional Reports or Attachment if required.
- Click the magnifying glass to preview the selected lot report, or click Proceed to see all selected lots.


Ledger Card Internal Template
There is the option to change the Ledger Card Template to remove the Owners details, this may assist with producing ledger reports for a Lost Building or including with a Certificate. The following will be available on the Ledger Card Internal template:
• Name and Address will not display on the Internal template.
• Lot and Unit number will display.
- Search or select Report Set.
- From the list of available reports, search or select Ledger Card.
- Click the configuration cog wheel to review the template, and set this to Ledger Card - No Recipient. Click Close.
- Click on the Accounts ... ellipse, tag the account/s required then clickOK , then Proceed.
- From the preview window, click Print X Pages, Send X Email, Save to DocMax button.

Ledger Card | Cogwheel Configuration

Settings
Style - see below for the available style reporting.

- Year to Date - will report from the beginning of the current financial year to today's date.
- Year to Date - include old year - will report from the beginning of the prior financial year to today's date.
- Month to Date - will report based on the 'current month' for the building.
- Selected Month - reports the current month.
- From Last Zero Balance - will locate the last time the selected account had a balance of $0.00 and report to today's date.
- All History - will report all transactions for the selected account.
NOTE: The top of the ledger card or ledger statement will show the Statement Period. Use this to determine if the correct style has been selected.
Do Not Calculate Interest
Ticking this setting will stop the Ledger Card from calculating interest.
Date for Interest Calculation (blank for today)
This field will assist with entering a date for interest calculation. An example where this would be useful includes providing the Ledger Card with interest as at a certain date for settlement purposes.
Message (Global)
Text entered here will appear on the second page of the Ledger Card for all buildings.
Building Override Message (Building)
Text entered here will appear for just that building on the second page of the Ledger Card for all buildings.
Due Date Words
This will change the date or wording on the Ledger Card's deposit slip in the bottom right, provided a template with a deposit slip is being used. There is a 20-character limit.
Due Days
This setting is a number of days setting, which will produce the Ledger Card's deposit slip due date in the bottom right based on the number of due days entered here.
Edit Legal Action Words
This will change the wording on the Ledger Card when the owner is placed in legal action. Where the legal action words are placed will depend on the template that is being used for the Ledger Card. The wording is also limited to 30 characters, including spaces.
Legal Action Words
Wording set in this field will produce on the Ledger Card when an Owner has been added to Legal Action.
Skip Zero Balance Accounts (Global)
Using this setting to skip zero-balance accounts from being produced.
Template
Use Override Letterhead
This tickbox will ensure the override letterhead, if available, is printed on the Ledger Card. It will be set in conjunction with the field below.
Override Letterhead
If there are multiple letterheads available, this is where you can pick the override letterhead to be used.
Template
There are two templates to choose from:
- Statement/Ledger Card - Deposit Slip (used for Owner Distribution)
- Ledger Card - No Recipient - Deposit Slip (used for internal purposes and produced in Report Sets)
- Ledger Report (does not include the Deposit Slip and contains the receipients contact details when produced)
Template (Local Building Override)
The default is Use Global, and if a local building override is required, select the required template.
Report Sets
Each ledger card style and period can be set as a report set, ensuring a clean list of options and avoiding changes to the global template. Once these have been saved, the ledger card for the preferred format will be selected from the Report Set drop-down list.
Note: The cogwheel settings, including Do not calculate interest, are not controlled by any Security Setup permission. Any user who can open the Ledger Card can change them, and the change applies globally. If you need a consistent result across your team, set up a Report Set for each variation you use and have staff select the Report Set instead of changing the cogwheel. See Report Sets below.
Creating the Ledger Card Report Set
- Search or select Ledger Card.
- Click the cogwheel on the Ledger Card template and set a style. Click Close.
- Next to the Report Set drop-down, click the Save icon and give the Report Set a name. Example: Year to Date (based on the style)
- In the report set drop-down list, select the blank line, then click the cogwheel again to set the next style.
- Next to the Report Set drop-down, click the Save icon, then give the next Report Set a name.
- Repeat for each style.

Distributing the Ledger Card Report Set
- Search or select Ledger Card.
- From the Report Set drop-down list, select the style required.
- Either use the search to locate the Owner, or scroll to find the record.
- Tag the record(s) to preview the ledger card(s) and click Proceed from the preview window.

If the Ledger Card is required for internal purposes, use Report Set to select the Accounts and produce this for internal users.

