 |
Office Bearers may be located on your StrataMax Desktop or found using the StrataMax Search. |
Each building has a number of owners that may hold positions on the committee. These are called "office bearers" and the information relating to their date of appointment and what position they hold needs to be entered into StrataMax. As office bearers are usually lot owners, their information can be added from the Roll directly into Office Bearers.
Any changes made in Office Bearers will trigger an automatic upload to our StrataMax server - this is to ensure that any updated details are reflected on the Invoice Hub and StrataMax Portal.
StrataMax has restrictions on duplicate executive committee positions (Chairperson, Secretary and Treasurer), meaning two office bearers cannot hold the same position.
In instances where committee members swap executive roles it is recommended to change the position/office of one of them to "Committee Member" first before assigning the executive role for the other members.
Office Bearers | Overview

- Configuration: Click to open the Configuration screen.
- Help: Open the online help article for Office Bearers (this one).
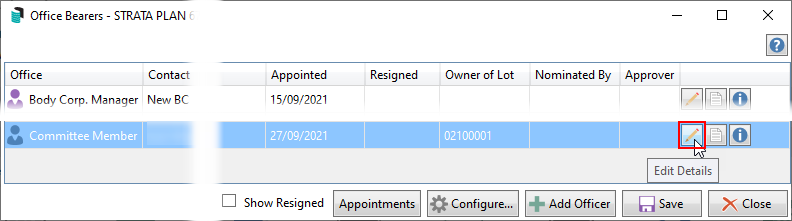
- Approver: If a clip board icon is displayed, it means this office bearer has been configured to approve invoices on the Invoice Hub.
- Buttons/Icons:
- Pencil: Opens the Office Bearer Details screen where the details can be edited.
- Note: Opens the Notes screen to add, edit, and remove notes for this office bearer.
- Info: Opens the office bearer's Contact Details.
- Warning: Hover your mouse cursor over the icon to display a tool tip, which describes the required action, which should also be displayed in the yellow warning box in the bottom left of the Office Bearer screen.
- Yellow warning message: Displayed when one of the office bearers needs a change made.
- Show Resigned: Ticked to display any resigned office bearers in this screen. Note that the icons for these will be grey.
- Appointments: Used as a quick way to update the Appointed Date field for all office bearers except for the position of Body Corp. Manager, and any resigned officers. See AGM Appointments further down this page.
- Email: Will open the Communication compose screen prepopulated with all the current officers email addresses, so that they can be emailed.
- Report: Opens the Office Bearers Report.
- Add Officer: Open the Office Bearer Details screen to add a new office bearer.
- Save: Saves any changes made to any of the office bearers. If changes are made, and this is not clicked, you will be prompted to save.
- Close: Closes the Office Bearers screen. If changes were made, and the Save button was not clicked, you will be prompted to save.
Office Bearers | Configuration
The configuration screen (Office Bearers > File > Configure) will allow user preferences to be set.
These settings are user specific and will need to be configured on each computer, allowing each user to chose their preferred view.
- Search or select Office Bearers.
- Click the Configure button (cog wheel in the top right).

Show Resigned Officers
If set, this will display resigned office bearers. The effect is the same as ticking the Show Resigned box in the main window.
Include Contact Info (User Setting)
Will include the contact details column in the Office Bearers Report.
Include Resigned Officers (User Setting)
Tick to display these in the Office Bearers Report.
Add an Office Bearer
This section covers the different methods of adding an office bearer to a building in StrataMax. It is important to note that when adding members to this area and if the Roll is in joint ownership, an individual contact can be added and linked via the Owner of Lot field. This area works from the same contact cards in the Roll, and changes made in the Office Bearers record will update the Roll.
Select From Roll
This section steps through how a contact in the Roll can be selected. If the contact card contains two people (such as a married couple) and only one of the individuals is an Office Bearer, then the contact must first be split Roll or using Contact Management OR use the Select Contact method below and add a single contact for the member.
'Select from Roll' should not be used if the Committee Member is not recorded on the roll as an individual contact. If selecting a contact card that contains multiple names and is then edited; the changes will also affect the contact associated to the lot in the Roll.
Using a contact with more than one individual is advised against as it can cause issues with StrataMax Portal accounts, access to appropriate reports & documents, and casting votes online in VoteMax.
That is why the Split Combined Owners process should be followed in this instance.
- Search or select Office Bearers, then click the Add Officer button.
- Click the Select From Roll button and the Account Code List window will appear with the list of owners. Select the required account.
- From the list of contacts associated with the account, select the appropriate contact.
- If the contact card contains two individuals, then the split combined owners function must be completed first. Using a contact with more than one individual is advised against as it can cause issues with StrataMax Portal accounts, access to appropriate reports & documents, and casting votes online in VoteMax.
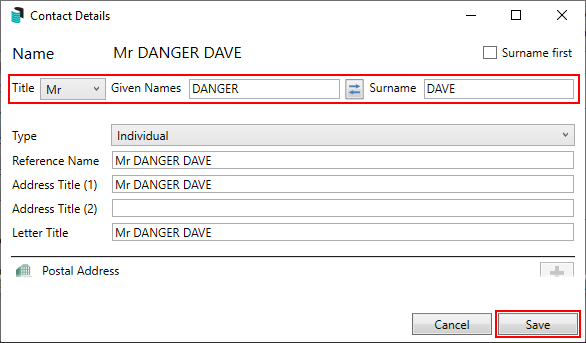
- In the Contact Details screen, you can make any necessary changes before clicking the Save button to close the Contact Details screen.
- Tick the Surname first box to display the surname at the beginning of the Name field.
- Click the button with the two blue arrows to swap the contents between the two fields.

- Click the Office drop-down menu and select the position.
- Change the Appointed date if necessary.
- You can retrospectively add the Resigned date as well if you are adding historical data.
- Click the Nominated by Lot ellipsis button to display the list of owners, then double-click the required owner, or single click the required owner, and click OK.
- Click the Creditor Code ellipsis button to display the list of creditors, then double-click the required creditor, or single click the required owner, and click OK.
- You can also click the Master Chart button in the top right, to select a creditor from the Master Chart.
- You can click the green 'plus' (+) button in the top right to quickly add a new creditor as well.
- The creditor is used to determine transactions that will appear on the Committee Expenditure report.
- If necessary, type anything relevant into the Comments, Registration Details & Payment Conditions fields (limited to 30 characters each).
- Click the Status Reports drop-down menu to select a preference for when the Status Report is sent:
- Use Report Default will observe the settings configured in Default Office Bearer Recipients in the Status Report screen.
- Always Send Report will always send the Status Report regardless of the settings configured in the cogwheel configuration in the Status Report.
- Never Sent Report will never send the status report regardless of the settings configured in the cogwheel configuration in the Status Report.
- Click the OK button to close the Office Bearer Details screen.
- Click the Save button in the bottom right of the Office Bearers screen.
Select Contact
Use this option to select a single contact to add to the Office Bearer area. This can be useful when the Roll contains more than one person, such as a married couple, and only one of the individuals is an Office Bearer. The other category of contacts that this area can be helpful for includes a non-owner such as a building manager or nominated contacts on behalf of a lot.
- Search or select Office Bearers, then click the Add Officer button.
- Click the Select Contact button, and the Contact Selection window will appear with the existing contacts list.
- Use the Search field to locate and double-click the required contact, or single-click the required contact and click Select.
- If the contact card contains two individuals, then the split combined owners function must be completed first. Using a contact with more than one individual is advised against as it causes issues with StrataMax Portal accounts, access to appropriate reports & documents, and casting votes online in VoteMax.
- In the Contact Details screen, any necessary changes are able to be made before clicking the Save button to close the Contact Details screen.
- Tick the Surname first box to display the surname at the beginning of the Name field.
- Click the button with the two blue arrows to swap the contents between the two fields.
- Click the Office drop-down menu and select the position.
- Change the Appointed date if necessary.
- The Resigned date can be added retrospectively if historical data is being added.
- If the contact is an Owner of a lot in the Roll, select the Owner of Lot field and select the associated lot account.
- Click the Nominated by Lot ellipsis button to display the list of owners, then double-click the required owner, or single click the required owner, and click OK.
- Click the Creditor Code ellipsis button to display the list of creditors, then double-click the required creditor, or single click the required owner, and click OK.
- Click the Master Chart button in the top right, to select a creditor from the Master Chart.
- Click the green 'plus' (+) button in the top right to quickly add a new creditor as well.
- The creditor is used to determine transactions that will appear on the Committee Expenditure report.
- If necessary, type anything relevant into the Comments, Registration Details & Payment Conditions fields (limited to 30 characters each).
- Click the Status Reports drop-down menu to select a preference for when the Status Report is sent:
- Use Report Default will observe the settings configured in Default Office Bearer Recipients in the Status Report screen.
- Always Send Report will always send the Status Report regardless of the settings configured in the cogwheel configuration in the Status Report.
- Never Send Report will never send the status report regardless of the settings configured in the cogwheel configuration in the Status Report.
- Click the OK button to close the Office Bearer Details screen.
- Click the Save button in the bottom right of the Office Bearers screen.

Create Contact | Individual
This section of the article covers how to set up an Individual as a contact.
- Search or select Office Bearers, then click the Add Officer button.
- Click the Create Contact button and the Contact Details window will appear.
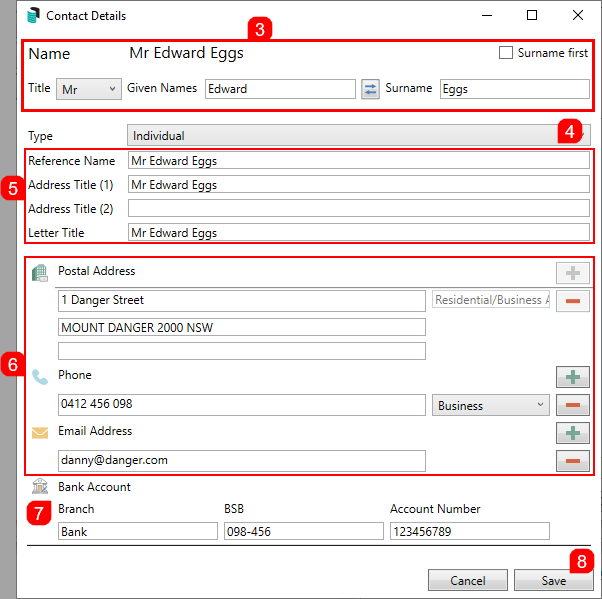
- The Name field will update automatically after entering the Title, Given Names and Surname (red outlines indicate this).
- Tick the Surname first box to display the surname first in Name and other fields.
- Use the 'switch' button (two blue arrows) to swap the contents of the Given Names and Surname fields.
- The Type field should be left as 'Individual'.
- The Reference Name, Address Title (1) (2), and Letter Title will also update automatically after entering the Title, Given Names and Surname, which will be displayed on correspondence and levies.
- Click the green plus button to add the Postal Address, Phone Number, and Email Address.
- If entering an email address, this can be assigned to its specific purpose. For example, using a specific email address for Levies, Correspondence or Invoice Hub. A separate email can be recorded for each type if needed. If all details should be sent to the one email address, this does not need to be changed.
- Additional phone numbers and email addresses can be added by simply clicking the green plus button.
- To delete them, click the red minus button.
- A notification icon will appear if a duplicate email address is found in another contact.
- The contact's Bank Account details can be optionally added here as well. However, these are currently not linked to any other areas of StrataMax.
- Click the Save button, then Close to close the Contact Details screen.
- Back in the Office Bearer Details screen, click the Office drop-down menu and select the position.
- Change the Appointed date if necessary.
- You can retrospectively add the Resignation date as well if you are adding historical data.
- Click the Nominated by Lot ellipsis button to display the list of owners, then double-click the required owner, or single click the required owner, and click OK.
- Click the Creditor Code ellipsis button to display the list of creditors. Then double-click the required creditor, or single-click the required owner, and click OK.
- You can also click the Master Chart button in the top right, to select a creditor from the Master Chart.
- You can click the green 'plus' (+) button in the top right to quickly add a new creditor as well.
- The creditor is used to determine transactions that will appear on the Committee Expenditure report.
- If necessary, type anything relevant into the Comments, Registration Details & Payment Conditions fields (limited to 30 characters each).
- Click the Status Reports drop-down menu to select a preference for when the Status Report is sent:
- Use Report Default will observe the settings configured in Default Office Bearer Recipients in the Status Report screen.
- Always Send Report will always send the Status Report regardless of the settings configured in the cogwheel configuration in the Status Report.
- Never Send Report will never send the status report regardless of the settings configured in the cogwheel configuration in the Status Report.
- Click OK to close the Office Bearer Details screen.
- Click the Save button in the bottom right of the Office Bearers screen.
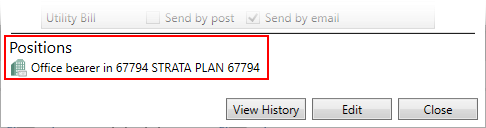
- Once a contact has been added as an office bearer, the bottom of the contact card will indicate that they are an office bearer, as well as the building they are associated with.


Create Contact | Company
This article section steps you through how to set up a Company as a contact.
- Search or select Office Bearers, then click the Add Officer button.
- Click the Create Contact button, and the Contact Details window will appear.
- Change the Type drop-down menu to Company.
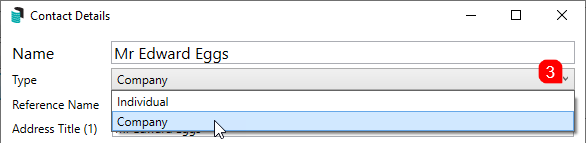
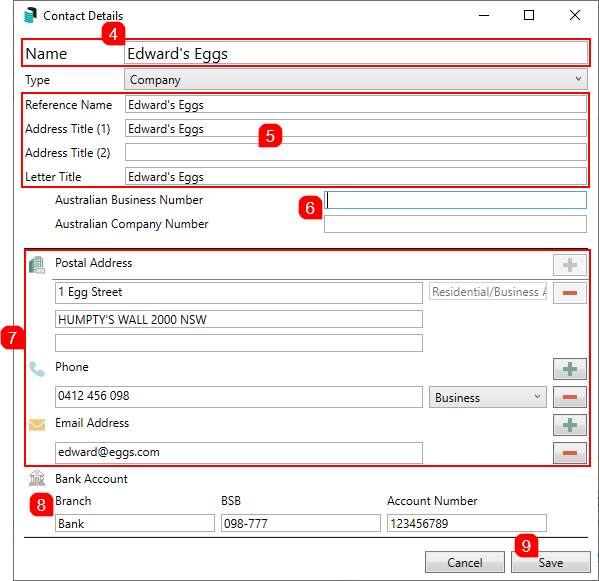
- Type the company's name into the Name field at the top, which is required in order to save the contact.
- The Reference Name, Address Title (1) (2), and Letter Title will also update automatically after entering the Title
- Enter an ABN and/or ACN if required. Both fields are validated.
- Click the green plus button to add the Postal Address, Phone Number, and Email Address.
- This can be assigned to its specific purpose if entering an email address. For example, using a specific email address for Levies, Correspondence or Invoice Hub. A separate email can be recorded for each type if needed. If all details should be sent to the one email address, this does not need to be changed.
- Additional phone numbers and email addresses can be added by simply clicking the green plus button.
- To delete them, click the red minus button.
- A notification icon will appear if a duplicate email address is found in another contact.
- The contact's Bank Account details can be optionally added here as well. However, these are currently not linked to any other areas of StrataMax.
- Click the Save button, then Close to close the Contact Details screen.
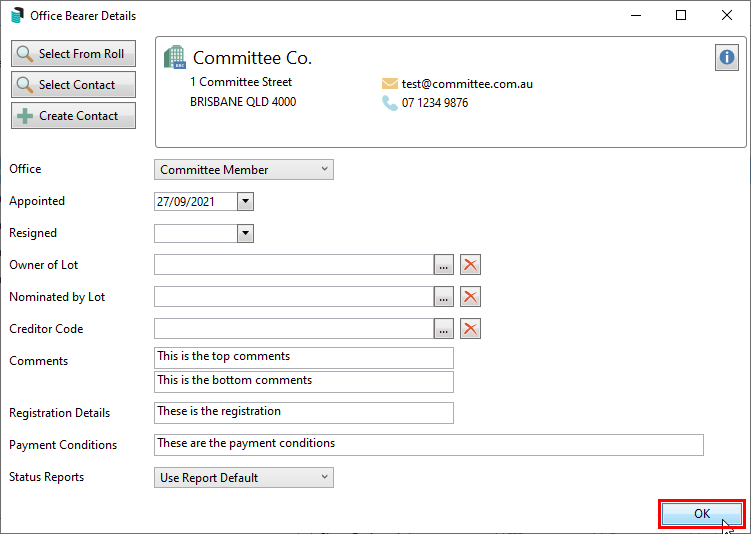
- Back in the Office Bearer Details screen, click the Office drop-down menu and select the position.
- Click the Office drop-down menu and select the position.
- Change the Appointed date if necessary.
- You can retrospectively add the Resigned date as well if you are adding historical data
- Click the Nominated by Lot ellipsis button to display the list of owners, then double-click the required owner, or single click the required owner, and click OK.
- Click the Creditor Code ellipsis button to display the list of creditors, then double-click the required creditor, or single click the required owner, and click OK.
- You can also click the Master Chart button in the top right, to select a creditor from the Master Chart.
- You can click the green 'plus' (+) button in the top right to quickly add a new creditor as well.
- The creditor is used to determine transactions that will appear on the Committee Expenditure report.If necessary, type anything relevant into the Comments, Registration Details & Payment Conditions fields (limited to 30 characters each).
- Click the Status Reports drop-down menu to select a preference for when the Status Report is sent:
- Use Report Default will observe the settings configured in Default Office Bearer Recipients in the Status Report screen.
- Always Send Report will always send the Status Report regardless of the settings configured in the cogwheel configuration in the Status Report.
- Never Send Report will never send the status report regardless of the settings configured in the cogwheel configuration in the Status Report.
- Click the OK button, to close the Office Bearer Details screen.
- Click the Save button in the bottom right of the Office Bearers screen.
- Once a contact has been added as an office bearer, the bottom of the contact card will indicate that they are an office bearer, and the building they are associated with.


Edit an Office Bearer
The ability to change the contact card on an Office Bearer record once it is linked to a StrataMax Portal user account is disabled to prevent conflicts on the Invoice Hub.
To be able to edit the Office Bearer Contact Details, the following 'Edit' permissions under the 'Roll' category in Security Setup.
Note that the 'Edit contact delivery preferences' is not currently enabled for Office Bearers.
These steps are for updating/editing an office bearer or their contact details.
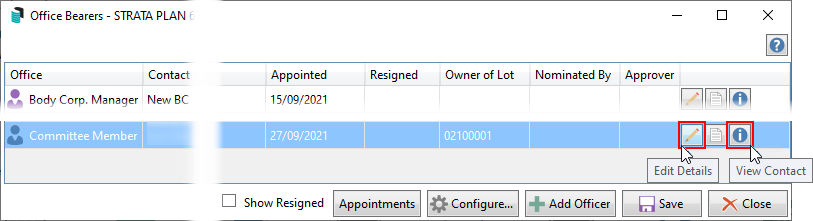
- Search or select Office Bearers and click the Edit Details button (pencil) to edit the Office Bearer record.
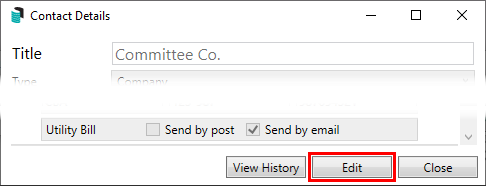
- To edit the contact details, click the View Contact (blue 'i') button to open the office bearer's Contact Details window. Then, click the Edit button in the Contact Details screen and make the necessary changes before clicking Save.
- If entering an email address, it can be assigned to its specific purpose. For example, a particular email address can be used for Levies, Correspondence, or Invoice Hub. A separate email can be recorded for each type if needed. If all details should be sent to the one email address, this should not be changed.
- If entering an email address, it can be assigned to its specific purpose. For example, a particular email address can be used for Levies, Correspondence, or Invoice Hub. A separate email can be recorded for each type if needed. If all details should be sent to the one email address, this should not be changed.
- In the Office Bearer Details screen, make the necessary changes and click OK.
- Click on Save when finished.


Resigning an Office Bearer
Office Bearers cannot be deleted from StrataMax, but can be resigned and hidden from the office bearer selection list (remove the tick from the Show Resigned box). This ensures a clear history of those who have held office bearer positions.
Resigning an Office Bearer who is an Invoice Hub approver will disable their access to the Invoice Hub and prevent them from seeing any history. It will also automatically retract all invoices on the hub if there are insufficient approvers on the Invoice Hub.
If a Change of Ownership is performed in the Roll, a prompt will appear, asking if the office bearer should be resigned. Answering ‘Yes’ will insert the date into the Office Bearers record in the Resigned field. Answering ‘No’ will not update the Office Bearers record.
- Search or select Office Bearers and click the Edit Details button (pencil) next to the required office bearer.
- The resignation date can be entered by either typing it into the field in a 6-digit format; '270921' for 27th September 2021 for example. Or by selecting it from the calendar drop-down menu.
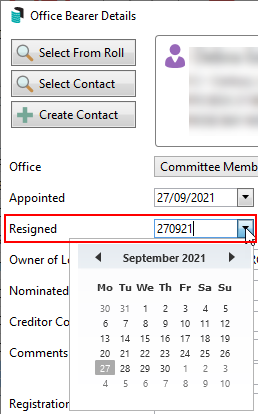
- Click OK to close the Office Bearers Details screen.
- Click Save in the main Office Bearers screen.


Body Corporate Manager
The Body Corp. Manager record will be available in all buildings as a default and is based on the information contained in Manager Maintenance. This record is used in other areas of the program, for example Certificates.

Office Bearer Notes
Office bearer notes can be accessed by clicking the Notes button. See the Notes article for information on how to add, edit, and delete notes.

AGM Appointments
If some or all of the committee members do not change after an AGM, simply update all members with the new date of appointment. Within Building Information, the Last Annual General Meeting field will allow for the date to pre-populate in this area, or it can be manually completed.
- Search or select Office Bearers, then click the Appointments button.
- If it's not populated already, enter the Last AGM Date (can be type or selected from the drop-down calendar) and click OK.
- In the Office Bearers screen, click the Save button to save the Appointed date.
Non-Owner Office Bearer StrataMax Portal Access
Please refer to StrataMax Portal | Non-Owner Office Bearers and Non-owner Office Bearer Approvers for more information.
Office Bearers Report
This section explains how to produce an Office Bearers Report can be produced.
- Search or select Office Bearers Report.
- or search or select Office Bearers, then click the Report button in the bottom right.
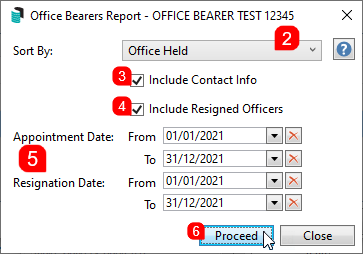
- Sort By: Click the drop-down arrow to select to sort by 'Office Held' or 'Contact Title'.
- Include Contact Info: Tick to include the contact details column in the report.
- Include Resigned Officers: Tick to show these in the report.
- Set Appointment Date and/or Resignation Date to filter by these dates.
- Click the Proceed button, and the Report Setup screen will appear.
- Select to print to Screen, Printer or Excel.
- The 'Excel' option is the only method that displays the 'Reference' or 'Office Bearer Record' number.
- Open the Template Selection screen to choose different templates:
- OFFICER_DEFAULT is the default template, which contains comment/registration details, but omits the "Nominated By" field. This template will be set as default on update to this version.
- OFFICER_NC1 omits the comment/registration details fields.
- OFFICER_NOM1 contains comment/registration details and includes the "Nominated By" field. It uses the Arial Professional font.
- OFFICER_NOM2 omits the comment / registration details fields but includes the "Nominated By" field. It uses the Arial Professional font.
- Open the Printer Setup screen to configure the printer and paper source.
- Click the Preview button to display the report in a separate window as a table, where it can then be printed or exported to Excel.
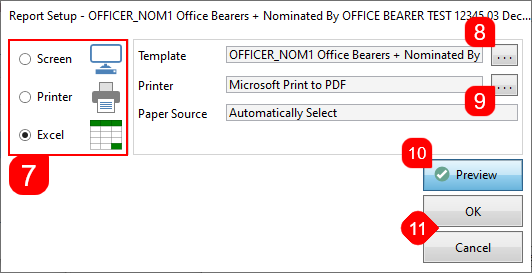
- Click OK to produce the report or Cancel to close the screen.


