This section of the guide covers how to generate, edit, and distribute the meeting minutes in Meeting Hub, after a meeting has been finalised. In order to generate the meeting minutes, all the Template Groups must be present.
When performing any functions related to merge letters, such as editing templates and distributing / printing, it is vital that before using this function, you have no other running instances of Word open in the background. Continue to ensure that whilst any processes in this area are taking place, you don't open any other documents until the editing of the template you are working on, or the processing of a distribution is completed. If you still continue to encounter errors, and you have Word closed, please email StrataMax support, so we can investigate further.
It is recommended to make any formatting changes after the minutes have been reviewed thoroughly and have received necessary approval. This saves users from making formatting changes every time a change is made in Meeting Hub, and a new notice or minutes document is generated, superseding the previous one.
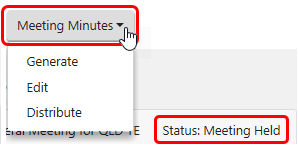
In order to generate the Meeting Minutes, the meeting status must be 'Meeting Held'. When the Meeting Minutes document is generated using an "Off The Shelf" (OTS) template, it contains a variety of merge fields that are automatically populated based on the information entered into Meeting Hub. For example, attendees and the outcomes of the motions. Some of these fields will vary depending on the meeting type, and which state the Template Group is for.
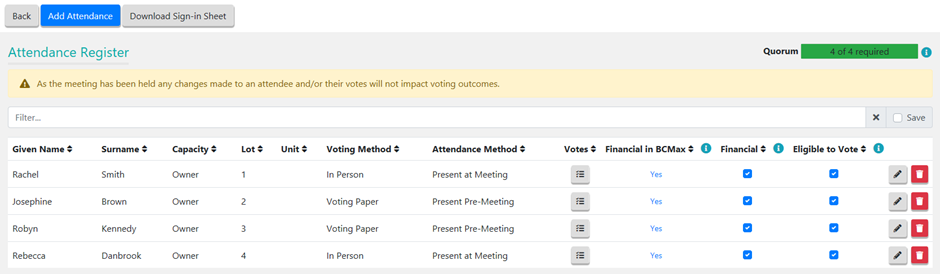
- Attendees are added to the minutes based on the Attendance Register.
- Pre-Meeting Votes are recorded from those lots that used VoteMax to cast their votes prior to the meeting.
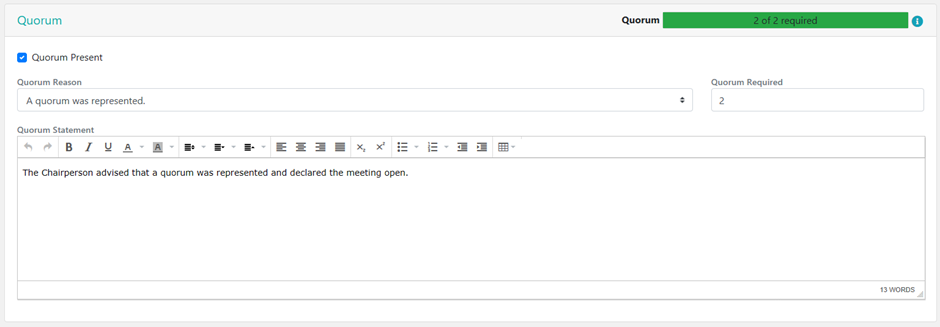
- The 'Quorum' section is populated from the Meeting Overview screen, merging only the 'Quorum Statement' field.
- The motion title, type, number of votes (QLD only), and outcome are automatically merged in the minutes. The resolution body field will also merge and will depend on what option was selected in the motion.
Please look at the Meeting Hub Templates page to review samples of OTS templates. Please be aware that these templates cannot be amended by users. However, amendments and changes can be made to each meeting notice and meeting minutes document in Word, once they have been generated.
Completing Minutes After The Meeting
For some meetings it may not be possible to run the meeting in Meeting Hub as the meeting occurs; for these meetings if you wish to still merge the meeting minutes, it is recommended to follow the below steps so this information can merge onto your minutes and save you time from having to manually edit the minutes generated to Microsoft Word.
- Ensure all attendees have been added to the Attendance Register.
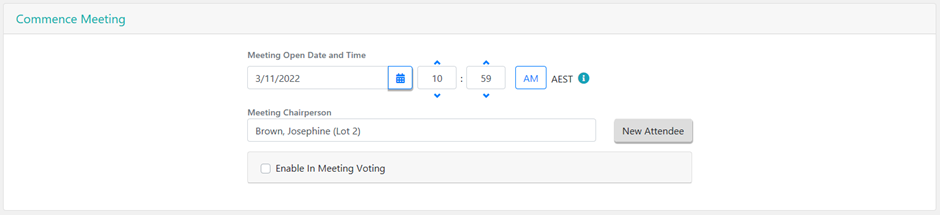
- Commence the meeting, making sure to select the correct meeting open date and time, the Chairperson for the meeting, and also to confirm a Quorum is present. For more detail on commencing the meeting, see the commence meeting steps.
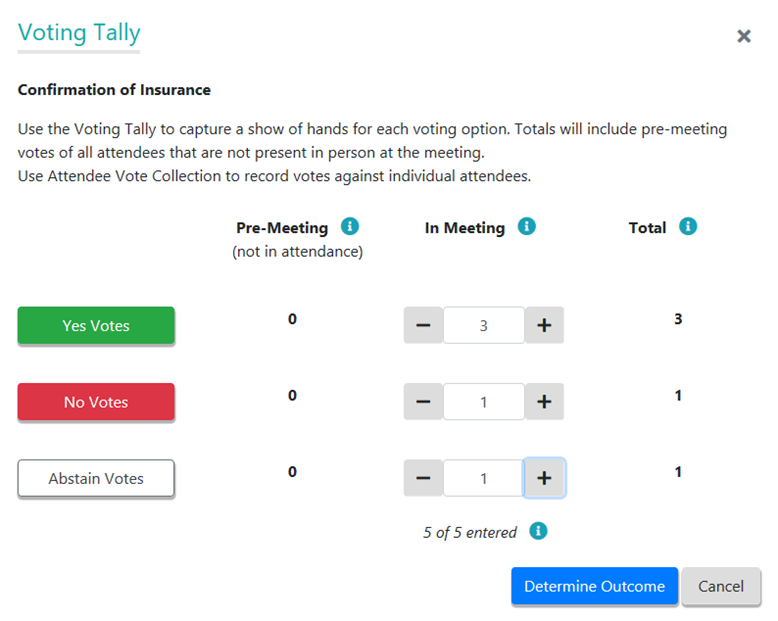
- In each motion, click the Vote Tally button, enter the number Yes, No, and Abstain votes, and then click the Determine Outcome button. Ensure the determined outcome matches what was voted on during the meeting.
- For any motions that were amended during the meeting, use Manage Agenda and Motions to edit the motion as required.
- For a Committee Election meeting, add the required nominees and determine outcomes for each position. For more detailed steps, see the committee election steps.
- At the end Close Meeting stage ensure the Meeting Close Date and Time is entered.

- In the Meeting Overview screen, click the Meeting Minutes button, and select Generate.
- The minutes document will open in Microsoft Word where it can be reviewed, and the formatting can be edited. The length of time it takes to open Word and display the document depends on your PC and your network.


Minutes Documents in DocMax
Generating the minutes document in Meeting Hub will automatically save the document in DocMax, and can be viewed in the Recently Added documents.

In the Document Details section of each document, the Title and Description fields will automatically be populated, and a new DocMax Category will also be assigned, called 'MeetingHub Meeting Minutes'.

If previous minutes documents exist in DocMax with their own existing Category, there are a couple of ways that these can be changed in order to ensure they all fall under one Category.
- Existing/previous meeting documents can be changed to the new Meeting Hub categories in bulk. This means any future Meeting Hub documents won't need their Category changed each time they are generated and added to DocMax.
- A profile can be created to change the category of each new Meeting Hub document to the existing meeting category as and when they are generated and saved in DocMax.
Edit Meeting Minutes
Please check out the Meeting Hub | Document Editing video which gives you tips, tricks and best practices for editing the Meeting Hub notice and Meeting Hub minutes documents in Word.
- Click the Meeting Minutes button, then the Edit option. This will open Word with the current document stored in DocMax.
- Make any changes and save before closing Word. It will not supersede the current document in DocMax.
It is strongly advised to NOT edit any sentences, words, or content in the Meeting Notice Word document as it will then differ from the details in Meeting Hub, and what owners see in VoteMax. These types of changes should be made in the Meeting Details screen in Meeting Hub, and then a new meeting notice document should be generated. Formatting changes such as removing extra spaces or paragraphs however, are fine since these have no bearing on the details in VoteMax.
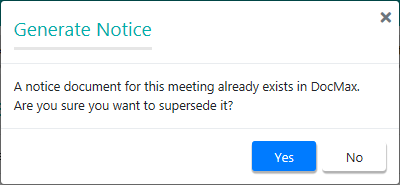
- After making the necessary changes in the Meeting Details screen, click the Meeting Notice button, then the Generate option. This will present a prompt confirming if the existing document should be superseded.
- The superseded document can still be viewed in DocMax.

Distribute Meeting Minutes
Once the minutes and all accompanying documents have been finalised, the minutes can be distributed. After selecting the Distribute option, the Report Distribution window will open. Please refer to the Report Distribution article and the Merge Letters QRG for more detailed information on this screen.
- Click the Meeting Minutes button and select 'Distribute'.

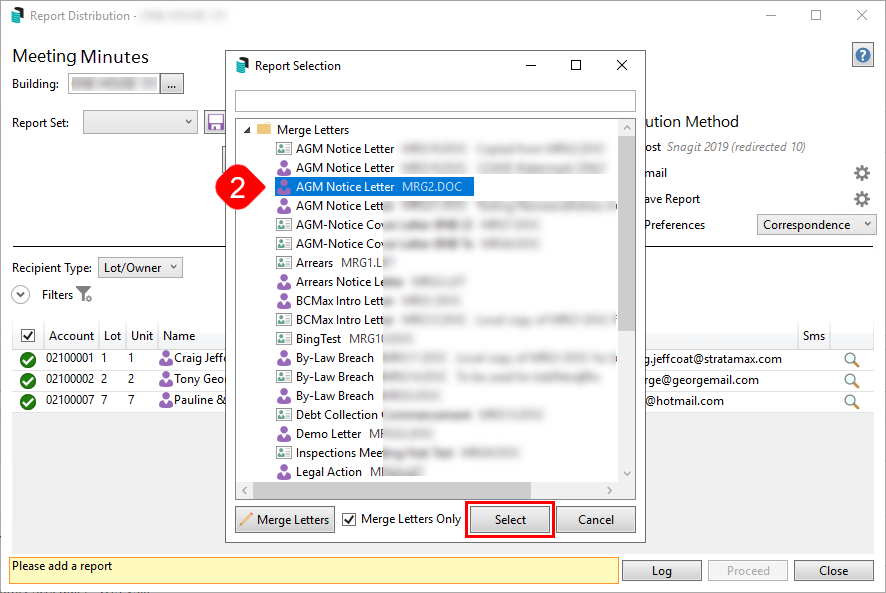
- Immediately the 'Report Distribution' screen will open, with the 'Report Selection' window on top, for you to select the notice cover letter from the list of merge letters. Select the require cover letter and click the Select button.
- You can also click the Cancel button if you don't want to select/include a cover letter for the notice.
- You can also click the Cancel button if you don't want to select/include a cover letter for the notice.
- After selecting a cover letter, the cover letter, the minutes, and any attachments will be listed in the 'Report Distribution' screen.
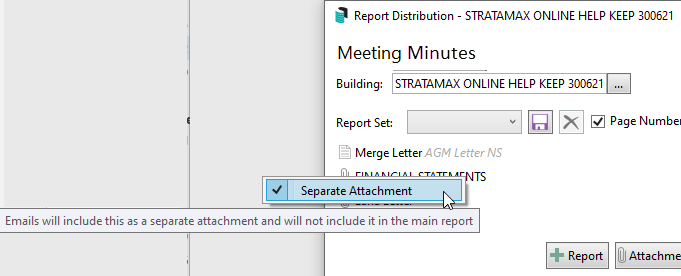
- From this point, please refer to the Merge Letters article for guidance on how to proceed, including how to choose recipients, add attachments, add more reports to the meeting minutes, etc. Note all attachments will be set as separate attachments in the merge letter interface. To send all documents as one attachment, simply right-click each attachment and unselect 'Separate Attachment' as required.


Edit Email Body & Subject
When meeting minutes are being sent through the Report Distribution screen, more specifically by email, the system will automatically insert the body of the email. The content of the body & subject can be changed, opening the Email Template Manager in StrataMax, or you can follow the below process.
The Meeting Hub distribution emails observe the user's signature setting in Communication (Options > Signature > Use Personal).
- In the Report Distribution screen, click the cog wheel icon next to the Email box on the right side of the screen.
- This displays the current email template.
- Click the Pencil button to open the Email Template Manager window, where the Template Type field will already have 'Meeting Hub Meeting Minutes' selected.
- To create or modify a Global Template, click Pencil button to the far right. If a LocalTemplate is being created, search for the specific property using the Search Building Name / Number field, highlight the building and click on the Pencil button.
- Enter a subject in the Subject line, and in the Body field, enter the body of the email.
- In order to enter a paragraph, add <BR> at the end of the sentence like in the screenshot below.
- Merge fields can be inserted in both the subject and body by clicking the Insert Field button.
- Building Long Name - Building Long Name field from Building Information.
- Building Number - Building Number from Building Maintenance.
- Company Title - Body Corporate Name from Building Maintenance.
- Meeting Type - The Meeting Type of meeting created; for example Annual General Meeting.
- Report Name - Type of document attached e.g. Notice or Minutes.
- Meeting Date Long (Friday 29 October 2021 - obtained from the Meeting Date and Time field).
- Meeting Date Short (DD/MM/YYYY - obtained from the Meeting Date and Time field).
- Meeting Location (Obtained from the Meeting Location field).
- Meeting Location Details (Obtained from the Meeting Location Details field).
- Meeting Time 12h (Obtained from the Meeting Date and Time field).
- Meeting Time 24h (Obtained from the Meeting Date and Time field).
- Meeting Time Zone (Based on the address in the Meeting Location field).
- Select Save.

The Security Setup setting is titled 'Edit Email Templates' located under the 'Meeting Hub' category and access must be granted to use this functionality. Please discuss access with your StrataMax Administrator.
Distribution with Bing
Please be aware that meeting notices, minutes, attachments and merge letters issued via the Meeting Hub Document Distribution screen can only be sent to Bing if the Bing Customer Portal has been set up. Once Bing has been contacted, and access to the Bing Customer Portal has been confirmed, there are some settings that need to be configured in StrataMax as well. Please refer to the BingMail Web API page for more info:
Please ensure that when using the BingMail EasyPost API that you have the 'StrataMax Bing Easy Post API' printer selected on the PC you will be using.
The credentials saved in this screen will apply to all StrataMax users. Once this area has been configured by one user, there is no need to repeat these steps. If you have previously configured BingMail for Levy Notices, you will not need to re-enter the details in other areas, including GLMax.
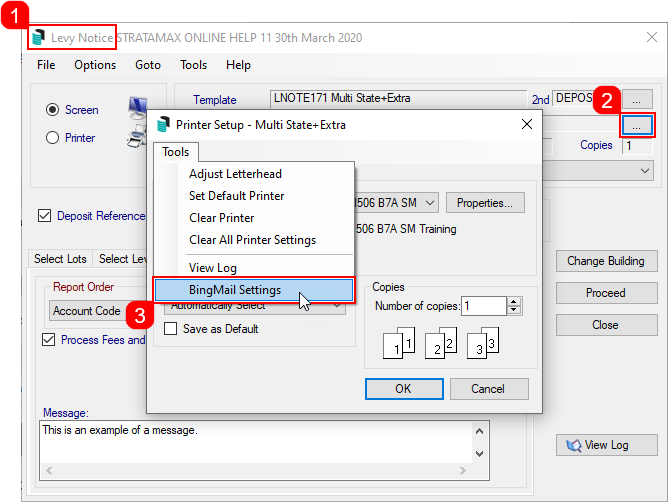
Levy Notice Method
- Search or select Levy Notice/Reports.
- This screen is also available from the Tools menu in any area where printing from StrataMax is an option.
- Click the ellipsis button next to the printer.
- In the Printer Setup window, click Tools > BingMail Settings.
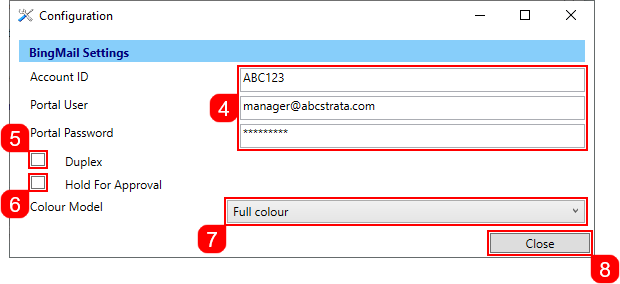
- In the BingMail Settings window, enter the details provided by Bing Customer Service; Account ID, Portal User, and Portal Password.
- Tick the Duplex box to configure the BingMail Portal to print multiple page documents on both sides of the paper. This can help reduce printing costs.
- Tick the Hold For Approval box for documents to remain on the BingMail Portal with the status "On Hold". This allows for an internal review, or approval process prior to issuing Levy Notices to lot owners. Any uploaded documents will be included in the next print run at BingMail if this setting is switched off.
- Select the required colour setting from the Colour Model drop-down menu.
- When finished, click Close.
- Click OK back in the Printer Setup window, then close the Levy Notice/Reports menu.

Merge Letter Method
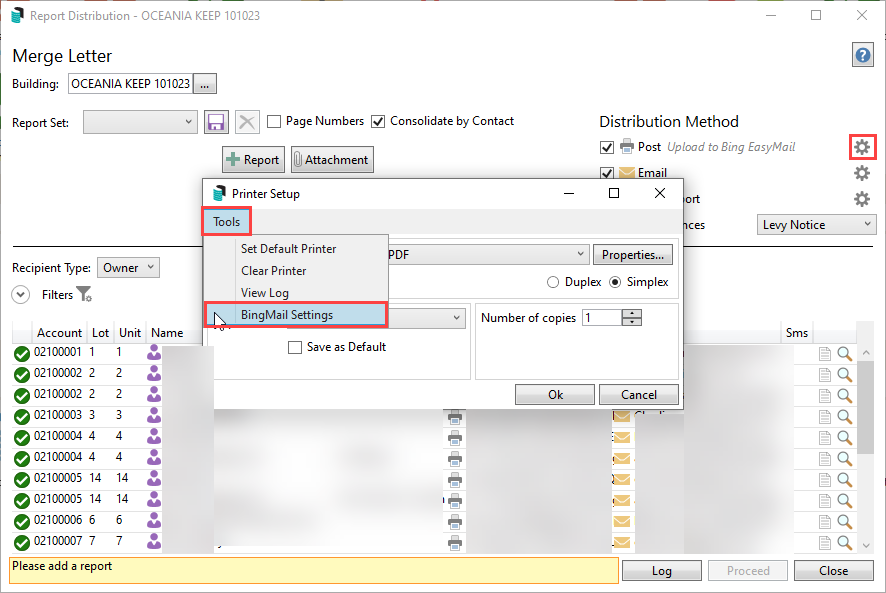
- Search or select Merge Letters.
- Click the ellipsis button next to the printer.
- In the Printer Setup window, click Tools > BingMail Settings.
- In the BingMail Settings window, enter the details provided by Bing Customer Service; Account ID, Portal User, and Portal Password.
- Tick the Duplex box to configure the BingMail Portal to print multiple page documents on both sides of the paper. This can help reduce printing costs.
- Tick the Hold For Approval box for documents to remain on the BingMail Portal with the status "On Hold". This allows for an internal review, or approval process prior to issuing Levy Notices to lot owners. Any uploaded documents will be included in the next print run at BingMail if this setting is switched off.
- Select the required colour setting from the Colour Model drop-down menu.
- When finished, click Close.


