|
The instructions in this article relate to Bank Account Setup. The icon may be located on your StrataMax Desktop or found using the StrataMax Search. |
As bank forms are not available for print until an account has been set up, this is where the details are added. First, you need to set up an account with the bank, then enter the details of this account into the fields listed below.
Any building using a Sub-Group will use the same details set in Bank Account Setup in the Main building, which will settle payments to the Sub-Group debtors, based on the building setup and the payment reference numbers issued from each group.
An overdraft limit and hold accessed in Set Bank Account Limits can also be configured from Bank Account Setup.
Bank Account details, balances, and account numbers will be read-only fields in the Building Information screen or alternatively using Bank Balances which also includes an additional PDF reporting option.
Setup a New SCM Operating or Investment Bank Account
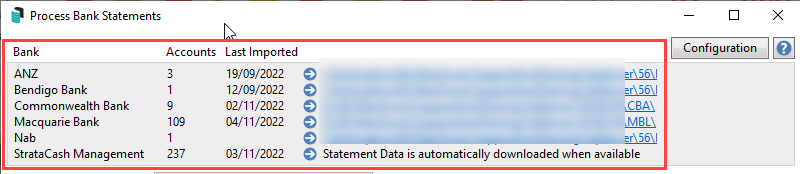
If a new StrataCash Management account has been opened and the details have not already been entered in the Bank Account Setup screen, it will appear in the Process Bank Statements screen under a section named 'Additional StrataCash Management accounts not set up in StrataMax'. By clicking the blue Set up icon on the far right, the bank account details will automatically be entered into StrataMax, in the Bank Account Setup screen. If there are no new or additional StrataCash Management accounts to be setup, this section will not be displayed.

- Search or select Process Bank Statements.
- From the top area of this screen, any new SCM accounts will be displayed, and the blue Set up icon can be clicked.
- This will open the Bank Account Setup screen with all the bank account details.
- For an investment account, additional information, including the SCM Reference wording, maturity and interest rate, will populate automatically on the first download of statement data. When using this method for investment accounts, the account and fund need to be selected, and will determine how the funds are displayed on Financial Statements.
- Both operating and investment accounts will default to Import and Reconcile (recommended).
- Click Save.
New StrataCash bank accounts can be requested in the StrataCash Hub screen.
Enter a New Operating Bank Account
This option will be available for all other banks and can be entered into Bank Account Setup.
- Search or select Bank Account Setup.
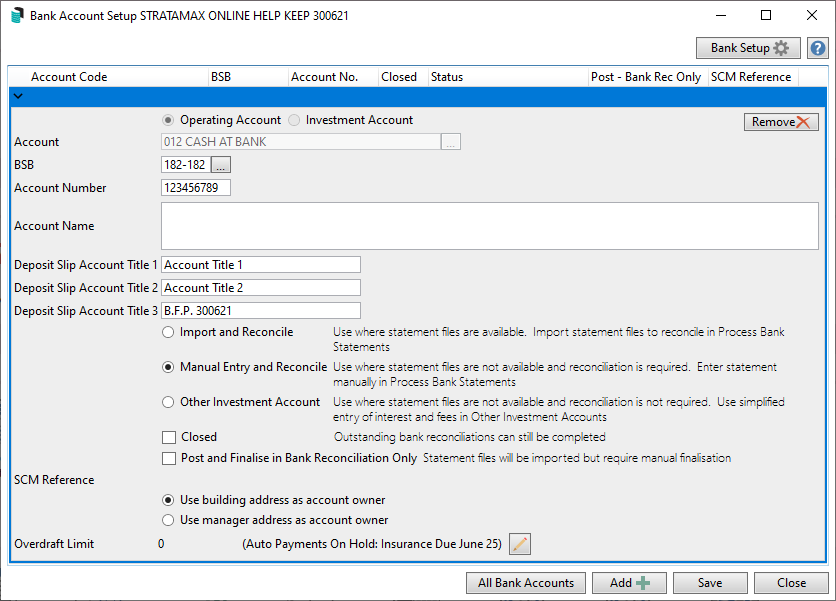
- Click the Add button, and the form will appear.
- The Operating Account radio button will be selected by default.
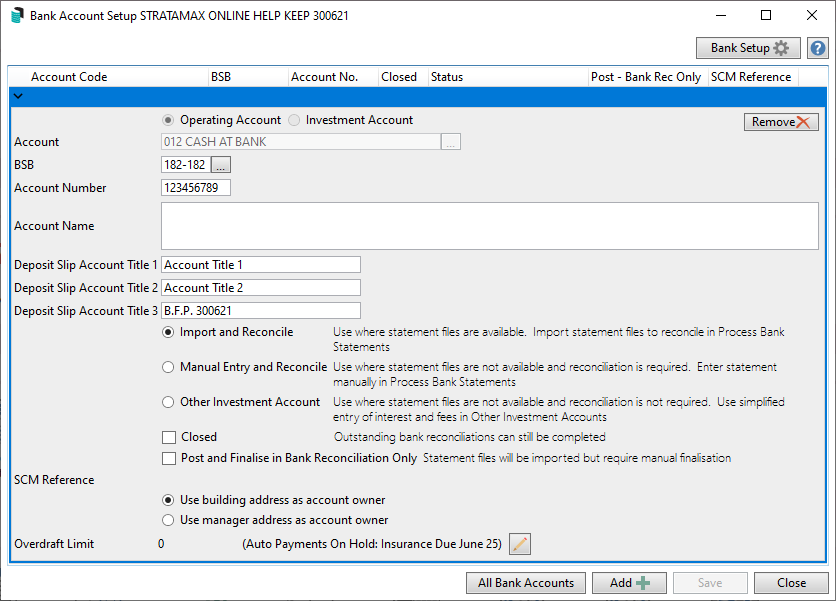
- The Account field will automatically default to '012 CASH AT BANK' as the operating account.
- Click the BSB drop-down to display the list of available banks. You can use the Filter field to find the BSB, bank, and branch to search.

- Type the bank account number into the Account Number field.
- Type the Account Name in the same named field if required (if Account Name is left blank the building name will be the default on bank reports and the statement produced in StrataMax).
- Tick any of the following boxes if they apply:
- Import and Reconcile should be ticked if the bank account is supported and will ensure the account is included in the Process Bank Statements screen and Bank Reconciliation to be processed automatically, even if the building is currently 'Inactive'.
The Manual Entry and Reconcile box affects the Bank Reconciliation screen, allowing items to be added to this screen. Manual Entry and Reconcile may be used if data is unavailable (un-supported bank) or when a transaction, such as a closing balance or transferred funds entry, is missing and required.
Manual Entry and Reconcile will prevent any current banking from downloading, and this should be considered when using this setting. Remember to turn it off after any required manual entries.- Other Investment Account - Use where statement files are not available and reconciliation is not required. Use simplified entry of interest and fees in Other Investment Accounts.
- This Closed box should only be ticked to indicate the bank account is closed. This prevents new payments from being processed in Payments (ensure that Import and Reconcile is not selected so account will no longer be reported in Process Bank Statements). When 'Closed' is noted in Process Bank Statements and when the balance is back to 0.00 click on the red cross in Process Bank Statements to remove the closed bank account.
- The Post and Finalise in Bank Reconciliation Only affects the Bank Reconciliation screen. When ticked, it displays a preview of the various transactions that will occur in the building before the user can then Auto Process the statement.
- Select the most appropriate option for the reporting of the account address for Bank reports:
- Use building address as account owner.
- Use manager address as account owner.
- Click the Save button, then Close.
- If the 'Import and Reconcile' box was ticked in step 8, and this is the first time the Bank has had a new account setup, then a new UNC download path will be visible in the Process Bank Statements screen.
- Once the file has been imported or banking file dragged and dropped into Process Bank Statements, follow the steps to process the bank statement data.


Only one Operating Account can be setup (Cash at Bank - account 012) and set to reconcile.
Enter a New Investment Bank Account
- Search or select Bank Account Setup.
- Click the Add button, and the form will appear.
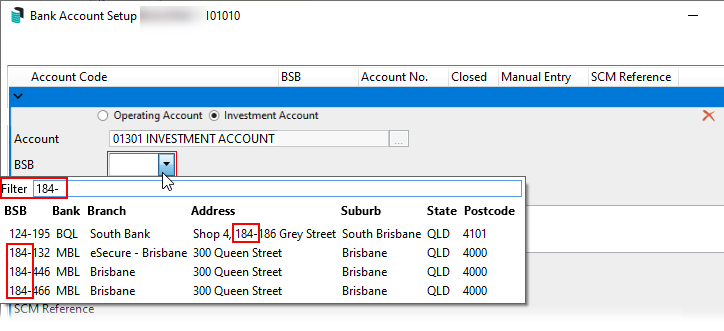
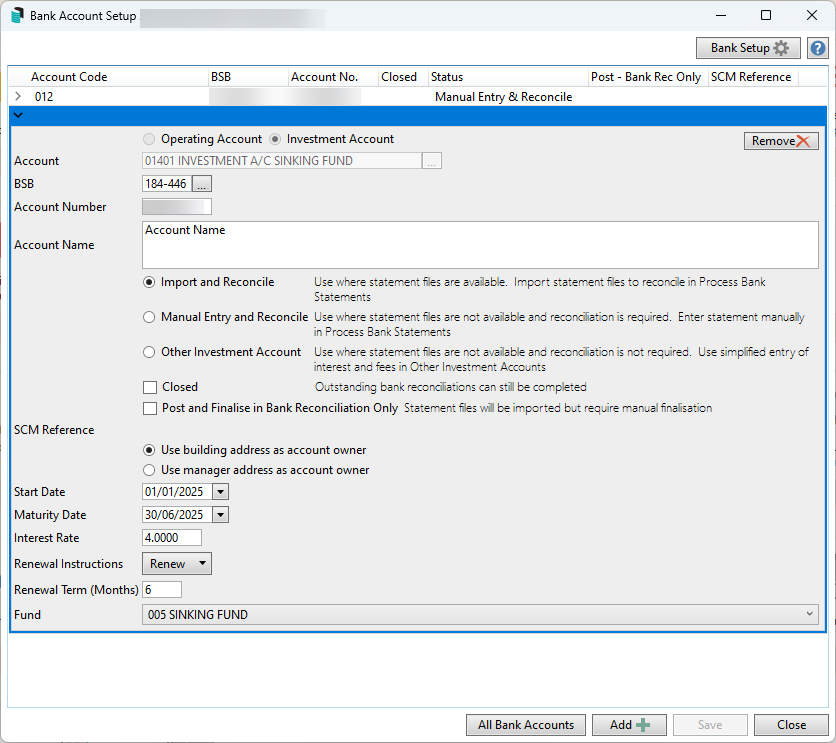
- Select the Investment Account radio button.
- Click the Account ellipsis button to open the 'Account Code List' window and select the required account (most likely 01301, 01302, 01401, 01402, etc.).
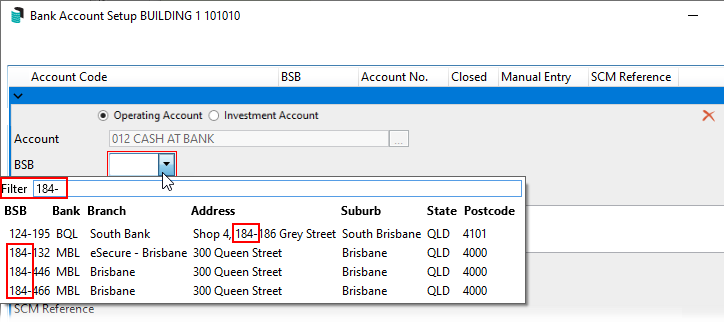
- Click the BSB drop-down to display the list of available banks, where you can use the Filter field to find the bank and branch you need. You can filter by any of the columns displayed - BSB, Bank, Branch, etc. In this example we've used '184-' in the Filter.
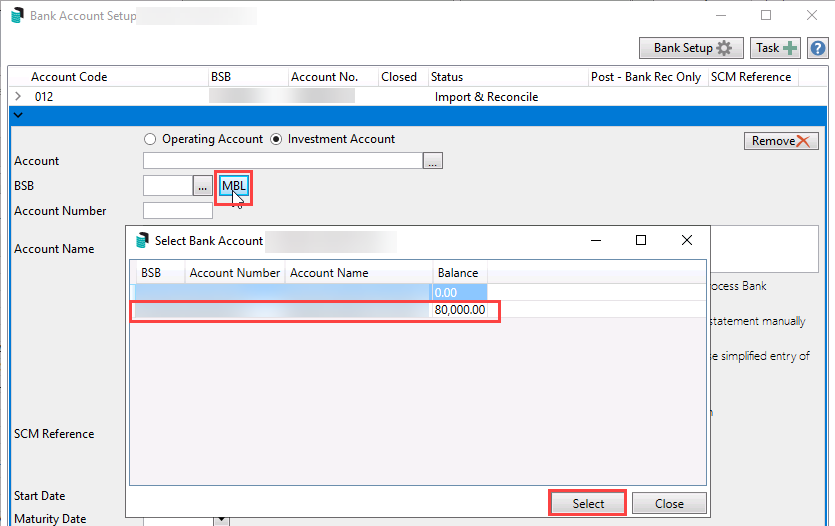
- If the data is available in the txn file, there will be an additional bank button next to the BSB to select the Bank Account from the file. Example:
- Type the bank account number into the Account Number field.
- Type the Account Name field.
- If Account Name is left blank the building name will be the default on bank reports and the statement produced in StrataMax).
- Tick any of the following boxes if they apply:
- Import and Reconcile should be ticked if the bank account is supported and will ensure the account is included in the Process Bank Statements screen and Bank Reconciliation to be processed automatically, even if the building is currently 'Inactive'.
The Manual Entry and Reconcile box affects the Bank Reconciliation screen, allowing items to be added to this screen. Manual Entry and Reconcile may be used if data is unavailable (un-supported bank) or when a transaction, such as a closing balance or transferred funds entry, is missing and required.
Manual Entry and Reconcile will prevent any current banking from downloading, and this should be considered when using this setting. Remember to turn it off after any required manual entries.- Other Investment Account - Use where statement files are not available, and reconciliation is not required. Use simplified entry of interest and fees in Other Investment Accounts.
- This Closed box should only be ticked to indicate the bank account is closed. This prevents new payments to be processed in Payments (ensure that Import and Reconcile is not selected so account will no longer be reported in Process Bank Statements).
- The Post and Finalise in Bank Reconciliation Only affects the Bank Reconciliation screen. When ticked, it displays a preview of the various transactions that will occur in the building before the user can then Auto Process the statement.
- Select the most appropriate option for the reporting of the account address for bank reports:
- Use building address as account owner.
- Use manager address as account owner.
- Enter the Maturity Date and the Interest Rate, if available can be manually entered for all banks except SCM.
- Select a fund from the Fund drop-down menu.
- Last Import Date will only be visible if the Reconcile box was not ticked in step 8.
- Investment Interest will only be visible if the Reconcile box was not ticked in step 8 and is the account that interest will be posted to. Only enter an account here if you want it to be a different account that is set up in Global Investment Legends.
- Investment Fees will only be visible if the Reconcile box was not ticked in step 8 and is the account that fees will be posted to. Only enter an account here if you want it to be a different account that is set up in Global Investment Legends.
- Click the Save button, then Close.
- If the Reconcile box was ticked in step 6, then a new UNC download path will be visible in the Process Bank Statements screen.
- Once the file has been imported or the banking file dragged and dropped into Process Bank Statements, follow the steps to process the bank statement data.


Managing transactions for an At-Call Bank Account
Transferring funds from the operational account to the at-call account, and recording the interest:
- Create a Balance Sheet Asset Account in Account Maintenance for the At-Call Bank Account. This account must be linked to the relevant fund and associated with the Trading Fund.
- Create a Creditor Account Contact in Creditor Maintenance for the bank account associated with the at‑call account. This creditor will be used when processing payments to or from the at‑call account.
- Raise a Creditor Invoice using the Creditor Account for the at-call bank account and Balance Sheet Asset Account.
- Review Interactive Reports to confirm transactions are appearing correctly and balances reconcile as expected.
Managing Interest:
Once the bank statement is received and the interest amounts are identified, create a Journal Set in Journal Preparation using the date the interest was received. This should debit the Balance Sheet Account and credit the appropriate fund interest income account X070. This will need to be completed each time there is interest received.
Managing transfers:
When funds are transferred from the at-call bank account back to the operating account, allocate the transaction to the Balance Sheet account. This will reduce the balance and ensure it reflects the actual balance held in the bank account.
Edit Bank Account Details or Change Banks
Editing the bank account details may be necessary if the building has moved to a new bank.
If the building is changing banks, you will need to ensure the day's banking has been completed in Bank Reconciliation, and be absolutely certain that there will be no further transactions to reconcile on the old bank account prior to undertaking this process. If they do not balance see our Banking Reconciliation FAQ article.
In order to edit bank account details, you will need the appropriate permissions in Security Setup.

- Search or select Bank Account Setup.
- The Operating and Investment Account radio buttons cannot be changed.
- The Account field will automatically have '012 CASH AT BANK' in it and cannot be changed.
- Click the BSB drop-down to display the list of available banks, where you can use the Filter field to find the bank and branch you need. You can filter by any of the columns displayed - BSB, Bank, Branch, etc. In this example we've used '184-' in the Filter.
- Type the bank account number into the Account Number field.
- Type the account name into the Deposit Slip Account Title (1), (2) and (3) fields.
- Tick any of the following boxes if they apply:
- Reconcile should be ticked by default.
- This Closed box should only be ticked to indicate the bank account is closed. This prevents new payments to be processed in Payments (ensure that Import and Reconcile is not selected so account will no longer be reported in Process Bank Statements).
- The Manual Entry box affects the Bank Reconciliation screen and will allow you to add items to the bank statement in the Bank Reconciliation screen - such as a Closing Balance or transferred funds.
- The Post and Finalise in Bank Reconciliation Only affects the Bank Reconciliation screen. When ticked, it displays a preview of the various transactions that will occur in the building before the user can then Auto Process the statement.
- Select the most appropriate option for the reporting of the account address for Bank reports:
- Use building address as account owner.
- Use manager address as account owner.
- Click the Save button, then Close.


Managing Transferred Funds using 011 Cash on Hand
If a building has changed banks or transferred to your portfolio from another manager, review the steps below for the posting of the transferred funds in the Bank Reconciliation.
If a new banking institution has been configured for your portfolio, review EFT Manager for the new bank account configuration.
- Search or select Bank Reconciliation.
- Depending on timing, when the closing balance is sitting in the Bank Reconciliation from the previous bank account, post the funds to 011 Cash on Hand (or another balance sheet code). This will act as the old bank account.
- Action any other transactions in the Bank Reconciliation statement. When the opening balance downloads from the new bank, firstly identify where the closing balance was posted. To do so view the Financial Statements and check if there is a bank balance in 012 Cash at Bank or 011 Cash on Hand. Once the account code has been identified as 011 Cash on Hand the deposit can also be posted to 011 Cash on Hand if this is where the transferred balance is currently reporting, then click Save and Auto Process to finalise the statement.
- If the old bank has charged a fee for the transfer of the funds, the deposited amount in Bank Reconciliation will reflect this and will not match the 012 Cash At Bank amount on the building's Financial Statement. To manage this, you need to process a journal set for the transfer fee in Journal Preparation as follows:
- Debit (DR) an expense code for bank charges.
- Credit (CR) the 011 Cash on Hand account.
Closing Bank Accounts
If you are with SCM, you can request the closure of the building's bank account by following these steps: Account Closure Request | Operating. Otherwise, you will need to contact the building's bank to initiate closure.
- Search or select Bank Account Setup.
- Tick the Closed box to indicate the bank account is closed.
- This prevents new payments from being processed in Payments.
- When the funds have been withdrawn, they can be processed in the Bank Reconciliation screen, where they need to be posted to account '011 Cash on Hand' or another balance sheet code of your choice.
- Depending on your circumstances, the building status can then be changed to 'Lost' (see Before changing the status to lost).
- If the building is being transferred to another StrataMax drive or strata management company, then the building status will be changed to 'Lost' automatically upon transfer.
- If it's not being transferred, then use the Building Information screen to change the status manually. See Change Building Status to Lost | Building Information.
- If you are not ready to change the status to 'Lost', or if the Bank Account is closed, you can remove the bank account by clicking the Remove button in Bank Account Setup and Save.
Remove Bank Account
Removing a bank account will stop data from downloading into Process Bank Statements, which will be used after an account has been closed, as outlined in the above instructions. Other examples may include removing an account due to an incorrect setup or manually managing an account. The Bank Transaction Report (include removed accounts) will still be available for any data downloaded historically.

Deposit Slips and Cheques Account Titles
Account Title fields will be available in Bank Account Setup for the main operating account (012) and are used for Deposit Slips and cheques for the dual bank account slip setups (MBL and StrataPay). The information displayed here may be populated based on previous versions and existing data. If there is no field information, it can be manually populated.
- Search or select Bank Account Setup.
- Expand the Operating Account, and review or update the Deposit Slip Account Title (1), (2) and (3) as required.
- Click Save to update any changed information.

Overdraft Limit
To include an Overdraft Limit warning, or to hold all global and auto payments for individual buildings refer to Set Bank Account Limits article.


All Bank Accounts
- The 'Search' screen will open with a table of all relevant data to the specific search screen you're in.
- Click the Refresh button in the top left to display the data. Each time you change, add, or remove a filter, you will have to click the Refresh button to apply the new filters and see the new set of data. There are also a number of default Fields that act as filters - which fields appear will depend on which 'Search' screen you're using, and these fields can be managed in the 'Restrict To' tab (see below).
- Click the Export button in the top left to export the current table of data to an Excel sheet.
- Click the Advanced button in the top left to display the tabs on the left; 'Restrict To', 'Columns', 'Sort Order', and 'Advanced'. Each of these tabs are explained in their own sections below.
- On the far right, there is a search field with a Find First and Find Next button. Use these to locate a specific line item in the table of search results.
- Depending on which 'Search' screen you're in, you may see a Details button at the bottom, which becomes active once you select a record from the table of results. If this is clicked in the Search Roll screen for example, it will open the contact window in the Roll screen.
- In the Search Roll, and Local and Global Debtors screens there is a Transactions button at the bottom of the 'Search' screen, which becomes active once you select a record from the table of results. When clicked the Local Transactions screen opens, displaying the transactions for that account in the current year.
- Click the Load/Edit/Delete Search button to manage Saved Searches. See the 'Saved Searches' section below.
- The Save Search button is only visible available when a Saved Search is loaded. This is to quickly save any changes made to the current Saved Search.
- Click Save Search As to bring up the 'Save Search' screen where the current search can be saved for future use. See the 'Saved Searches' section below.
Restrict To
In the 'Restrict To' tab you can manage the filters
- To add fields, click the green plus button or remove them with the red minus button.
- Click the Field drop-down to select the item you want to include in your filter.
- Which items are available to choose will depend on the 'Search' screen you're in.
- You cannot add more items to the list as these are hard coded into the StrataMax database.
- The Condition drop-down options will change based on the type of item you select in Field drop-down. For example:
- If you selected a date related item, the Condition drop-down will contain options that lend themselves to dates, like 'is on', 'is after', 'is tomorrow', 'is in the last 30 days', etc.
- The Value drop-down options will also change based on the items you choose as a Field and a Condition. For example:
- If you selected a date related item as a Field, and the Condition selected is 'is tomorrow', then the Value will disappear.
- If the Condition selected is 'is in the range' then a tick box for 'Specific Dates' appears along with two date drop-down menus.
Columns
It's possible to add or more columns within ecah of the Search screens in StrataMax. the columns that are available will obviously differ depending on which Search screen is being used, but the user interface and process is the same.
- Within the Search screen, click the Advanced button to reveal the additional tabs on the left side. Click the Columns tab.
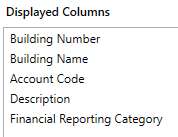
- Add more columns by selecting it in the 'Available Columns' list on the left and clicking the Add> button, which moves it to the 'Displayed Columns' list on the right.
- Remove columns by selecting it in the 'Displayed Columns' list on the right, then clicking the < Remove button, which moves it back to the 'Available Columns' list on the left.
- Change the order of the columns by selecting a column in the 'Displayed Columns' list on the right and clicking the up or down arrow buttons. The column at the top of the list will be displayed first on the far left in the table.
- Remember to click the Refresh button each time a column is added or removed.

Sort Order
The Sort Order tab shows the order in which the data is displayed. The default sort order with depend on which 'Search' screen you are using.
- Add more columns to sort by, by clicking the column name in the 'Available Columns' list on the left, then clicking the Add> button, which moves the column name to the 'Sorted Columns' list on the right.
- Remove columns by selecting the name in the 'Sorted Columns' list on the right, then clicking the <Remove button, which moves the column name to the 'Available Columns' list on the left.
- Change the sort order of the search results by selecting a column name in the 'Sorted Columns' list on the right, and clicking the up or down arrow buttons, and then clicking the button next to each item. The sort order will then be reflected in the column headings of the search results.
- The heading will be highlighted, and an arrow will indicate the direction of the sort (A to Z; 0 to 9; earliest to latest, etc.), and can be changed by clicking a column header.
- If the search results are restricted and you click a column header, the displayed data will refresh and the results re-listed in the selected sort order.
Advanced
The options in the 'Advanced' tab are there to assist if you are experiencing degraded performance with retrieving data in the 'Search' screen. In most cases you shouldn't need to use these settings.
- Select a figure into 'Maximum Number of Records to Retrieve' to help with speeding up the display of the data - the smaller the number, the faster the data will be retrieved. In most cases you won't need to amend this figure, but it can be used if you are experiencing delays in displaying large amounts of data.
- Tick the 'Read Uncommitted' box to include data that has been entered on-screen by users, but may yet to be saved.
- Enter a number of seconds in the 'Database Timeout' field if you are experiencing slow performance when displaying large amounts of data. If the data doesn't display within the amount of seconds entered, a timeout will happen and stop the process so that you can amend your filters to narrow down the data.
All Bank Accounts | Saved Searches
'Saved Searches' are designed for convenience so that you can save a selection of fields, columns, and a specific sort order so that it can be loaded later. There is also a tool to assist with quick-finding fields of text information. Use the top right corner and enter text into this field to search. Click Find First or Find Next to locate results.
'Saved Searches' can also be set as the 'default' search for the selected screen. This means that the selection of fields, columns, and specific sort order will be the one chosen whenever the menu screen/icon is selected.
'Saved Searches' can be saved for the current user, globally (accessible to all users), or for a specific user group.
If a Saved Search is loaded/opened this will be noted at the top of the search screen.

Saved Searches | Security Setup Permissions
A security permission will either allow or deny individual Users or User Groups access to create or delete a search. The permission is called ‘Save Group and Saved Searches’ under the 'Menus' category in Security Setup. You can also type the word ‘Search’ into the filter field and click the Filter button to see the permission.

If the User or User Group do not have the permission set to 'Allow', then the ability to save a search for all users or a user group will be inactive.

Saved Searches | Set up a new Saved Search
- Configure the required fields and click the Refresh button to display the required data.
- Optionally click the Advance button to also configure the displayed columns, and specific sort order.
- Click the Refresh button to display the data.
- Click the Save Search As button, and the 'Save Search' window will appear.
- Enter a 'Name'.
- Select one of the three radio buttons, depending on your requirement:
- Available to current user only will save the search for the current user only.
- Available to users in security group will save the search for the User Group selected from the drop-down (this radio button is only available if you have the right permission, and the User Groups available in this list are limited to the User Groups that you are a member of).
- Available to all users will save the search for all StrataMax users (this radio button is only available if you have the right permission).
- Optionally tick the Save as default box to load this 'Saved Search' whenever the menu screen / icon is opened.
Saved Searches | Load or Delete a Saved Search
- At the bottom of the screen, click the Load/Delete Search button.
- In the 'Load Search' window, click the blue Load button to load the Saved Search, or click the red cross button to delete the Saved Search.
- If you click the Load button, the 'Load Search' window will disappear, and the screen will refresh automatically and load the Saved Search data.
- If you click the Delete button, a confirmation pop-up will appear; Click Yes to confirm the deletion.
When a Saved Search is loaded/opened, the Saved Search name will be noted at the top of the search screen.
Saved Searches | Edit a Saved Search
- If the Saved Search you want to edit has been set as the default search, it should be on screen already, and you can proceed to the next step. Otherwise click the Load/Delete Search button.
- In the 'Load Search' window, click the blue Load button.
- Now make any changes required to the required fields, and optionally click the Advance button to also configure the displayed columns, and specific sort order.
- Click the Refresh button to display and check the data.
- Click the Save Search button to save the applied changes.
Saved Searches | Add To My Dashboard
There is the option to add certain searches to your own Dashboard. This is limited to your own Dashboard only (you cannot add it to the Dashboard of another user or group), and only available in these specific 'Search' screens:
- Search Office Bearers
- Search Bank Accounts
- Search Creditor Invoice Items
- Search Work Orders
- Search Quotes
- Search Building
- Search Inspections
- Search Levies
- Management Fees Report
- Follow the steps to set up a new Saved Search, or edit a Saved Search (see the two relevant sections above).
- In the 'Save Search' window, click the Add To My Dashboard button.
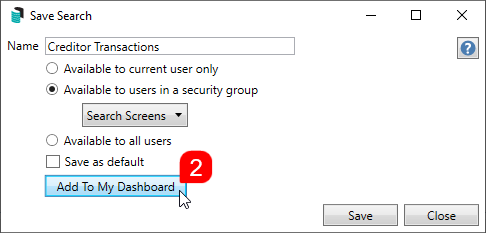
- The 'Dashboard Configuration' window will then appear.
- The Report drop-down menu cannot be changed from 'Saved Search'.
- The Display Title can be changed to whatever is required.
- Choose the Display Type that is preferred. See Display Types for more information.
- Tick Show On Desktop if preferred.
- Depending on which Display Type was chosen, the fields for the different number values will change. Observe the Preview to assist with picking the right number values suited to the Display Type.
- Click the Save button.
- Back in the 'Save Search' screen, there are now buttons to Edit Dashboard and Delete Dashboard.
- Click the Close buttons on any remaining screens.

Export and Print
Each search can be exported to Excel or produced as a PDF-style report, and the column display for these reports will be included.
- Export - If there are more than 1000 results, Check the Advanced tab / Advanced area to report the maximum. Click Export for an Excel report.
- Print - Check the cogwheel from the Report Distribution screen to change fonts and set the letterhead style. This print style will produce the report based on the column width. Click Print for a PDF-style report.

Examples of Searches for Dashboard
The below are some examples of saved searches that can be used as a dashboard to either prompt based on particular dates or to provide quick access to information & reporting. Examples are reliant on fields being populated with data and information as part of your processes, and your particular setup of Restrict To, Display Columns and Sort Order may vary to suit your requirements.
All Overdue Tasks (Search Tasks)
Restrict To:

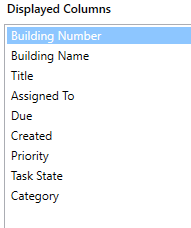
Displayed Columns:
Last AGM where minutes have not been sent (Search Buildings)
Restrict To:

Displayed Columns:

Assigned Team Members (Search Buildings)
Restrict To: No requirements, however you may filter by Account Manager for example.
Displayed Columns:

Creditor Invoices Awaiting Invoice Hub Approval & dated more than 1 month in the past (Search Creditor Invoice Items)
Restrict To:

Displayed Columns:

Creditor Invoices on hold & dated more than 1 month in the past (Search Creditor Invoice Items)
Restrict To:

Displayed Columns:

Inspections due in next 30 days (Search Inspections)
Restrict To: setting the category to specific values allows dashboards specific to inspection types.

Displayed Columns:

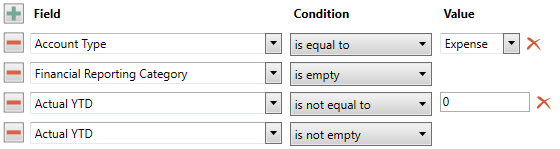
Identify expense account codes without a category (Search Global Accounts)
Useful for ensuring the NSW State of Key Financial Information is accurate; this relies on account codes having a category set in Account Maintenance.
Restrict To:
Displayed Columns: