 | The instructions in this article relate to Stored Report. The icon may be located on your StrataMax Desktop or found using the StrataMax Search. |
StrataMax automatically stores reports, including Levy Notices, Levy Arrears, Certificates, Financial Statements and Merge Letters, which are available to review. A copy of the Financial Statements will be available from Stored Reports. The purpose of storing these reports is to be able to reprint them exactly as it was printed the first time, without having to reproduce the report with a current date on it.
Financial Statements are required to be stored if you are attaching them to Status Reports,and will still be available in Stored Reports to refer to.
Types of reports that are now stored in DocMax and available in Stored Reports are:
- Arrears Notices
- Certificates
- Financial Reports stored on Month-End Rollover
- Funds Management Reports
- Invoices
- Levy Notices
- Ledger Cards
- Merge Letters
- Status Reports
- Sub Group reports and Invoices
Please note that GLMax reports/documents will not be stored in DocMax, and Management Fee Invoices and Recoveries, if configured, will be. Deleting any of these documents from Stored Reports will also be deleted from DocMax. The same applies if you delete any of these from DocMax - they will also be deleted from Stored Report.
Viewing Stored Reports
- In the selected building, search or select Stored Reports.
- All stored reports will be displayed for the building. Expand the window for easier viewing.
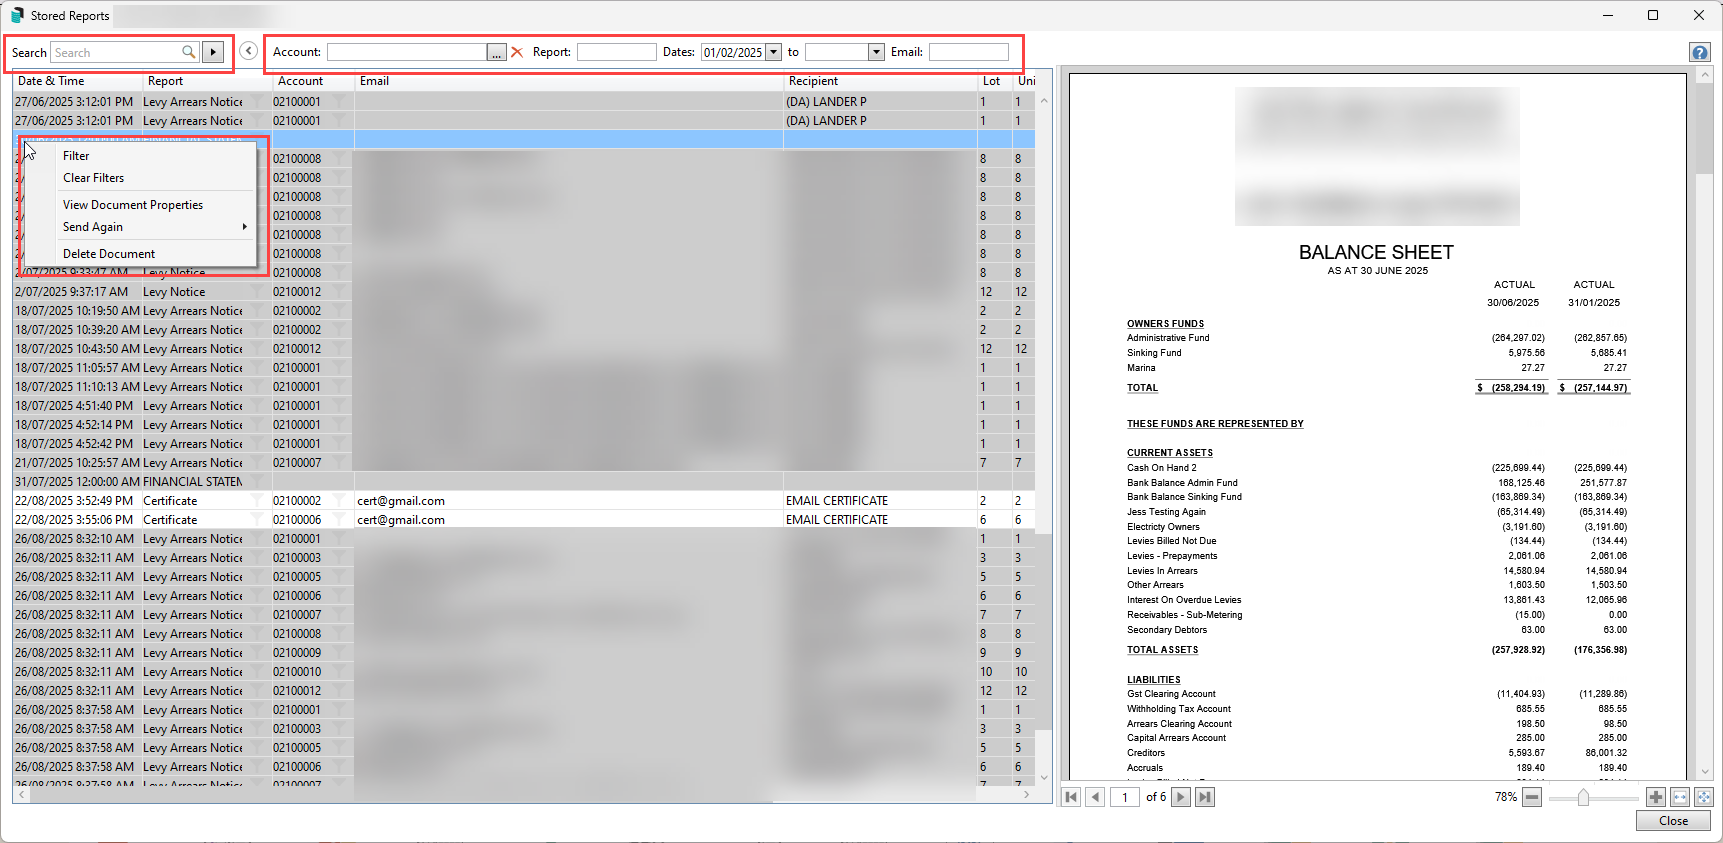
- Either use the Search field or expand the filters to access additional fields of restriction.
- If using the Search field, click the > button to locate the next result. Repeat for the next instance of text to find the next result.
- If the additional search fields are being used, they are dynamic search fields and will filter as text is entered.
- The right-hand side of the screen will include a preview of the document.
- Right clicking on a document will provide further options to select:
- Clear Filter - Clear the applied filter.
- View Document Properties - This option opens the document in DocMax to view.
- Send Again will provide these options:
- Compose Email will open Communications ready for sending.
- Report Distribution Batch will open the original batch the report was sent with in Report Distribution.
- Selected Items Only will open the selected Report (s) in Report Distribution. NOTE: This option is designed to be used where multiple new style reports are selected.
- Delete Document (Controlled with Security Setup / DocMax tab / Delete Documents).
- To select multiple documents, select one document and hold Ctrl on the keyboard and select the next document, or Ctrl+A to select all (keep in mind email attachment size).

Changing the column display in Stored Report
To change the view of the stored report window for the current view, click on the column and drag it to the desired heading to reposition it. When closed and reopened, this will revert to the original view.

Viewing Stored Report via a DocMax Saved Search.
The information available in Stored Reports can also be created as a saved search in DocMax and can provide similar columns of information. Click here to review further information on creating this type of saved search.
Stored Reports | API vs BING
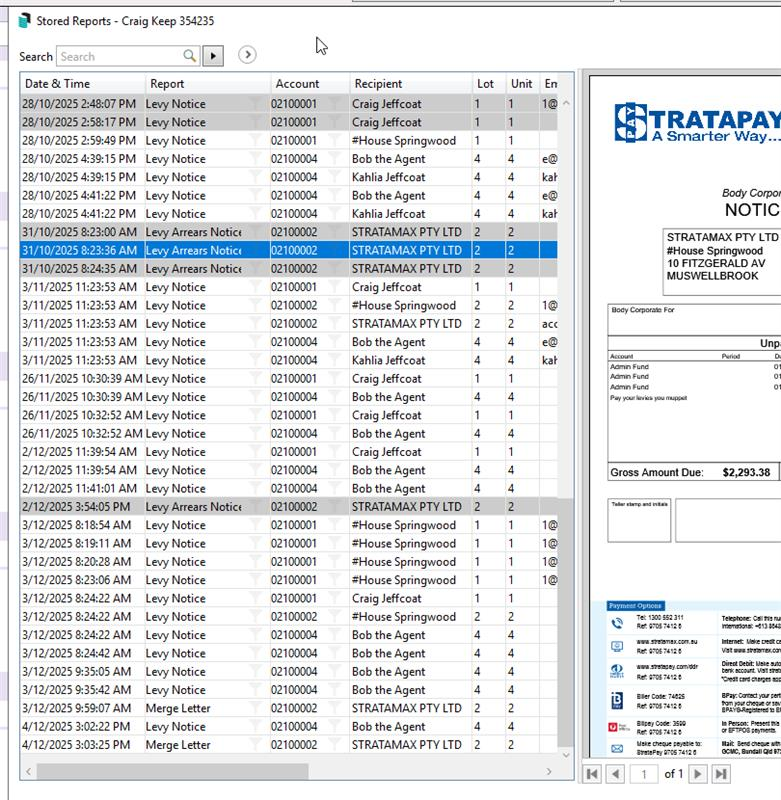
When viewing Stored Reports, the colour indicates the type of notice and available printing options for API or BING.
Grey Reports
- Represent older notices.
- Open in the older-style preview.
- Printing Options:
- Can be printed to Mailroom only.
- No option to print via Bing API.
White Reports
- Represent notices originally distributed using the current method.
- When you right-click and select Resend (single or batch):
- Opens the original report distribution preview.
- If the original distribution used Bing API, you can resend via API.
- Printing Options:
- Same method as the original distribution applies.
Accessing Legacy Stored Report
- In the selected building, search or select Stored Report.
- All stored reports will be displayed for the building. Filter to locate the stored report as desired (i.e. In report name column, sort to Certificates, or Levy Notice etc. You may also sort by Lot and Unit Number).
- Expand the window for easier viewing.
- Tag report you wish to reprint.
- Click Preview to view stored report before printing.
- Report will display, redistribute as desired.

Proceed
Send the report directly to the printer or will email out. This will be based on the distribution method of the original report and only applies to Levies or Arrears, other reports will print.
Printer Setup
Allows changing of the printer to print to.
Preview
Bring the report to the screen, which will enable you to print or email the report, save it as a PDF, or save it in DocMax.
Close
Closes the screen.
Print Full Report
If this setting is set, the tagged report will print the entire file, including all other reports that were printed with it. For example, a Levy notice tagged for one lot will print all the notices for all other lots in that levy run.
Select Account Codes
Print reports for the selected codes only.
Show a Deposit Slip Background
If this setting is tagged, levies will print or email with the deposit slip overlay added.
Single Print
This setting will print a single report if multiple reports are stored.
Show All
It shows all reports if you have gone to stored reports from another area, e.g. Levies, which just shows only the levies, or if you have used the Filter button.
Filter
Allows you to filter for a specific account or report type, etc.
Delete Stored Reports
Please be aware that if you delete any documents from Stored Report, they will also be deleted from DocMax. The same applies if you delete any of the stored reports from DocMax - they will also be deleted from Stored Report.
- Search or select Stored Report.
- Stored reports will be displayed for the building. Filter to locate the stored report as desired (i.e. In report name column, sort to Certificates, or Levy Notice etc. You may also sort by Lot and Unit Number).
- Tag the report/s you wish to delete.
- Select Options and click Delete Stored Reports.
- You will be prompted to enter your user password. Refer to your internal StrataMax Administrator for assistance if required.

Arrears Stored Report
- Search or select Stored Report.
- Or from Arrears Notice via 'GoTo' / 'Print Stored Notices' (this will filter only by Levy Arrears type reports).
- Maximise the screen if required.
- All stored reports will be displayed. Filter to locate the stored report as desired (i.e. sort by 'Account' / 'Name' / 'Entry Date' / 'Report Name' - Levy Arrears or email column).
- This will then display only arrears notices for filtered account.
- Tag (click in the tag column field) to select the individual arrears notice.
- Click Preview.
- Once the Arrears Notice/Letter has displayed to screen, you may then either Print or Email.
The email address column is where the notice/letter was emailed to the owner.
Certificate Stored Report
- Search or select Stored Report.
- Or from Certificate via 'GoTo' / 'Print Stored Certificates' (this will filter only by Certificate type reports).
- Maximise the screen if required.
- All stored reports will be displayed. Filter to locate the stored report as desired (i.e. sort by 'Account' / 'Name' / 'Lot' / 'Unit' / 'Entry Date' / 'Report Name' - Certificate 021XXXXX' or email column).
- This will then display only arrears notices for filtered account.
- Tag (click in the tag column field) to select the individual Certificate.
- Click 'Preview'.
- Once the Certificate has displayed to screen, you may then either Print or Email.
Owner Tax Info Report
This is the one area that can only be accessed via Stored Report and not directly from the menu.
- Search or select Stored Report.
- Maximise the screen if required.
- All stored reports will be displayed. Filter to locate the stored report as desired (i.e. sort by 'Account' / 'Name' / 'Lot' / 'Unit' / 'Entry Date' / 'Report Name' - Owner's Tax Year' or email column).
- This will then display only the selected detail for filtered account.
- Tag (click in the tag column field) to select the individual Owner Tax Year Report.
- Click Preview.
- Once the Owner Tax Year Report has displayed to screen, you may then either Print or Email as required.
Utility Stored Report
As the Utility Bills are stored when they are printed or emailed, you can retrieve the stored notice to re-send to the resident.
- From the 'Utility' Group search or select Stored Report.
- Or from Utility Billing via 'GoTo' / 'Print Stored Bills'.
- Maximise the screen if required.
- All stored reports will be displayed. Filter to locate the stored report as desired (i.e. sort by 'Account' / 'Name' / 'Lot' / 'Unit' / 'Entry Date' / 'Report Name' - Electricity Bill DD/MM/YY or email column).
- This will then display only Electricity Bills for the filtered account.
- Tag (click in the tag column field) to select the individual Utility Bills.
- Once the Bill has displayed to screen, you may then either Print or Email.
Financial Statements
At each month end rollover, the Financial Statements will be available for reproducing. This is the recommended action to obtain backdated financial's. If trying to achieve the same result from Financial Statements, with the 'Report Period' the result may not be as effective as reviewing the Stored Report, due to the Balance Sheet consisting of current posting accounts that do not backdate.
- Search or select Stored Report.
- Maximise the screen if required.
- All stored reports will be displayed. Filter to locate the stored report as desired (i.e. sort by 'Account' / 'Name' / 'Lot' / 'Unit' / 'Entry Date' / 'Report Name' - Financial Statements').
- This will then display only the selected detail for filtered account.
- Tag (click in the tag column field) to select the individual Financial Statements.
To adjust the format of the stored monthly Financial Statements, select the Report Name in Financial Statements and under Options click Save Settings for StrataMax.
