  | The instructions in this article relate to the Storage Space Plan and Car Space Plan. The icon may be located on your StrataMax Desktop or found using the StrataMax Search. |
The Storage Space Plan and Car Space Plan menus are for maintaining a list of units and any storage spaces & car spaces allocated to them, if the building or body corporate specifically allocates storage spaces.
This article covers the set up and maintenance of both of these menus with the exception of recording them in the Roll menu.
Please note that these menus are identical and functionality is the same so the information is combined in this article.
Storage/Car Space Plan Setup
- Open the Storage/Car Space Plan menu.
- Click Tools > Re-initialise.
- A prompt may appear 'This Accessory Plan has already been set up, do you want to re-initialise it?'
- Click Yes to start with a blank list.
- Click No to view the existing plan.
- Type in the total number of available storage/car spaces then click OK.
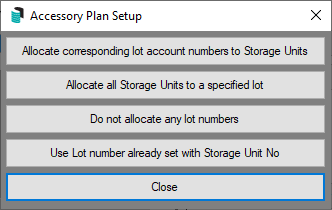
- Select one of the following buttons:
- Allocate corresponding lot account numbers to Storage/Car Units: Creates a storage/car space for each unit up to the number of storage spaces typed in.
- Allocate all Storage/Car Units to a specified lot: Creates the number of storage/car space records and allocates all of them to one lot specified.
- Do not allocate any lot numbers : Creates the number of blank storage/car space records with no lot allocations.
- Use Lot number already set with Storage/Car Unit No: Reads the storage/car space number from the Roll menu (if entered).
- Close: Cancels the operation.
- Each of the above buttons creates a list of completed or partially completed storage space records. The information in each record is 'Storage/Car Space No', 'Lot Number' and 'Account Number'.
- Once the Storage Space has been set up, the below functions can then be done.

Add a Storage/Car Space
- In the Storage/Car Space Plan menu, a list of existing storage space allocations will be displayed.
- If a storage plan is already set up, click Tools > Re-initialise, then confirm the prompt by clicking Yes to start with a blank list, or No to view the plan already existing.

- If a storage plan is already set up, click Tools > Re-initialise, then confirm the prompt by clicking Yes to start with a blank list, or No to view the plan already existing.
- Click the Add button.
- Type in the Storage Space number, then OK.
- In the Account Code List window, select the lot to allocate this storage space to, then click OK.
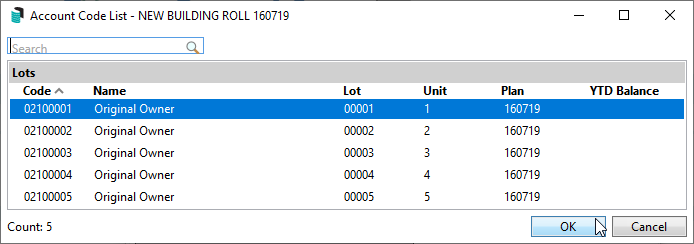
- The storage space you just added will be displayed at the bottom of the list.
- In the Roll menu the storage space will be updated.


View Storage/Car Space Allocations
The allocations should display by default. If the transfers are showing, switch to allocations by clicking Options then View Allocations.
Edit Storage/Car Space Plan
To retain a record of which storage spaces were previously allocated to another unit, it is recommended to transfer the storage space instead of editing it.
- Open the Storage/Car Space Plan menu.
- Click Options > View Transfers.
- Select a transfer record, then click Edit.
- Change the details or the lot number as required and click OK.
- Click Close.
Transfer a Storage/Car Space
To retain a record of which storage spaces were previously allocated to another unit, transfer the storage space to another lot instead of editing it.
- In the Storage/Car Space Plan menu select the storage space to transfer, then click Transfer.
- Type in the Date of the transfer.
- Select the lot to transfer it to.
- In Details the word Transfer will be automatically entered, but this can be changed to suit requirements.
- Click OK.
- To see the transfer records, click Options > View Transfers.
Delete a Storage/Car Space
- In the Storage/Car Space Plan menu select the storage space to delete, then click Delete.
- When asked: Delete this unit? click Yes.
- Click Close to exit.
Print Storage/Car Space Plan Allocation
- In the Storage/Car Space Plan menu click Options > Report.
- Select one of the following sort order options to print the report in, then click OK.
- Storage Space No
- Lot Number
- Account Number
- Set report options (click here for instructions) as you require then click 'OK'.

