 |
The instructions in this article relate to Debtor (Second Debtor). The icon may be located on your StrataMax Desktop or found using the StrataMax Search.
|
Debtor (Second Debtor) provides a way to bill parties external to the property. This can be used, for example, when storage spaces or common property are rented to tenants or other entities, and where creditor invoices need to be on-charged to that account.
Invoices raised for second debtors can be printed with their own deposit slip for payment and, when used, will auto-reconcile in the banking.
Second Debtor accounts are not included in Levy Arrears processes because charges to second debtors are typically issued as invoices. However, they can be included in the Arrears Manager to identify overdue accounts. This is for reporting only.
Second Debtors can also be included in reports created from the Local Debtors and Global Debtors icons by adding the fields Debtor Name, Lot Number, and Account Code.
Add a Second Debtor
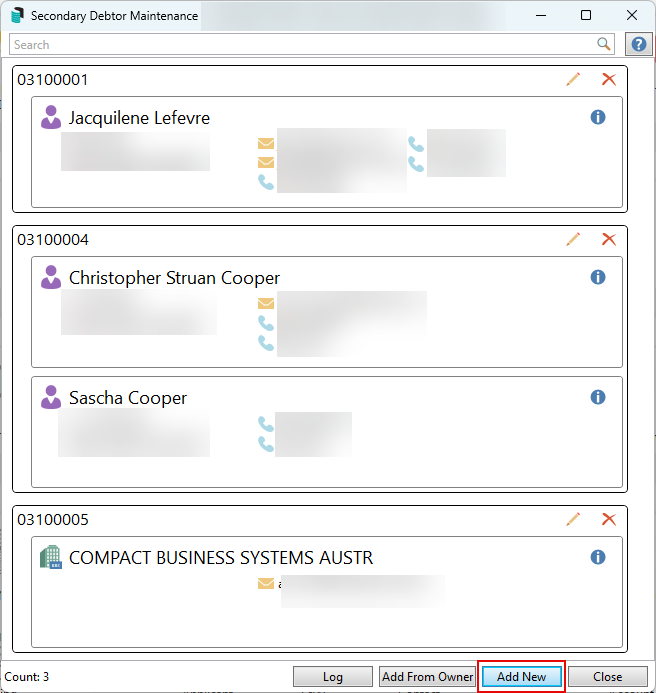
- Open the Debtor (Second Debtor).
- Click the Add New button to create a new contact.
- Click Add Contact. From the list of existing contacts, search or click Create Contact to create a new contact.
- Enter details for the Second Debtor as required, noting that the type can be set for Individual or Company. Entering an Email Address will allow the contact to have delivery preferences set to email.
- Click Save once complete.

Add a Second Debtor - Add From Owner
- Open the Debtor (Second Debtor).
- Click the Add From Owner button.
- Select the owner from the owner list of accounts. If this lot is owned by multiple contacts, each contact will be included.
- If only one second debtor contact is required, click the delete option for the non-required debtor. If both are needed, click the pencil icon to edit the Second Debtor area and enter a combined Address Title (1) and (2).
- The Lot and Unit Number fields will pre-populate based on the Roll information.
Invoice Entry & Invoice Printing (Second Debtor)
Refer to the article here for further instructions.
Delete a Second Debtor
To delete a secondary debtor, the account must have no financial activity - in either the current or old year. If attempting to delete a record with transactions, there will be a prompt to confirm that this record cannot be deleted. This can be checked using Local Transactions with the debtor code or description for current and old year if needed. For records that are available to delete, the below can be applied.
- Search or select Debtor (Second Debtor).
- Click the red Delete cross icon.
- When prompted, 'Are you sure you want to delete this account?' click OK.
- Click Close.
Add a Note to Second Debtor
- Search or select Debtor (Second Debtor).
- Search for the debtor record required and click the Pencil icon to edit the record.
- Click Notes.
- Click Add to add to a note or Edit to edit an existing note. You can also Delete notes where required.
- Click the Save icon.
NOTE: Images are not permitted to be saved.
Second Debtor Invoicing - Due Date
Refer to the article on Setting Default Days to Pay. This will also control the below area when changing the original invoice due date if needed.
Second Debtors Invoicing - Change Invoice Due Date
This process will update the original due date entered and allow it to be changed based on the Set Pay Days configuration. Once the due date has been changed, the invoice can be reprinted with the updated due date for the debtor.
- Search or select Invoice Printing (Second Debtors).
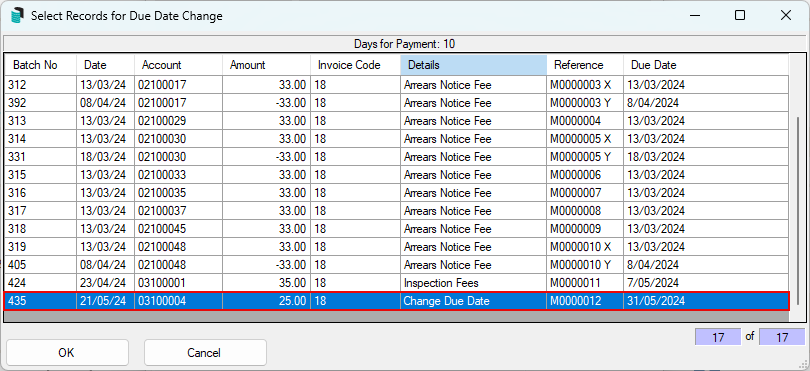
- Select Options and Change Due Date for Existing Invoices.
- Locate the transactions by debtor number from the table of records. If more than one invoice needs to be included, you can multi-select by clicking the first record, holding the shift key, and selecting further records. Note the invoice number, as this will be used to reprint.
- Click OK.
- When the message 'The Due Date in selected records will be changed. OK?' appears, click Yes.
- Click Close.
- Then, reprint the invoices selected in the Conditions tab in the 'Invoice Number Range', ensuring that the correct Invoice Number Start reference is entered, e.g., M0000012. If multiple invoice numbers were changed, include a Finish invoice number.
- Click Proceed to resend, and if the contact includes an email address and the Email configuration is set, when clicking the print icon from preview, it will send this by email.


Reporting Debtors (Second Debtors)
See the Debtors List and Secondary Debtors List article to report these contacts. Second Debtors can also be included in reports created from Local and Global Debtors icons by adding fields Debtor Name, Lot Number, Account Code.
Secondary Debtor Setup
For instructions on how to check this account code via Account Maintenance.
