 |
This article explains how to set up and use Work Queues in DocMax. Work Queues can be configured to show specific document types, support team-based processing, and help manage document workflows across your office. The DocMax icon may be located on your StrataMax Desktop or found using the StrataMax Search. |
We also offer a completely free DocMax Basics online course, which you can enrol in here. Please see the StrataMax Online Courses page for more details, including the coupon code required to enrol for free.
Feel free to also watch this DocMax Work Queues and Saved Searches video.
Work Queues | Introduction
Work Queues help manage common document processes by acting like folders for selected document types. Each work queue can be configured with restrictions so that only the required documents are displayed.
Documents must be added to DocMax first before they will appear in a work queue.
Work Queues can also include Action Buttons. These buttons apply selected updates to a document and can move the document to another queue or remove it from the current queue.
Work Queues | Security Setup
Creating, editing and deleting work queues is done in the Administration area in DocMax. Users must have the appropriate permissions in Security Setup before these options are available.

Work Queues | Example for Correspondence

Optimized query performance condition fields
When setting up a work queue, the condition selected can affect performance. The following options are recommended from best performance to least efficient.
Equals is the fastest option because it returns an exact match.
Starts With is generally the next most efficient option because it searches from the beginning of the text.
Contains is the least efficient option because it searches more broadly and may increase query time.
Work Queues | Action Button Merge Fields
Merge fields can be used in the Title, Description and Notes fields of an action button. These values are populated automatically when the action button is used.

Building info merge fields
These fields are populated from the Building Information screen in StrataMax.
- Building Name / Company Title: {BuildingName}
- Financial Year Start: {FinancialYearStart}
- Financial Year End: {FinancialYearEnd}
Creditor invoice merge fields
Creditor and invoice merge fields are populated after the Invoice Details section has been completed. When the final action button is used to create the transaction, the applicable creditor and invoice merge field values will then populate.
This also applies when using DocMax Work Queues with Action Buttons to process invoices.
- Creditor Name: {CreditorName}
- Invoice Number: {InvoiceNumber}
- Invoice Amount: {InvoiceAmount}
- Invoice Date: {InvoiceDate}
DocMax-specific merge fields
- Today - computer date: {Today}
- Current Username: {CurrentUser}
- Action Date: {ActionDate}
Formatting for date merge fields
By default, date fields are displayed as DD/MM/YYYY. Date merge fields can be formatted manually, for example:
{InvoiceDate: yyyy-MM-dd}
This will display as 2026-08-29.
The following components can be used when formatting a date merge field:
- yyyy = Year (for example, 2026)
- yy = Year (for example, 22)
- MM = Month (for example, 08)
- MMMM = Month (for example, August)
- dd = Day (for example, 29)
The formats can be used independently or together, as shown below.
| Field and Formatting | Display Example |
| {InvoiceDate: yyyy} | 2026 |
| {InvoiceDate: yyyy-MM-dd} | 2026-08-29 |
| {InvoiceDate: dd/MM/yy} | 29/08/26 |
| {InvoiceDate: MMMM yyyy} | August 2026 |
Add a New Work Queue
Use the steps below to create a new work queue.
- Select the Administration tab.
- Select Work Queues.
- Click Add New.
- Enter the Name and Description for the work queue.
- Select who the work queue will be Available To. This can be a user, group or everyone, based on the users and groups set up in Security Setup.
- Select the Restrict To tab to define which documents will appear in the work queue. Add the required restriction fields using the available field list and set the condition and value for each one. Include at least one of the following fields:
- Assigned To
- Status
- Action Date
- Categories
- Select the Action Buttons tab and add the buttons required to update or move documents.
- Review the Columns, Sort Order, Review Results, Tab Fields and Display sections.
- Click Save Changes.
Recommended restriction fields
For many work queues, the recommended restriction fields are Status and Categories. These are the simplest fields to use when moving documents between queues or identifying documents that have reached a final status.
Work Queues | Creditor Invoices
Work Queues can be used with Creditor Invoices to support invoice processing from receipt through to final review. A work queue can be used as a single-step process or as part of a multi-step approval workflow.
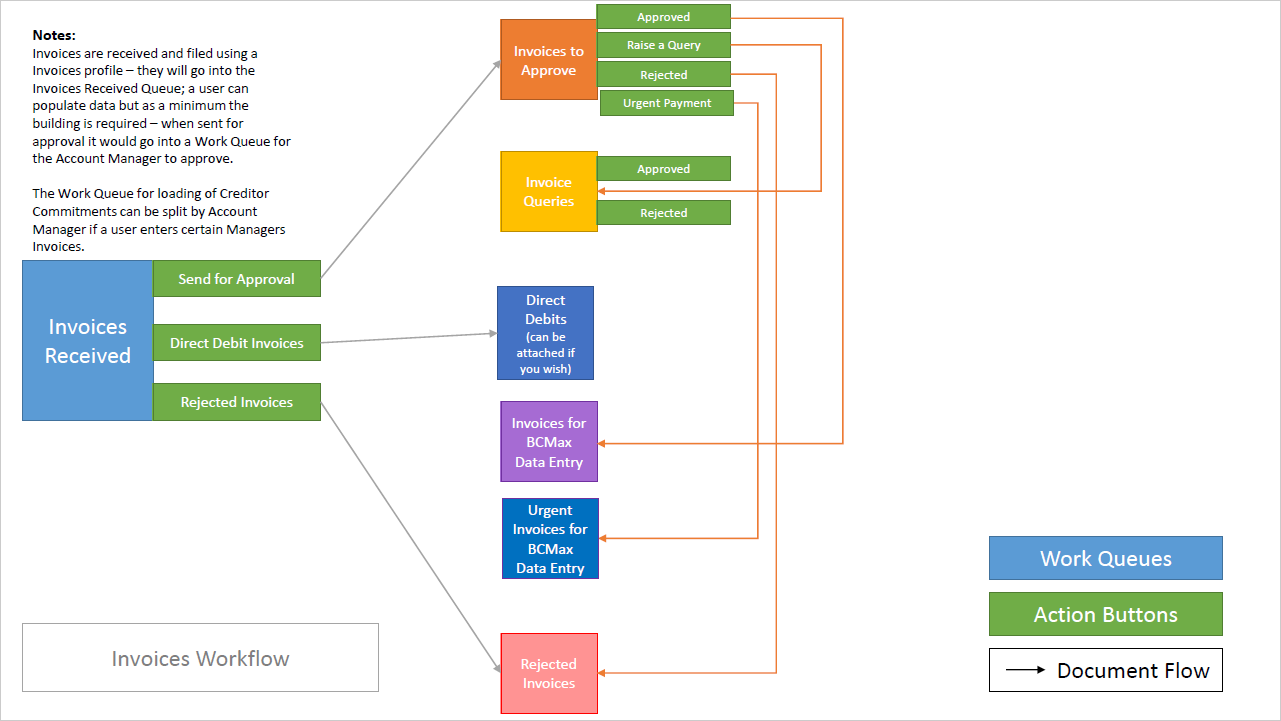 Here is an example of what a series of Work Queues could look like
Work Queue Setup | Creditor Invoices
This example sets up a work queue for invoices that have just been received and added to DocMax, ready for processing in Creditor Invoices. It also includes a visible button for invoices that are not ready to process and a hidden system action for invoices finalised from the Creditor Invoices screen.
Using merge fields such as {Today} and {CurrentUser} can help record who processed the invoice and when.
- Search for or select DocMax, and Select the Administration tab.
- Select Work Queues.
- Click Add New.
- Enter the work queue Name and Description.
- Tick Work Queue is to be used for Creditor Invoices in BCMax.
- Select who the work queue will be Available To. It is generally recommended not to use Everyone, as this may include external groups such as search agents or auditors.
- Select the Restrict To tab and add the required restrictions. The restrictions can be rearranged by using the up and down arrows on the far right. For a basic invoice work queue, include:
- Categories > is any of > Invoices
- Status > is equal to > Received
- Select the Action Buttons tab and add the required buttons. For example, one button for Finalised and one for Not Ready.
- Select the Action button for each action button and configure the required updates.
- For the Finalised button, update the Status to Finalised. You can also add merge fields such as {Today} and {CurrentUser} to the Notes field.
- For the Not Ready button, update the Status to Not Ready.
- Close the action button configuration window.
- Select the Review Results tab and confirm that the queue contains the expected documents.
- Select the Tab Fields and Display tab and enable Show this section expanded for the sections that should open by default, such as Document Details and Invoice Details.
- Review the work queue summary.
- Click Save Changes.


Useful Restrict To fields for invoice-related work queues
The following Restrict To fields can help refine invoice-related work queues:
- Invoice Manual Entry – Use the condition is equal to and select Yes or No.
- Creditor Invoice – Use the condition is equal to and select Yes or No.
- Scheduled Creditor Invoice – Use the condition is equal to and select Yes or No.
Creditor Invoices Work Queue Setup
Two settings are required in Creditor Invoices for the work queue to function correctly. See Document Attachment for more information about the related settings.
- Search for or select Creditor Invoices.
- Select File > Configure and scroll to the Document Attachment section.
- Select the required Invoice Document Display Position.
- Select the required Creditor Invoice Work Queue.

Creditor Invoice Document Properties
When creditor information is entered in DocMax, the Invoice Details section uses the same data entry fields as Creditor Invoices.
Once the building and creditor have been entered, the creditor bank account details and Invoice Hub status will display.

Manual Entry
The Manual Entry tick box excludes invoices from the Creditor Invoices Auto Create All option. This allows additional actions to be completed before the invoice is finalised.
- Add Purchase to Asset Register
- Bill to Owner
- Pro Rata
Create Invoice
The invoice can be created directly in DocMax using the Create Invoice button. Once created, the button changes to Details, where the transaction can be reviewed or edited. Select Save to update the information or Undo Changes to discard them.

Edit a Work Queue
Use the steps below to update an existing work queue.
- Select the Administration tab.
- Select Work Queues and choose the required queue.
- Click Edit.
- Update the required section of the work queue.
- Review the Tab Fields and Display settings and confirm that any required Tab Stops and Mandatory fields are selected.
- Use Review Results to confirm the changes are correct.
- Click Save Changes.
Delete a Work Queue
Once a Work Queue is deleted, it cannot be recovered.
- Select the Administration tab.
- Select Work Queues and choose the required queue.
- Click Delete.
- Confirm the deletion.
Document History
As documents move through work queues, document history is recorded with date and time stamps. This can be used to review who processed a document and when.
To view document history:
- Search for or select DocMax.
- Locate the required document.
- Right-click the document, or use the ribbon to select View History.
- Review the document and property updates shown in the history.

Work Queues system performance
The work queues available to each user depend on the security group they belong to. Work queues can also be created for an individual user if the required permission has been granted in Security Setup.
Work queues update at least every 5 minutes, depending on DocMax Settings, and can also be refreshed manually.
If the system detects slow query performance, an alert icon may appear next to the work queue. When more than 1000 documents are returned, the count is truncated to 1000 to reduce the impact on resources.
This change is scheduler-driven and must be activated by the Development Team upon request. Please email support@stratamax.com.au if you would like to use this feature.
The appearance of a work queue folder changes depending on whether documents are waiting in the queue.
 |
 |
- When empty, an empty tray icon will display next to the work queue name:

- When the work queue contains documents, a full tray icon will display next to the work queue name:


