This article is designed to cover the various methods of adding documents to DocMax.
If you are new to DocMax, we highly recommend enrolling in our DocMax Basics Online Course - it's completely free!
The Add Document window will appear when documents are added using the following methods:
- Click the Select Documents button in the Add Document tab or Add Document window.
- Placing a file in a Drop Box folder, which is configured to add via the Add Document window.
- Dragging and dropping files from another location onto a DocMax window.
- Adding a document in Outlook (with the Outlook DocMax add-in installed and enabled) using the Add with Details button.
- Adding a document by ‘printing’ to DocMax using the DocMax Printer.
If the Add Document window is already open when additional files are being added, then the files will appear within the same Add Document window.
Password protected PDF’s can be added to DocMax as well. The password will be requested from the Document Preview pane and once entered can be added to DocMax. Please note that protected PDFs cannot print, split, or append to or from another document.
For buildings in Victoria that are Multi OCs and have multiple account groups in StrataMax, there is an additional drop-down menu called 'Account Group' so that the document can be allocated to a specific Owners Corporation.
Sub-Group buildings can also be selected if the document being added belongs to a property. If the Sub-Group building is selected, then the 'Debtor' field will appear for you to select a debtor as well.
Sub Groups documents cannot be uploaded at this stage and will not include details for Portal Uploads, Invoice detail or Insurance detail. These sections will be hidden if a Sub Group building is selected. Work queues that include these fields should not be used for Sub Group documents.
Add Documents Ribbon
When in the Add Documents tab, these are the icons available in their relevant menus. Each icon is available at all times, except if you don't have necessary permissions for that icon/button. For example, the Delete button may be inactive. Each icon is explained in more detail in their own section below.
Select Documents
This option will allow the selection of an individual or multiple documents. Using this icon will add documents from a file location once, and not retain any Recent Locations.
- From the Add Documents tab, click the Select Document button in the ribbon to open a Windows Explorer window.
- Navigate to the file path of where the document is located.
- Select document / or multi select documents (holding Shift key to select a list of documents or Ctrl and click and pick sub sets of documents where required).
- Click Open.
- From the Add Document window you can apply a Document Profile if suitable.
- Complete the Document Details as per the Document Profile requirements.
- Click Add Document.
Add Folder
Use this icon to add another folder / windows directory to the Recent Locations list, on the left side. This performs the same functions as the Add New Folder Location option in the Recent Locations list, on the left side.
- Click Add Folder (or Add New Folder Location option in the Recent Locations list, on the left side).
- In the Browse Folder window, a list of drives will appear; You need to click the arrows to navigate to the required folder, then click the folder.
- Click the Select Folder button.
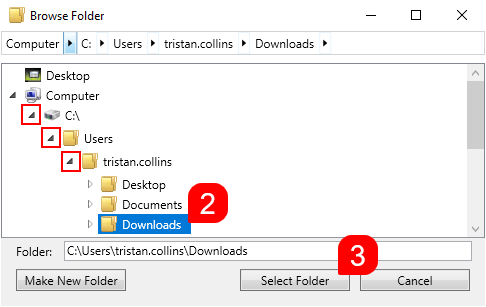
- You can also click the Make New Folder button to create a new folder within the folder you already have selected.
- You'll need to type in the name of the folder, then press your Enter key.
- When prompted 'Folder doesn’t exists. Do you want to create this folder?' Click OK.

Preview Pane
Click to adjust the position of the document preview pane or remove the preview pane.

Open Folder
Opens the current selected folder in the Recent Locations list, on the left side.
Delete
Permanently deletes the currently selected file from Windows. It does not place the file in the Windows Recycle Bin first, so use with extreme care, as it cannot be recovered. When clicked a prompt will appear.

Document Properties & Settings
Each document has its own set of properties and settings, which, at a minimum, include a Building (if the Property Document radio button is selected). When a single document is selected and the Results Layout option in the ribbon is set to 'Show Results Properties', all fields in each section become available for editing.

It is also possible to update the properties and settings of two or more documents simultaneously. However, if two or more documents are selected (by ticking their boxes), the fields that can be updated are limited. See DocMax | Bulk Update Documents for more information. All documents added to DocMax will build a history, which logs the changes made to the document properties and can be a tool to identify document property updates with usernames and dates.
Each of these sections is covered separately below. However, above these sections are almost always four fields available to update:
Document Profile: Assign a Profile to the document. Not available when multiple documents are selected. See DocMax Profiles for more information.
Assigned To: A drop-down list will display, allowing you to select a user to whom the document should be assigned. See My Assigned for more information.
Status: Assign a Status to the document. See DocMax Statuses for more information.
Action Date: Enter a date in DD/MM/YYYY format, click the drop-down to select a date from the calendar, or select one of the quick links (Tomorrow, In 3 days, etc.). This will not trigger any alerts or reminders on its own, but it's another field that can be used as a filter in searches or Work Queues.
Document Details

- Building: Only available if the Property Document radio button is selected. Select the building from the drop-down list. Only active buildings are available. This may be populated automatically if you have the Auto prefill setting enabled.
- Internal Document: This will allow the document to be saved to GLMax Companies, where internal documents can be saved.
- Lot or Debtor Owner: After selecting the building, you can choose either a lot or a debtor account from this drop-down list. It will display the debtor's name after the lot is selected.
- Category: Choose a category from this drop-down list. This is the internal filing category for DocMax. It's also one of the document fields that can be changed for multiple documents at once. See DocMax Categories for more info.
- Title: It's always recommended to type in the document title. If uploaded, this is displayed on the StrataMax Portal and in other areas of StrataMax when linked to certain areas. Merge fields can be used in this field for Action Buttons in Work Queues.
- Description: This isn't mandatory and isn't displayed in other areas, but it can be useful as an additional filter when searching and as an internal description for other users.
- Notes: Add any extra details about the document that other users might find useful. When documents are passed through a Work Queue, including merge fields such as Current Username and Today, will insert this information based on the person actioning the document.
- Search Words: Used strictly for search purposes. Previously added words can be selected from the drop-down list, or you can add more by clicking the Add button. It's also one of the document fields that can be changed for multiple documents at once. Any search terms that have not been applied to any document will be automatically removed from the list overnight. Documents that have been pre-filed for the building will include the system search word System Pre-Fill.
- Document Date: This field can be clicked to select a date from a calendar, added to Advanced and Saved Searches, and set in DocMax Profiles or Work Queue restrictions and actions.
Online portal
Please see the DocMax | Online Portal Uploads article for more information.
Invoice Details
This section is used for invoices that are most likely to be placed in a Work Queue and have a Creditor Invoices applied. In most cases, these details are entered when the document/invoice is added to DocMax.
- Creditor: Select the creditor from the drop-down menu. Click Master Chart to add from the Master Chart of creditors or
 to add a new creditor (Security Setup applies)
 - Invoice Date: The date of the invoice. Not necessarily the date the invoice is processed in StrataMax, or when it is paid. Can be typed in a DD/MM/YYYY format or selected from the drop-down menu calendar.
- Invoice Number: The invoice number on the invoice itself.
- Invoice Items: This is where you add the Expense Account, Details, and Amount, DR/CR and for each line item on the invoice. Multiple expense items can be added here.
- Create Invoice: Opens the Creditor Invoice screen. Finalised invoices display as Details for viewing or editing similar to Search Creditor Invoice Items.
 to add a new
 Document Source
- Added From: Will display where the document originated from. This can be many things such as 'Building Transfer', 'Outlook', 'Document Append', etc. This cannot be changed.
- Added By: This will display the user who added the document. It is was added as part of a building transfer, it will display 'TRANF'. This cannot be changed.
- Added Date: The date the document was added. This cannot be changed.
- File Name: The name of the original file. This cannot be changed.
- Email Details (Subject, Sender, etc.): Only applicable if this is an email added from Outlook, using the Outlook Add-In. All of these fields can be changed and saved.
File Details
- Document ID: This is assigned automatically when the document is added to DocMax and cannot be changed. This ID is used throughout various other areas of StrataMax, such as in the Roll screen for owner documents, and in the TaskMax work orders screen.
- Document Locked: If not ticked, you can tick it to lock the document. If it's been locked already, you need a specific permission in Security Setup to unlock it. Any document that's locked will display a yellow notification saying it has been finalised and cannot be updated.
- Document Expires: This is the expiry date of the document. This field can be set automatically with the Default expiry years setting in the DocMax settings. It can also be changed by a user on an individual document, and is one of the few document settings that can be changed for multiple documents at once. This field doesn't delete any documents. The deletion of expired documents is maintained in the Data Health Dashboard Documents section in conjunction with this exipry date and it is recommended that these settings are only updated by an Administrator or your IT consultant.
- View Extracted Text: Clicking this button will open a separate window with the raw, unformatted document text, which has been detected using OCR technology. The accuracy of this relies heavily on the document type and source, so your mileage may vary in this regard - especially with scanned documents, such as old building plans. The purpose of this feature is so text can be copied and pasted elsewhere.
References
- Linked Documents / Add Link: Displays any documents that are linked to or superseded by this document. Click the Add Link button and select 'Link' or 'Supersede', then click Save.
- Insurance Policy: Used to link the document to the main insurance policy in the building - most likely the 901 Building policy. Used predominantly for an insurance CoC or invoice. Once selected in DocMax, the document can be viewed in the Insurance screen.
- Insurance Claim: Used to link the document to a claim in Insurance Claims.
Add New Folder Location
- Click Add New Folder Location at the bottom of the Recent Locations list, on the left side.
- In the Browse Folder window, a list of drives will appear; You need to click the arrows to navigate to the required folder, then click the folder.
- Click the Select Folder button.
- You can also click the Make New Folder button to create a new folder within the folder you already have selected.
- You'll need to type in the name of the folder, then press your Enter key.
- When prompted 'Folder doesn’t exist. Do you want to create this folder?' Click OK.
Split Documents
Prior to adding a document to DocMax, a multiple page document can be split, either into individual pages or from a certain section / page. There are two methods of splitting document - split a document from a certain section using the Preview window, or split all pages from the document list.
Split Documents from Preview Window
- In the ‘Add Document’ preview window of the image, you can split the document by navigating to the required page split and click ‘Split Here’.
- Split the document as many times as required. This will create a ‘Document View’ window for each of the split documents.
- The ‘Document View’ windows will allow for adding the document in a split format.
- Select the ‘Document Profile’ (if required).
- If a profile has been applied, fill in the required fields of information.
- Complete any additional field information.
- Click ‘Save and Close’.
- Complete steps 4-7 for any further split ‘Document View’ windows.
Split Documents from Document List
This is useful when scanning one page invoices in as a whole file and splitting to create individual invoices for processing.
- Highlight the required document for splitting from the ‘Add Document’ window and click’ Split All Pages’.
- The original document will remain the in the ‘Add Document’ window plus individual pages, for each, which can then be added to DocMax.
Processing 'Drag and Drop'
Documents can be added to DocMax by simply dragging and dropping the document from a Windows folder on top of DocMax. This can be the simplest method of adding documents to DocMax. Please be aware that you cannot drag and drop emails or attachments from Outlook - the Outlook Add-In should be used instead (see further down this article).
If the document (s) have been added in error, drag the cursor to the pink area, or click Cancel on the keyboard.
- From a Windows Explorer window, select required document(s) and drag them on top of the DocMax screen; or
- Users can Drag and Drop document (s) onto the StrataMax icon on the taskbar.
- Drop the cursor over the blue area to add them to DocMax.
- This will display the Add Document window, ready for the document(s) to be processed.
- Apply Document Profile (recommended) and complete required fields.
- Click Add Document once complete and proceed to next document.
DocMax Drop Box
Drop Boxes allow documents to be added to DocMax quickly and easily by placing the document file in a pre-defined network folder on your server. DocMax does not need to be running for this to occur.
When setting up a Drop Box within DocMax, it is recommended to use UNC pathing, rather than a drive letter for the path to the Drop Box. The reason for this is if the drive letter were to change or differ depending on the device where it has been set, this can cause the Drop Box upload functions to fail.
The Drop Box is commonly set up for the network folder which receives the outputs from an office scanner, but may be configured for any network location which is accessible by the user.
To do this, it is recommended to setup a base Drop Box folder as an application share for example:
\\Servername\Dropbox\Name_of_dropbox
If you were to have a server named “Office”, you would create a new folder share called “Dropboxes” and within this “Dropboxes” folder, create the required dropboxes, i.e.
\\Office\Dropboxes\Invoices
\\Office\Dropboxes\Filing
Only documents that are supported by DocMax will be added via the Drop Box.
A Drop Box can be set up to apply a particular Profile on adding the document, or to prompt the user to enter details manually.
- Open DocMax.
- Click on Administration tab.
- Select Drop Boxes.
- Click Add New.
- Browse to locate the Drop Box Location.
- Select to Add to DocMax either 'with Profile' or via 'Add Document window'. (Refer to Processing Drop Box with Profile below for information on this option).
- Click Save Changes.
Processing Drop Box with Profile
Processing documents via a Drop Box with a Profile would be best used for the same types of documents. An example of this is would be invoices, which can be added via a Drop Box with a Profile, so that they are automatically added to a Work Queue.
Documents added via a Drop Box folder with a Profile will remove the document from the Drop Box folder after it's been added to DocMax.
In order for the above to occur, the following basic criteria should be configured in the Profile:
- Status = 'Received'
- Category = 'Invoices'
This is simply one example of a scenario where it would appropriate to have a Drop Box with a Profile.
- Scan, save or drag and drop document to 'Drop Box'.
- Working with the example of Invoices, based on 'Profile' setting is pushing the document through to the Work Queue for 'Invoices for Processing'.
- Process document properties as per normal procedure.
- In this example, use the 'Action Buttons' to move the document to its next processing stage.
Processing Drop Box via Add Document
Processing with a Drop Box via an 'Add Document' window allows for a multitude of different documents to be added to this folder. It should be noted that the document properties (Profile) are assigned at the time of adding the document.
Right clicking on multi-page documents will allow a 'Split All Pages' function which will split the document into single pages plus retain the original file.
- Scan, save or drag and drop document to Drop Box.
- From the Add Document window, assign the Profile (recommended) for the document.
- Complete any required document fields as per the Profile.
- Click Add Document.
DocMax Outlook Add-In
The StrataMax Outlook Add-in allows emails and attachments to be added directly from Outlook into DocMax. The StrataMax Outlook Add-in displays a variety of tick boxes to control what gets added to DocMax. The Outlook Add-In should be available within the Outlook 'Home' tab. However, if the add-in is not be visible, please see the DocMax Outlook Add-In article for a more detailed guide on enabling the add-in.
These controls (except the Settings control) are also shown in the ribbon when an email item is opened in a separate window.
Users may see a log in option for the StrataMax Outlook Add in in Outlook. The user must enter their own login details here - the same one used for logging into StrataMax. Users who have logged into StrataMax with the ‘Remember Me’ tick box enabled, will not see the log in option.

DocMax Outlook Add-In | Settings
There are settings for the DocMax Outlook Add-In that can be adjusted to suit any user's needs. To access these, click the Settings button in add-in section of the Outlook ribbon, as seen in this screenshot. Details of each setting are explained below, beneath the screenshot.

Send Email Options: These settings determine how emails sent from Outlook are actioned by the add-in.
- Do not add to DocMax will not add the email to DocMax.
- Add to DocMax with Details will add the email to DocMax.
Outlook Categories: Settings for applying Outlook categories to emails added to DocMax.
- Apply an Outlook Category to emails - will apply a specific Outlook category to just emails.
- Apply an Outlook Category to emails with attachments - will apply a specific Outlook category to emails with attachments.
General: A single setting related to applying a DocMax Profile.
- Use selected profile for 'Add With Details' also will allow the user to apply a DocMax Profile when using the Add With Details button in the add-in. This results in the 'Add Document' window appearing with the selected DocMax Profile already applied.
DocMax Outlook Add-In | Document Queueing
In order to understand and enhance the user experience and functionality with the DocMax Outlook Add-In, we recommend that all users familiarise themselves with these behaviours:
- Emails sent from Outlook to DocMax do not require StrataMax to be running.
- If StrataMax is closed, the email will be added to a queue in the database and processed the next time the user opens StrataMax.
- Behaviour varies based on how the document is added:
- Add with Details: DocMax opens in "Add Document" mode when next StrataMax is started by the user.
- Add using Profile: The email is processed as per the DocMax Profile configuration, with optional property editing.
- If StrataMax is open while adding documents, the add-in will continue to function in the normal way.
Add an Outlook Email to DocMax with a Profile
- Select the email in Outlook (multiple emails can be selected by holding the keyboard Shift or Ctrl key and selecting emails).
- In the Outlook Add-In section of the ribbon, tick the Add Email box and from the profile drop down list, assign the required profile.
- Click Add with Profile to add the email to DocMax for either filing or further processing.
Add an Outlook Email to DocMax with no Profile
- Select the email in Outlook (multiple emails can be selected by holding the shift or ctrl key and selecting emails).
- In the Outlook Add-In section of the ribbon tick the Add Email and click Add with Details box.
- Complete the Document Details from the Add Document window.
- Click Add Document to add the document to DocMax for either filing or further processing.
Add an Outlook Email including its Attachments to DocMax
These steps will add the email including its attachments to DocMax; the attachments are only seen if the email is opened in DocMax.
- Select the email in Outlook (multiple emails can be selected by holding the shift or ctrl key and selecting emails).
- In the Outlook Add-In section of the ribbon tick the Add Email and Include Attachments box.
- Select a Profile (optional) and select Add with Profile or click Add with Details to add the document with the ability to manually add further details in DocMax before clicking the Add Document button.
- The email and any attachments will be added as a single file, and will be able to be viewed by using ‘Open’ button in the ribbon in DocMax to display the original email and its attachments simultaneously.
Add an Outlook Email and its Attachments separately to DocMax
These steps will add the email to DocMax and add the attachments, but as separate documents in DocMax, so that they can be added with different details such as Categories, Search Words, etc.
- Select the email in Outlook (multiple emails can be selected by holding the shift or ctrl key and selecting emails).
- In the Outlook Add-In section of the ribbon tick the Add Email and Add Attachments box.
- Select a Profile (optional) and select Add with Profile or click Add with Details to add both documents (the email and the attachments) with the ability to manually add further details in DocMax before clicking the Add Document button.
- The email and any attachments will be added as separate files.
Add Only an Outlook Email's Attachments to DocMax
- Select the email in Outlook (multiple emails can be selected by holding the shift or ctrl key and selecting emails).
- In the Outlook Add-In section of the ribbon tick the Add Attachments box.
- Apply a Profile and select Add with Profile or select Add with Details to add the Attachment Details.
- This will add only the attachments to DocMax.
