This article covers the setup and various settings required if fees are charged when arrears notices are sent to owners to recover outstanding levies. There is also information on how to exclude at a per-lot level or building level, particular owners from receiving an Arrears Notice.
It also includes how the arrears fees can be presented in the building's Financial Statements, and details how to set up an arrears schedule, which determines if an arrears notice should be generated or not. You will also find the needed Merge Letter settings to create an arrears letter or arrears cover letter.
Arrears Fees Breakdown
A fee can automatically be charged to a lot account when an arrears notice or letter is sent to the owner. There are two ways to present these fees in the financials for the building.
- The standard method uses an arrears clearing account, 061003 to manage the debits and credits. This will display a single figure on the balance sheet in the Financial Statements.
- The other method is to use an income account and an expense account to manage the debits and credits. These will display as two separate figures on the income and expenditure sheets of the Financial Statements.
The income account and expense account used for these transactions are set up by the Strata Manager, and can be given any code or name preferred. The section, Add New Account Code covers this topic.
Arrears Clearing Account
- The arrears fee amount is debited on the lot account, 02100***.
- The arrears fee amount is credited on the arrears clearing account, 061003.
- A TRMax record is created at the same time as the arrears fee is charged.
- When the TRMax recoveries are processed in GLMax (recommended as part of the Month End Process), the arrears clearing account is then debited and Standing Journals are created to credit the Strata Management Company creditor account, 08200***.
As long as you process TRMax records before processing Month End Rollover, the arrears clearing account, 061003, should balance to 0.00 at the end of every month.
Income & Expenditure Accounts
- The arrears fee amount is debited on the lot account, 02100***.
- The arrears fee amount is credited on the income account.
- A TRMax record is created at the same time as the arrears fee is charged.
- When the TRMax recoveries are processed in GLMax (recommended as part of the Month End Process), the arrears fee expense account is then debited and a Standing Journals are created to credit the Strata Management Company creditor account, 08200***.
Arrears Fees Setup
This section covers the setup of arrears fees, which must be reviewed and configured once, and will only need to be updated if changes are required.
- Search or select Arrears Notice.
- Select Tools then Arrears Notice Setup.
- Select File > Arrears Fees Setup.
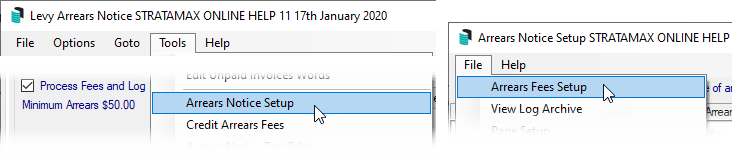
- Click the Change button to alter the following fields.
- Managers Account Code: This is the creditor account code for the Strata Management Company.
- Fees Account: This is the arrears clearing account, 061003, or the income code for arrears fees (refer to the Arrears Fees Breakdown section above for an explanation on the difference).
- Invoice Code: This is the Levy Invoice Code used to charge arrears fees to the lot account (normally set to 18 - Other).
- Export to: This can be either TRMax or No Export.
- If TRMax is selected, the Invoice Code field should be the Invoice Code number for the arrears fees that has been set up in the Edit Invoice List menu in GLMax.
- If No Export is selected, the fees will post to the account code in the Fees Account field, and immediately create a Standing Journal to credit the Strata Management Company creditor account, 08200***.
- Select either the Global or Local radio button to apply these setting to either all buildings or just this building, respectively.
- When done, click Save then Close.

Arrears Notice Configuration
This is the configuration setup for arrears. There are a number of settings that should be considered as part of the initial arrears setup. To change the below settings open the Arrears Notice menu, and click File > Configure.

New Owner Arrears Days
If a change of ownership has occurred on a lot, this is the number of days before the lot is included in the arrears schedule. This will observe the next the option selected in Arrears Days Key Field.
Arrears Days Key Field
This setting is linked to the above setting, New Owner Arrears Days.
- Transfer Date will observe the date the change of ownership was completed in the Roll menu.
- Notice Receipt Date will observe the Date of Receipt of Notice field in the Roll menu.
Clear all arrears log records upon levy generation
Recommended to not be ticked and should be used on advice by the Support Team. This setting will set the clear flag in the levy arrears log when a new levy is generated.
Arrears Record Detail
This is the wording for the arrears notice fee on the levy / arrears notice.
Arrears Notice Schedule
The Arrears Notice Setup menu is where Strata Managers can set up a series of arrears notices and/or letters, where each notice is sent in a chronological sequence, and only when a lot's arrears balance reaches a certain amount. This series is referred to as the Arrears Notice Schedule. The number of notices to enter in the schedule is determined by how many letters need to be sent to an owner before their debt is sent to a debt collection agency (Legal Action).
A maximum of seven arrears notices/letters can be set up. For the Days Overdue calculation, it will include the due date as one of the days in the calculation. For example, 14 days overdue with a levy being due on the 1st allows for the arrears process to be run on the 15th of the month.
Each time the Proceed button is clicked in the Arrears Notice menu, the following fields in Arrears Notice Schedule are checked to (a) determine which lots qualify for an arrears notice, and (b) which notice/letter in the schedule should be sent:
- The Notice Type (number) of the previous notice if one was sent.
- The lot balance is equal to or exceeds any of the amounts in the Amount Overdue column?
- The age of the lot balance is equal to or exceed the Days Overdue column.
Create/Insert an Arrears Notice
The arrears notices and letters can either be set up globally or locally. Buildings without a local schedule will adhere to global schedule.
Global Schedule |
Local Schedule |
| Click the Global Settings button, which will change to green and the global schedule will immediately appear. The button beneath it will also change its name to 'Copy Global Settings to this building''. |
To remain in a Local Schedule, simply don't click the Global Settings button, and proceed with the below steps.
|

- Open the Arrears Notice menu.
- Click Tools > Arrears Notice Setup.
- In the Arrears Notice Setup window, click the Global Settings button if you would like to set up a global schedule (recommended).
- Click the Insert button.
- In the Template Selection screen, click an arrears notice or letter template, and click the Select button.
- Instead of having to test each levy template, here is a PDF with the arrears templates available for your convenience: Arrears Notice Templates.pdf
- If you would like to preview the template first, select the template, then click the Preview button at the bottom.
- To change the preview style, click Options > Preview Style > Field Names or Field Numbers.
- In the bottom section click either DEPOSIT or NONE:
- NONE should be used for arrears letters that don't require a deposit slip.
- DEPOSIT should be used to produce a notice with a deposit slip at the bottom.
- Click the Preview button to check that it is appropriate.
- Upon clicking the Close button, the Levy Arrears Notice options will need to be determined. When all fields are entered, click the Save button.
- Days Overdue are the number of days a levy or balance is overdue before this arrears notice/letter will be produced.
- Amount of Arrears is the balance overdue on a lot before this arrears notice will be produced.
- Arrears Fee is the amount the lot will be charged when this notice is produced.
- Output Ledger Card can be ticked if you would like to attach the lot's ledger card to the arrears notice/letter. When ticked, you'll be able to select a Ledger Card Template.
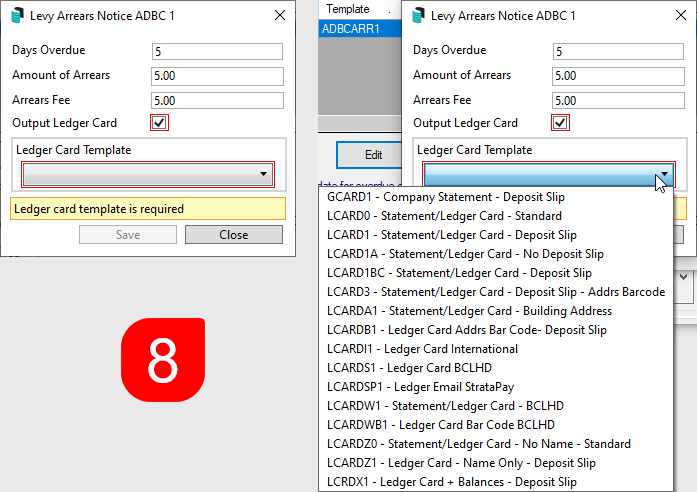

If levy arrears notices are being printed and include ledger cards, be aware if using levy notice paper with StrataPay deposit slips in your printer, that due to the number of pages on ledger cards being different from lot to lot, ledger cards transaction will print over the top of the deposit slip.
The total showing on the Arrears Notice will not always match the total on the Ledger Card, due to the current arrears fee not being posted until the Arrears Notice has been printed/emailed. Levies generated not yet due will also be reported on the Ledger Card.
- Simply repeat the above steps to add further notices/letters to the arrears schedule until all required notices are configured. Once they have been, click the Close button on the right.
- Set the printer for each notice in the schedule.
If preferred, the Save Local Settings as Global button can be clicked to save the current building's local schedule as the global schedule. You will be then prompted to confirm.

Edit an Arrears Notice
This section explains the first steps for amending an existing arrears notice in the schedule, such as changing the selected template, removing the ledger card, or changing or removing the arrears fee.
If changes to an arrears template are needed, please contact the StrataMax Support Team, and be aware that fees may apply.
- In the Arrears Notice Setup window, select the arrears notice or letter and click the Edit button.
- Now follow step 5. onwards in Create/Insert an Arrears Notice section above.
Delete an Arrears Notice
- In the Arrears Notice Setup window, select the arrears notice or letter and click the Delete button.
- When then confirmation prompt appears, click the Yes button.
Edit Arrears Letter
If the arrears notice template is a letter, then the letter should be edited with the necessary merge fields, formatting, and body. The templates for the arrears letters are .LET file types, which can only be edited in Notepad. For more information and guidance on .LET merge letters including merge fields, refer to our Notepad Merge Fields article.
- Highlight the arrears notice in the schedule and click the Edit Letter button.
- If nothing happens, then the arrears notice template selected is not a letter template, but a notice template.
- Click the Edit Letter button, in the small button selection window.
- Once Notepad opens, use the below sample letters (copy & paste) to set up the number and margins to suit.
Arrears Letter | Sample 1
&TopMargin=550
&LeftMargin=150
&RightMargin=2250
{LetterHead}

{Font=5}

<Today>
<NameAndAddress>

{BoldOn}ARREARS OWING ON YOUR ACCOUNT{BoldOff}

There is currently an outstanding balance overdue on your account.
{ULineOn}Please pay the below amount immediately to avoid further arrears fees.{ULineOff}

<CompanyTitle>
Account <General-2>
Lot <General-114>
Amount Outstanding $<General-10>
Last Arrears Sent <General-64>

Regards
Body Corp Manager Pty Ltd
Arrears Letter | Sample 2
&TopMargin=550
&RightMargin=2200
&Font=9
{LetterHead}

{Font=10}{Centre}FINAL NOTICE
{Font=38}<Today>
{Font=11}
&LeftMargin=300
<NameAndAddress>
&LeftMargin=150
{Font=60}
{BoldOn}RE:  Lot <General-114> at <Building-3>, <Building-6>, <Building-7>, <Building-8>  <Building-238>{BoldOff}
Please be aware that the amount owing on your lot is $<General-10>.
Regards
Body Corp Manager Pty Ltd
Set Printer For Each Notice
Because some arrears notice template require the use of deposit slip paper, whilst arrears letters don't, the Arrears Notice Setup menu supports different printers and paper trays for each arrears notice/letter in the schedule. Therefore, the below steps need to be completed for each new arrears notice/letter in the schedule. If you have not selected a printer you will be prompted before you produce your Arrears Notices.
- In the Arrears Notice Setup menu, select an arrears notice/letter in the schedule.
- Click File > Page Setup.
- In the Printer Setup window, select the printer and paper source from their respective drop-down menus.
- Click OK.
Arrears Cover Letter
Cover letters can now be sent with arrears notices/letters. These letters are also a .LET file type.
- Once the Merge Letters (see above for basic fields you can use for setting up a .Let letter) are set up the following needs to be done:
- In the Arrears Notice Setup window, click the Global Settings button.
- Right-click the arrears notice that requires a cover letter, hover the mouse cursor over the menu Cover Letter from Merge Letters (TEMPLATE NAME) and click the merge letter from the list provided.
- Repeat for any other arrears notices/letters.
The cover letters can only be set up when the Global Settings button is enabled. However, if a building has a local arrears schedule, and the notice/letter template matches the one in the global schedule, it will produce a cover letter as well.
Settings / Tick Boxes

Use earliest due date for overdue days calculation (Default is latest due date).
When ticked, the arrears schedule will observe the oldest (instead of the most recent) due date to determine if a notice is to be issued (recommended).
Include Journal arrears in Not Due Calculation
When ticked, the arrears calculation will include amounts billed, but not yet due, as well as any balance in the 'Other' invoice code.
Include Other balance in Arrears
When ticked the arrears calculation will include any balance in the 'Other' invoice code (recommended).
Print Notice only if there are Levy Arrears
When ticked, the Arrears Notice menu will only observe balances from overdue levies (in the Levy Management menu), and will ignore balances in the Overdue Interest and Other invoice codes (recommended).
Default Overdue Days (used for Other)
This is the number of days a balance can remain in the lot's Other invoice code before the Arrears Notice menu observes the balance and produces an arrears notice. This setting is only observed when there are no overdue levy or invoice balances.
View Log | Reset Arrears | Delete Arrears
This menu is used to view the history of what arrears notices have been previously issued. From here, you can completely reset the arrears schedule for a single lot so that the next time the arrears is processed, the lot will received arrears notice #1. This process is also applied the same from the Utility Billing area.
You can also remove the last issued arrears notice so that when the arrears is next processed, it will issue that notice again. For example, when the arrears was last processed, a lot received arrears notice #2. So the next time you process the arrears, it will issue arrears notice #3, which is the final letter of demand/referral to a debt collector/solicitor. However, as an exception in this one particular instance, you would prefer the issue arrears notice #2 again.
- Open the Arrears Notice menu.
- Click Tools > Arrears Notice Setup.
- Click the View Log button.
- This will display the Arrears Notice Log showing the arrears history for all lots in the selected plan.
- In order to ensure that action is taken on the last/latest issued notice, click on the date column header to put the table data into an appropriate order.
- Once the appropriate line item has been identified for the appropriate lot, select it and click on the required function button:
Toggle Clear Flag
When clicked, the arrears notice history will be reset for the selected lot account. When the Arrears Notice menu is next processed, the first notice in the schedule (Notice Type 1) will be produced (provided the lot meets the notice criteria Amount Overdue and Days Overdue).
The same will also occur when a lot account levy balance is paid in full. On the other hand, if there is no 'Y' in the Clear column, the next arrears notice in the schedule will be generated when the Arrears Notice menu is next processed.
Delete
When clicked, the selected entry in the log will be deleted. The same notice will then be produced when the Arrears Notice menu is next processed. For example; If a lot account's entry for Notice Type 2 is deleted, then Notice Type 2 will be produced when the Arrears Notice menu is next processed.
Please be aware that this is not the preferred method to reprint an arrears notice as the lot account will be subject to arrears fees again. The correct method is to use the Stored Report menu.
OK
Will close the Arrears Notice Log screen.
Export
Will open the log in Excel.
Clear Arrears Notice on Change of Ownership or nil balance
When a change of ownership is completed in the Roll menu, the arrears notice log can be reset automatically. This will result in the new owner receiving the first arrears notice in the Arrears Notice Schedule if the lot account balance is overdue.
- In the Roll menu, click File > Configure.
- Tick the box labelled Clear Arrears Notice on Transfer.
Note: There is a separate setting 'Clear Arrears Flag' located in Receipt Entry / File/ Configure - if enabled, the owner's arrears flag will be cleared automatically when their payment is receipted and their account balance becomes zero, or below the pre-configured tolerance allowance (see below). This is a global setting and will affect all users. When the arrears flag is cleared, it will also create an entry in Log Viewer, in the 'ArrNoticeClr' category (Global Setting).
Exclude Lot from Arrears Notice
When a lot account needs to be excluded from the processing of the Arrears Notice indefinitely, it's not necessary to untag the lot in the Arrears Notice menu, every single time the arrears are processed. To exclude a building from receiving an arrears notice, refer to the 'Excluding a building from the global arrears process' section below. To exclude the lot until the flag is manually removed or a Change of Ownership is processed, follow the below steps:
- In the Arrears Notice menu, click the GoTo > Arrears Manager.
- In the Configuration window, click the Close button.
- In the Arrears Manager window, select the lot account to exclude.
- Confirm that there isn't already a 'Y' in the No Send Arrears Notice column.
- Click File > Set No Send Arrears Notice.
A global report can be produced on the Arrears Notice Disabled setting using the Global Debtor search.

It is also recommended to click the Notes button and record who advised to put this owner’s arrears notices on hold, and for the period.
To clear the Send No Arrears Setting
If a lot account has been set to be excluded from the Arrears process by having the 'No Send Arrears Notice' setting in place, this can be removed by repeating the steps to add a 'N' to the 'No Send Arrears Notice' column.
- In the Arrears Notice menu, click the GoTo > Arrears Manager.
- In the Configuration window, click the Close button.
- In the Arrears Manager window, select the lot account to include in the Arrears process.
- Confirm that there is a 'Y' in the No Send Arrears Notice column which will be changed to an 'N'.
- Click File > Set No Send Arrears Notice.
- Review the Lot account to ensure the 'Y' has been adjusted.
Excluding a building from the global arrears process
Excluding a building from the global arrears process can be managed in a few different ways, and the options below can assist you.
Setting a local arrears schedule
Setting a local arrears schedule with the days overdue and the amount overdue to a large value, will prevent the building from issuing the arrears notices. When this is set, it is also important to remember that this exists and should be deleted if the building needs to rejoin the global arrears process.
Insert a local notice from the Arrears Notice / Tools / Arrears Notice Setup and include the Days Overdue and Amount Overdue fields for a significant value.

Change Building - untag building from the list
When running the process from Arrears Notice and using the Change Building button to tag all buildings. Un-tag the required building to exclude from generating and issuing a notice.
