 | The instructions in this article relate to Key Register. The icon may be located on your StrataMax Desktop or found using the StrataMax Search. |
The Key Register menu is a central database to assist with managing, recording and tracking information related to keys for each property and each lot.
Keys can be added to the register for any part of common property, such as garage or front lobby door keys, and also for individual lots. The Key Register allows for various types of keys, such as swipe cards, fobs, or just plain metal keys.
The Key Register menu has 5 main functions.
- Building and Lot Selection Facility.
- Creation of Keys (adding a key).
- Allocation of Keys (allocating the created key to an individual).
- Reporting Functions (detailed reports on when keys were created, allocated and dates etc).
- Search Functions (i.e. searching for a register of lost keys for the building for example).
Key Register Setup
Before adding keys, some setup is required. First the general ledger codes must be set within each building that will be using the Key Register. See the Account Maintenance article for more info on creating new account codes.
- Open the Key Register menu.
- Click File > Settings.
- Select the Ledger Accounts tab.
- Account Type, select ‘Sale Account’.
- Tick Default (All buildings) if required, or select an individual building to create different codes.
- Enter the Ledger Account Code that will be used for the sale of a key Sale Account, and click the Set Code button.
- Continue setting the codes for each of the ‘Deposit Account’ & ‘Refund Account’.
These codes are not linked to the Financials within StrataMax; these are for reference within the Key Register only.
If a security deposit is held for keys issued, to then be refunded on the return of an issued key, then a Balance Sheet code should be created to hold the funds - if a normal income/expense account is used, this will be cleared to $0 at year end rollover. If a key is lost, and the security deposit is then not refunded, the security deposit amount should then be moved to an income account for the building.
If fees are being charged for keys issued which will not be refunded, an income account code should be created for the building.
- Click tab Key Types tab to add a new type if required, or highlight a key type and click Delete button if you need to remove a key type.
Adding / Creating Keys
There are two stages to adding keys to the register; the first is to create or add the key itself to the register, and then the second is to allocate the key to a specific lot owner or authorised person. One or several keys can be added at a time.
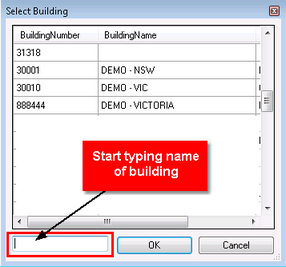
- Open the Key Register menu and select a building.
- When the Select Building window appears, type in the building required in the bottom left field, and then click OK.
- Within the Key Register menu, there are four filters:
- Building: The Building you have selected.
- Lot Account: The Lot number applicable that will become the possessor of a key.
- Location: The Location the key is for (ie. Garage, Pool etc).
- Issued / Unissued: To select whether the key has been issued to the owner / occupier or not.

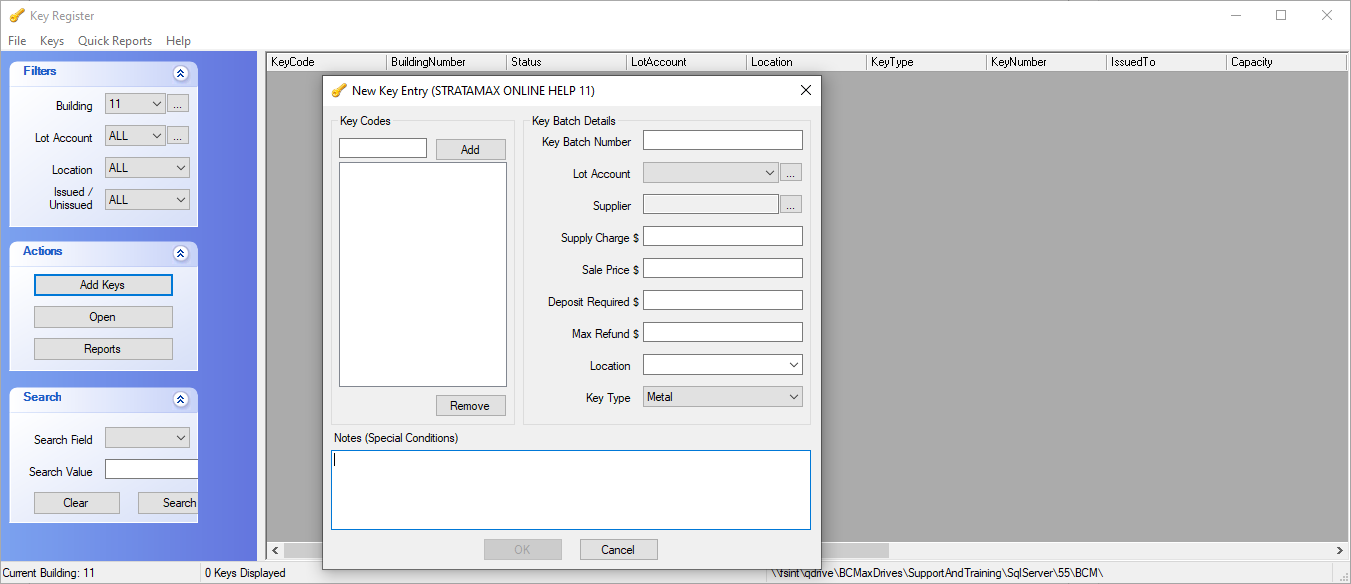
- Click the Add Keys button, and complete the New Key Entry screen.
- Keys are created in a batch, and then each individual key within that batch is given its own individual code. If adding additional keys to a batch, select a key within the batch, right click and select Add Keys to this Batch.
- Keys are created in a batch, and then each individual key within that batch is given its own individual code. If adding additional keys to a batch, select a key within the batch, right click and select Add Keys to this Batch.
- Enter the Key Batch Details section.
- Key Batch Number: Enter a key number either supplied or double-click the field to automatically generated a code.
- Lot Account: Select either common area or a specific lot.
- Supplier: Complete if applicable.
- Supply Charge: Complete if a charge is applicable; this is just for reference purposes.
- Sale Price: Complete if a charge is applicable; this is just for reference purposes.
- Deposit Required: Complete if a deposit is required.
- Max Refund Amount: Complete if a refund is required.
- Location: Click the drop-down to select from the drop list (i.e. Garage, Pool etc).
- Key Type: Select from the drop list (the options for this drop-down list is created in File > Settings).
- Enter the Key Codes.
- Double-click inside the field to automatically generate a code for each key in the batch, or type in manually (must be more than 3 characters).
- Click the Add button, and repeat until all required key codes are added.
- Highlight a code and click the Remove button to remove a key code.


- Manually type any notes in the Notes (Special Conditions) field.
- Click OK to finalise the addition of the batch of keys.
Viewing and Editing Key Details
Use this function to view and edit important information relating to the specific key allocated to a particular lot owner.
- Open the Key Register menu.
- To view the Summary Screen simply highlight the respective key code, then double-click or right-click and select the Open button.
- Summary: Displays both Key Summary information and Current Key Holder (if issued). The most important part of this screen, is the 'Status' field. This is where information can be entered in relation to a particular individual key. For example, if the key is lost or stolen, here is where that information would be recorded.
- Issue / Return: This tab enables a created key to be allocated to an owner or other authorised person, or when you need to record a key that is being returned. Note that the tab will either State ‘Issue’ if the key has not been allocated, and will revert to ‘Return’ if the key has in fact been issued.
- History: The history tab reveals the history of a particular key. For example, when it was allocated, reported lost or re-issued.
- Notes: Add a note for this key. The note will remain with the key but does not show in BCMax notes.
- Batch Details: The batch details tab enables you to view the entire batch details from a particular set of keys (rather than just an individual key).

Issue Keys
Once a key has been created, it may stay in the system until it needs to be issued.
- In the Key Register menu, use the filters to locate the key.
- Select the key to issue, and click the Open button.
- Click the Issue tab, and then click Edit.
- In the next screen - the Contact List - you have the option of choosing a Lot Account, Contractor, or Office Bearer from the existing information from BCMax. Alternatively, you may click on Tools and then Add New Contact, to issue a key to a non-owner, or non-contractor.
Issue a key to an existing contact in BCMax; ensure that you tick ‘Select from BCMax’. - Click OK.
- Click Issue to finalise issuing the key to the respective owner or contractor:-
Or click Make Payment if you are charging for keys, and complete the details.
Once the key has been issued, the tab name will change to Return.

Return Keys
The return tab records when a key is returned. It records the name of the owner returning the key, capacity, phone and address. It also records any amounts refunded.
- Search or select Key Register.
- Select the individual key that is being returned, and right click then click Open, or click Open on the left side under the Actions menu.
- Select the Return tab, and select Edit. You may edit ‘Return Notes, Amount, Payment Type, Receipt Number, Refundable Amount and Payment Dishonour’. Complete the information as required.
- Once all the required information has been entered, select Return then Close.
Once the key has been returned, the tab name will change to Issue.
Refer to Refunds for instructions (see below) on how to Make Payment (if applicable) to the owner / occupier on the return of a key. This is done ONLY if a refundable amount was set during the creation of the key.
Viewing History
This tab allows you to view the entire history of a particularly key. For example, what owners have been allocated the key, how many times lost/stolen etc.
- Search or select Key Register.
- Select the individual key and right click then click Open, or click Open on the left side under the Actions menu.
- Select the History Tab.
Lost/ Stolen Keys / Delete Key
How to record the Status of a key as, Lost, Returned or Damaged. You can also mark keys as Deleted. If a Key Status is adjusted to Deleted, this will remove the record. Other Status will remain in the list.
- Search or select Key Register.
- Select the individual key and right click then click Open, or click Open on the left side under the Actions menu.
- The summary screen for the selected key is now displayed.
- Click Edit Status.
- Click the drop arrow button in the Status field from OK to Lost, Stolen, Faulty or Deleted.
- In addition to changing the Status of the key, you can also add notes in relation to why the status of the key changed.
- Click on the Apply button.
- Click Close.
Note: The main screen now displayed (with your building still being selected) that the Status has now been changed to Stolen.
Notes
The notes section is specifically designed to enable you to record any notes for a selected key. To record notes for a key, follow the instructions below.
- Search or select Key Register.
- Select the individual key and right click then click Open, or click Open on the left side under the Actions menu.
- Click on the Notes tab, and then click Edit.
- Click inside the white text field and type any notes you require and click Save Notes.
- Click Close.
To view the notes for any key in the future, simply click the ‘Open’ tab under the Actions section, then click ‘Notes’.
Quick Reporting
The Key Register has been designed to provide report functions for ease of reference. You may produce a report for the entire building, or select an individual lot.
- Search or select Key Register.
- Select the Reports button.
- Click on the down arrow to select the Report Type you wish. You may choose either:
- History – provides a report for each 'event' involving a key. For example, what day it was issued and created. This report also includes the key code.
- Summary – provides a building number, Lot number (if key allocated), key code, the current status (ie. whether lost or OK) and also the actual name of the holder of the key.
- Funds - provides a report which includes Building, Lot, Key Code, Funds Held and the holder of the key.
- Select your building from the list as shown below.
- Choose one specific lot (if you have tagged one building above) you require a report for, or choose All Lots and also Common which is for Common Property Keys issued / created.
- Choose a Date From and Date To if you require a specific period and then click Run Report.
Search
Use the search function to search using various ‘search fields’ such as:
- Holder Name
- Holder Mobile Phone
- Holder Telephone
- Holder Capacity
- Key Status
- Key Notes
- Key Supplier
- Search or select Key Register.
- Filter by building.
- Select the Search Field.
- Enter Search Value.
- Click on Search.
