After the meeting creation process, the Meeting Details screen will be displayed. This section of our guide explains what each different section of this screen is for, and how it works. Meeting notices can be generated and distributed from this screen as well, however these topics are covered in the Meeting Notices section.
When the meeting is initially created, this section of the screen will look like this first screenshot.
 Whilst the meeting status is 'Created' this is what this section will look like.
- Status: This is an internal prompt for staff, and isn't visible to owners on VoteMax. The meeting status will change when the appropriate buttons are clicked in the Meeting Details screen. Please see the Meeting Stages and Statuses article for a detailed explanation of the different statuses.
- Update to Draft Agenda Issued: Once clicked, this button will disappear, and the meeting will progress to this status and cannot be reverted back.
- Update to Agenda Finalised: This will progress the meeting to the Agenda Finalised status. If any attachments are missing from attachment placeholders, a red notification will appear at the top of the screen and the meeting status will not change.

- Delete Meeting: Whilst the meeting has not been progressed to a status of Draft Agenda Issued, the meeting can be deleted by clicking this button. Deleting a meeting cannot be undone, so proceed with caution.
- Quorum: Free text field to type in the number.
- Enable Committee Election: Tick if this meeting includes a committee election. Enabling this will also display the tick box under the VoteMax Settings, Enable Committee Election Voting. Please refer to the Committee Elections article for more information on this option, as well as the considerations, and the steps to follow when enabled.
- General Info: A text box used for information purposes.
- Cancel Meeting: Once the meeting has progressed to a status of Draft Agenda Issued, the Delete Meeting button will change to a Cancel Meeting button.
- Cancelling a meeting cannot be undone, so proceed with caution. Once cancelled, the status of the meeting will change to Meeting Cancelled and no further changes can be made. The meeting will not be visible in the list of meetings in the MEETINGS main menu. Any meeting notices previously generated will remain in DocMax.

- Cancelling a meeting cannot be undone, so proceed with caution. Once cancelled, the status of the meeting will change to Meeting Cancelled and no further changes can be made. The meeting will not be visible in the list of meetings in the MEETINGS main menu. Any meeting notices previously generated will remain in DocMax.
- Rollback Status: Click this button to revert the status back from Agenda Finalised to Draft Agenda Issued, so that changes can be made again.

- Update to Notice Issued: Click to progress the meeting status to 'Notice Issued'. The meeting will then move to the Active meetings (visible in the Meeting Hub home screen), and will become visible to owners in VoteMax, if configured to do so in the 'VoteMax Settings' section. This will also refresh the screen and progress it to the 'Meeting Overview' screen.
- No changes can be made after the meeting status has been updated to the Notice Issued or beyond.
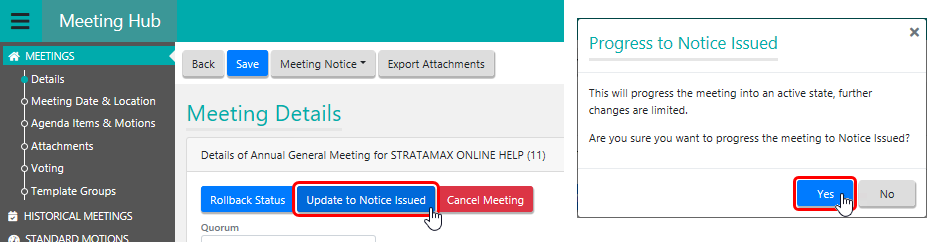
- No changes can be made after the meeting status has been updated to the Notice Issued or beyond.
- Adjourn Meeting: This buttons appears after the meeting status has been progressed to Notice Issued. Click the button to adjourn and reschedule the meeting. If no date has been confirmed for the new meeting, a temporary date must be inserted and the tick box Do Not Show Meeting must be enabled under the VoteMax Settings. Once a new date is confirmed, the Adjourn Meeting button can be selected to confirm the date and reopen VoteMax voting if required. The adjourned date is required to be in the future.

- In the Details section, click the Adjourn Meeting button.
- The Adjourn Meeting Details screen will then open:
- Enter any details into the Reason field.
- In the Meeting Date & Location section, enter the new meeting date, time, and location.
- Make any necessary changes to the VoteMax Settings section.
- Click the Save button to be taken back to the Meeting Details screen.
- Update to Meeting Held: After the meeting has been held, the status must be updated to Meeting Held to move the meeting to Recently Held stage. This status cannot be rolled back. Once this status has been reached, the Meeting Minutes can be generated and distributed, and the votes should be tallied.

- Update to Minutes Issued: Click to progress the meeting to the last status. This is designed to be used after Meeting Minutes have been distributed, the status can be updated to Minutes Issued and the meeting will be moved to Historical Meetings.


Set Committee Members
If the meeting type is a 'Committee Meeting', then the Committee Members can be added or changed.
- Click the Set Committee Members button.

- Select or remove members by clicking their respective Select buttons.
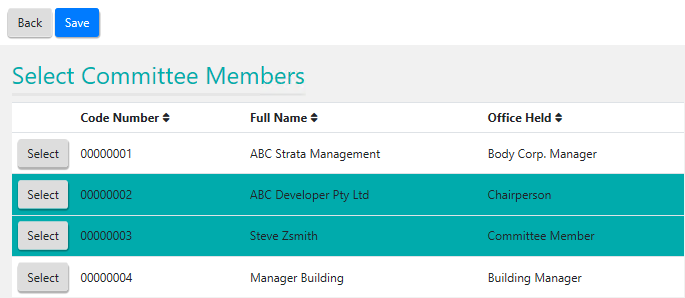
- Click Save and Back to return to the Meeting Details screen.


Export Attachments
Any documents that have been attached to the meeting can be exported into a .zip file, to be used outside of Meeting Hub and StrataMax
- Click Export Attachments.
- Edit File name if required and click Save.

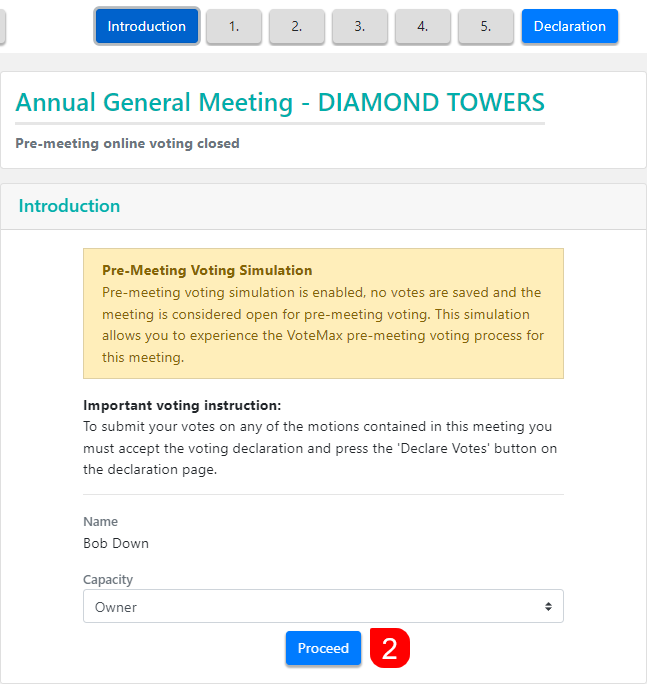
Pre-Meeting Voting Simulation
This button offers a preview of the owner pre-meeting voting experience so that motions can be checked and ensure they are presented in VoteMax exactly as intended. You will not be able to declare votes from this screen, and subsequently nor will you receive an email confirmation for the votes.
However, when owners declare their votes through VoteMax, they will automatically receive an email that confirms their votes.
- Click the Voting Simulation button, and the simulation will immediately begin.

- The yellow notification box will not appear for owners of course. Select the Capacity from the drop-down menu, and click Proceed.
- From this point, simply progress through each motion by selecting a vote. You can review the Casting Votes article on Portal Help for more info on this process.
- At the end, you can review the votes that have been cast for each motion, then tick the 'I warrant...' box, and click the Declare Votes button to finish and close the voting simulation.


Meeting Date & Location
The date & location of the meeting can be amended from this screen as well. All of this information is displayed for owners in VoteMax.

1. Meeting Date and Time
Select a date from the calendar button, and time from the appropriate fields. The AM/PM button will change when clicked, and the time zone displayed is based on the location of the meeting.
2. Meeting Location
Start typing the address into this field, which integrates with Google Maps, so it will display suggested addresses automatically and display them on the map. The map is interactive and can be zoomed in & out, and moved around.
3. Meeting Location Details
This is a free text field for more detailed location information to be entered.
Agenda Items & Motions
Provided the meeting status has not progressed to the Notice Issued, Agenda Items and Motions can be added, edited, or deleted. New meetings will only be able to add motions and standard motions with a resolution type relevant to the meeting type. For example, committee type meetings can only add motions with a Committee Resolution. On the Meeting Details page, motions with resolutions that are invalid for the meeting type will be identified by with alert icon, advising ‘Motion has an invalid Required Resolution for a Committee Meeting.’
Agenda items and motions can also be reordered and placed in Agenda Groups.
Any merge fields that are within a Standard Agenda Item or Standard Motion will merge with the data in StrataMax. If there is no data for that merge field, it will present as a blank space.

1. Add Motion
Will open the Motion Details screen where a brand new Motion can be created, just for this meeting. The process is exactly the same as creating a Standard Motion, except merge fields cannot be inserted.
2. Add Agenda Item
Will open the Agenda Item Details screen where a brand new Agenda Item can be created, just for this meeting. The process is exactly the same as creating a Standard Agenda Item, except merge fields cannot be inserted.
3. Add Standard Motion
Will open the list of existing Standard Motions to select from.
4. Add Standard Agenda Items
Opens the list of existing Standard Agenda Items to select from.
5. Numbering Style
Will display various Numbering options.
When using standard templates, the Motions Only numbering style should be used for the best results in the meeting notice.
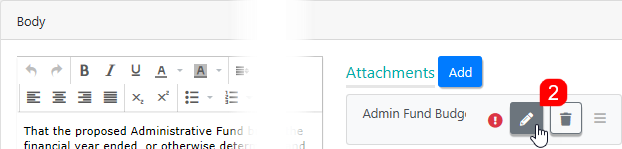
Motion & Agenda Attachment Placeholders
Any Motions or Agenda Items highlighted in red with a warning triangle will have an Attachment Placeholder in them. Either a document must be added to this placeholder, or the placeholder must be deleted.

- Click the pencil button to open the Motion or Agenda Item.
- In the details window, locate Attachment Placeholder with the alert icon, and click the pencil icon.
- if there is no document to be attached, delete the Placeholder by clicking the rubbish bin button.
- if there is no document to be attached, delete the Placeholder by clicking the rubbish bin button.
- The Select Document window from DocMax will open, so locate the document and click the Select Document (3.5" Floppy Disk) icon.
- Back in the Motion or Agenda Item Details screen, click the Save then Back button to return to the Meeting Details screen.

It is recommend any attachments are in a .pdf format as this has the highest compatibility and reduced processing time when the notice or minutes document is previewed and sent from the distribution screen.
Motions Submitted by Owner
If the Motion Category is Submitted by Owner, the Submitted By Lot Number, Submitted By Name and Submission Date fields will need to be populated. If the motion needs to be recorded as submitted by multiple lots a comma can be used.

Motion with Alternatives
If a motion is required with additional options for owners to choose from, then a Motion with Alternatives can be created. It can either be created as a brand new Motion in the Meeting Details screen, or it can be created as a Standard Motion with Alternatives in the Standard Motions menu, and then be added to the Meeting Details screen where more specific details can be inserted.


To preview the motion details, click the glasses button:

Attachments
Any documents that don't relate to any Agenda Items or Motions can be attached to the meeting as well. Simply click the Add button in the Attachments section, and select the document from DocMax.

VoteMax Settings
The VoteMax Settings were entered during the meeting creation process, however can be changed here as well. VoteMax Settings determine if a meeting is visible to lot owners/committee members in VoteMax, and whether voting is enabled before and during the meeting.
Show in VoteMax
This will display the meeting details to the owner on VoteMax, but they will not be able to cast votes electronically using VoteMax.
Enabled Pre-Meeting Voting
This will display the meeting details to the owner in VoteMax, and allow them to cast and declare their votes electronically before the meeting starts, during the configured voting window.
- Tick the Enable Pre-Meeting Voting box.
- In the Voting Open Date and Time field, voting must be set in the future, and the Voting Closing Date and Time field must be set prior to the scheduled meeting date and time. It is also recommended to allow sufficient time for pre-meeting votes to be checked in the Attendance Register, and for any issues to be resolved. Setting the voting window close time no later than 4pm (AEST) will also allow StrataMax to provide support if necessary.
Enable Committee Election Voting
Under the Voting Open and Close Date and Time fields, this tick box will be present if the Enable Committee Election tick box is enabled.
Enable In Meeting Voting
By ticking this box, attendees will be able to join the meeting at or after the configured date and time, and cast their votes, which will automatically update each motion during the meeting, provided the motion outcome hasn't been determined already. You will need to configure Join Meeting Date and Time fields to coincide with the meeting start date and time.
Template Groups
This last section is used to select the Template Groups, which are basically the Word templates that the meeting notice and minutes documents will be based on.
If this meeting was created using a Standard Meeting as a base, then these may already be present and no further action should be needed.
To learn more about Template Groups and how to change them, please refer to the Template Groups section in the Standard Meetings article.
