 |
The instructions in this article relate to Building Information. The icon may be located on your StrataMax or GLMax Desktop or found using the StrataMax Search. |
The Building Information function is for recording general information for each property or company information in GLMax. There is a customisable 'Favourites' menu, so you can decide what important property information is viewed or required to be updated based on user/company requirements, plus notes and photos can also be accessed from here. Some fields are read-only as they contain data from other menus in StrataMax. When entering the property Address the automatic address lookup will automatically suggest and auto-populate an address for you. Click and make adjustments to the information recorded in each field as required and save.
Be sure to check out the Building Information video on our StrataMax Videos page as well. Also view our Frequently asked questions page for a little more help.
Building Information | Security Setup
The ability to Edit in Building Information is controlled by permissions in Security Setup. This provides control over who can and can't edit building information to ensure data accuracy. We recommend the 'Building Info - Edit Display' permission has restrictions applied.
- Search or select Security Setup.
- Right-click the User or Group as required.
- Under the BCMax tab, locate and right-click the 'Building info - edit display' permission to the access level.
Building Information | Overview
The fields available to report in Building Information can also assist with processing other areas in StrataMax, some examples of these are;
- Basic information about the plan, such as the plan name, type, and number.
- Building Information holds the property address and uses the automatic address looking, as well as who the Body Corporate or Strata Manager is.
- It controls functional configurations such as: the deposit slip and how credit card fees are processed, as well as how creditor payments are configured for payment and the use of the Invoice Hub.
- The financial year start and end dates are stored here, as well as the date that the plan was registered.
- Storing of key meeting dates such as the last and next general meetings, along with the history of each.
This section provides brief explanations for each element of Building Information and how to access this menu.

- View: Navigate between the different Views configured for your company. All fields available in Building Information can be displayed if 'All Fields' is selected.
- Edit Views: To edit the View items, refer to Edit View below.
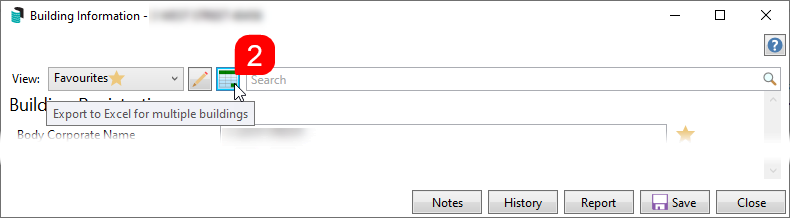
- Export to Excel for multiple buildings: Will provide the option to tag one/multiple properties and produce data to excel for the View you have selected.
- Search Bar: There is a search bar which allows you to type the name of a field or category, and the displayed items will be adjusted to show only fields containing the letters entered.
- Warning icon: This icon means the field has been set as a Policy & Comments field, a Company Requirement.
- This is the comment entered for the field in Policy & Comments.
- Notes: Refer to Notes below.
- Report: Produces a PDF report to screen on the property selected.
- Save: Will save any changes made in the Building Information menu.
- Close: To close the Building Information menu.
View history on edits or changes made in Building Information from Search Building Info History.
View Edit | Create Customised Views
There are three standard Views available in the View Edit window: 'All Fields', 'Favourites', and 'Policy & Comments'. Click the Edit Views button to edit and create your own customised Views for specific fields, which also export when using the Export to Excel function. The Views can be configured for each of your departments or roles, with an 'Accounts' view with the financial information fields selected, or a 'Manager' View with fields pertaining to meetings and general property information for example. This function has a permission in Security Setup called 'Building info - edit display'. If your Building Information screen is blank or the fields are not as expected, check the View selected.
Create a customised View or Favourites View for any regularly produced reports on Building Information to only report the fields in that View.

- Search or select Building Information.
- Click on pencil icon next to View.
- Click Add.
- Enter a Name.
- Tick the fields you would like displayed in your created view.
- Click Save.

View Edit | Delete Customised Views
- Search or select Building Information.
- Click on pencil icon next to View.
- Locate View name and click Remove.
- Click Save.
View Edit | Policy & Comments
Policy & Comments provides the ability to configure and easily report on important fields, with users prompted if the fields are left blank. By selecting Policy & Comments and running the Excel report, this will offer a quick reporting option on company required data. The fields and supporting comments set in Policy & Comments is generally configured by your StrataMax Administrator.
- Search or select Building Information.
- From the View selection, select Policy & Comments.
- Click on pencil icon next to Policy & Comments.
- Tick the required fields and enter a supporting comment next to each field to provide details on the information required to be entered. Users will be prompted to enter data into this field and a comment will be listed next to the field.
- Click Save.


If Policy & Comments is the 'View' selected, click on the Excel report option to only report on your company required fields.
Setting up Favourites
The Favourites option offers a customisable view so that all your regularly used fields are displayed for easy viewing, as well as quick reporting to Excel. To set a category / field as a Favourite, click on the star icon next to the field. Each field selected will be viewable only for your username when you have Favourites selected as the View. Your selected Favourites will also be available for quick view on the StrataMax Tool bar by hovering on the info icon.
- Search or select Building Information.
- View all fields and click the star icon next to your regularly used fields to save them as a Favourite.
- To display only your Favourite fields, select 'Favourites' from the View drop down selection in the top left corner.
A blue 'Info' icon is available to the right of the Building Selector, which when clicked will open the 'Favourites' view in Building Information.

Copy value to other buildings
Certain data fields, such as Overdue Levy Interest Rate and Overdue Interest Start Date, have the ability for the data entered into the field to be copied into the Building Information in another property or across your entire portfolio. The copy icon will be displayed next to the field, and when clicked you can select/tag the buildings to copy the data to.
- Search or select Building Information.
- Search/locate the field required and ensure data is entered to be copied.
- Click on the copy icon (this will copy data immediately).
- In the Building Selection screen, tag the buildings and click Select button to copy data to the selected buildings.

Click the History button in Building Information to review any changes made to buildings using the 'Copy value to other buildings' option.
Building Information | Field Descriptions and Uses
This section is designed to explain how to use a some of fields and sections in the Building Information screen. It is not a full list, as some fields are self-explanatory, but it attempts to cover the ones that need it.
Building Status | Mark as Inactive/Active/Lost
These buttons control whether the building is active, inactive or lost. They are contextual and change depending on the current status of the building. Please see the below links for further information.
- Change Building Status to Lost or Inactive | Building Information
- Change Building Status to Active | Building Information
Community Management Statement (CMS) Document Attachment
Attaching the CMS (which can be included in other areas in StrataMax) and the other related CMS fields is available here. When this document is attached to this field, it will allow it to appear in Document Inclusion for QLD Certificates by default.
Click the pencil icon on the CMS Document field to launch DocMax, where you can attach the CMS document. The notepad icon will view this document, and the red cross will delete the document from this field.
The other CMS fields are date reporting only fields.

Number of Lots (All) | Lot Type Editor
The 'Lot Type Editor' screen is accessed from the Number of Lots (All) field in Building Information and used to amend the 'Lot Type' and 'Lot Purpose'. This will affect the corresponding fields in the Building Information screen.
The Enable Charge Class Change button is password protected and managed by the StrataMax Support Team.
Lot Type
The Lot Type field has four options:
- Standard: The default type and should be used in most instances. The lot will be counted towards the 'Number of Lots (Standard)' and 'Number of Lots (All)' fields in Building Information. It will be considered active as well, so will also count towards the 'Number of Active Lots' field.
- Car Space: Used for car spaces. The lot will only be counted towards the 'Number of Lots (All)' field in Building Information. It will not be considered active (represented by a red cross under the Active column), so will not count towards the 'Number of Active Lots' field. The Lot Purpose field will also disappear.
- Storage Space: Used for storage spaces. The lot will only be counted towards the 'Number of Lots (All)' field in Building Information. It will not be considered active (represented by a red cross under the Active column), so will not count towards the 'Number of Active Lots' field. The Lot Purpose field will also disappear.
- Resubdivided: Should be used after the lot entitlements have been set to zero/nil and reallocated as part of resubdivision or staged development, and the lot needs to be extinguished (see Change Existing Lot Entitlements for more info). If the lot has '1' or more in the Contribution or Interest Entitlements fields, the 'Resubdivision' option can still be selected, but it will not count towards the 'Number of Lots (All)' field. The lot will still be considered active as well, so will also count towards the 'Number of Active Lots' field. The Lot Purpose field will also disappear.
Levy Notices & Correspondence are not sent to lots with a lot type of Resubdivided.

Lot Purpose
The Lot Purpose field is only available if the Lot Type is set to 'Standard' and has four options. These do not affect the 'Number of Lots' fields, or whether the lot is considered active or not:
- Residential: The lot will be counted towards the 'Number of Residential Units' field in Building Information.
- Commercial: The lot will be counted towards the 'Number of Commerical Units' field in Building Information.
- Retirement Village: The lot will be counted towards the 'Number of Retirement Village Units' field in Building Information.
- Other: The lot will be counted towards the 'Number of Other Units' field in Building Information.

Australian Business Number & Registered for BAS / IAS (GST)
When entering the Australian Business Number (ABN) a validity check is completed to ensure the ABN being entered is active. The building details will be displayed under the ABN field and it is important to check that this information matches the property details being setup. The current GST Registered status will also be displayed. It is recommended, at this install stage, the Registered for BAS / IAS (GST) field is set so not missed. GST will not be calculated when entering the financials in the Opening Balance Setup screen.
- Search or select Building Information.
- Search for BAS / IAS or GST.
- Tick to register for one or more of the types based on information registered with the ATO.
- Complete all required fields
- Select Save.
The BAS or IAS must have valid ATO creditor details, including the BPAY CRN or EFT Reference for payments, and ensure that the BAS / IAS can finalised in the Business Activity Statement screen. The ATO's BPay CRN or EFT Reference, which is unique for each building, should be entered into the ATO's Creditor Maintenance record, which will then be displayed in this section in Building Information.

- Simple BAS - Reports:
- G1 - Total Sales
- 1A - GST on Sales
- 1B - GST on Purchases
- Full BAS - Reports additional information and is used if the income is greater than $10 million dollars annually. This also includes:
- G2 - Export Sales
- G3 - Other GST Free Sales
- G10 - Capital Purchases
- G11 - Non-Capital Purchases
- GST Reporting Style - Changing the Reporting style will update the GST transactions for reporting when saved.
Gross reporting will show the GST on Income & Expenses in a separate account on the Income and Expenditure Statement. If the Show Generated Levies on Balance Sheet configuration in Levy Management has been set, there will also be a GST account code included on the Balance Sheet for Gross Reporting.
Net reporting will report GST on the applicable Income or Expense account.
The reporting style will update reporting and transactions for the Current Year and Old Year if changed. If Financial Year Audit field is set to Y (Audit Done) for the prior year, then the accounts will not adjust for the Old Year, only the Current Year will change GST reporting style. - Override BPAY CRN / EFT Reference - the option to enter an override reference number is only required if the reference is different to the number stored on the Creditor in Creditor Maintenance (i.e. using the same Creditor for BAS and Income Tax or using Account Groups with the same Creditor for BAS).
GST Reporting Style
To change the Income and Expenditure statement from Gross GST Reporting to Net Reporting follow the below steps.
- Search or select Building Information.
- Search for BAS / IAS or GST.
- Amend the GST to Net Style or Gross Style.
- Select Save, this will update the GST transactions.
This will update the GST on Income and Expense accounts, or on each individual income or expense account, depending on the reporting method selected. The reporting style will update reporting and transactions for the Current Year and the Old Year if changed. If the Financial Year Audit field is set to Y (Audit Done) for the prior year, then the accounts will not adjust for the Old Year; only the Current Year will change GST reporting style.
Budget information can be exported via the Financial Statements, which include all account codes in use. This information can then be used to create formulas to update each account to either include or exclude GST, depending on how the change is being applied.
Account Group Buildings | ABN / TFN / GST & Number of Lots/Entitlements
Account Group information such as the ABN, TFN, GST Registered status and the Number of Lots/Entitlements is displayed in Building Information as Read Only. This information is set up from Account Group Setup for each individual account group. Each Account Group can be setup to report either separately for each tax or using a consolidated BAS. If each account group is to report separately, the Override BPay CRN or EFT Reference can be added to the specific account group to ensure that the Creditor Invoices will be processed correctly when the BAS is finalised.
A global report can be produced selecting these fields from Building Information | Global Report (Export to Excel).
Adding Meetings & Voting Details
Record and retain the history of the date, time, location and notice distribution dates for Annual General Meeting, Committee Meetings and Extraordinary General Meetings under the 'Meetings & Voting' heading. Each meeting recorded here can also be linked to multiple documents, such as the Agenda, Meeting Materials, and Minutes. This information can also be accessed from Search Meetings.

- Search or select Building Information.
- Click Meetings button next to the meeting type.
- Add all details (Location, Timezone, etc.) as required.
- Under the 'Linked Documents' field, click the Add Meeting Document button to open the DocMax 'Select Document' window, to select and link a document to this meeting.
- Once all fields are populated as needed, click Save.
- Last Meeting & Next Meeting date will be displayed, and historical meetings can be viewed by clicking on the Meetings icon.

The Committee Election Ballot Type can also be recorded, with options to select either Open or Secret Ballot as per the example below.

Financial Year Audit (Audit Done)
Record if an audit is required, completed and the date of audit and Auditor Name. If Audit Done is ticked this will prevent any additional journals or transactions posting in the relevant Financial Year.
- Search or select Building Information.
- Search or locate the Financial Year Audit field under 'Other' heading.
- Tick Audit Done or Audit Required as needed, add the details as required and click Save.

Lock Transactions
Use this setting to lock transactions from posting in the previous financial year for a building. Once activated, it prevents any additional postings - such as journals or Creditor Invoices - from being entered into that financial year.
- Search or select Building Information.
- Search or locate the Financial Year Audit field under 'Other' heading.
- Tick Lock Transactions under the required Financial Year.
- Click Save.
Please note: The Security Setup permission for this function is Edit Lock Last Year Transactions / Audit Done Setting.

Builder, Developer, Accounts Manager Assistant & Asset Manager
The Builder, Developer, Accounts Manager Assistant & Asset Manager fields adopt the Contact Card principle, whereby each contact will have an individual contact card, which can be selected across properties in your portfolio once it has been created and saved.
- Search or select Building Information.
- Search for the required field.
- Click Select and then either:
- Search from list to see if contact exists and click Select if located.
- Click Create Contact if contact not located in list.
- Click Save.

Building Photos/Building Plans
To save building photos/plans for viewing in Building Information, the photo/s can be added to DocMax with the Category selected as 'Building Photos' for Building Photos or 'Building Plans' for Building Plans, these documents will then be viewable when clicking on the hyperlink to be directed to the record in DocMax.
- Search or select DocMax.
- Add a document using your preferred method and save for each property as required, with the Category set as either 'Building Photos' or 'Building Plans' depending on the type of document being saved.
To view the saved documents in StrataMax:
- Search or select Building Information.
- Using the search bar, type in 'Photo' or 'Plans' for quick navigation to the Building Photos or Plans field.
- Click on the hyperlink to view the saved record.

‘StrataPay Only’ Setting – Building Information
This field setting is used when you want to exclude one or more plans from your portfolio from accessing the Owners Portal/StrataMax website for any reason. Including this field with a 'Y' (Yes) will prevent the building from being available to view on the Portal, and will also affect Invoice Hub approvals.
Building Information | Local Report
A local report is available for the property selected.
- Search or select Building Information.
- Click the Report button in the bottom right.
- The report will be produced to screen for printing/emailing or saving as required.
Building Information | Global Report (Export to Excel)
Any fields in Building Information can be exported to an Excel report, where filters can be used to view the data in numerous ways, and formulas can be used to modify the data. This export can be used to create a list of buildings, displaying the building name, number, number of active lots, account manager, if the Invoice Hub is active/enabled or not, and many more.
The export will include any fields that are visible in the View that is selected at the time the Export to Excel button is clicked. So, you should use a customised view or Favourites view to produce an export with fields to suit your needs. For regular reporting on fields that are not setup in a View, use the Search Buildings function available from the search bar or menu icon, as this allows one off reporting and saved searches.
- Search or select Building Information.
- Make sure that the required View is selected, then click the Export to Excel... icon in the top left.
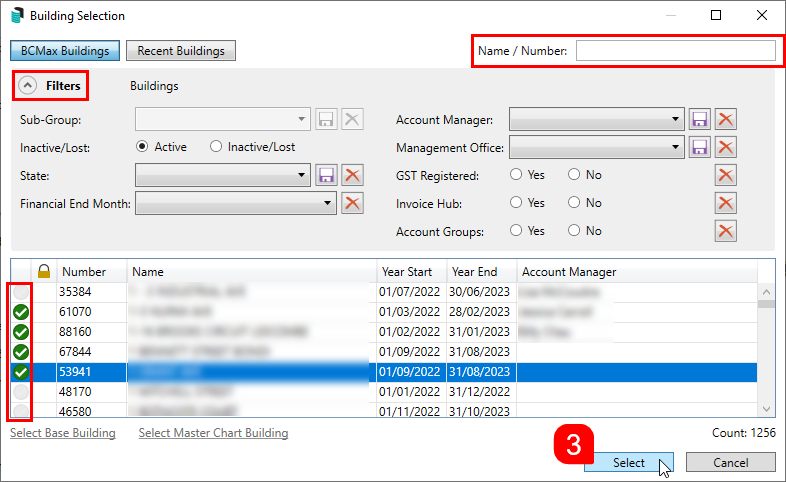
- When the 'Building Selection' window appears, you can use the Name / Number field to search for a building or use the different Filters to narrow down the list to the required buildings. Tag the required buildings and click Select.
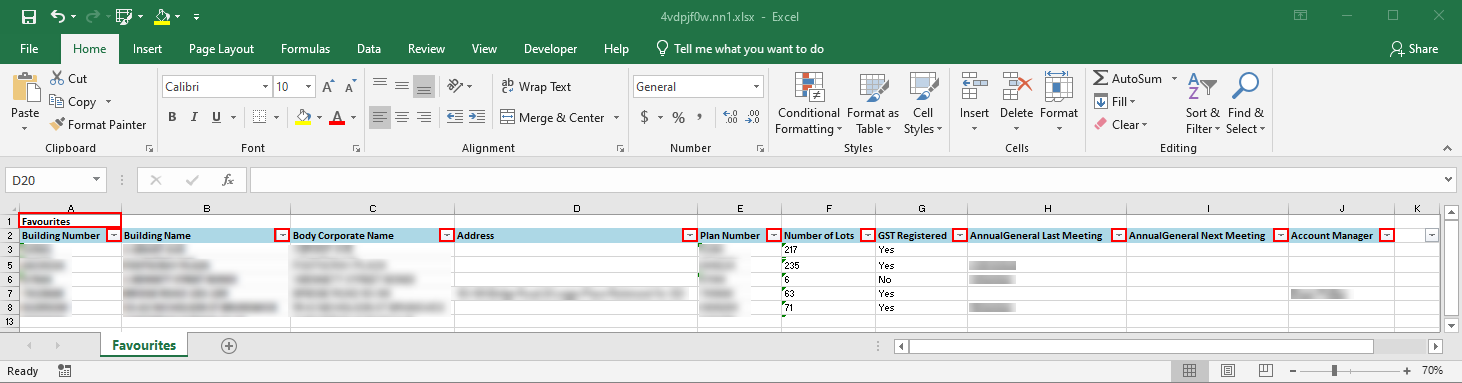
- The Excel sheet will open with the View name in cell A1, with all fields included in the View assigned to each column, with filters for each column ready in place for your convenience.
- To save the report, make sure to use File > Save As so you can choose the save location and file name. If you just use the Save function, the report will save with a random name ('zabpllprf.cfz.xlsx' for example) in a hidden temporary folder.
- To save the report, make sure to use File > Save As so you can choose the save location and file name. If you just use the Save function, the report will save with a random name ('zabpllprf.cfz.xlsx' for example) in a hidden temporary folder.


Building Information | Notes
This is for storing notes relevant for the particular property. There is a search bar on the top to quickly search stored details. The Subject list is made up of all prior Subjects used when a note is entered. Categories can be saved so they are available from the drop-down arrow & may also be deleted if required.
- Search or select Building Information.
- Click on Notes.
- Click Add to add a note for the Building Information screen, enter a Subject and select the Category as required.
- Add your notes to the notepad area of the screen or copy and paste from the source of information.
- Click the 'X' in the top right when finished and you will be asked if you want to save the note, select Yes.
- Further information on Notes is in the Notes article.
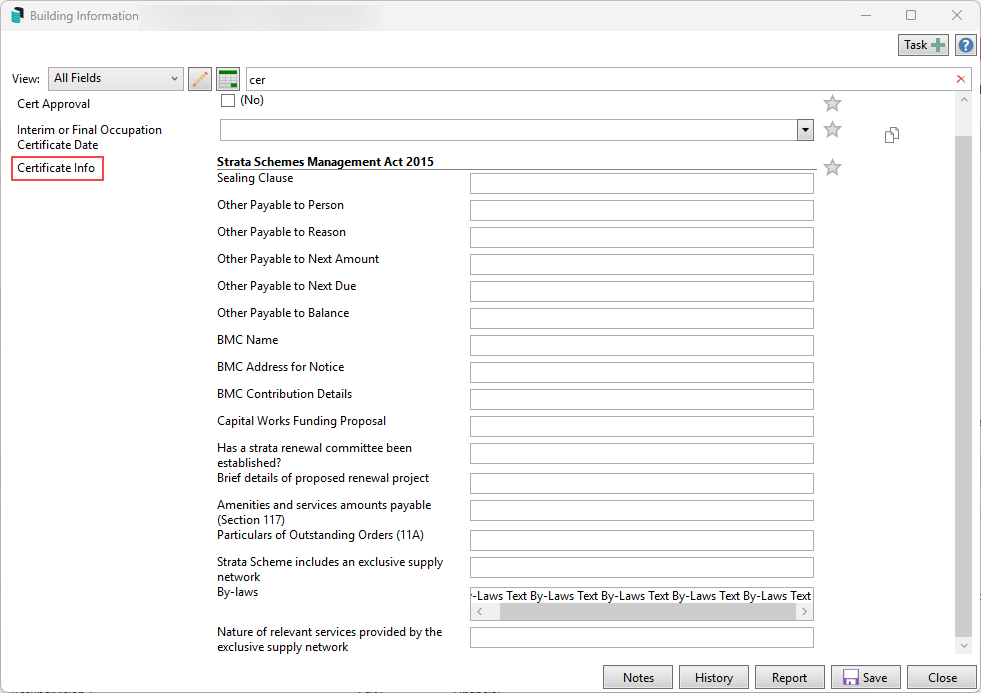
Building Information | Certificate Info
Information for this building only, which can be edited, added or deleted from Certificates/cogwheel / Info Editor, is also available to amend in Building Information. The available fields will be state-specific to the certificate type.
Valid Combinations / Building Registration
The State, Type, and Regulatory Module options will be displayed for valid types, depending on the options selected. For example, if QLD is the State, only valid QLD Type and Regulatory Modules will be available for selection; if NSW is selected as the State, only NSW-valid options will be available for selection. The Type selection list includes both the full name and the abbreviation. Click on Valid Combinations.xlsx to view an Excel report of the Valid Combinations available in StrataMax. These combinations also drive what certificate type is produced in StataMax.

Management Office Function
The Management Office field allows for buildings to be associated with a specific Management Office. This is often used when a Management Company has multiple offices, and allows for buildings to be assigned to a office, which can be used for filtering and reporting. The Building Selector allows for the list of buildings to be filtered to a specific office, once filtered will only show selected office for processes and reporting. The management office field can also be output on various reports such as Management Fees Report, TRMax Recoveries (Excel) and Searches can have the field added to include in reports.
A separate Letterhead can be set if required to be different by management office, please refer to our article on Manager Maintenance for further details on setting up multiple manager records.
To create Management Offices follow the below steps:
- Search or select Building Information.
- Locate the Management Office field.
- Click on the [...] icon
- Click on the Add button and enter the required details.
- Click on the Save button.
To assign a Management Office, follow the below steps:
- Search or select Building Information.
- Locate the 'Management Office' field.
- Select the Management Office from the dropdown list.
- Click on Save.
Note: Use the 'copy value to other buildings' to allow to update easily across the portfolio.
Change Financial Year End Date
The financial year dates of a building are set when a building is first setup in StrataMax. In some scenarios a building may require the financial year end date to be changed, which can be done within Building Information in some scenarios. Changing a financial year does not update budgets, levies, management fees etc., therefore update these as required after changing the financial year.
Changing a Financial Year End will not change Old or Historic Years.
If a financial year end date needs to be changed to a date that has already passed; please log a case with our support team providing the building number and required dates.
Shortening a Financial Year
To change a financial year to less than 12 months; in Building Information edit the Financial Year End date and select Save.
Extending a Financial Year
If a financial year is set to more than 12 months, back dated and monthly financial statements may report incorrectly as some transactional data is stored by month.
To change a financial year to more than 12 months; in Building Information edit the Financials Year End date and select Save. A warning will appear regarding the above.
