 | The instructions in this article relate to Invoice Entry. The icon is available on the StrataMax Desktop or GLMax Desktop, or can be found using the StrataMax Search - also within either BCMax or GLMax. |
For Invoice Entry in GLMax, the information in this article still applies, however there may be slight differences in the screenshots.
This menu is designed for invoicing a specific debtor (owner) account and should be used for items other than standard charges billed via Levy Management.
Configuration
Configuration should be reviewed to ensure that the correct settings are applied. These settings also apply to Second Debtor invoices.
- Search or select Invoice Entry.
- Click File and then Configure to set:
Auto insert today's date
This will automatically insert today's date.
Clear date for each entry
After each entry, this will clear the date field.
Clear details for each entry
After each entry, this will clear the details field.
Overwrite Always On
If set, this will overwrite any existing data in any fields when typing.
The default settings for 'Allow Electricity Invoice Entry' will not be available unless you are in the Utility Group.
Setting Default Days to Pay
A number of days to pay the invoice can be set in Invoice Entry. This will automatically calculate the due date based on the date that the Invoice was issued.
- Go to the File menu > Set Pay Days.
- Set the Number of days till the invoice is due in the Local and/or Global fields.
Please note: This configuration is not designed to allow for 0 day invoices. If 'Number of days till due (Local)' is set to 0, the system will default to the Global configuration - however if this is also 0, the system will default to 14 days. Refer to Zero Day Invoices for details on zero days until due.
Zero Day Invoices
The feature Configure Zero Day Invoices exists to allow system generated invoices to be issued with 0 days till due as the base configuration. This works by configuring invoice descriptions that StrataMax will look for on each individual invoice. If a matching description is found, the invoice will be produced with 0 days till payment is due.
- Search or select Invoice Entry.
- Click the Options menu.
- Select Configure Zero Day Invoices.
- Click Add.
- Enter the Description Text for StrataMax to Match and click OK.
New Debit Invoice
Creating a new debit invoice will charge the lot account, and credit the selected account. The posting month can be changed to a prior period, however this will affect some of the aged balance calculation, so use with care.
- Search or select Invoice Entry.
- Make sure that 'New Entry' is displayed in the top right hand side of the screen.
- Click the drop-down arrow in the top centre to display the Account Code List screen, and select the lot account to debit.
- The Account Code List screen will remain for the user to select the account code that will be credited.
- This can be an income or expense code.
- The Due Date will be set automatically based on the number of days entered in File > Set Pay Days.
- Enter the Amount to debit, along with Details, and a Comment for this invoice.
- Click the Previous button to repeat the comment from the most recent invoice if suitable.
- If more than 30 characters are required, you can use the Notes field to add more details, which will print on the invoice.
- Click Save.
- Once all of the invoices are entered, they can then be printed or sent in Invoice Printing.
New Credit Invoice
Saving a credit invoice will credit the lot account, whilst debiting the other. This can be useful for situations where an owner has paid for good or services on behalf of the building and would like the amount owed to be credited to their lot account instead of receiving a reimbursement.
The posting month can be changed to a prior period, however this will affect some of the aged balance calculation, so use with care.
- Search or select Invoice Entry.
- Make sure that 'New Entry' is displayed in the top right hand side of the screen.
- Click the drop-down arrow in the top center to display the Account Code List screen, and select the lot account to credit.
- The Account Code List screen will remain for you to select the account code that will be debited.
- For example, if you want to credit the owner's Admin Levy Fund, select account code '101'.
- Enter the Date, and the Due Date will automatically update based on the number of days entered in File > Set Pay Days.
- Enter the amount to credit the lot, remembering to enter a 'minus' symbol at the beginning, i.e. -100.00.
- Enter any Details and a Comment for this invoice (click the Previous button to repeat the comment from the most recent invoice if suitable).
- If more than 30 characters are required, you can use the Notes field to add more details, which will print on the invoice.
- Click Save, then Close.

Editing an Invoice
Once an Invoice has been entered, it can be edited if any changes are required if the invoice was entered in the current month. However if the income or expense code is incorrect, the invoice will need to be deleted by editing the amount to zero (0.00) and a new invoice entered.
- Search or select Invoice Entry.
- Change the mode entry to 'Edit'.
- Select the Account and click OK.
- Select the invoice to be edited, then click OK.
- Make change to the invoice as required then click Save.
- Search or select Invoice Printing and re-print the invoice if required.
Reversing an Invoice
If an invoice was entered in a previous month and needs to be changed, it will have to be reversed first and re-entered. When reversing an invoice, remember to check and if required select the 'Aged Balances' area to ensure that the reversal is in the correct period.
If the entry is for a Owner record, use the BCMax Buildings tab and select the Building. If the entry is for a Building record, use the GLMax Companies tab and select company.
- Search or select Invoice Entry.
- Change the entry mode to 'Reverse'.
- Select the account to reverse the invoice for, and click OK.
- Select the invoice to reverse, click OK.
- If required, click Balances to change where the funds are to be reversed and;
- Click on a period in Aged Balances to the correct period and click 'Yes' to "Set posting month to match selected period?"
- Click Save.
- Re-enter and print the invoice as required.
Deleting an Invoice
If the invoice was entered in the current month, follow the instructions for edit an invoice and change the amount of the invoice to $0.00.
If the invoice was entered in a prior month but within this financial year, then you will have to use Reverse an invoice to delete the invoice.
If the invoice is now reporting in the prior financial year, journals for the opposing entries will need to be entered via Journal Preparation.
Invoice Entry (Item Charge) [GLMax Only]
This menu option is for charging any disbursements or additional fees based on the Invoice Code selected. This is specific to GLMax Companies.
If the Invoice Code has a preset value, then the number of units is entered to be multiplied by the preset amount. If the preset value is 0.00, then the total value to be charged can be entered.
- In the GLMax company, search or select Invoice Entry (Item Charge).
- Make sure that New Entry mode is displayed on the top right hand side of the screen.
- Select the Debtor (building) and then 'Select Invoice Code'. Based on the preset amount, this will determine if the No. of field is available to enter, or an amount field.
- Enter the Date and Due Date.
- Enter the No. of units, or total value amount. If the number of units is entered, this will automatically update the amount based on the number of units multiplied by the preset amount.
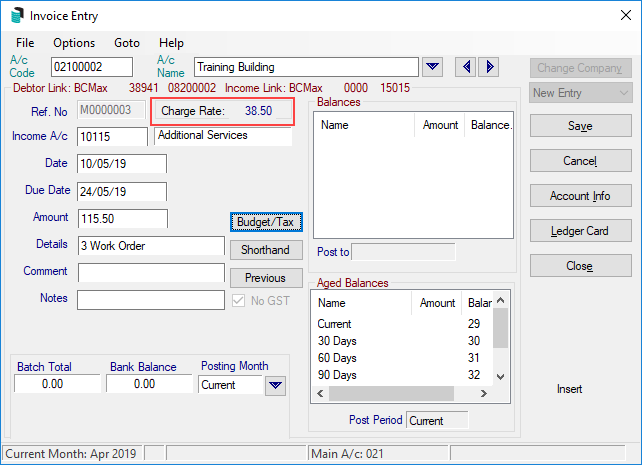
- The 'Details' field will update to the No. of and the income code e.g. 3 Work Order. This can be changed to reflect a specific detail, and will be the information provided when running a Transaction List.
- Add any Comments or Notes. The Notes field will print on the invoice and is the recommended field to include as much detail as possible for this invoice.
- Click Save then Close to exit.

Reverse GLMax Invoice (Management Fees)
Refer to the Process Management Fee article for instructions on how to reverse or cancel a processed Management Fee.
