This article has been designed to explain the purpose and function of the Security Deposit Account, as well the setup, receipting, reversal and refund of Security Deposits.
Account code 060 Electricity Security Deposit – This is the Security Deposit Holding Account and is presented on the balance sheet.
A/C Balance
The balance of the debtor/customers account.
Deposit Available
Money paid over and above their electricity bills, which is available to pay off the Security Deposit.
Security Deposit
Amount that has been moved to the Security Deposit Holding Account.
Deposit Required
This is the Security Deposit Amount required for this building.
View All Deposits
This provides a snapshot of all Lots and their security deposit status.
Customer to Deposit A/C:
By selecting Customer to Deposit A/C for a particular account, this will move the amount shown in Deposit Available to the Security Deposit Field. This moves the deposit from customers account to the security deposit holding account. The amount of Security Deposit held will display on the bill.
Deposit A/C To Customer:
By selecting Deposit A/C to Customer for a particular account, this will move the amount held as Security Deposit from the Security Deposit Holding Account and credit the customer’s account.
Set Up a Local Security Deposit
This feature enables a local set up (for a single building), for a security deposit amount(s) for all / certain lots for that building.
- Within the Utility Sub-Group, open the Utility Billing menu.
- Select the Deposits Tab.
- Click the View All Deposits button.

- To change for all accounts, press Ctrl + A to highlight all records. Or to select one account, highlight the record.
- Click Set To.

- Enter the Security Deposit amount, and click OK.
- Click Close.

Remove a Local Security Deposit
This feature enables the removal of Security Deposit amounts locally (for a single building), for all / certain lots for a building.
- Within the Utility Sub-Group, open the Utility Billing menu.
- Select the Deposits Tab.
- Click the View All Deposits button.
- To change for all accounts, press Crtl +A on the keyboard. To select one account, highlight the record.
- Click Clear Required Deposit, then click Close.
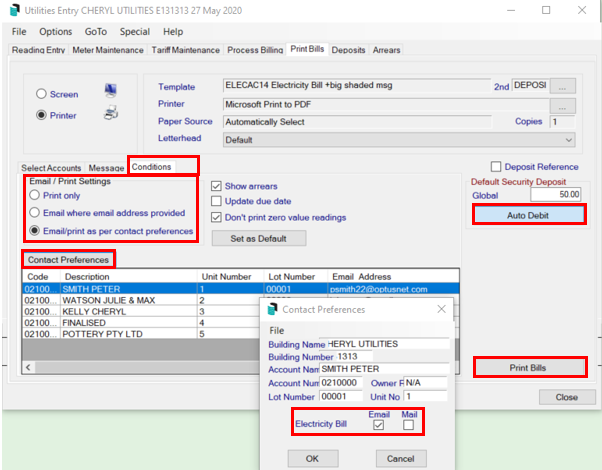
Auto Debit the Security Deposit & Print Bills
Once the Security Deposit required has been set up - either globally or locally for individual lots, the Security Deposit can be flagged to Auto Debit on the bills when printed. This will add the Deposit Required on the Bill, and once received transferred to the Security Deposit Clearing Account.
- Search or select Utility Billing.
- Select Print Bills Tab.
- Select all lots (Crtl +A) / individual lots and select Auto Debit (Note: The Auto Debit option can also be set in File/Configure).
- Review Conditions tab and set Contact Preference by tagging the desired delivery option.
- Select Print Bills.

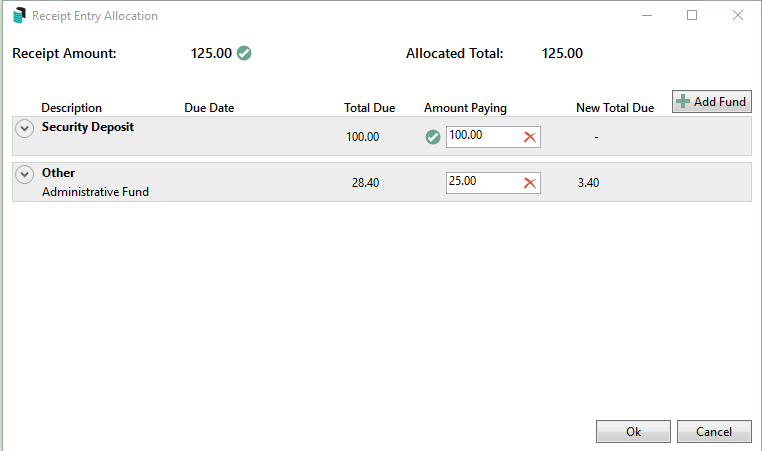
Receipt a Security Deposit
This process will work once the Security Deposit has been set. The payment received from an Occupier will be allocated against the security deposit, and upon saving, the Security Deposit will transfer to the Security Deposit Clearing Account
Normally receipts received from a Utility Debtor will have a 2 prefix on the Agent Deposit reference in the banking screen.
- Highlight the record in the bank statement (in Main).
- Select Receipt Entry.
- Select the Utility Group > OK.
- View Statement >OK.
- Details for the transaction will auto-populate into the Receipt Entry screen.
- Click in the Receipt Entry Allocations box, and enter the amounts to be allocated to Security Deposit and utility charges.
- Select OK > Save.
- Select Yes when prompted to Transfer deposit amount to Security Deposit?
- If receipting more than one Security Deposit, select Yes when prompted to Transfer all future deposits this session? This will prevent the message from popping up for each entry.
Edit or Reverse a Security Deposit
If there has been an error in receipting the Security Deposit and this needs to be edited.
- Within the Utility Sub-Group, open the Utility Billing menu.
- Click GoTo > Receipt Entry.
- From the New Entry drop the selection down to select Edit if within the current month, or Reverse if before the current month.
- From the Reference Name drop down list, select the Debtor Account.
- From the Transaction History select the transaction received for the Security Deposit.
- Click in the Receipt Proceeds Allocation box to change the allocation of the receipt.
- Click OK, then click Save.

If Reverse has been applied, all details from the original receipt will be greyed out. Select Save, and the receipt will be reversed. The receipt will then need to be re-entered correctly. The new receipt will also need to be marked as presented in Process Bank Statements, using the variance column to tag the newly entered receipt.
Refund a Security Deposit
When a final bill is issued to a debtor, any deposit held in the Security Deposit Account will automatically move from the Security Deposit Account to the Utility Account for the debtor. This amount will reduce any amounts owing from the Utility Account. There may be a residual credit remaining on the account to be refunded back to the debtor.
Processing the Security Deposit Refund (No Final Bill)
Ensure the Refund Clearing account code has been set up in File > Configure > Refund Clearing account. Also ensure that a linked account to main has been set.
- Open the Utility Billing menu, and click the Deposits tab.
- Select the Debtor Account to transfer the Security Deposit to.
- Select Deposit A/c to Customer; this will move the deposit held back to the debtor account. If the security deposit amount is greater than any outstanding amount, a credit balance will display on the account and will be available for refund.
- The amount will now be in the Payments menu in the main building, ready to be printed.
- Please see the Payments Process article for help with this.
Security Deposits Report
 | The Security Deposit held is available for reporting on the Aged Balance List, Account Dissection Report, Arrears Letter and Ledger Cards. This will only report when the Debtor has been billed for the Utilities. It will not display if the Security Deposit owing is for a Debtor that has no activity. |
- From the Utility Sub-Group open the Utility Billing menu.
- Click File > Configure > Include Security Deposit in Aged Balance, Account Dissection List, Arrears Letter and Ledger Card as Notation.
- Select Close.
A Security Deposit report is available in PDF or Excel format :
- Search or select Security Deposit Report.
or - From the Utility Sub-Group open the Utility Billing menu.
- Click Go To > Security Deposit Report.
- Select the report output format (PDF or Excel) and click OK.
- The report shows the amount of the Deposit Held and account Balance for lots that have paid a Security Deposit.
