 | The instructions in this article relate to Invoice Hub. The icon may be located on your StrataMax Desktop or found using the StrataMax Search. |
The Invoice Hub approvers are based on the Office Bearer records and will specifically use the email address recorded to send communication and notifications to. Please ensure that information in Office Bearers is accurate.
Any changes made in Office Bearers will trigger an automatic synchronisation to ensure that any updated details are reflected on the Invoice Hub and StrataMax Portal. Other screens in StrataMax that will also trigger this automated synchronisation include:
- Roll
- Bank Account Setup
- Proxy Managers
- Building Information
Office Bearer Record
To add or edit an office bearer record, refer to the article on Office Bearers. The Office Held cannot be edited for any records with a StrataMax Portal account, instead a new Office Bearer record should be created.
Non-owner Office Bearer Approvers
A non-owner office bearer, that is, an office bearer who does not own a lot, such as a building manager, can be configured to approve invoices uploaded to the Invoice Hub. Their details can be added using the instructions found in the Office Bearer article.
They must have a StrataMax Portal Account to log in and approve invoices. When an invoice is uploaded to the Invoice Hub with a non-owner office bearer as an approver, the first time this occurs, StrataMax will send an email with instructions to invite that approver to create a StrataMax Portal Account.
If they no longer have access to the old email address to access their online account, or if it is a different Non-Owner Office Bearer / Caretaker, etc., then you will need to resign them in Office Bearers and either update their contact card with the new email address, or if it is a different person, create a new contact card and add them again as a Non-Owner Office Bearer. This new office bearer will then need to be added again in Invoice Hub > Options > Approver Defaults, which will create and send an email to create a new account.
For further information on how an office bearer / committee member creates a new account can be found by providing the following link to them:
https://portalhelp.stratamax.com/help/creating-a-stratamax-portal-account
Configuring Approvers
Office Bearers will only see the Invoice Hub tab on the StrataMax Portal once an invoice has been uploaded for the approver to approve. If an office bearer/committee/council member has just been added as an approver, the Invoice Hub tab on the StrataMax Portal won't be visible until an invoice is uploaded for their approval. Also, each office bearer/committee/council member will only be able to see the history of invoices that they themselves have approved.
Each building has a configuration to specify which office bearers will be required to approve invoices. Each approval condition must be configured depending on the approval limit configuration and the number of layers. Once the default approvers have been set, if the 'minimum number of approvers required' is a reduced number of approvals required, for example, 4 approvers and only 2 out of the 4 are needed to approve, this can be set in this area.
- Search or select Invoice Hub.
- Select the Options menu > Approval Defaults.
- From the Layer 1 area, tag the appropriate office bearer(s) and enter the Minimum number of approvers required.
- Click Save.
- If there is a second approval layer, tick the Second approval layer. Tag the appropriate office bearer(s) and enter the Minimum number of approvers required.
- Click Save.
An approval limit exists. One layer of approvers:
Invoices below the approval limit will require the Below limit approvers to approve them, and invoices above the limit will require the Above limit approvers to approve them.

No approval limit exists. Two layers of approvers:
Invoices will be sent to the First layer of approvers, and once they have approved them, they will be sent to the Second layer of approvers. Email notifications are not sent to the second layer until the first layer of approvers has approved the invoices.

An approval limit exists. Two layers of approvers
Invoices below the approval limit will be sent to the First layer, Lower limit, and then to the Second layer, Lower limit. Once the lower limits have approved the invoices, it will go to the First layer Upper limit, and then to the Second layer Upper limit before they are approved for payment.

Creditor Override | Single Layer
You can use the Add Creditor Override function if a specific creditor requires different approvers. Whatever the minimum number of approvers is set to, the same number of approvers must be included for the override. A typical scenario would be if a building manager is an approver, and a different set must approve their invoices.
- Search or select Invoice Hub.
- Click Options > Approver Defaults.
- If not already set within Layer 1, tag the approver (s) and enter the Minimum number of approvers required.
- Click Add Creditor Override, and select the creditor that requires approval from a different approver. Click OK.
- From the Override area, tag the approver approving this creditor.
- If any other creditors require a similar override, repeat steps 4 and 5.
- Click Save.

Creditor Override | Double Layer
- Search or select Invoice Hub.
- Click Options > Approver Defaults.
- If not already set, tick Second Layer Approval Layer' and tag the approver(s) in each layer, entering the Minimum number of approvers required on each.
- Click Add Creditor Override, and select the creditor that requires approval from a different approver. Click OK.
- From the Override area, tag the approver(s) approving this creditor.
- If any other creditors require a similar override, repeat steps 4 and 5.
- Click Save.

Approval Override - Two Layers
If an invoice must bypass a layer, for example, layer one does not need to approve the invoice; only the approvers in layer two do. The below instructions will assist with the upload process. If the invoice is currently uploaded, it will need to be retracted first before it can be resubmitted with the changes to approvers. If this is done first, follow steps 2 onwards.
An example where you may wish to override a layer for a specific invoice may include a query from an approver to change the transaction code where the first approver has already approved it. This would allow the approver who raised the query to re-approve the change without requiring the first approver to re-approve.
- Search or select Invoice Hub.
- Click Invoice Submission Wizard. If the Welcome screen displays, click Next.
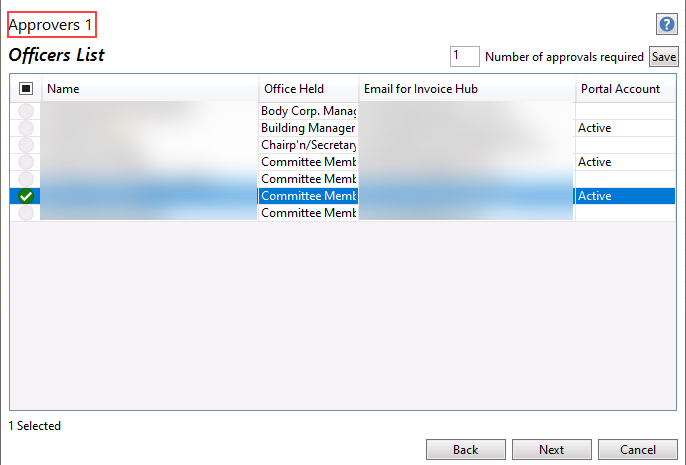
- Tag Invoice(s) that require approval from one layer. Click Next.
- From the Approvers 1 list, tag the required approvers. Click Next.
- From the Approvers 2 list, untag all approvers and click into the Number of approvers required and enter 0. Tab out of this field. Click Next.
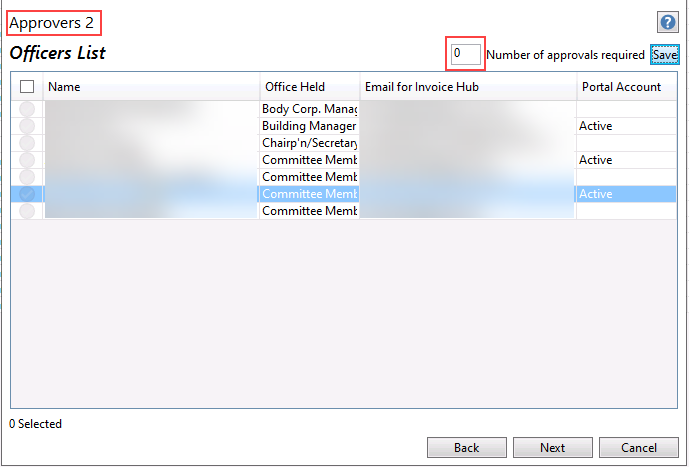
- Click Finish.


Changes to Existing Approvers
Sometimes you will need to change the default approvers in Invoice Hub, or you may need to add another approver. Complete the following steps before submitting invoices for approval.
- If an Office Bearer who was critical for the approval of invoices has resigned, and no other approvers have been set up in Approver Defaults, StrataMax will automatically retract invoices that require approval. You will need to review the Approver Defaults before the Invoices can be sent back to the Invoice Hub.
- If a new approver is added, they will only see invoices that are uploaded to the Invoice Hub from that moment onward. If they need to approve any invoices that were already submitted, those invoices will need to be retracted and then resubmitted so the new approver can see them.
- Search or select Office Bearers.
- Update the relevant Office Bearer record with the information provided and Save.
- Search or select Invoice Hub.
- Select the Options menu > Approver Defaults. Update your default approvers, then click Save Officer Selection and then Close to exit.
- Submit your invoices (from defaults).
Suppose you temporarily redirect approvals from a Non-Owner Office Bearer (e.g., the Building Manager is on leave for a month). In that case, you should create a 'temporary' Non-Owner Office Bearer record and update your default approval instructions accordingly. When the original Non-Owner Office Bearer Approver returns, you can update the approval defaults again (and ‘resign’ the temporary approver if applicable).
