 | The instructions in this article relate to TRMax. The icon may be located on your StrataMax Desktop or found using the StrataMax Search. |
TRMax is another part of the StrataMax suite that has been designed to recover costs and charge consulting fees. Items can be set by units or on a time basis. This area can also be configured to automatically charge for certain disbursements (printing / emailing etc) as outlined below.
If you would like StrataMax to record items automatically but not charge, please see Process Recoveries.
If invoices are in 'Numerical' order, but need to be in 'Alphabetical', sort them and then highlight one invoice and click Select and click OK. Close and then reopen TRMax and this will hold the order.
TRMax Video
Set Up Invoice Codes
Before recoveries can be set to charge automatically, you will need to create 'invoice codes' in GLMax. This is done in Edit Invoice List.
Set Up Automatic Recoveries
After creating invoice codes in Edit Invoice List, you should open Disbursements to set up automatic recording of recovery items such as Certificates, Work Orders, Levy Notices, etc.
TRMax Configuration
TRMax configuration is opened in TRMax, in the File > Configuration. The configuration is a combination of User and Global settings. These are identified below:
Save Tab
- Take No Action – User
- Close Entry – User
- Create New Blank Record – User
New Tab
- Keep Selected Building – User
- Keep Recovery Code – User
- Verify Zero Amount Entry – User
Data Entry
- Chargeable Rate – User
- Simple Mode (User Setting): This will impact the functionality in the 'Edit Rate' and 'Edit Consultancy Rates' screens, allowing custom rates to be set per user / account manager and building.
- Approve Consultancies by Default – Global
- Charge Fee Period – Global
- Skip Notes – User
- Require Charge or No Charge – User
Display Tab
All & Mine (User):
- Recovery Display Fields Setup - User
- Recovery Display Sort Order - User
General Tab
Consultancy Recovery Code for Company (Global): This is for selecting 'Consultancy' code in the GLMax company. Select the GLMax company first from the drop-down menu, then select the more button to select the invoice code used for the consultancy recovery. If you cannot locate the invoice code, then you will need to create one in the Edit Invoice List screen in GLMax.
Import and Export Path (Global): This should already have a file path selected for the Softlog export. See TRMax Softlog Recording.
Company for Import Invoice Codes (Global): Click the more button to automatically populate this field with your GLMax company.
Set Import Data with Local Rates (Global):
- Do not Populate
- Populate only when zero
- Populate always
Invoice for each Recovery Record: If ticked; when recoveries are imported into GLMax, an invoice will be created for every recovery record for the invoice codes tagged within the ‘Set Invoice’ button/screen. When not ticked a single invoice will be created in GLMax per invoice code.
Set Invoice: Click this button to open the screen where you select the invoice codes to print on invoices for recoveries that are processed in the Process Recoveries screen in GLMax. These will also include any details entered into the 'Notes' area in the recovery record entered in TRMax.

Warn On Exit: When ticked, a prompt will appear asking "Are you sure you want to exit? Yes or No" when the user closes TRMax.
Auto Post Owner Invoice: If ticked; recoveries marked as ‘charge owner’ will invoice the owner when the recovery is saved. Alternatively, if not ticked the invoice will be created when the recoveries are processed in GLMax.
Use Access Pins On Import: This option allows you to utilise Access Pins during the import process, ensuring that only authorised personnel can import data. Additionally, Softlog Operator Pins are set up in the Security Setup, which is crucial for linking user details during the import process.
Consultancy Invoice Code
Ensure that you have a Company setup in 'Consultancy' and an invoice code, and also ensure you have 'Process BCMax Data' ticked.
Multiple invoice codes can be selected by selecting each one from the invoice code list as outline in Step 2 b. This will assist with the description of the task, and allow for different selections when entering a new TRMax consultancy record.
- In the TRMax menu, click File > Configure.
- Select the General tab.
a. Select the GLMax company for Consultancy.
b. Set the Invoice Code for Consultancy. Multiple can be selected; by default the first code will be selected if a user ticks the consultancy box in a new record, however the invoice code can be changed to any selected in this configuration.
c. If you are using Softlog, browse and set the path.
d. Select the company from GLMax (if you only have one company it will be COMP1).
e. Set Import Data with Local Rates - set 'Do not populate'.
g. Invoice for each Recovery Record. Generally 'Sundry' is selected as the 'Recovery Record'.
h. Warn On Exit. This will ask the question 'are you sure you want to exit'.
i. Auto Post Owner Invoices in BCMax.
j. Use Access Pins On Import.
k. OK - to save settings and configurations.

TRMax Consultancy Rates
TRMax consultancy rates are hourly, with a custom increment of required minutes and a minimum cost. This area will also allow for multiple consultancy accounts to be set where required, and for examples where there may be different rates applied for specific tasks; Administration, Accounting or Strata Meeting types. Examples have been included below.
A unique rate can be set up for:
- A single consultant, regardless of which building.
- A single building, regardless of which consultant.
- A specific consultant, in a specific building.
- A single consultancy rate per invoice code, regardless of which consultant or which building.
- A different consultancy description per invoice code.
Set Up Rates for a Single Operator
Example: A specific building has an agreed consultancy hourly rate of $150.00, charged in 15 min increments, and a minimum charge of $60.00. When that consultant creates a new TRMax record for Consultancy for 30 minutes, the cost will be $75.00, whilst any time up to 14 minutes will charge $60.00.
- Search or select TRMax and click the Edit Consultancy Rates button on the right.
- If the list of buildings is on the left without the list of Users on the right, click the Default button in the top right.
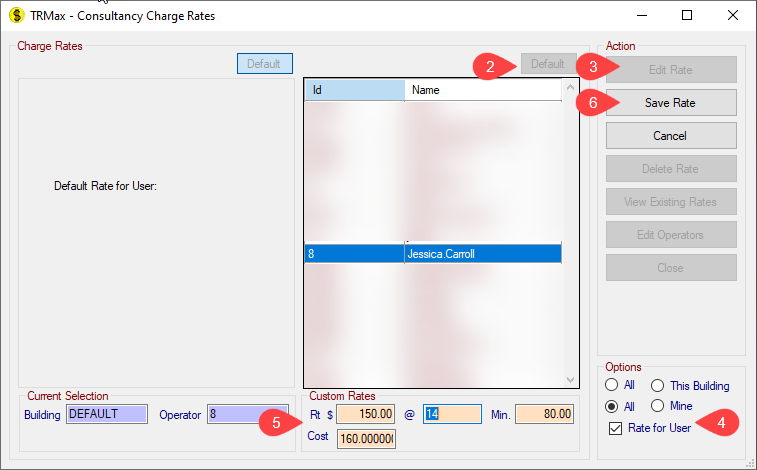
- Select the required user and click the Edit Rate button on the right.
- Under the Options section in the bottom right, ensure the All radio button and the Rate for User tick box are selected.
- In the Custom Rates section in the bottom, fill in the fields are required:
- Rt $: Enter the hourly rate to charge.
- @: Enter the incremental charge time. For example '14' for 14 minutes.
- Min.: Enter the minimum amount to be charged.
- Cost (optional): Enter the cost of the consultant for your office.
- Click Save Rate.

Set up Rates for a Single Building
Example: A specific building has an agreed consultancy hourly rate of $220.00, charged in 15 min increments, and a minimum charge of $80.00. When that consultant creates a new TRMax record for Consultancy for 30 minutes, the cost will be $120.00, whilst any time up to 14 minutes will charge $80.00.
- Open the TRMax menu and click the Edit Consultancy Rates button on the right.
- If the building list does not appear, click the Default above in the top left to make the building list appear.
- Select the required building and click the Edit Rate button on the right.
- Under the Options section in the bottom right, ensure the All radio button and the Rate for Building tick box are selected.
- In the Custom Rates section in the bottom, fill in the fields are required:
- Rt $: Enter the hourly rate to charge.
- @: Enter the incremental charge time. For example '14' for 14 minutes.
- Min.: Enter the minimum amount to be charged.
- Cost (optional): Enter the cost of the consultant for your office.
- Click Save Rate.

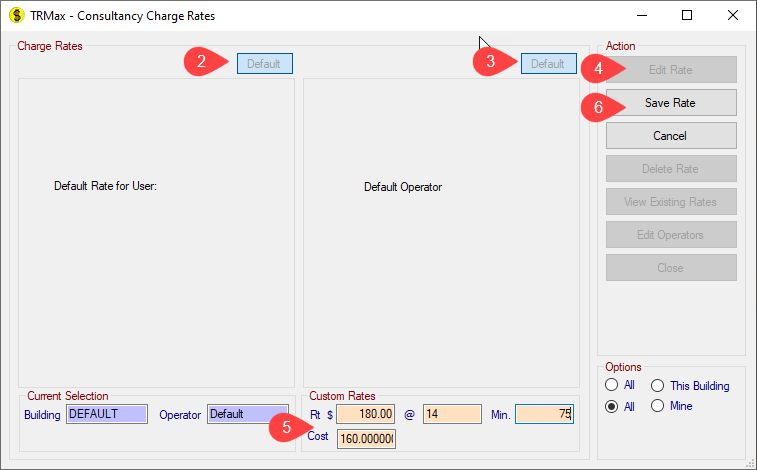
Setup Rates for a Default User for Default Building
Example: All buildings and all users have an agreed consultancy hourly rate of $180.00, charged in 15 min increments, and a minimum charge of $75.00. When that consultant creates a new TRMax record for Consultancy for 30 minutes, the cost will be $90.00, whilst any time up to 14 minutes will charge $75.00.
- Search or select TRMax and click Edit Consultancy Rates.
- If the building list does not appear, click 'Default' above the building area.
- If the user list appears, click 'Default' above the list so it is no longer showing.
- Click 'Edit Rate'.
- In the Custom Rates section in the bottom, fill in the fields are required:
- Rt $: Enter the hourly rate to charge.
- @: Enter the incremental charge time. For example '14' for 14 minutes.
- Min.: Enter the minimum amount to be charged.
- Cost (optional): Enter the cost of the consultant for your office.
- Click Save.

TRMax Custom Rates
Standard recovery records have each unit price configured for each. The default list created via GLMax / Edit Invoice List will be the standard list for selection, and the below details how to make custom rates applied to specific buildings and invoice codes.
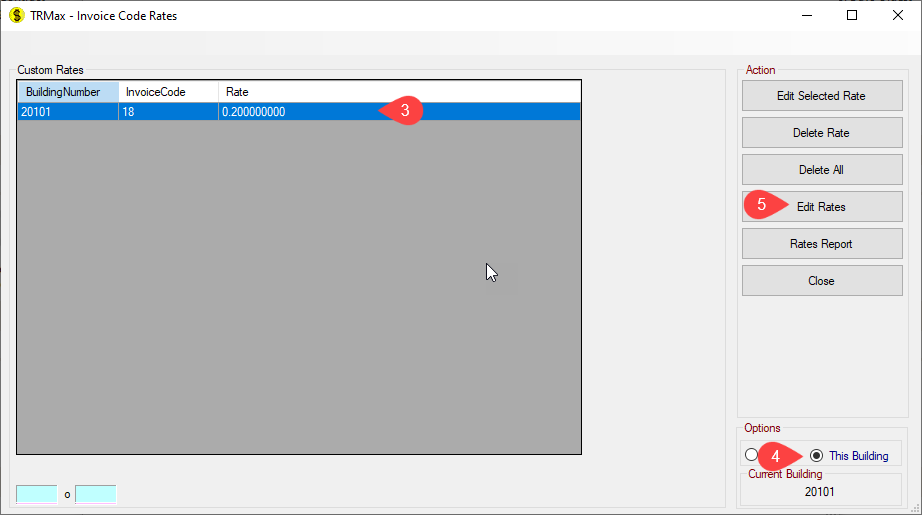
- Search or select TRMax and click Edit Invoice Rates.
- Select the building for the custom rate to be applied to from the Buildings table.
- Select the invoice code from the Rate Information table.
- Click Edit Rate.
- Amend the rate, using the (orange) Rate $ field. Cost $ can be completed if desired and refers to the actual cost to the company.
- Click Save Rate.

TRMax Custom - Delete Rates
When deleting a custom rate, the default rate will then be used to create TRMax charges. The below process includes how to delete a custom rate.
- Search or select TRMax and click Edit Invoice Rates.
- Select the building for the custom rate to be applied to from the Buildings table.
- Select the invoice code from the Rate Information table.
- Click Delete Rate.
- Click Yes to message: Are you sure you wish to delete the following custom rate.

TRMax Custom - View Existing Rates
To view any custom rates that have been set for one or all buildings, use this area to report this information.
- Search or select TRMax and click Edit Invoice Rates.
- Click View Existing Rates.
- From the Option (bottom right) select for All or This Building.
- Click Rates Report.
Note this report will confirm basic information.

TRMax Custom - Copy Rates
To copy a custom rate from one building's invoice code including the rate and cost, complete the below process.
- Search or select TRMax and click Edit Invoice Rates.
- Select the building that has the custom rate applied from the Buildings table.
- Select the invoice code from the Rate Information table.
- Click Copy Rates and tag the buildings required. Click OK.
- Click Yes to message: Are you sure you wish to Paste custom rates to selected Buildings.
- Click OK to message: Rates have been pasted OK.

If an invoice code has been copied incorrectly, to correct this select another building that contains the correct invoice rate and apply the copy rates again to correct the rate and / or cost.
TRMax Custom - Report
Reporting on any custom rates that have been applied to a single plan or multiple buildings can be done from this area, using the default application of Excel. The information included will be the building number, invoice code, description, default rate, custom rate, income account, cost, expense account and the rate used as shown below.
- Search or select TRMax and click Edit Invoice Rates.
- Click Report.
- Select from Rates report for Current Building or Rates Report for Multiple Buildings (select buildings from list if this was the option).

TRMax Custom - Auto Increase Custom Rates
Using this function will auto increase a custom rate that already exists for the building. After the auto increase application, any further entries will use the increased % custom rate for any new TRMax charges, and will not retrospectively update any unprocessed entries.
- Search or select TRMax from the required building and click Edit Invoice Rates.
- Click View Existing Rates.
- From the list of buildings, select the building that the auto increase is to apply to.
- Change the Options (bottom right corner) from All to This Building.
- Select the custom rate from the list and click Edit Rates.
- Select Auto Increase Custom Rates.
- Enter the percentage increase for the custom rate and click OK.
- Click Yes to message: Auto Increase ALL custom rates for Building X by X%.

