This article provides general information about Utility Bill Items in the Utility Billing menu within the Utility Sub-Group, and covers the setup of the different types of Utility Bill Items: Tariffs, Various Items, and Rebates.
The different Utility Bill Items that can be set up and used in the Utility Billing menu are defined by types:
- Debit Tariff: This is a debit charge based on a meter reading.
- Credit Tariff: This is a credit charge based on a meter reading.
- Credit Sundry: This can be used to credit a Sundry amount to a bill (e.g. a back-dated rebate).
- Debit Sundry: This is used to charge a debit amount to a bill (e.g. administration fees).
- Rebate: This is used to set up rebates across a combination of tariffs and sundry items.
Bill Items can be either a debit or credit (select the relevant type), and Rebates can be applied against multiple tariffs and/or sundry items.
When setting up a rebate, tariff(s) and sundry charges can be selected for the rebate they can be applied to.
The Qld Government Pensioner Rebate is gazetted by the Qld Government, and the rate is reviewed annually. The rebate is applied daily, based on the number of days in the billing period.
The rebate is limited to the bill amount (based on tagged tariffs for offset) for the Qld Government Pensioner Rebate. This means that if the charges amount to $26.04 but the rebate would have been $50.93, the rebate would be reduced to -$26.04, and the amount due would be $0.00.

Other rebates may allow the account to go into credit if the rebate amount exceeds the tariff charges. In these instances, the option to put the account into credit would need to be ticked when setting up the tariff.
Set up a Levy Invoice Code for Utility Tariffs
For each tariff used, there will need to be a Levy Invoice Code with the relevant income code, posting priority, and sort order. Normally, the main utility tariff will be Invoice code 27.
- Access the utility sub-group and open the Levy Invoice Code Setup menu.
- Add or delete Invoice codes as required. An Invoice Code must exist for every income code linked to a tariff.
- By clicking on any line in the schedule, the Invoice Code record will open for editing.
- Sort Order and Posting Priority must be unique for each record.
- Change the Levy Description, Income Account, Posting Priority or Sort Order fields if necessary.
- The changes will not be able to be saved if there are any errors.
- Select Save > Close when complete.
- If the delete button (a red X) is displayed to the right, it means the code has not been used for this building, and can be removed by clicking it.

Tariff Calculations
The calculation of Tariffs is applied by the Type of Tariff Item order:
- All debit tariffs and sundry charges applicable to the building are calculated based on the entry order into the system.
- All credit tariffs, sundry credits and rebates applicable to the building are calculated in entry order into the system.
This order of calculation supports the requirement for a rebate to be applied, but not exceed the calculated charges of the debit tariffs and sundry charges to which it has been linked.
Set Up New Tariffs
- From the Utility Group open the Utility Billing menu.
- Select the Tariff Maintenance Tab.
- Select Add.
- From the Type drop the selection down and select the bill item that is required.
- Enter a Tariff Title.
- Enter a Tariff Code that can be identified in the code column within the Tariff Maintenance tab.
- Select the Income Account Code applicable to this tariff.
- Choose the Calculation style:
Per Month (uses the number of months for the basis of the calculation).
Per Usage (uses the metered usage for the calculation). - Select the Supply type that this tariff applies to. Where more than 1 Utility is being billed in a building, each tariff can be assigned to a Supply Type, so that when entering readings only the tariffs pertaining to the utility currently being billed will be shown in the reading screen. If say, the Service fee tariff applies to all bills (whether electricity, water or gas), the Supply type should be set to n/a. Alternatively, a separate tariff can be created for each utility type e.g Service Fee-Electricity, Service Fee-Gas etc, and a Supply type set for each tariff. Only the service fee set to the relevant utility being billed will then be applied.
- Comparison. This allows for another tariff to be selected as a comparison to demonstrate savings achieved on the selected tariff as against say the industry gazetted rate. If a Comparison Tariff is selected, a suitable Bill template will need to be selected in order for the Comparison to show on the Bill e.g. ElecBill_52 (Templates supporting the Comparative Rate option will include Comparison Tariffs in the description). Once configured, the bill displays a comparison rate table under the meter readings that details the different rates and variance between the two. Beneath this, there is further detail to show the comparative difference in both a percent and dollar value.
- Enter the Minimum charge (applicable to Debit Tariff only) if required.
- Select Range units per day – this setting if selected will break down the reading amount per day based on the charge rate tiers (see example below).
- Enter the Charge rate as needed. The Charge rate needs to be entered as Ex GST amount, as the GST is added as 1 amount (total GST on all charges) on the bottom of the Bill. If the building is NOT GST registered, then enter the Charge Rate amount as the full charge amount.
- Enter the range From and To fields
- Save.
- If you have one charge rate you do not need to enter a range, simply enter the Charge amount in the field and leave the From and To fields blank.
- If you have a tiered tariff which is billed at different rates for different levels of consumption, then you would need to enter the Charge rate1 e.g.: 0.16 per klw and the tiered amounts into the From and To fields (see example below), Charge Rate 2 etc.
Example of Set Up with range units per day
Per month (Calculation Style) selected with range units per day:
- Total unit reading / divided number of days / charged at the charge rate tiers.
E.g. reading entered for 500 units for one month:
500 units / 31 days = 16.13 units per day – as this does not exceed charge rate 1 (200 units per day) the entire units are charged @ 0.16000.
Per usage (Calculation Style) selected with range units per day:
- Total unit reading / divided by number of months days / charged at the charge rate tiers.
E.g. reading entered for 12,000 units for 59 days:
12000 units / 59 Days = 203.3898 units per day – this will breakdown to 200 units per day times 59 days using Charge Rate 1 @ 0.16000 and 3.3898 units per day times 59 days using Charge Rate 2 @ 0.14000.

Example of no range units per day setting
Per month selected
- Total reading / divided number of months / calculated by charge rate tiers.
E.g. reading entered for 500 over 2 months:
500 units / 2 months = 250 units per month, therefore first month= 200 units charged @ 0.16000, 50 units charged @ 0.14000 and second month is 200 units charged @ 0.16000, 50 units charged @ 0.14000.
Total charge is $78.00.
Per Usage selected
- Total unit reading / charged at the charge rate tiers.
E.g. reading entered for 500 units;
500 units – breakdown will be 200 units charged @ 0.16000, next 200 units charged @ 0.14000 and the remainder 100 units charged @ 0.15000.
Total Charge is $75.00.
It is important to be aware of how the set up can affect the calculation of charges. As demonstrated by the above examples, the setup options may result in different amounts being charged depending on the options selected.
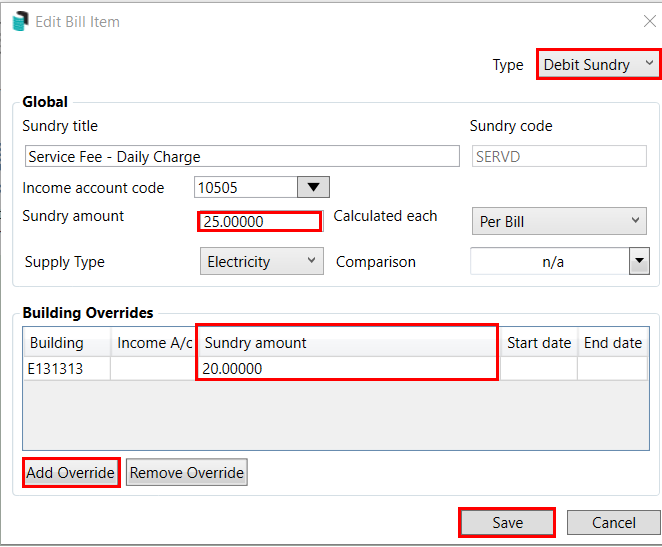
Set Up a Credit or Debit Sundry Tariff
- From the Utility Group open the Utility Billing menu.
- Select Tariff Maintenance Tab.
- Click the Add button.
- From the Type drop down menu, select either Debit Sundry or Credit Sundry.
- Enter the Sundry Title.
- Enter the Sundry Code (this is a code that defines the code from the sundry bill item list).
- Select the Income Account Code from the drop-down list.
- Enter the Sundry Amount.
- Click the Calculated each drop-down list to select whether the sundry item is calculated per bill or per day.
- Select Supply Type, if applicable. If the sundry charge relates to one particular utility, this can be selected in Supply Type. If the sundry charge applies to all utilities being billed, by leaving Supply type blank, the sundry charge will be applied on all bills regardless of utility type.
- Alternatively, a separate sundry tariff can be added for each utility type, and the relevant supply type set for each. This allows for a different rate to be set for the sundry charge for each different supply types.
- Select a Comparison tariff if required, from the Comparison drop-down list.
- If the tariff rate is different for specific buildings, or if a different income account code is required for specific buildings, an option is provided at the bottom of the screen to set up a local Building Override for those buildings.
- Select Save.
- If required tick the sundry charge in the Utility Billing > File > Configuration setting Set No Delete Sundry Charges for Finalising Accounts, to ensure sundry charges are not deleted from a debtor code on final readings.

Delete a Sundry Tariff
Once a Sundry Tariff has been used, for example, the one-off electricity rebates passed down by the Government, which affect only the current bill. Once the sundry tariff has been applied, processed, and printed on the bill, it can be deleted to prepare the account for regular billing. This type of tariff may not be obvious. If this sundry tariff is processed incorrectly, it will need to be reversed and deleted before the following instructions can be applied. If the entry does require reversing and deletion, the current bill will need to be re-entered, processed and printed.
- From the Utility Group.
- Search or select Utility Billing.
- From the Meter Maintenance tab, select the required account and click Sundry Charges.
- Click Delete and OK to the preview of the tariff type.
- Repeat for any other lots requiring the same action.

Change Tariffs in Meters
Where the meters have been added to the Debtors and there is a requirement to apply a new tariff to the meters, complete the following:
- From the Utility Group.
- Search or select Utility Billing.
- Select File > Change Tariff in Meters.
- Select OK.
- Select the Tariff required.
- Select Yes to Replace Tariff in selected record with Tariff XXXX.
- Select replacement tariff.
Delete a Tariff
It is not possible to delete a Tariff regardless of whether it is actively in use or not. This has been implemented to avoid problems that arise when re-printing bills for a tariff that has been deleted. This will also be important in supporting pro-rata billing, where one tariff ends mid bill and another starts mid bill (both the previous and current tariffs need to be available in order to generate the bill).
Set Up Global Rebate
Functionality exists to allow rebates to be applied across a combination of tariff and sundry charges.
When a new rebate is created, by default it will be a global rebate available to all buildings. If the rebate rate or account code varies for any buildings, the Building Override allows for different rates / account code to be set for any buildings.
- From the Utility Group.
- Search or select Utility Billing.
- Select Tariff Maintenance Tab.
- From the Type drop down menu, select Rebate.
- Enter the Rebate Title.
- Enter the Rebate Code.
- Choose the Income Account Code applicable to this rebate.
- Enter the Rebate rate (do not enter a minus sign to denote a credit value - this is not necessary).
- Enter the Maximum amount of rebate allowed (if required).
- Select the check box Can put account into credit if applicable to apply the rebate to the tagged tariffs (Note: Qld Pensioner Rebate cannot be more than the total of the Tariff and Sundry Charges, so the calculated rebate amount will automatically reduce to charges total).
- Tag the tariffs and sundry charges that this rebate can be applied to.
- Select Supply Type, if the rebate applies to only tariffs flagged as a particular Supply type (e.g electricity only).
- Select Save.

Rebates that exceed tariff and sundry charges
In order to support the ability to apply a rebate to the calculated tariff and sundry charges without exceeding the value of those charges (i.e. without creating a credit on the account), the tariff calculation order has been enhanced. Tariffs are now calculated in the following order:
- All debit tariffs and sundry charges applicable to the building are calculated based on the entry order into the system.
- All credit tariffs, sundry credits and rebates applicable to the building are calculated in entry order into the system.
As a result, by default, if the rebate amount exceeds the bill amount, the rebate will not generate a credit value on the account. However, the opportunity exists to override this logic to allow a rebate to create a credit charge in this scenario if required. In order to apply this override, ensure that the Can put an account into credit box is selected.
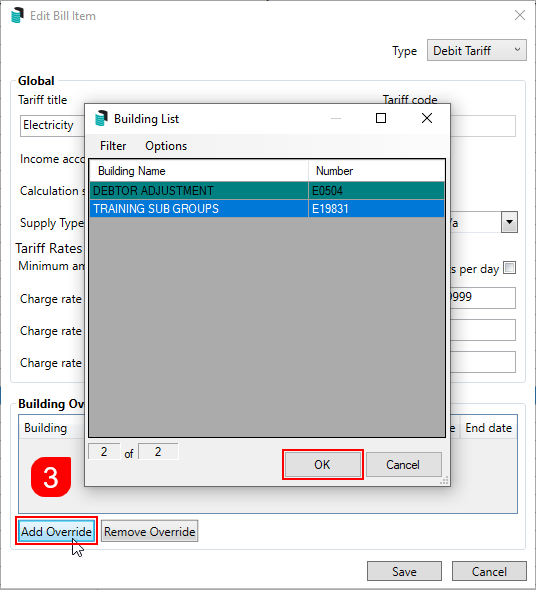
Set Up Local Building Overrides
All tariffs showing in the list are created global, but there is the function to override the global tariff amounts on a per building basis. This allows for a different tariff rate being set for each building where required. This function also allows for a different income account code to be selected if required.
- From the Utility Group open the Utility Billing menu.
- Select the Tariff Maintenance tab, then double-click the required tariff.
- Under the Building Overrides section, click the Add Override button, then select the required building and click OK.
- The building will now appear as a line item in the Building Overrides section.
- The building will now appear as a line item in the Building Overrides section.
- Double-click the cell under the Income A/c column to type in a different income code.
- Click the cell under the Charge rate 1 column to type in a different charge rate.
- Repeat for Charge rate 2 and Charge rate 3 if required.
- Click the cell under the Start date and End date columns, to enter a certain period that this local override can be applied for. Norman practice would be to leave this fields blank.
- Click Save .

To remove the override from the Tariff screen, simply select the override to be removed and click the Remove Override button.
Edit a Bill Item
A Tariff, Sundry or Rebate rate can be altered, as well as the income account code. However the Tariff Code cannot be altered.
- From the Utility Group, open the Utility Billing menu.
- Select the Tariff Maintenance tab.
- Double-click the Tariff.
- Amend the Charge Rate, Supply Type, Comparison etc as required.
- Click Save.
- Repeat to edit any other Tariff, Sundry, or Rebate items.
GST will be calculated on the total amount of the meter readings. Cents Adjustment will be automatically deducted based on the total amount of the meter readings and the GST amount due. The Total amount due will be calculated from the total of the bill, plus the GST owing and any cents rounding factored in.
Cents rounding is turned On / Off in File > Configure.
Setting up Meters
Once the tariff set up has been completed, the meters for each lot can now be set up also. The last reading details for each lot will be required to enable this. If the set up contains a new development building, the reading start point will be 0.
- From the Utility Group open the Utility Billing menu.
- Select the Meter Maintenance tab.
- Highlight the first Debtor, and click the Add button.
- Type in the Meter Number.
- Select the Tariff to be applied to the meter from the drop-down list.
- Enter the Last Reading Date.
- Enter the Last Meter Reading.
- Enter the Multiplier if required (this is rarely required - only where exceptionally large usage applies).
- Click OK.
- Repeat for any additional meters required for the selected lot.
Replace a Meter
If the meter needs replacement, the following steps can be applied to include the new meter and remove the old meter. This should be done before entering any current reading information.
- From the Utility Group, open the Utility Billing menu.
- Select the Meter Maintenance tab.
- Select the Debtor that has had the meter replaced and check that there is no current read to be processed or printed.
- Click Add, enter the Meter Number, and select the Tariff to be applied to the meter from the drop-down list.
- Enter the Last Reading Date.
- Enter the Last Meter Reading.
- Enter the Multiplier if required (this is rarely required - only where exceptionally large usage applies).
- Click OK.
- Repeat for any additional meters required for the selected lot.
The old meter must remain with the debtor to allow historical billing and reporting.
Once the meter has been replaced, this can be entered using the Reading Entry tab and is ready for use.
Add Sundry Tariffs to Automatic Billing
Sundry charges can be set up to automatically be added to a bill each time a new meter reading entered. This is suitable for administration fees and other regular charges.
- From the Utility Group open the Utility Billing menu.
- Select Meter Maintenance tab.
- Highlight the relevant lot account (or first lot account that the Sundry Charge will apply to).
- Select Sundry Charges, and click the Add button.
- Select the tariff to be applied to the meter from the drop-down list.
- Double-click the Style field, then click the Clear button, then OK.

- Highlight the Sundry Tariff that has just been created, and click the Apply To button.
- Tag the additional lot accounts that the Sundry Tariff applies to, then click OK.
- Further sundry charges can be added if required.

When sundry charges are initially applied against the lots they will not appear in the Meter Maintenance tab. Once the first bill has been entered and processed, the sundry charge will be visible in the meter schedule for each lot.
Troubleshooting Tariffs
If the billing has been entered and ready for processing, and a particular Sundry tariff has been omitted from the billing process, it will need the entries deleted, and the additional tariff added. The readings will then be re-entered to capture the additional tariff. If this has been a processed bill, the bill will need to be Reverse Processed Reading first before it can have Delete Current Reading processed. Complete the following to have this included;
- From the Utility Group open the Utility Billing menu.
- Select Options > Delete Current Reading.
- Tag the required lot account, then click OK.
- Open the Meter Maintenance tab, select the first lot and click the Sundry Charges button.
- Click the Add button, and in the new Select Tariff screen, click in the Tariff field to reveal a drop-down arrow; use it to select the tariff to be included.
- Click in the Style field to reveal a drop-down arrow; use it and click the Clear button.
- Click OK to close the Select Tariff screen.
- Click the Apply to button, and in lot selection window, tag the additional lot accounts that need to be charged, then click OK.
- Click Close to close the Standing Charges window.
The readings will then need to be entered again in the Reading Entry tab in order for the new sundry charges to be applied.
Set Days for Payment
Before printing and processing the utility bills, the days for payment needs to be set.
- From the Utility Group open the Utility Billing menu.
- Select Options > Set Days for Payment.
- To set the option for payment days refer to the Electricity Arrears and Electricity Bills area to configure:
- Number of Days till Due (Local).
- Number of Days till due (Global).
- Select Close.

Where Number of days till due (Local) is 0, the Global Days till due will Apply.
