Creditor Reporting

The following article contains information regarding creditor/contractor reports. These reports can be useful to refer to for creditor activity on a per property basis or globally across your portfolio.


Unpaid Creditors Report (Global)

The Unpaid Creditors Invoices Report provides a review of invoices entered for payment, but have yet to be paid. It's useful to produce before processing a global payment to ensure all details are correct and as expected.


Example of Unpaid Creditor Invoices Report

  1. Search or select Unpaid Creditor Report (Global).
  2. Click the ellipsis button next to the Buildings field to open the building selector menu, tag the required buildings to be included in the report, and click the Select button.
    • The single building option is available to run this report from when opening this area.
    • Multiple or all buildings can be selected (CTRL + A to tag all).
  3. By default, all creditors will be selected, but by clicking the magnifying glass button, you can tag specific creditors and click the OK button.
    • Multiple or all creditors can be selected (CTRL + A to tag all).
    • Click the Master Chart button to reveal the global creditor list if necessary.
    • Click Show Preferred Creditors Only to show the preferred creditors list.
    • Click Show Inactive Creditors to display the creditors marked as I (Inactive) in field Prompt, Preferred, Banned.


  1. A Start Date can also be selected as well if required.
  2. Click the Proceed button to display the Report Setup screen
    • Select the required radio button to output the report on Screen, Printer or Excel.
      Note: Excel will include additional information: Status (Pay/Hold), BSB/Bank Account Number, BPAY CRN, available cash balance.
    • Click the Preview button if you would like to simply preview the data.
  3. Click OK to produce the report or preview.


Creditors Aged Balances

The 
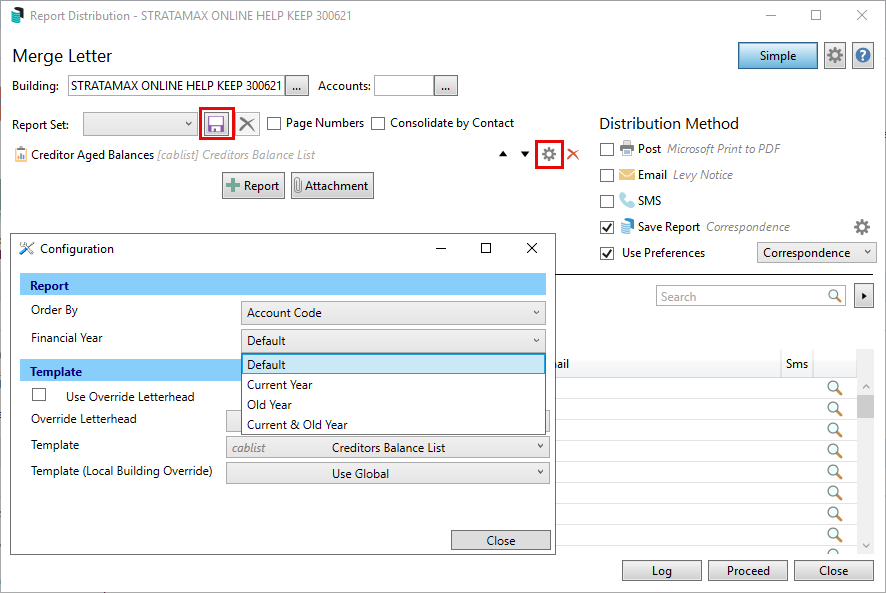
Creditor Aged Balances report will provide the ageing balance of a creditor account. It can be produced for the current selected building, in the current year. 

  1. Search or select Creditors Aged Balances.
  2. Set the output method; Screen, Printer or Excel.
  3. Select either the Creditor Code Order or Creditor Description Order radio button to determine the sort order of the creditors.
  4. Choose a date from the Aged to Date to update the column in which the balances report. (i.e. Invoice date - 15/01/23 is current until 14/02/23 when it moves to 30 days as is now 30 days old).
    • The date is not for back dating of balances - see below.
  5. There are two templates to choose from; one with and one without the creditor's phone number.
  6. Click the Print button.

If this report needs to be produced for the old year, then you can do so by selecting the building's old year, then producing Financial Statements with the 'Creditors Balance Report' box ticked under the Report Settings section on the left. 

To produce this report for multiple/all buildings, for a current year a Report Set can be setup for 'Creditors Balance Report', (this report can only be produced for the current year), however a 'Creditors Balance Report' can be produced for either current or old year.


Creditors Info List

This report contains the creditor information that is available within Creditor Maintenance. The Creditors Info List is also available in the Master Chart, where all or selected creditors will report.

The Creditors Info List screen utilises the Report Distribution interface with all the same buttons, icons and features - with a few tweaks where appropriate. Please refer to the Report Distribution article to learn more about this screen in more depth.

  • Account code (08200...)
  • Name
  • Payment method and details.
  • Address details.
  • ABN
  • Insurance details (workers comp policy number and professional indemnity policy details)
  • Contact info (phone and email)
  • Licensing
  • Contractor industry.

Example of Creditors Info List Report


Creditors Info List Configuration

Please refer to the Report Distribution article to learn more about the buttons, icons, and functionality in this screen, in more depth.

  1. Search or select Creditors Info List.
  2. When the Report Distribution / Creditors Info List window opens, click the cog wheel icon to the right of the 'Creditor Info List' report.


  3. Ticking Alphabetical order will sort the list of creditors as such as opposed to account code (0820...).
  4. Industry allows you to narrow down the report by contractor industry.
  5. The Template drop-down can be used to switch between 'Creditor Info List' and 'Creditor Master List'.


Global Creditor Info List

Please refer to the Report Distribution article to learn more about the buttons, icons, and functionality in this screen.

  1. From the Building Selector Tool click Select Master Chart Building.
  2. Search or select Creditors Info List.
  3. Select either 'Advanced' or 'Simple' mode. This will affect which buttons and icons are available on the screen, and the functionality.
  4. Set the Distribution Method
    • Simple Mode only provides the option for a printer, where the cog wheel icon can be clicked to change the printer and printer setup preferences.
    • Advanced Mode provides further options.
  5. Optionally, click the Report button (with the green '+' on it) to add more reports to output/distribute, or the Attachment button to attach documents from DocMax.
  6. Clicking the Excel Export button will output the report data to Excel.
  7. Click the Proceed button and the 'Report Publish' window will open with a preview of the report.
    • Click the Email button to email this report using the Communication screen.
    • Click the DocMax button to save a copy of this report to DocMax.
    • Click the Save button (3.5" Floppy Disk) to save a PDF copy of this report in Windows.
    • Use the navigation and zoom tools at the bottom of the screen as required.
  8. Click Proceed to produce the report to the selected Distribution Method, or Cancel to close the 'Report Publish' window.

Local Creditor Info List

Please refer to the Report Distribution article to learn more about the buttons, icons, and functionality in this screen.

  1. Search or select Creditors Info List.
  2. Use the Building field to select a single or multiple buildings to include in the report.
  3. Use the Accounts field to select specific creditor accounts to include in the report, or by leaving the field blank, all creditors in the selected building/s will be included.
  4. Select either 'Advanced' or 'Simple' mode. This will affect which buttons and icons are available on the screen, and the functionality. Please refer to Simple Mode and Advanced Mode for details on each.
  5. Set the Distribution Method
    • Simple Mode only provides the option for a printer, where the cog wheel icon can be clicked to change the printer and printer setup preferences.
    • Advanced Mode provides further options.
  6. Optionally, click the Report button (with the green '+' on it) to add more reports to output/distribute, or the Attachment button to attach documents from DocMax.
  7. Clicking the Excel Export button will output the report data to Excel.
  8. Click the Proceed button and the 'Report Publish' window will open with a preview of the report.
    • Click the Email button to email this report using the Communication screen.
    • Click the DocMax button to save a copy of this report to DocMax.
    • Click the Save button (3.5" Floppy Disk) to save a PDF copy of this report in Windows.
    • Use the navigation and zoom tools at the bottom of the screen as required.
  9. Click Proceed to produce the report to the selected Distribution Method, or Cancel to close the 'Report Publish' window.


Creditor Activity Report

The Creditor Activity Report details the last activity date used for all codes; balance sheet, income and expenditure plus creditor account codes. If the Creditor has an industry entered this will also report.

Local Creditor Activity Report

  1. Search or select Creditor Activity Report.
  2. Set the output method; Screen, Printer or Excel.
    Note that this opens in Excel with a temporary file with a random file name,  so if you want to save the file, you should use the 'Save As' option, not the 'Save' option
  3. From the Preview window, select the appropriate option for saving the report if needed. Close once complete.

Global Creditor Activity Report

  1. Search or select Reports / Utilities (Global)
  2. Click Select Buildings and tag required buildings (Ctrl + A to tag all) then click OK.
  3. Select Group then Creditor Activity Report then click OK.
  4. Set the output method; Screen, Printer or Excel.
    Note that this opens in Excel with a temporary file with a random file name,  so if you want to save the file, you should use the 'Save As' option, not the 'Save' option
  5. Complete any Data Limits where required and Proceed.
  6. Assign a Sort Preference selections if desired then click OK.
  7. From the Preview window, select the appropriate option for saving the report if needed. Close once complete.

Creditors - Bank Balances Report

This report will detail the Creditor balance plus the available funds for the Bank Balance (012 - Cash at Bank) for the tagged buildings.

  1. Search or select Reports / Utilities (Global)
  2. Click Select Buildings and tag required buildings (Ctrl + A to tag all) then click OK.
  3. Select Group then Creditor+ Bank Balances Report then click OK.
  4. Set the output method; Screen, Printer or Excel.
    Note that this opens in Excel with a temporary file with a random file name,  so if you want to save the file, you should use the 'Save As' option, not the 'Save' option
  5. Complete any Data Limits where required and Proceed.
  6. Assign a Sort Preference selections if desired then click OK.
  7. From the Preview window, select the appropriate option for saving the report if needed. Close once complete.


Creditors Master List

This report lists all creditors that are available within StrataMax. It can also be used to export the list to Excel.  When exporting to Excel, all information for the creditor maintenance record, including ABN, BSB, Account Number, BPay Biller Code, GST Registered etc. Saving the report to the 'Screen' or 'Printer' options will offer the PDF version. The PDF version will list the account code, name, telephone and fax numbers, Workers Comp Policy number and Professional Indemnity Policy number.

The Creditors Master List screen utilises the Report Distribution interface with all the same buttons, icons and features - with a few tweaks where appropriate. Please refer to the Report Distribution article to learn more about the buttons, icons, and functionality in this screen, in more depth.

Example of Creditors Master List


Creditors Master List Configuration

Please refer to the Report Distribution article to learn more about the buttons, icons, and functionality in this screen.

  1. Search or select Creditors Info List.
  2. When the Report Distribution / Creditors Info List window opens, click the cog wheel icon to the right of the 'Creditor Info List' report.

  3. Ticking Alphabetical order will sort the list of creditors as such as opposed to account code (0820...).
  4. Industry allows you to narrow down the report by contractor industry.
  5. The Template drop-down can be used to switch between 'Creditor Info List' and 'Creditor Master List'.

Creditors Master List | Global

Please refer to the Report Distribution article to learn more about the buttons, icons, and functionality in this screen, in more depth.

  1. From the Building Selector click the Select Master Chart Building link at the bottom of the list.
  2. Search or select Creditors Master List
  3. Select either 'Advanced' or 'Simple' mode. This will affect which buttons and icons are available on the screen, and the functionality.
  4. Set the Distribution Method
    • Simple Mode only provides the option for a printer, where the cog wheel icon can be clicked to change the printer and printer setup preferences.
    • Advanced Mode provides further options.
  5. Optionally, click the Report button (with the green '+' on it) to add more reports to output/distribute, or the Attachment button to attach documents from DocMax.
  6. Clicking the Excel Export button will output the report data to Excel.
  7. Click the Proceed button and the 'Report Publish' window will open with a preview of the report.
    • Click the Email button to email this report using the Communication screen.
    • Click the DocMax button to save a copy of this report to DocMax.
    • Click the Save button (3.5" Floppy Disk) to save a PDF copy of this report in Windows.
    • Use the navigation and zoom tools at the bottom of the screen as required.
  8. Click Proceed to produce the report to the selected Distribution Method, or Cancel to close the 'Report Publish' window.

Creditors Master List | Local

Please refer to the Report Distribution article to learn more about the buttons, icons, and functionality in this screen, in more depth.

  1. From the Building Selector select a building.
  2. Search or select Creditors Master List.
  3. Select either 'Advanced' or 'Simple' mode. This will affect which buttons and icons are available on the screen, and the functionality.
  4. Set the Distribution Method
    • Simple Mode only provides the option for a printer, where the cog wheel icon can be clicked to change the printer and printer setup preferences.
    • Advanced Mode provides further options.
  5. Optionally, click the Report button (with the green '+' on it) to add more reports to output/distribute, or the Attachment button to attach documents from DocMax.
  6. Clicking the Excel Export button will output the report data to Excel.
  7. Click the Proceed button and the 'Report Publish' window will open with a preview of the report.
    • Click the Email button to email this report using the Communication screen.
    • Click the DocMax button to save a copy of this report to DocMax.
    • Click the Save button (3.5" Floppy Disk) to save a PDF copy of this report in Windows.
    • Use the navigation and zoom tools at the bottom of the screen as required.
  8. Click Proceed to produce the report to the selected Distribution Method, or Cancel to close the 'Report Publish' window.