StrataMax provides a 'User' configurable desktop with icon groups that can be customised, and items for security groups can be set up depending on whether the user is allowed to edit Desktop Groups for the Users security group. The purpose of this feature is to enable the icons to be accessed quickly for faster processing within office roles. The desktop also allows for various menus to be running at the same time.
If a user does not have permission to access a particular function, the icon will appear on the desktop but is not active - identifiable by its grey colour. Icons irrelevant to the building or company selector will also be inactive. For example, if a user chooses a building that does not have a sub-group, the icons relating to the subgroups will be inactive. Similarly, if the user has selected a building, GLMax Company-related icons will be inactive. Conversely, if a company has been selected, icons that are only relevant to buildings will be inactive.
Security Permissions
- Customise menu groups & items for your security groups: If allowed, the user will only be able to edit groups that have been assigned to security groups of which they are members.
- Customise your own menu groups & items: If allowed, a user will be able to customise their own desktop; changes will not impact any other users.

Desktop Overview
This section provides an overview of the StrataMax Desktop. More detailed explanations on their use has been provided further down in this article.

- StrataMax Logo Button: Click this to open a screen with all StrataMax icons.
- StrataMax Version: Displays the StrataMax version installed. The Release Notes page contains all release notes, detailing version changes and feature updates.
- Building Selector: Displays a list of active buildings in StrataMax.
- Main/Sub-Group Button: Click to switch between the Main building and Sub-Group building, used for utility billing, marinas, etc.
- A/c Manager: Displays the account manager for the currently selected building. The Account Manager is set in Building Information, and more Account Managers can be added to StrataMax in Account Manager Edit.
- Current Month: Displays the current month of the currently selected building. If this is still displaying the previous month, then a Month End Rollover will need to be completed for this building.
- Working Date: This should default to your system's current date/today's date, and in most cases should not be changed.
- Year Selector: Click this to change between the financial years of the currently selected building.
- Lock Button: Click to lock the currently selected building. See Lock Building for more info.
- StrataMax Search: Use this to search for icons, contact names, contact email addresses, 9-digit StrataPay numbers, lot addresses.
- Desktop Group: These are used to group StrataMax icons together. These can be restricted to specific User and/or Groups. See Creating A New Desktop Group for more info.
- Whats New: View our most recently updated features here.
- StrataCash Hub: Click to open the SCM Hub for New Account Requests, Trace Requests, Certificates, Term Deposits etc.
- Edit Desktop Group: Click this to edit the Desktop Group. See Editing a Group.
- StrataMax Icon: Each icon represents an area of StrataMax, which has it's own set of menus and functions. These can be added to the desktop by adding them to a Desktop Group. See Editing a Group.
- Colours: Click this to select the colour of the desktop background.
- Dashboard & Notification Bell: The Dashboard & Notifications Bell will appear with a number indicating there are important messages to read. Details of StrataMax Version Updates including Release Notes will be listed and any completed Building Transfers. Refer to Task Notifications for more information on Task Management notifications.
- The username button displays the user name of the current user. Click this to display:
- Logout to log out of StrataMax and close the application
- Preview Features are released at times and will be available alongside the original interface that has been redesigned. This allows the original functionality to be used where required however this is only for a short period of time until the original older interface is removed. Tick to enable the new features for your username or untick if you require access to the older interface. If access to the older interface is required for specific purpose that the new interface does not allow for; a support case should be raised with StrataMax Support (Security permissions exist to restrict users ticking & unticking so if you do not have access contact your systems administrator).

- StrataMax Website: Click to open the StrataMax website home page.

Building Selector
- Display the list of buildings in your portfolio.
- Display the list of companies (usually there is only one company (COMP1)).
- Show or hide the various filters available (see the section below for an explanation of each filter).
- Will save the current selected filter option as default for the current logged in user, so that it will always be active when using the Building Selector list.
- Will remove the selected filter option as default for this user.
- Indicates that this building has been locked.
- Type the building number or name to search for it in the list. Part of the name or number can be typed - it doesn't have to be the start.
- Open the Base Building.
- Opens the Master Chart.
- Active Building Totals can be quick viewed from the bottom right corner.
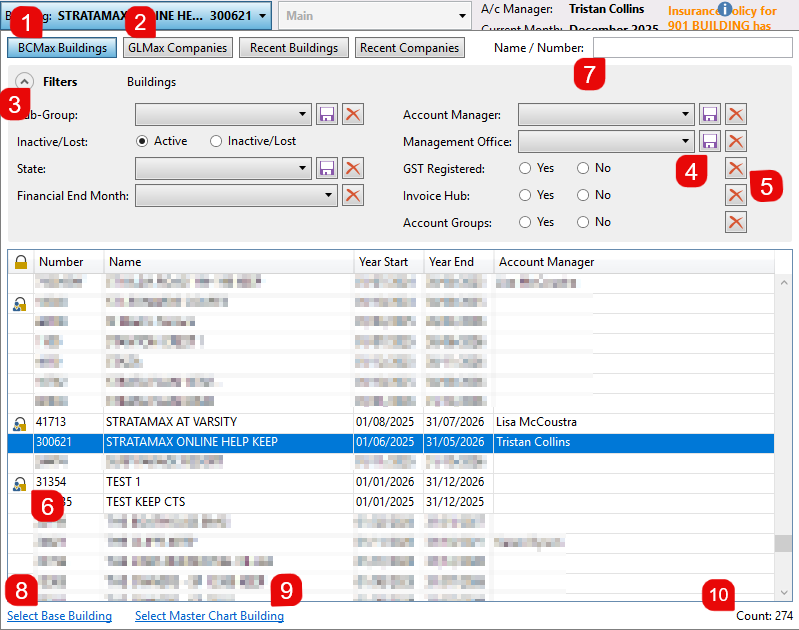

Building Selector Filters

- Sub-Group: Buildings have have a sub-group, which can be Air Conditioning, By-Laws, Utilities, or Marina. See New Sub-Group Setup for details.
- Inactive/Lost: See Lost/Inactive Buildings for more info.
- State: State is set during the building setup, but can be changed using the State field in Building Information.
- Financial Month End: Select a month to filter all buildings that have a financial year end in that month. This is set during the building setup.
- Account Manager: This is configured in Building Information, in the Account Manager field.
- Management Office: This is configured in Building Information, in the Management Office field.
- GST Registered: Filters buildings that are GST Registered. See GST Setup for more info.
- Invoice Hub: Filters buildings that currently have Invoice Hub enabled. See Invoice Hub | Setup & Configuration for more info.
- Account Groups: Buildings in VIC. Filters buildings that have account groups configured. See Account Group Setup for more info.
Year Selector
Underneath the Building Selector there is a Year Selector. If the selected building has any old or historical years in StrataMax, these will be listed when it is clicked.

There are limitations on what icons, menus, functions, and features are available in the old or historical years, so you will notice that certain menus on the StrataMax Desktop will become inactive whilst the old or historical year is selected.
When a Year End Rollover is completed, that year will be added to the list of available years in this menu. Also, when a building is transferred, it will also include the old and historical years.
Creating a New Desktop Group
- Select 'Add Group'
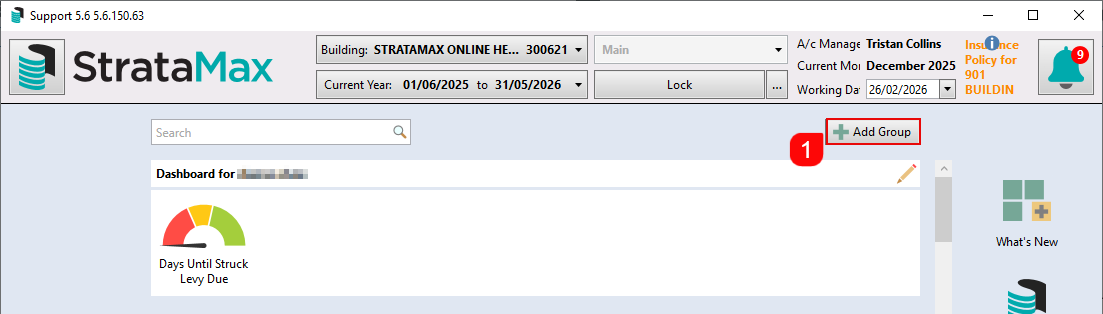
- Enter a 'Title' for the 'Group'.
- From the drop down list, select users that will have access to the group; you can give access to yourself, or alternatively a user-group that you are a member of.
- A group of menu items cannot be assigned to both a User and a User Group or multiple User Groups.

- A group of menu items cannot be assigned to both a User and a User Group or multiple User Groups.
- Select ‘Add Menu Item’.
- 'Select Menu Item' to add to the desktop group by selecting a 'Category' and then the specific 'Menu' Item, or alternatively using the 'Search' function.

- Repeat steps 4 & 5 until all 'Menu' Items have been selected for the group being created.
- Using the '<' & '>' buttons move the 'Menu' Item to the left or right of the Group.
- Click 'Save Changes'.
- Based on the above example; the group will now be available for any user that is a member of the ‘Accounts’ security user-group.
- The above steps can be completed for all Groups that you want to create; there is no limit to the number of menu items you can add to a group or the number of groups you can create. A scroll bar will be shown if required.


Editing / Deleting a Group
A group can be edited by following the below steps:
- Click on the 'Pencil' symbol at the end of the group to edit.
- To move menu items left or right click the '<' or '>' buttons.
- To delete a menu item click the '–' button.
- To add a new menu item select 'Add Menu Item'.
- Select 'Menu Item' to add to the desktop group by selecting a 'Category' and then the specific 'Menu' item(s), or alternatively using the 'Search'.
- The group 'Title' & the 'Assigned User' or 'User-Group' can be edited if required.
- Click 'Save Changes' to save any changes made or;
- Click 'Cancel' to revert back to the original 'Menu' items.

- To remove a 'Group' click 'Delete Group'. This will delete the Group for any members that may have been associated in the Group.

If deleting a Desktop Group that is assigned to a group of users, it will change all of that groups users desktops. If a group is deleted unexpectedly; use Log Viewer to identify who removed the group by searching the Description field for Removed desktop group.
StrataMax Logo Button
All icons in StrataMax can be located by clicking the StrataMax logo icon in the top left of the StrataMax desktop. Upon clicking the StrataMax logo icon, you will see a list of categories on the left. Each category can be clicked to display all of its icons, which are also split into sub-categories.

StrataMax Search
Searching for a contact is available using the search bar in the top right hand side of the screen. Functionality exists for searching using the contact name, creditor name, email address, lot address field or the whole StrataPay reference number.
These options will assist for owners who do not know what building they belong to, and offer the contact details including the positions of what building the contact is associated with. Options also include in some of these areas to launch directly to the Roll.
When using the StrataMax Search, it will include all of the below:
Contacts
Typing into the StrataMax Search bar the partial / full name / lot address field / email address or 9 digit StrataPay ID will return results of a Roll contact. Clicking on the contact will open their Contact Details screen.
When searching by email address; results based on the email address will only show once the @ symbol has been included.

Creditors
Entering the partial or full name of a creditor into the StrataMax Search bar will return results matching the name under the heading 'Creditors' and if selected, will open the Creditor Maintenance record.
Building Names/Number
Typing into the search bar the partial / full name of the 'Building' / 'CTS' / 'SP' / 'OC' number will produce results based on 'Building Names' / 'Building Number'.

Building Address
Typing into the search bar the partial / full name of the 'Building Address' will produce results based on the 'Location 1' and 'Location 2' on all properties within the portfolio.
When a result is clicked for both 'Building Names' and 'Building Address', the Building Information Manager will open with this information.
- 'Buttons' / 'Menu' Options. All 'Classic' buttons and 'Menu' options will be available for searching and adding to a 'Group' (if security options have been allowed for required 'Button' / 'Menu' option).

From the search results you can select the menu item. This function will search menu items and synonyms, e.g. typing invoice could bring up the Creditor Invoice menu item.
The list of potential menu items that a search will deliver in its results will display the 'Category', 'Sub Category', 'Menu' item name and 'Searched Synonym in brackets'.
For example, a user wants to enter an invoice for a creditor in the system. They could type the word 'Invoice' and would see the following results:

- (Group - italic) Creditors & Payments> Invoices & Payments> Creditor Invoice.
- (Group - italic) Levies & Arrears> Levies (Sub Group - italic) *if applicable, Arrears & Invoices> Invoice Entry ('Menu' item name - Bold - Searched term underlined).
- Synonyms have also been included for various terms used within the industry, e.g. typing the various names of sales certificates will show the appropriate menu item.


Launch Multi-Window
Users can open multiple windows and switch between / close them using the Multiple Windows section at the bottom of the StrataMax desktop.
This allows users to access various functions from within StrataMax and other modules at the same time. For example, a user may be part way through entering creditor invoices and then receive a phone call from an owner; the user can open a new window by selecting the menu item and changing building if required.

The same Menu Item cannot be opened more than once; for example a user cannot open two Creditor Invoices windows.
Colour Selection
The BCMax Desktop allows you to change the background colour scheme or set back to the default colour.
- Click on the icon on the bottom right corner of the StrataMax Desktop.

- This will expand into a colour slide bar.
- Move your mouse over the colour bar to select the desired colour.
- To revert back to the default colour click 'Default', and to change to the default grey colour, click 'Grey'.


