 |
|
Cash Payments is a report that details payments and direct entry transaction types. The format for this report includes a transaction list style. Options exist to apply limits and conditions.
Cash Payments Report
- Search or select Cash Payments.
- In the Select A/c’s tab section, tag which general ledger account codes to report on.
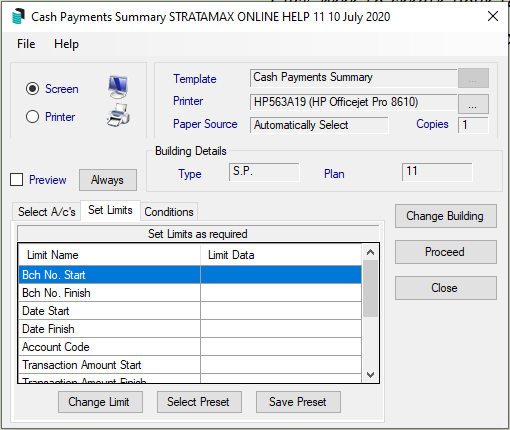
- Click Set Limits tab and set limits if required.
- Click on one of the fields then click Change Limit, type in the limit then click on OK (see below).
To use a preset combination of limits (after it is set, see below): - Click on Select Preset.
- Click on the limits preset to use, and click OK.
When there is an option to set a start and finish criteria for any limit, the idea is to print a range of information from the start setting to the finish setting. You can set none, one or all of these options.

Batch No Start: Set a Batch No Start to report on all transactions entered after this batch number. Use with Batch No Finish to report on a batch range.
Batch No Finish: Set a Batch No Finish to report on all transactions entered before this batch number. Use with Batch No Start to report on a batch range.
Date Start: Set a starting date to report on all transactions entered after this date. Use with Date Finish to report on a date range.
Date Finish: Set a finishing date to report on all transactions entered before this date. Use with Date Start to report on a date range.
Account Code Start : Set an Account Code to report on all transactions entered for this code. Use with Account Code Finish to report on a code range.
Account Code Finish: Set a finishing Account Code to report on all transactions entered before this date. Use with Account Code Start to report on a code range.
Account Code: Tag the account codes to report for (if none are tagged then the report will assume all are to be printed).
Type: Tag the transaction types to report for (if none are tagged then the report will assume all are to be printed).
Presented: Type in a Y for yes or an N for no for transactions that have been presented (i.e. cheques presented at the bank).
Transaction Amount Start: Type in the lowest amount to report on transactions for. Use with Transaction Amount Finish to report on an amount range.
Transaction Amount Finish: Type in the highest amount to report on transactions for. Use with Account Code Start to report on an amount range.
Invoice Code: Tag one or more invoice codes to report for (if none are tagged then the report will assume all are to be printed).
Description: It is possible to select transactions by matching comments made in the Description field. Only exact matches will be selected.
Reference Start: Set a Reference Start to report on all transactions entered after (and including) this reference number. Use with Reference Finish to report on a reference range.
Reference Finish: Set a Reference Finish to report on all transactions entered before (and including) this reference number. Use with Reference Start to report on a reference range.
Extra Details: It is possible to select transactions by matching comments made in the Extra Details field. Only exact matches will be selected.
Posting Month: Tag one or more posting months to print all or limited transactions for (If none are tagged then the report will assume all are to be printed).
- Click Proceed
If you print the report to screen by ticking Preview, you will be shown a brief listing of the information in this report. These information fields will be displayed: Batch Number, Date, Account Code, Type, Amount, Details, Reference, Extra Details, and a Running Total. Any of the column headers can be clicked on to sort by, and clicking into the appropriate column and keying reference information will filter the search to the entered text. - If you chose to print to the screen, click on the print button to send this report to the printer.
- Click on the close (X) button in the top right corner of the report to close.
You may select a different building by clicking on Change Building. Click on the building or Ctrl+A to select all, then click on OK and then Proceed.
Example Report

Saving Presets
After setting the limits of the reports, those limits can be saved as a preset.
- In the Set Limits tab, once the required limits have been set, click on to Save Preset.
- Type in a Report Description to identify this limit.
- Click on OK.
- To delete a set of limits, click on it and then click Delete.
Conditions Tab
Entry Order: Report will list Account Codes in the order of which they were entered.
Account Coder Order: Report will list in Account Code Order.
Account Code Order: (1 page per) Report will list each Account Code - 1 item per page.
Batch Number Order: Report will list each Batch Number Order.
Show GST separately: Tick to show GST amounts separately.
Ignore No Prints: Tick to ignore no print items.
Include Sub-Headings: Tick to include Account Code Sub-Headings.
Include Nil Amount Items: Tick to include Account Codes even though Nil Amount.
Prepare Data for Printer: Tick to print the report.
Add Account Names: Tick to include Account Names on the report.
Show Brought Forward: Tick to include Brought Forward Balances to be displayed.
Running Total: Continuous, the report will be a continuous running total or Batch/Code, the report will total each batch/code.
