 | This article covers the Levy Notice/Reports. The icon may be located on your StrataMax Desktop or found using the StrataMax Search. |
Levy Notice/Reports is where levy notices can be printed and distributed for levies that have been generated.
If a previous levy notice needs to be reprinted, select the lot in the Roll and the document icon in the Lot section to show all documents related to the selected lot, including Levy Notices. Alternatively Stored Reports can be used to reproduce the notice. Either option will display the original notice with the date that the notice was printed and the address, and amounts due at the time the notice was produced.
Generating levies and printing or emailing them for distribution is normally a two-step process. However, StrataMax has the ability to combine this process, so levies are printed and emailed during the generation process. See our Levy Management article for instructions.
After consultation with the Australian Taxation Office (ATO) and others, StrataMax has concluded that levy notices should be issued on a gross basis. This means that the full amount of the levy including GST will be shown on the notice. For Strata Schemes and Bodies Corporate which have an ABN recorded and are registered for GST, a 'Tax Invoice' stamp with the ABN will be printed on notices and invoices, provided you have selected one of the GST ready templates.
Levy Notice | Configuration
This section covers the different settings that pertain to Levy Notice/Reports, which is accessed by clicking File > Configure. Only those settings that affects the levy notices are highlighted and covered in this section. Some of the other settings are related to the Levy Arrears, which are covered in the Levy Arrears article.

Settings
Always show last active global message (Levy Notice)
If ticked, the active message for this building will be displayed on Levy Notices.
Always show last active global message (Arrears Notice)
If ticked, the active message for this building will be displayed on Arrears Notices.
Show Interest separately
If ticked, interest will be shown as a separate entry on the levy notice as opposed to being added together with the arrears.
Show Other separately
If ticked, will show on the levy notice any item in the 'Other' fund on a separate line.
Print Sample Levy Notice each time notices are printed
If ticked, a sample levy notice will generate each time the levies are printed.
Email Copy to owner/s (if owners preference is set to email) when Global Agent/ Mortgagee is set to receive levy notices
If ticked, the 'Global Agent/Mortgagee' will receive a copy of the Levy Notice if the Owner details also include an email address in the Roll, the Agent must be configured to receive the notice via the delivery preferences.
BCC to Account Manager
If ticked, this option will email a copy of any Levy or Arrears Notices that are emailed to owners or agents to the Account Manager set in Building Information.
Show Not Yet Due Levies as Normal Levies During Global Run
With this Global option activated, levies that have been generated but are not yet due (eg Special Levies) will report on the Levy Notice, the levy details, rather than as Arrears/ Adjustments.
Unit Number Style
'S' Prefix for Shop Number
Using the field 'Unit No' in the roll you can add an 'S' to distinguish the lot is a shop and then add the shop number e.g. S4. On the levy notice the word 'Unit Number' will be replaced with 'Shop Number' but if you untick this option it will suppress the word 'Shop Number 4' and show 'Unit Number S4'.
'T' Prefix for Street Number
If you tick this setting it will add the word 'Street Number' where 'Unit Number' shows on the levy notice.
Levy Notice | Email Template Setup
Please refer to the Email Template Manager article to learn how to manage email templates.
Levy Notice | Templates
The levy notices can be configured to use certain templates. Instead of having to test each levy template, here is a PDF with the levy templates available for your convenience: Levy Notice Templates.pdf
- Click the ellipsis button next to the Template field in the top right of Levy Notice/Reports.

- In the Template Selection screen, select the template required, and either click the Select as Global button to use the template for all buildings, or click Select as Local to use this template for the current building only.
- If you would like to preview the template first, select the template, then click the Preview button at the bottom.
- To change the preview style, click Options > Preview Style > Field Names or Field Numbers.
- Make sure you select the Deposit in the bottom section of the screen, and click the Select as Global button.
- Click Close to close the Template Selection screen.

Levy Notice | Templates for Direct Debit
If you would like to use a levy notice template which includes direct debit instructions, use these levy notice templates (they have the Payment Direction 1/Field60 merge fields):
- LNOTE84
- LNOTE107
- LNOTE113
- LNOTE125
- LNOTE114
- LNOTEWA
Levy Notice | StrataPay Deposit Slip
The StrataPay deposit slip will need to be enabled and you may need to make some changes to ensure all fields are aligned on the StrataPay deposit slip, and that the correct template is being used.
StrataPay Deposit Slip | Setup
Please see StrataPay | Deposit Slip Setup for info on enabling the StrataPay deposit slip in a building.
StrataPay Deposit Slip | Bank Details and Building & Address
The bank details on the deposit slip and the building's title and address can only be edited by the Support team at this stage. It is recommended to review the Logging a Support Case article and emailing them on support@stratamax.com.
Levy Notice | Printing & Emailing
Below are instructions on how Levy Notices can be printed and/or emailed after the levy has been generated.
Conditions Tab Settings
Report Order
The order in which the levy notices will be presented.
- Account Code - print in 'Account Code 021XXXXX order.
- Alphabetical - print in alpha account order based on the Roll.
- Lot Number - print in lot number order.
- Unit Number - print in unit number order.
- Levy Notice Address - print in Levy Notice Address order based on the Roll.
Process Fees and Log
For Arrears Notices, this setting will process the arrears fees if they should be charged. Recommended to be ticked.
Print Message
Tick Print Message if a message is needed. If this is the first time a message is being added, go to Message Maker to setup.
Show Arrears
Displays amounts that are in arrears. Recommended to be ticked.
Print Interest Words
This displays the overdue interest wording on Levy Notices. See Edit Interest Wording.
Email Where Set
If ticked, levies will be sent to any address in the Email field in the Roll, regardless of the owner's Contact Preferences.
Email / Mail as per Contact Preferences
Used in conjunction with the above settings, if an email address exist in the email address field in the Roll, it will look at the Contract Preferences to determine the delivery of the levy notice.
Include Current
Predominantly used for Levy Arrears to include the most recently generated levy, which is not due yet.
Set as Default
By clicking this button, any tick boxes that are ticked at the time will remain ticked by default when this menu is opened.
Set Local Paper Source
No longer used.
Message Maker
Opens the Message Maker setup window.
Levy Notice | Printing & Emailing For a Building
See Global Distribution for guidance on how to print levies for multiple or all buildings.
If the message printed on levy notices needs to be changed for a particular building, make sure that you do so before proceeding. Head over to our Message Maker article for instructions.
- Search or select Levy Notice/ Reports.
- Click the Select Lots tab if only particular lots are needed - otherwise the default will include all lots.
- Click the Select Levies tab and tag the applicable levies if necessary.
- Click the Conditions tab, detailed above, and configure the settings as needed.
- Click the Proceed button, otherwise go to the Select Lots tab and tag one or more lots to print / email the levy notices.
- Click Proceed.
Levy Notice | Options Menu
There are a number of reports and areas that can be accessed from the Options menu in Levy Notice/Reports. These reports are:
- Levy Register
- Levy Balance Control Report
- Levy Arrears Notice
- Overdue Report
- Pre-Issue Report
- Process Last Arrears Fees and Log
- Levy Notice and Correspondence Delivery Arrangements
Levy Notice | Correspondence Delivery Arrangements
This report will identify how owners will receive their correspondence and levy or arrears notices when generated out of StrataMax, and it observes the Contact Preference in the Roll.
- Go to Options > Levy Notice and Correspondence Delivery Arrangements.
- Click Show in Excel to export.
Each lot will have two lines, one for Levy (and Arrears) Notices and one for Correspondence (which is Labels or Merge Letters produced from StrataMax). It will list how each type will be delivered, either by email or mail and what address field in the roll it will refer to. This report will also list the email address and/or the mailing address that correspondence type will be sent to.
The results produced in a Levy Notice & Correspondence Delivery Arrangements report are also dependent on the settings selected in the Conditions tab within Levy Notice/Reports, as well as the Global settings under Levy Notice/Reports > File > Configure (as per below screenshot).

Levy Notice | Tools Menu
The Tools menu in Levy Notice/Reports contains a number of options available to change the wording on levy and arrears notices. Which wording appears on the levy notice and arrears notice depends entirely on the template used, as some templates simply do not include those merge or text fields.
We recommend in all instances of a change to any wording on levy or arrears notices, that an actual levy be previewed on screen before printing or emailing the levy or arrears notices.
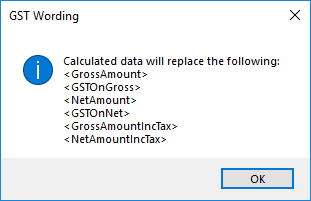
Edit GST Wording
The words used on Levy Notices and Invoices may be edited by using Edit GST Wording. There are now several options for replacement of the displayed data. The words in brackets are replaced with data as follows:
| <GrossAmount> | The Gross Levy (before discount) excluding GST |
| <GrossAmountIncTax> | The Gross Levy (before discount) including GST |
| <GSTOnGross> | GST on the Gross amount (before discount) |
| <NetAmount> | The Net Levy (after discount) excluding GST |
| <NetAmountIncTax> | The Net Levy (after discount) including GST |
| <GSTOnNet> | GST on the Net amount (after discount) |
The first line of text is used where there is no discount. The second line is used where there is a discount. The wording for both Gross and Net should be added to the second line when there is discount showing on the levy notice.
By default, the system applies Gross amounts calculated as the total less GST. If you require the gross amounts to include GST, the wording must be manually updated. This ensures the values shown in the GST wording align exactly with the amounts displayed on the Levy Notice.
For example:

- Search for or select the Levy Notice/ Reports icon.
- Click Tools > Edit GST Wording.
- Click OK to the 'GST Wording' prompt. This will identify how the wording should be formatted to incorporate the GST wording on the Levy or Arrears Notices.
- This opens the GST wording in Notepad.
- The GST wording should be written on two lines, the first line will be used for buildings that have a discount on levies, the second line will be used for buildings that don't have a discount on levies.
- Click File > Save to save any changes and then close the menu using the X button on the top right of the screen.

Edit Interest Wording
Before adding the interest wording, ensure that the building is set up with the overdue interest rate in Building Information and Overdue Levy Interest Rate field has the correct interest rate. Also, before printing a levy notice, ensure that that Print Interest Words is checked in the conditions tab in Levy Notice/Reports.
Interest Wording will use Field 61 on Levy Notice Templates.
- Search or select Levy Notice/ Reports.
- Go to the Tools menu > Edit Interest Wording.
- Click on 'Default Interest Wording' or 'Interest Wording for <State> only'.
- Click 'OK' to the message. These fields are found in Building Information and will need to be completed if these are to be added in step 5.
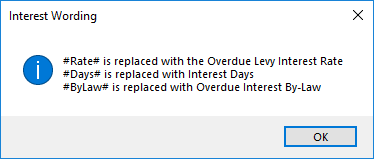
- Notepad will open and the default wording can be amended. Ensure that the correct wording has been added in between the hashes # as these act as merge fields that are inserted from Building Information.
- Close Notepad and then click Save.

Edit Arrears Wording
- If there is text that is used for arrears wording, this wording will replace the period dates for the levy period that is in arrears.
- Search or select Levy Notice/ Reports.
- Go to the Tools menu > Edit Arrears Wording.
- Enter the wording, then click OK.
Edit Advance Wording
If there is text that is used for advanced wording, this wording will replace the period dates for the levy period that is in advanced.
- Search or select Levy Notice/ Reports.
- Go to the Tools menu > Edit Advance Wording.
- Enter the wording, then click OK.
Edit Other Wording
If there are any debits in the lot's 'Other' fund, the text that is entered here will replace the 'Other' description with this wording.
- Search or select Levy Notice/ Reports.
- Go to the Tools menu > Edit Other Wording.
- Enter the wording, then click OK.
Edit Payment Instructions
- From the Tools menu select Edit Payment Instructions.
- Type what you want into the text field (max 100 characters) and click OK.
Edit Direct Debit Instructions
This text will only appear on levy notice templates, which contain the direct debit merge field, which is Field 60 / Payment Direction 1. To learn more about direct debits for levies, check out our Direct Debit article.
- From the Tools menu select Edit Direct Debit Instructions.
- Type the appropriate text and click OK.
- Bear in mind that the system will try to fit all the text on one line, so the font size will decrease at about 105 characters, and paragraphs should not be used, as any text after the paragraph will not be included on the notice.
Edit Arrears Due Date Words
Please refer to the Edit Arrears Due Date Words section in our Arrears Notice Overview and Configuration article.
Edit Levy Notice Due Date Words
These words will appear in the Due Date field on the deposit slip on the Levy Notice.
- From the Tools menu select Edit Levy Notice Due Date Words.
- Type in the required text (30 character limit) and click OK.
Edit Prior Debit Words
This will replace the default words 'Prior period owing', which is the description for a single additional line item on the Levy Arrears Notice.
- From the Tools menu select Edit Prior Debit Words.
- Type in the required text (30 character limit) and click OK.
Edit Prior Credit Words
This will replace the default words 'Part payments', which is the description for a single additional line item on the Levy Arrears Notice.
- From the Tools menu select Edit Prior Credit Words.
- Type in the required text (30 character limit) and click OK.
Edit Unpaid Invoices Words
This will replace the wording 'Unpaid Invoices' , which appears in section for a breakdown of the arrears. This has to be configured to appear on levy notices, and a template that supports it needs to be used.
- From the Tools menu select Edit Unpaid Invoices Words.
- Type in the required text (30 character limit) and click OK.
Tax Invoice Stamp Setup
If you are adding a Tax Invoice Stamp to the Levy Contributions and need to adjust the location of the stamp you can follow the steps below. This is only applicable if the building is registered for GST.
- Click Tax Invoice Stamp Setup.
- Type in the new Horizontal location as a distance measured from the left edge of the page.
- The distance is measured in a 300th of an inch. So adding or subtracting 300 will add or subtract 1 inch, respectively.
- Type in the new Vertical location as a distance measured from the top of the page.
- The distance is measured in a 300th of an inch. So adding or subtracting 300 will add or subtract 1 inch, respectively.
- Click OK.
- Print a test levy notice and check the new location is correct.
Return Address Editor
Please refer to our Return Address Editor article.
Split Levy Setup
A levy notice can be split by Levy Invoice Code and sent to another address. For example this could be used when Admin Fund levies are paid by a third party. This will result in Levy Invoice Code 01 – Admin Fund being shown, with arrears, on a separate Levy Notice.
If using Split Levy Notices, it is recommended the below configuration settings be set.
Levy Management / File / Configure - tick Suppress Rationalisation for current building to ensure credit balances from one fund are not automatically applied to another fund in debit.
Receipt Entry / File / Configure - set both post over payments and under payments building override to no to ensure levy payments are not automatically receipted, therefore allowing a user to receipt payments to the appropriate fund.
- Search or select Levy Notice / Reports.
- Click Tools > Spit Levy Setup.
- Click the Insert button to add a new record.
- Enter the details:
- Levy Type - this is the levy invoice code, which can be found in Levy Invoice Code Setup.
- Account Code - this is the lot account code.
- Name and Address - the address for the levy notice to be sent to.
- Click OK.
- If necessary you can continue to add other invoice codes that are required to be on the split levy, and repeat for each lot.

When adding an additional record the original data is retained, and assists so that only the Debtor or Invoice Code should need to be changed if the notices are all going to the same address.
Split Levy Notices
- Search or select Levy Notice / Reports.
- Tag the Lot/s and Levies.
- You can tag all the current levies automatically by right-clicking on the Select Levies tab.
or - Tag only certain levies, which can be done if you only want to issue a notice for a specific fund.
- You can tag all the current levies automatically by right-clicking on the Select Levies tab.
- Click Proceed.
All Levy Invoice Codes not added in Split Levy Setup will report on the Levy Notice as per the Roll record for the Lot, such as interest, Other, Special Levies, etc.
 Sample of the first levy notice: Sinking Fund and Sinking Arrears.
 Sample of the second levy notice: Admin Fund and Admin Arrears.
 Sample of Ledger Card.
Add Extra Files for Levy Notice via Email
Adding extra files/attachments for levy notices that are sent by email can only be used when printing levy notices for an individual building. This cannot be used as a global action.
- Search or select Levy Notice/ Reports.
- Click Tools > Add Extra Files for Levy Notice by Email.
- The 'Extra Attachments for Levy Notice' window will appear.
- Click the Add a File or Add from DocMax button.
- If Add a File was clicked, browse windows to locate the file.
- If Add from DocMax was clicked, locate the file in DocMax and click the Select Document button in the top left of the DocMax ribbon.
- The 'Extra Attachments for Levy Notice' window will appear again with the attachment listed. You can choose to add more attachments / files, or click the Close button.
- Proceed to send the levy notices as per the usual process.
If needing to add additional attachments to a Levy Notice sent via Bing, you must print to the BING EasyPost Mailroom to access this functionality - further details in Bing EasyPost Mailroom Process (Mailroom Instructions).
Reissue Levy Notices
Individual levy notices can be produced from Stored Reports.
Sometimes levy notices need to be reissued due to printer errors & / or if the email options were not selected. The below steps can be used to print & / or email levy notices again.
If only requiring to reissue the printed levy notices; pause the emails in Communications Setup and reissue the levies using the above steps. Once completed then delete the required emails from the email log, and then take the pause off.
If charging for levy notices printed & / or emails sent it is recommended to review the TRMax records and delete if required.
- Set the Working Date as the date the levy was generated. This is required as the levies that will be included on the notice will be the levies generated on this date.
- Search or select Levy Notice/ Reports.
- The levies generated will automatically be tagged in the Select Levies tab; check to confirm the correct levies are tagged.
- Set all the required settings in the Conditions tab.
- If only needing to issue the levies that should have been sent by email; set the printer to StrataMax or another printer that will not print.
- If re-issuing for multiple buildings select Change Building and tag the required buildings.
- Select Proceed.
- Set the Working Date back to the correct date.
