 |
The instructions in this article relate to the Status Report. The icon may be located on your StrataMax Desktop or found using the StrataMax Search. |
A Status Report produces relevant information about a building for a set period, with frequency configuration for monthly or quarterly. This report can be sent to Office Bearers using their contact preferences and will be automatically created for DocMax, ready to be uploaded to the StrataMax Portal. It can include payments drawn, receipts received, the bank account balance (based on the operating account and investment accounts set in Bank Account Setup) and owner roll changes. The bank statement, including any term deposit report and financial statements, are the standard reports included. Further reports in Report Distribution can be added for standard issuing as outlined below. If charging for the distribution of this report is set via Disbursements, this report will create the TRMax fee based on what is configured in that area.
Reviewing the available reports is recommended before sending/saving the automated reporting version of the Status Report for the first time.
Using the Activity Report/ Annual Summary will include state-specific legislative reporting, such as NSW delegated function and WA annual reporting.
Security Setup
Access to this menu is held within Security Setup under the Status Report menu category.
Automation of Status Report
The status report is set to save to DocMax from the Rollover Configuration by default and will use the DocMax Profile called Monthly Status Reports. This setting is recommended for auto-storing this report.

Distributing Status Reports now uses the report distribution interface. Some benefits of this change include adding additional reports from Stratamax as part of the Status Report, such as Aged Balance or any of the reports available in Report Distribution. There is also functionality that includes additional attachments from DocMax, such as newsletters and processes for all buildings. The standard Bank Transaction Report can also be used to report on investment accounts, as outlined below. The current configuration of these standard reports will be migrated.
DocMax Profile Configuration
The available profile is called the Monthly Status Report and will include the document category, expiration date, internet group, and report period previously set via the Status Report configuration area. This profile can be reviewed in DocMax via the Administration tab and will be applied in the Report Distribution window. Use the DocMax merge fields {PeriodStart} and {PeriodEnd} in the title and/or description to ensure the Status Report is filed to DocMax with a recognisable title which is used on the StrataMax Portal.
Generally, this report is available only for the Committee for the Portal. Refer to these instructions to enable DocMax to display the corresponding document group.

Configuring automated Status Report for portal
This section covers the configuration for the Status Report. When using the automation of 'Save Status Reports to DocMax on Rollover' as outlined above, the configured reports will upload to the Portal automatically without the requirement to complete any processes. If additional reports or attachments are to be included, these can also be added.
- Search or select Status Report.
- The cogwheel accesses each report's configuration settings, which should be reviewed before generating a Status Report and additional attachments for the first time. Click the + Report or Attachment button to add any additional reports / attachments for inclusion in the Status Report.
- Bank Transaction - select the Report Period to align the statement data included with the report. For example, the Last Status Report Period is suggested for Quarterly reporting.
- Financial Statements - select the format desired for this report. This will be the standard set of financials. Note if Split Banking is preferred, ensure that Split Bank Balances is set in the Configuration cog. For additional reports, click the + Report button to add - for example, Account Summary or Transaction List.
- Click the Save icon to save configuration / additional reports or documents as the default for future Status Reports.

Manually generating a Status Report
It is recommended that the automated report distribution method be used, which will upload these to DocMax using the set profile. However, if a status report is required to supersede an existing report, it can be produced using the steps below. This process will require a recipient to distribute the report, which can affect the address title on the report.
If a prior period has not been completed and is required for reporting, alternatives must be considered using the Report Distribution screen. Refer to the FAQ below on how to manage these scenarios.
- Search or select Status Report.
- If multiple buildings are required, use the Building ... button and tag the required buildings.
- Review the list of reports included, and if required, click the + Report or Attachment buttons to add additional documents.
- Click the Save icon if these are to a standard set of reports included with each month's status report.
- Review the Save Report area for DocMax and check / select the Profile set. This profile will be used for any Online Portal upload settings. It will also need a recipient tagged, such as the Body Corporate Manager record.
- Click Proceed.
- From the preview window, click Proceed again to finalise the report.

Generating a previous period Status Report
Generate a Status Report for a period that was not produced using the instructions below. Please note that the override period applied to run the reports will be reset to the current period (monthly or quarterly) when the Report Distribution window is closed. This tool can be used to send Office Bearers recipients and / or upload to the Portal via DocMax. Please note the DocMax version will include a recipients name and is recommended to use the Body Corporate Manager record.
- Search or select Status Report.
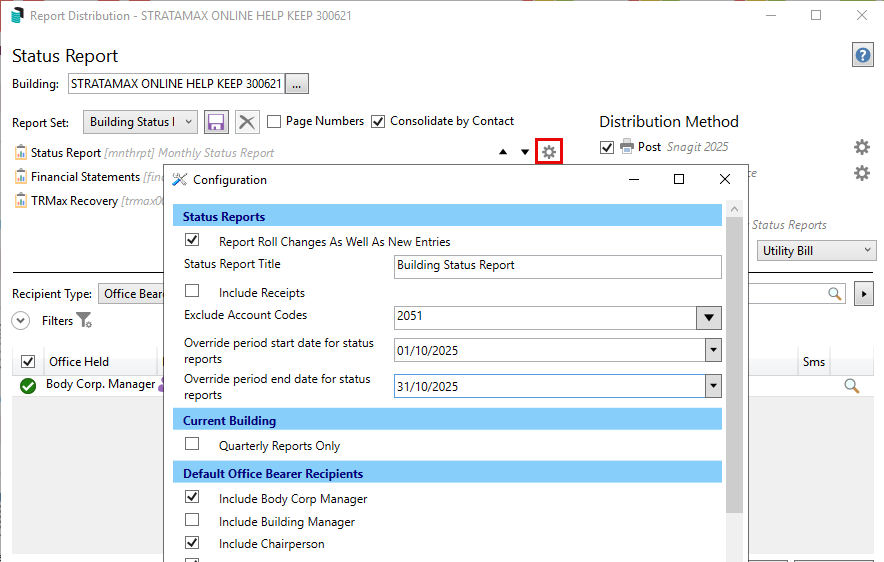
- Click the cogwheel on the Status Report template and enter the Override period start date for status reports and Override period end date for status reports. Click Close.
- Check the Reports and Attachments included and click their respective buttons to add more if required.
- Review the Distribution Method and select the options accordingly. For example, if this is to upload to DocMax via a profile - tick Save report and check the profile set. NOTE: The recommended Office Bearer to use if applying this method is the Body Corporate Manager record. This report may be set to upload to the Portal and should not include specific Office Bearer address information.
- Click Proceed to preview the report, and Proceed again to distribute the report to the tagged Office Bearers / including the DocMax option.
- Click Close to finalise the process and reset the dates back to the current period.

Configuration
Status Reports
Report Roll Changes As Well As New Entries (Global)
This option will add changes to the roll and new entries. If the property has just been set up, it will include all owners as new entries, but these will not be included in the following report.
Status Report Title (Global)
Use this field to adjust the wording used for the report's title.
Include Receipts (Global)
Receipts will be included in the report.
Exclude Account Codes (Global)
This will allow for a drop-down selection, and specific account codes can be tagged to exclude from the report data. An example of this may include Banking Transaction Fees. If this is applied and the Financial Statements use the Account Summary, this should be reviewed and set to exclude the same account similarly.
Current Building
Quarterly Reports Only (Building)
When selected, this enables specific buildings to create quarterly reports while keeping all the other buildings set to a monthly report. This individual building setting will need to be set for each building, which requires quarterly reports, which will be produced each quarter based on a building's financial year.
Default Office Bearer Recipients
This section is for selecting the default Office Bearers (Global) that should receive the Status Report. You can also configure this for each office bearer in a specific building, by opening the Office Bearers screen, editing the office bearer, and selecting an option from the Status Reports drop-down menu. Office bearers who hold multiple positions will be tagged in the recipient window based on the included position.
Template
Use Override Letterhead (Global)
If multiple letterheads are available, ticking this will allow the letterhead to be selected from the field below, and set which one is to be used when producing the Status Report.
Template (Global)
Use this area to change the template that the Status Report outputs with.
Bank Transaction Report Configuration
Include Primary Account (User)
Tick this setting to include the main operating account.
Include Investment Accounts (User)
Tick this setting to include any investment accounts. Statement data must be available to report with and does not include any accounts set in Other Investment Accounts in Process Bank Statements.
Report Period (User)
This will control the bank transaction reporting period, which can be set to the last month, the current year or the last status report period.
Hide Bank A/c No. On Attached Statement (Global)
The bank account number will be excluded if you attach the bank transaction report to the status report.
Template
Template (Global)
There is only one template available for selection and display here.
Financial Statements Configuration
Report Date (User)
This can include either the last month, current month, old year or current and old year periods.
Display (User)
Both sub heading areas must apply the Account Maintenance setup to use this setting.
Sub Headings Reports Report.
Sub Headings Report as Header.
Budget (User)
Print Variation Totals.
Show Budget Variance Inverted.
Show Rate per Entitlement.
Template
Use Override Letterhead (Global)
If multiple letterheads are available, ticking this will allow the letterhead to be selected from the field below, and set which one is to be used when producing the Status Report.
Template (Global)
Use this area to change the Financial Statement template.
Recipient Filters
Several options exist for filtering recipients. Expand the filter section from the Recipient Type to see these options, and these are used in conjunction with the Office Bearer setup.
- Include Owner of Lot – Includes owners who are valid Status Report recipients.
- Include Non-Owners – This includes non-owners who are valid Status Report recipients.
- Status Report Recipients – Includes all valid Status Report recipients.
The Office Held selections will default to the ones set in Status Report Configuration but can be manually set to include other positions if required.

Email Template
The email template can be set using these instructions, and if No Email Signature is required, it can be selected from the email cogwheel in the Report Distribution screen.
Distributing the Status Report
The Report Distribution process will be used to distribute the Status Report to the required Office Bearer recipients. It is similar to a lot-specific report, just for a different group.
FAQ - Status Report
Q: What do we do if a Status Report that was not generated for a prior period is missing?
A: Within the Status Report configuration option, set the Override Period Start & End Date for Status Reports to produce a report for a prior period.
Q: How do we access old saved Status Reports?
A: Previously generated Status Reports will be available in DocMax. To retrieve a report copy, use a search to refine by category or building. These reports must have been generated in the past, and if they were not done, alternative reporting will need to be considered to create a report set similar to a Status Report using the steps in the above Q&A.
Q: We use the Quarterly reporting style, and when producing the report, it is blank; why is this and how do we see the current report?
A: Quarterly reports will be available in the preceding month of that particular quarter and will be produced when previewed. If the specific month does not fall into that quarterly cycle, it will not display a report, and DocMax can be referred to for the previous quarterly report.
Q: If we need to regenerate a Status Report for a specific period that has already been completed, will it create a duplicate in DocMax? And what happens if it’s set to upload to the Portal?
A: If you need to regenerate a Status Report, you’ll need to go through the Report Distribution window and tag a recipient (such as the Body Corporate Manager contact). Before doing this, it's best to pause emails in Communication to prevent unnecessary emails from being sent.
- For the current period: Open the Building Selector tool, select the buildings you need (Ctrl+A to tag all), tick Save Report for DocMax, and click Proceed. In the preview window, click Proceed again to finalise.
- For a past period: Use the Override Period Start Date and Override Period End Date for Status Reports setting to enter the required date before following the same steps.
Once the report is generated, delete any paused emails from the Communication log and confirm that the revised report is available in DocMax. The previous report will be superseded, and only the updated version will be displayed on the Portal.
Q: The Transaction List is available on the Report Distribution screen and ready to include in the Status Report Set. When adding this type and adjusting the start and finish account codes, it appears with all codes and does not filter. Why does it not apply the filter that has been set?
A: Report sets do not include saved user settings by design. They are designed for many users to run and allow consistent reports for each person that runs them. The Status Report set that includes the ability to add the Transaction List in a user set, which means that these do not apply. Using an alternative like the Account Summary, which will include a list of expenditures for a building, is a recommended report.
