The menus with Second Debtor functions have been designed for invoicing external parties to the building that are not covered by the four sub-groups provided. The sub-groups provided for billing non-owners in StrataMax are: Electricity/Utility, Marina, By-Laws and Air-Conditioning. An example of when to use the Second Debtor functions for invoicing may be for storage spaces, or common property rented to tenants or other entities.
Invoice Entry for second debtors has similar functionality to Invoice Entry for lot owner accounts. The difference between the two is the list of accounts available to select, i.e. in the Invoice Entry (Second Debtor) menu, only second debtor accounts will be available. The configuration in File / Configure applies to both.
Second debtor accounts are not included in any levy arrears processes as charges to second debtors are typically invoices. Second debtor accounts can be included in the Arrears Manager menu to identify any accounts that are overdue, however this is only for reporting.
If a second debtor invoice is raised against a regular levy income code then it will charge interest. This can be identified by viewing the levies set up in the Levy Invoice Code Setup menu, with the exception of the income code for Interest / Other. For example, if an invoice is raised against the income code 101 it will charge interest, whereas if the invoice is raised against the income code 108, it will not charge interest.
Invoice Entry (Second Debtor)
Create a new invoice
Creating a new invoice will charge the second debtor and credit the selected account. A credit can be added by simply entering the amount as a negative (-).
- Open the Invoice Entry (Second Debtor) menu.
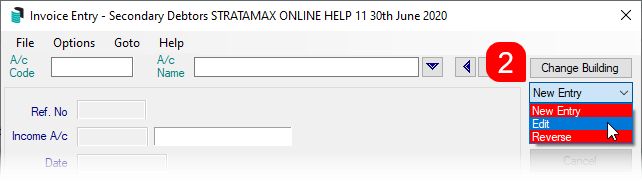
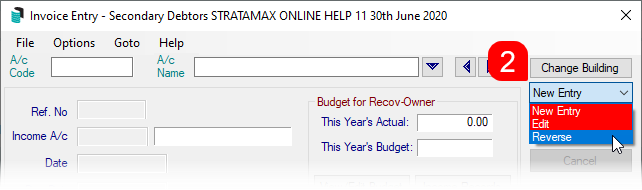
- Ensure New Entry is displayed in the top right corner of the menu.
- Click the A/c Name drop-down arrow to display the list of second debtors, then select the debtor and click OK.
- When the list of expense and income codes immediately appears, select the required income or expense code, then click OK.
- Enter all required details:
- Date (press Shift+2 to insert today’s date).
- Due Date (set automatically based on the Set Pay Days).
- Amount (for a credit, enter a minus '-' in front of the figure).
- Details.
- Comment for this invoice (click Previous to repeat the comment from the most recent invoice if suitable).
- Notes if there is not enough space in details to explain what this invoice is for, it will print on the invoice.
- Click Save.
Edit an Second Debtor Invoice
Only invoices created in the current month can be edited. If the details are incorrect, delete the entry by editing the amount to zero (0.00) and re-entering the invoice.
- Open the Invoice Entry (Second Debtor) menu.
- In the top right corner, change the drop-down menu from New to Edit.
- Click the A/c Name drop-down arrow to display the list of second debtors, then select the debtor and click OK.
- Select the invoice to edit, then click OK.
- Make change to the invoice as you require then click Save.

Reverse an Invoice
Reversing an invoice entry is required for invoices entered in the prior month. Invoices entered in the current month can be edited.
- Search or select Invoice Entry (Second Debtor).
- In the top right corner, change the drop-down menu from New to Reverse.
- Click the A/c Name drop-down arrow to display the list of second debtors, then select the debtor and click OK.
- Select the invoice to reverse, click OK.
- If required, click Balances to change where the funds are to be reversed and;
- Click on a period in Aged Balances to the correct period and click Yes to Set posting month to match selected period?
- Click Save.

Invoice Printing (Second Debtor)
The following instructions are for printing all invoices that have not yet been printed. At the bottom, there are some variations noted for reprinting any invoices. Multiple invoice charges will appear on the same invoice page if they have not been printed previously.
Each invoice entry item will have its own invoice reference; this is the 'M' number. If a previous invoice charge needs to be reprinted, you will need to determine that specific invoice number and ensure that it falls within the 'Invoice Number Range' Start and Finish fields.
- Open the Invoice Printing (Second Debtor) menu.
- Tag the account code in the Select Lots tab.
- Select the Message tab.
- Type in a temporary message to use for this invoice only, or select a different message by clicking the Message Maker button.
- Select the Conditions tab.
- Report Order: Select one of the following to print the arrears notices in that order:
- Account Number: Print the invoices in account number order.
- Alphabetical: Print the invoices in alphabetical order.
- Report Period: These options are only valid for printed invoices not yet printed:
- Month to Date: Print the invoices for the current month only.
- Year to Date: Print the invoices for the entire financial year so far.
- Invoice Number Range:
- Start: Type the invoice number that needs printing.
- Finish: Type in the Start invoice number. Leave the existing number suggested to print all invoices not yet printed, or change to a previous invoice number.
If you are reprinting a specific range of invoice numbers, type in the highest number of the range you want to select. In the Invoice Number Range section, fill in the Finish invoice number.
- Due Date and Pay Amount: Enter the number of days from the invoice date to set the due date.
- Show Nil if Paid: Displays an invoice with a nil amount.
- Show Brought Forward: Displays brought forward amounts if any.
- GST: Select whether to 'Print Non-Taxed' invoices by clicking this option to select it.
- Update Due Date: Will update the due date based on today's date plus the number of days from the invoice date.
- Email: This will use the Contract Preferences in the Roll to determine how the invoice will be distributed.
- Report Order: Select one of the following to print the arrears notices in that order:
Reprinting a Printed Invoice
Refer to Reprinting a Printed Invoice article.
Creditor Invoices and On-Charging to Second Debtors
You can use the Bill to Owner area in DocMax and in Creditor Invoices to on-charge a creditor invoice from the building to a secondary debtor. If the invoice has already been paid and the on-charge needs to be completed retrospectively, this can also be processed from a range of search screens.
The debtor must already exist in the building before it is available to select in the list. When the invoice is on-charged, the process creates a StrataMax invoice for the secondary debtor, including a deposit slip with payment options.
