 | The instructions in this article relates to Auto Entry Transaction Maker which can be found by searching or selecting it from StrataMax desktop. |
The Auto Entry Transaction Maker is a tool that can create standing journals for future and reoccurring transactions for multiple Debtors (Owners), Creditors or to a General account code, so it's a convenient way to create bulk transactions for more than one account, whereas in contrast a standing journal only allows future or repeatable transactions to be created for one account at a time.
When creating reoccurring journals, a final entry date is not entered. If a final entry date is required, this needs to be added in manually. Note that entries created using Auto Entry Transaction Maker does not automatically post the same way standing journals do on or after the process date, so these will have to be posted manually.
Once transactions have been created, you can edit, delete or post those transactions.
An example of where Auto Entry Transaction Maker is valuable is when invoicing multiple lots for the same amount instead of having to create a separate invoice for each lot. Another example, trying to invoice all buildings for an amount due to the Body Corporate Manager which would be a Creditor Invoice. As this function is not be applicable in GLMax, refer here for an alternative option.
Another alternative for a more permanent arrangement for regular payments other than levies is to use one of the spare levy setups in the levy system. See Levies with Custom Entitlements for further details.
Further configurations can be found in Standing Journal Configurations.
Creating an Auto Entry Journal
The following instructions will show you how to create journals to post to multiple accounts. Further entries can be added to existing transactions where required.
The below information will include how to create a batch of auto entries. It should be noted that these can have further entries appended to them where required. Applying transaction in this manner can be useful when there are examples of billing has a requirement to be split into blocks.
- Select the Options menu and then Transaction Maker.
- Select Creditor, Debtors or General. This will be the type of transaction created.
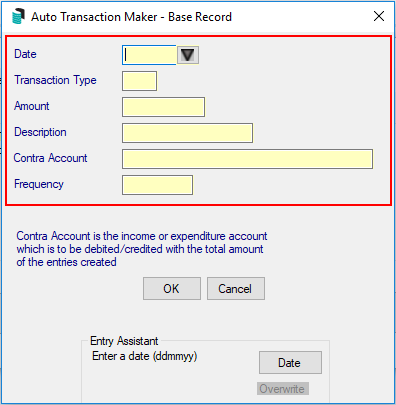
- Enter the date in the 'Date' field - this is the date the standing journal will process. If the 'Frequency' field is also used, it will repeat based on this date and frequency.
- The 'Transaction Type' will depend on the transaction you create. It is either Creditor Invoice (C), Debtor Commitment (D) or Journal (J) and will depend who and what you're creating the transaction for.
- Enter the 'Amount' and the 'Description' of the journal.
- Select the 'Contra Account' code and the 'Frequency' if this transaction is a repeatable transaction. Note that if a frequency is entered, there is no Final Entry date and this has to be manually added later.
- Click OK.
- If a Creditor Invoice (C) is created, tag the relevant Creditors for this transaction, then click OK.
- If a Debtor Commitment (D) is created, select the Invoice Code that these transactions relate to, then click OK. You will then need to tag the relevant lots for these transactions then click OK.
- If a Journal is created (J), select the account to make up this journal, then click OK.
Editing an Auto Entry Journal
Editing an auto entry journal should be done with care to ensure all entries are edited correctly. Some edits can be done using the automated process such as changing the next process date or filtering an account to change the date or frequency for a group of entries for the filtered account.
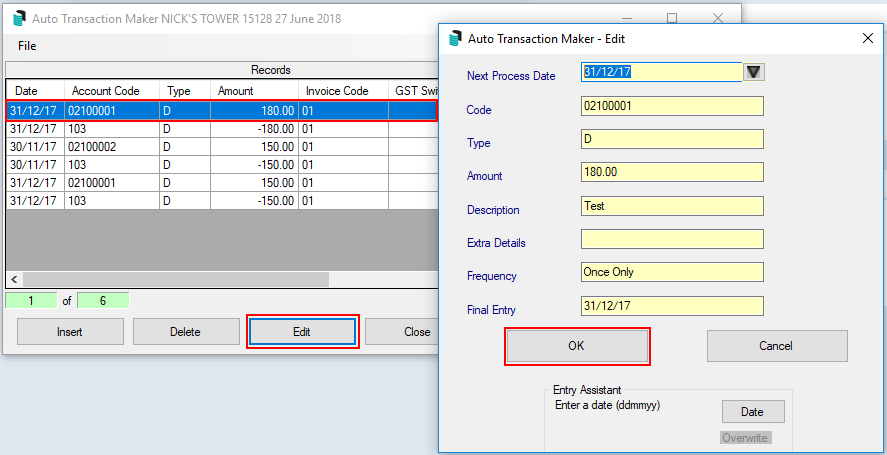
Manually Editing an Entry
- Click Edit.
- Highlight the existing primary auto transaction journal and click Edit. The contra journal will update when the first entry is amended. If the transaction that is not the primary is selected, you will receive a warning message.
- Update the required information and click OK.
- Based on the transaction type that has been created; select the appropriate contra account code from the list and click OK.
- If a Creditor Invoice (C) is created, tag the relevant Creditors for this transaction, then click OK.
- If a Debtor Commitment (D) is created, select the Invoice Code that these transactions relate to, then click OK. You will then need to tag the relevant lots for this transactions then click OK.
- If a Journal is created (J), select the account to make up this journal, then click OK.
Change Next Process Date
- In the selected building, search or select Auto Entry Transaction Maker.
- Click Edit.
- Highlight the existing primary auto transaction journal and then select the File menu and then select Change Next Process Date.
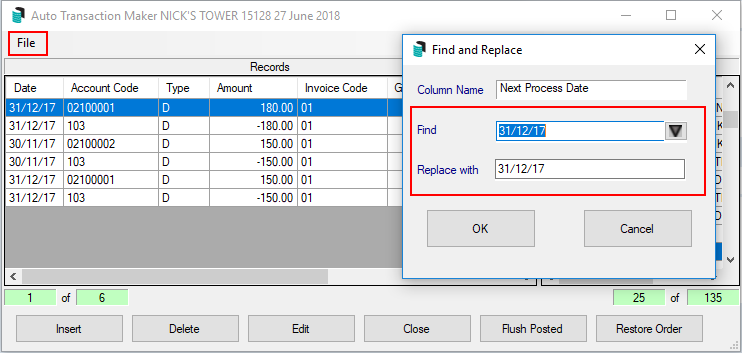
- In the 'Replace with' field, enter the new process date. This will be applied to all transactions with the date displayed in the 'Find' field. Then click OK.
Filter Selected Account
- Click Edit.
- Highlight an existing auto transaction journal and then select the File menu and then select Filter Selected Account.
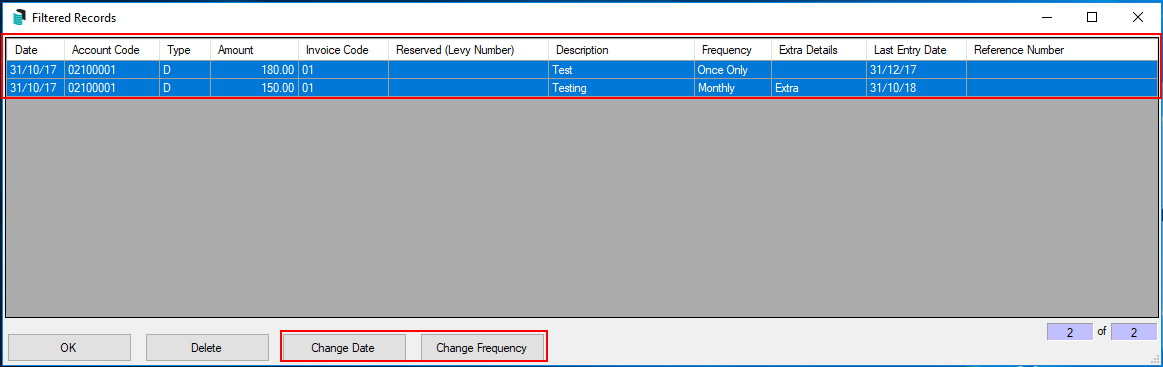
- Highlight one or more item transaction lines using the Shift or Ctrl keys to select multiple lines. Then click on Change Date or Change Frequency.
- Enter the new date if changing the next process date, or select the frequency type if changing the processing frequency, then click OK.
Deleting an Auto Entry Journal
A reoccurring auto entry transaction is created without an end date. These standing journals can be deleted if it is no longer required or it can be edited so a 'Final Entry' date is entered.
Note that transactions that has passed it's final entry will still appear on the list but will have a blank date field. These entries can now be deleted.
- Click Edit.
- Highlight the existing primary auto transaction journal and click Delete, then click OK.
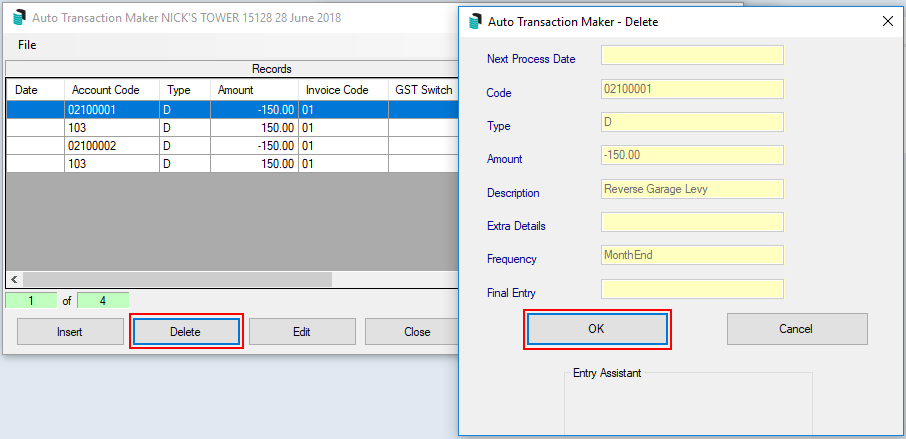
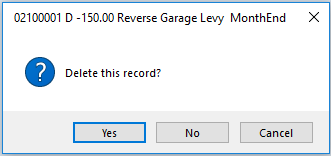
- Confirm Yes to 'Delete this record?'. This will delete the primary and contra transaction.
- Repeat as required and click Close, when finished and then Close again to exit.
Posting Auto Entry Journals
Posting Auto Entry Transactions will check the next process date and the frequency of all auto entry transactions for the building. If the next process date is today, then the auto entry transactions will then be created in the transaction ledger. This area can be checked if required prior to posting the transactions or can be posted directly from here.
- If the entry is required to be previewed prior to processing, click Edit to view the journals.
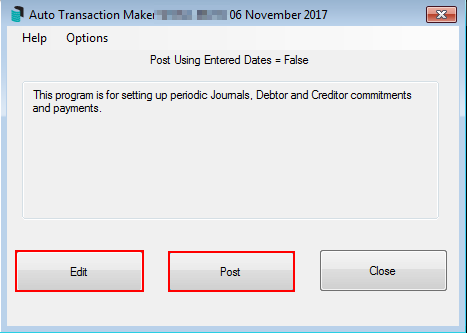
- To post the entry immediately, click Post.

Posting these records may cause the records to remain in Auto Entry Transaction Maker under the Edit view. These records should be flushed to remove them from the list once the transactions are posted and no longer have any future periodic transactions.
Flush Posted Auto Entry Journals
When entries are posted, there may be a record held within the Auto Transaction Maker screen which require flushing. Flushing these records will only update the table to include future dated transactions and remove old posted transactions.
- Click Edit then click Flush Posted.
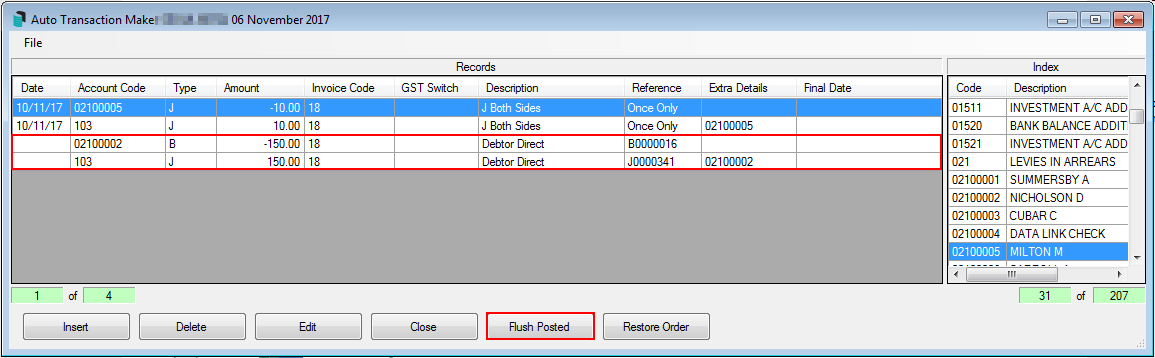
- Any records that have reached it's frequency end point as per the example above will be removed.

