 |
The instructions in this article relate to Payments Management located in StrataMax. The icon may be located on your StrataMax Desktop or found using the StrataMax Search. |
Payments Management provides a single screen to both review, manage, as well as delete / reverse payments. The information can be produced into an Excel report and therefore can be used to generate reports for creditor accounts and payments across the portfolio. Remittance Advice notes can be added and copies of Remittance Advice can be produced and sent. Be sure to watch our Payments Management webinar for additional guidance on Payments Management.
Security Access to Payments Management
To access the Payments Management screen, users will need to be granted the below permission in Security Setup. A demonstration on allowing access can also be viewed in the Payments Management Video.
- Search or select Security Setup.
- Right-click the required User or Group and select Edit Permissions.
- Navigate to Menus > Payments Management or type in 'Payments Management' and click Filter.
- Right-click and select Allow.
- Repeat steps for Reverse Payments if the user should also have access to the Reverse Payment functionality.
- Click Close to exit.

Payments Management | Searching & Filtering
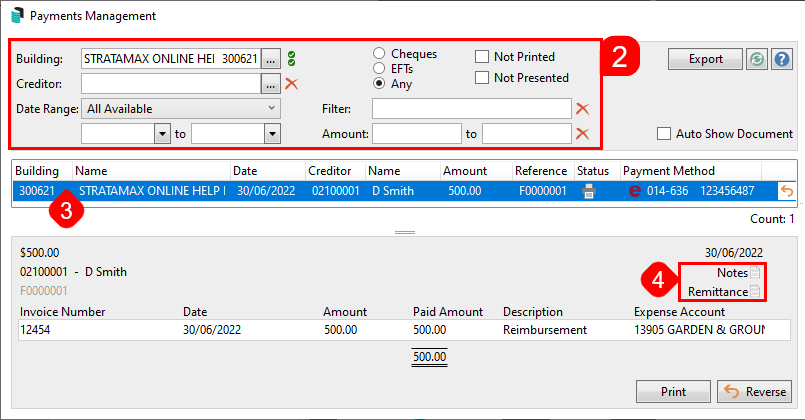
It is possible to search one property or multiple properties based on set filter settings and also select to view the attached document.

a. Building
Click the ellipsis button to select a single or multiple buildings to display. Clicking the green circles with white ticks will tag all buildings.
b. Creditor
Click the ellipsis button to select a single creditor.
c. Date Range
Select a date range (Today, This Week, This Month, This Month and Last, 2 & 3 Months Ago, All Available, Custom Range).
d. Custom Range
Select dates to report if using Custom Range.
e. Payment Type
Select to filter payment type and if not printed or not presented.
f. Filter
Type free text to search for a particular name or detail.
g. Amount
Enter any minimum or maximum amounts to filter.
h. Auto Show Document
Automatically view the attached invoice document in the right hand window. By selecting the DocMax Icon highlighted in the lower right hand corner of the above screen shot the invoice details can be previewed in full.
i. Refresh
Refresh search parameters.
j. Help
Open StrataMax Online Help in browser.
k. Status column
If the 'Printer icon' is displayed, this indicates the Payment has completed the Email Remittance Advice process.
If the 'Bank/Building icon' is displayed, this indicates the Payment has been Presented at the bank and therefore cannot be reversed.
l. EFT column
If an e icon is displayed indicates an EFT Payment type.
If a B icon is displayed this indicates a BPAY Payment type.
DD indicates Direct Debit type.
m. Notes & Remittance
Click to add any Internal Notes (will not be displayed on the Remittance Advice) or select Remittance to add notes to be displayed and printed onto the Remittance Advice for the Creditor. Security permission Edit Remittance Advice Notes needs to be set to 'Allow'.
n. Print
To produce the Remittance Advice to Screen, Printer or Email (select 'Screen' to receive a preview prior to Emailing or Printing). Any Remittance notes added will be printed on the Remittance Advice.
o. Reverse
Click Reverse to cancel/reverse the selected payment. Review the Reverse a Payment section.
p. Export
To produce a report into Excel of payments created for a particular Creditor account or date range.
Reverse a Payment
Access to the Reverse Payments button, including presented payments, users will need to be granted permission by their StrataMax Administrator in Security Setup.

Payments Management provides the ability to reverse Cheques, BPay, and EFT payments. Once a payment has been reversed, the creditor invoice can be edited or reversed in Creditor Invoices, or it can be created again in Payments.
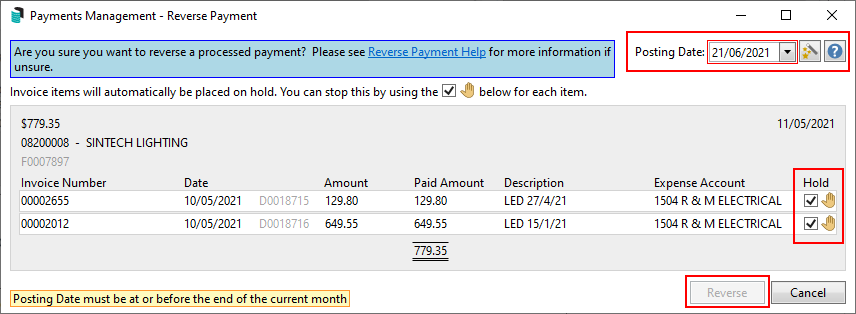
Reversed payments will automatically place the invoices on hold as can be seen in the Search Creditor Invoice Items screen, unless you remove the tick in the Hold tick box. The invoice transaction will then be visible in the Payments screen.
Owner refunds and reimbursements, when reversed, will remove the payment and be ready for re-entry via Payment Entry where required. A common area for checking first includes any completed batches created in EFT Manager to confirm that the original payment was uploaded.
The process for reversing a payment or creditor invoice in StrataMax will vary wildly due to a lot of different factors. For example, how far along did you get in the payment/invoice process before you realised you had to reverse it? Did you just save it in Creditor Invoices, or did you also authorise it on the SCM website? Has the payment already left the bank account? Was the payment in the building's current financial year or in the old year? We strongly recommend carefully reading the Payment Reversal article to check which steps you need to follow for your particular circumstances.
- Search or select Payments Management.
- Adjust the Date Range if needed and select Any for all payment types (if not presented in the list).
- Click the Reverse button, either on the same line as the payment, or the button at the bottom part of the screen.
- Check the Posting Date and remove the tick in the 'Hold' box for the creditor to be placed back in Payments.
- Click the Reverse button.
- Once a payment has been reversed, the creditor invoice then can either be reversed in Creditor Invoices, or it can be processed in Payments (if the Hold box was unticked as per step 4 above).

Edit Description &/or More Info of a Paid Invoice
To amend a description of a paid invoice, which is printed on the transaction list and other reporting areas please use the below method.
Users must be granted permission in Security Setup to access the Creditor Invoices screen.
- Search or select Payments Management.
- Adjust the Date Range if needed and select Any for all payment types (if not presented in the list).
- Find the creditor record, and use the Filter area if needed.
- At the bottom of the screen, click the Pencil icon and amend the description as needed. Click Save.

Remittance Advice | Internal & External Notes
To edit the Remittance Advice Internal & External notes, users will need to be granted permission to 'Edit Remittance Advice Notes' and 'Edit Internal Payment Notes' by their StrataMax Administrator in Security Setup.


Internal Notes can be added to a payment for viewing from Payments Management. External Notes can be included on the Remittance Advice and printed for the contractor to receive.
- Search or select Payments Management.
- Adjust any filters at the top of the screen to find the payment required; Building, Creditor, Date Range, and select Any for all payment types.
- Find and select the payment in the list.
- At the bottom of the screen, click the Notes button to add an internal note, and/or the Remittance button to add a note for the remittance advice.
- If the icon on the button looks like a sheet of paper, then you don't have security permission to add or edit the notes - only view.

- If the icon on the button looks like a sheet of paper, then you don't have security permission to add or edit the notes - only view.
- Type the required notes in the window, then click Save.
- A blue and white ' i ' will display if there is a note added.
Remittance Advice | Print or Resend
To produce a copy of the Remittance Advice, reprint a Remittance Advice or once Remittance Advice notes have been added, the Remittance Advice can be brought to screen to be viewed or emailed / printed.
- Search or select Payments Management.
- Adjust any filters at the top of the screen to find the payment required; Building, Creditor, Date Range, and select Any for all payment types.
- Find and select the payment in the list.
- At the bottom of the screen, review any Remittance Advice notes if there is an ' i ' button next to Remittance.
- Click the Print button and select Screen to preview the Remittance Advice prior to emailing or printing. Any Remittance Advice notes added will be included on the Remittance Advice. The Remittance Advice also includes a Payment Date and Remittance Advice Date to differentiate between the two dates if the Remittance Advice is sent at a later date or reprinted.
Please note: The Email Remittance Advice step is actioned from EFT Manager during the Payment process. Any contractors / creditors without an email address recorded in their Contact, who require a Remittance Advice to be printed, can be printed individually per payment using the steps above in Payments Management.


