 |
|
The Bank Slip Report produces a separate list of receipts for each property, unless otherwise selected only cheques will be listed. When running these reports, this area will store the date of the last printed bank slip report. This means that if receipt entries have been made since the last printed bank slip report, there is no need to set a Start Date in the report options. To print the bank slips for the last days banking, do not set any options.
Print a Bank Slip Report 'Daily Banking'
A bank slip will be printed for a building that has had receipts entered since the last bank slip for this building was produced. So, if no receipts have been saved since the last report was produced, then no report will be printed.
- Search or select Bank Slip Report.
- Tick the Daily Banking box to print a bank statement for today's banking only.
- Or untick the Daily Banking box and insert Start Date and Finish Date for a set period that you require the bank slip report for.
- Tick the box next to the building name, under the Selected Building Only section, if the report is only being produced for this building.
- If this report is not being used as a deposit slip to take to the bank, tick the Include Direct Deposits box. The direct deposits will be included in the totals of the report.
- To change the sort preference of the report, click in the Sort Preference field for the drop-down arrow to appear, and click it to display a list of options to choose from, then click OK.
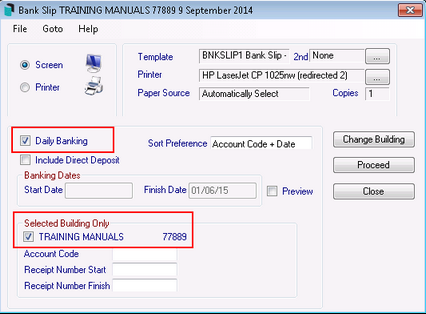
- Click Proceed.

Print all Receipts since last Bank Slip Report
A bank slip will be printed for each building that has had receipts entered since the last bank slip for each building has been run. No blank reports will be printed.
- Ensure that the current building is NOT selected. The system will then automatically print for ALL buildings (without the need to select all buildings). Of course, from this screen you can click Change Building and select another building should you wish to produce this for a SINGLE building.
- Make sure Daily Banking is marked.
- If you are not using this report as a deposit slip to take to the bank, you can choose to Include Direct Deposits. The direct deposits will be included in the totals of the report.
- Select Sort Preference if required.

- Click Proceed.
Print a list of receipts for one Owner
You may limit the report to any one owner to obtain details of receipts. The report only shows the total amount of the receipt (not where the receipt amount was posted to). To obtain full details of postings, print the Ledger Card.
- Disable the Daily Banking option.
- If you are not using this report as a deposit slip to take to the bank, you can choose to Include Direct Deposits in the report by clicking on this item so that it is marked. The direct deposits will be included in the totals of the report.
- Change the receipt sort preference by clicking in the current choice, click on the button that appears, click the sort preference then click OK.
- In the Banking Dates section type in the Start Date and the Finish Date.
- In the Selected Building Only section at the bottom of the Bank Slip report window, tick the building name.
- Select the lot account.
- Enter both the Receipt Number Start and Receipt Number Finish details if required.
- Set other report options as required.
- Click Proceed.
Reprint a Bank Slip Report
Each time a bank slip report is run in Daily Banking mode, the last receipt number printed for each building is recorded. To reprint a bank slip you need to disable the daily banking first.
- Disable the Daily Banking option.
- If you are not using this report as a deposit slip to take to the bank, you can choose to Include Direct Deposits in the report by clicking on this item so that it is marked. The direct deposits will be included in the totals of the report.
- Change the receipt sort preference by clicking in the current choice, click on the button that appears, click the sort preference then click OK.
- In the Banking Dates section type in the Start Date and the Finish Date.
- Set other report options as you require.
- Click Proceed.
Adjust the total location on the Bank Slip Report
- Click GoTo then Bank Slip Setup.
- To adjust the horizontal location of the first digit in the total, type in Horizontal the new location as a distance measured from the left edge of the page. The measurement is in 300th of an inch - 300 = 1'.
- To adjust the vertical location of the total from the top of the page, type in Vertical the new location as a distance measured in 300th of an inch - 300 = 1'.
- Click OK.

