 | The instructions in this article relate to Merge Letters. The icon may be located on your StrataMax Desktop or found using the StrataMax Search. |
Letters can be created in StrataMax that can have merge fields that refer to data from different areas of StrataMax. These letters are edited using Microsoft Word (or Notepad in very specific, small number of cases). These letters can then be distributed to a number of different contact types such as, but not limited to owners, office bearers, creditors, etc. This is also available from Sub-Groups and will use other debtors.
During the distribution process all reports and documents will process through StrataMax without using Microsoft Word, allowing for efficiency in processes for single or multiple buildings.
Merge letters can include additional reports ranging from building and financial reports to further lot-specific reports. If these are frequently used, you can save the set to reuse where applicable.
Merge fields can be inserted from their respective categories and, once added from the Merge Field Editor, can be inserted into the Merge Letter. Renaming the merge fields is also a tool that can create a meaningful description and assist with the creation process.
Merge Letters | QRG - Distributing Documents
The instructions below are a quick reference guide to distributing a merge letter and include the basics of this process. We recommend reviewing the rest of this article if you are unfamiliar with the Merge Letter process. Merge Letters can also be distributed from the Sub-Group for Debtor Maintenance contacts.
- Search or select Merge Letters from Main or Sub-Group.
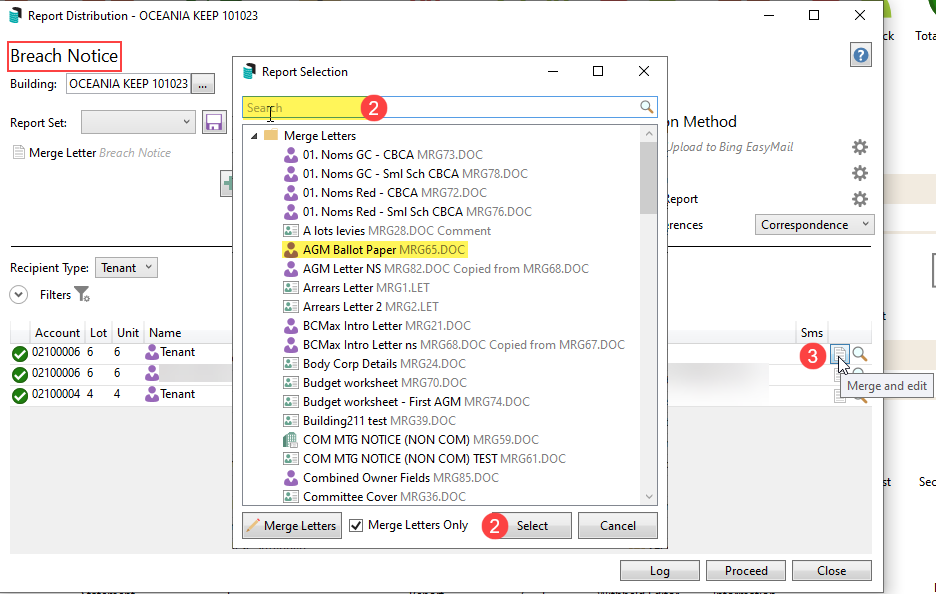
- Select from the existing list of merge letters or click the Search field to enter the description or comment information to filter the list. Click Select to pick this letter.
- Select the appropriate buildings from the Building tool if there are multiple buildings to receive this letter.
- If further reports are needed, untick Merge Letters Only to produce the list and select each report.
- If attachments are to be included, click Attachment to open the Add Document DocMax window and navigate to where the document is saved, noting that a folder location can also be accessed.
- Use the up and down arrows to change the order of documents and reports if there are multiple.
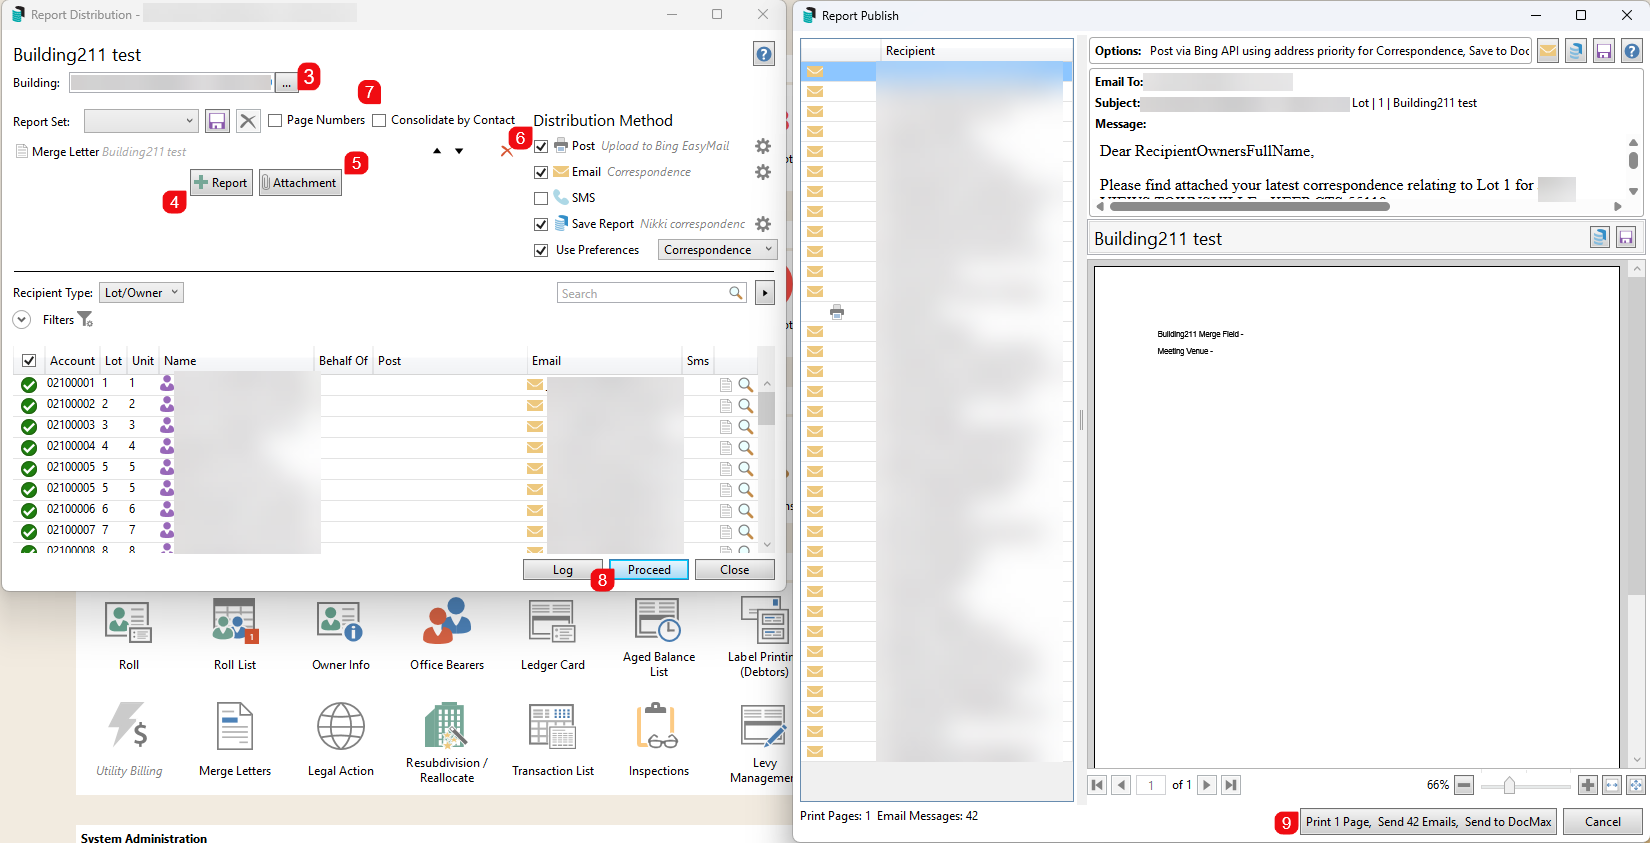
- Select each tick box for the appropriate Distribution Method. Each tick box
- Post will print to the configured printer, including Bing Easy Mail.
- Email to send the document using the StrataMax Communication screen. Use the cogwheel to set the Email Template Manager (use <Report Name> field if you wish to be more specific on your emails).
- SMS will only be visible if the SMS service has been enabled in StrataMax and is to be used to alert the contact that a distribution is to be received.
- Save Report will save the document in DocMax. Use the cogwheel to set the required DocMax Profile.
- Use Preferences will add or remove contacts from the list of recipients based on the Delivery Preferences for the contact.
- In the contacts list, if needed, tick the 'Consolidate by Contact' box to send only one copy of the document to contacts who own multiple lots, tag all lots (Crtl+A) as needed, or tag the required contacts.
- Click Proceed to preview the document in the 'Report Publish' window.
- When distributing to a large number of recipients, it can be useful to tick the Auto Process on Load Complete box, which automatically proceeds with the distribution once all documents have been processed and loaded in the Report Publish window. This tick box will remain on screen at the bottom in the green progress bar whilst documents are loading. Once they have all finished loading, the tick box will disappear automatically.

- Review the results, including the Options area (top of the screen), to check the Distribution Method and click Print X Page, Send X Emails, Send to DocMax to finalise.


Merge Letters | Merge and Edit Letter
This will allow an individual letter to be merged and edited for a single contact using Microsoft Word. The merge field data will be available when merging and editing in Word. Standard Word tool functions can be applied to the letter, which is helpful for one-off changes to be made to a master template. Using this function applies to a standard Merge Letter and does not apply to a Report Set type.
When using this method to send the document, it will need to be sent manually after saving it using Outlook or StrataMax Communication. Subsequently, this will not automatically save the document in the Roll. If this is required, it must be manually added to DocMax and assigned to the lot. Or alternatively, add the saved document as an Attachment in Report Distribution screen to link through to the lot.
- Search or select Merge Letters from Main or Sub-Group.
- Search OR select the required merge letter from the list. Once selected, the name of the Merge Letter will be noted at the top of the window.
- Click the Merge and Edit icon for the lot required.
- This will open the document in Word with all the merged field data, and any required changes can be made.
- When done, click 'Save As' to save the document to a folder in Windows.
- The document can then be attached in Merge Letters / Report Distribution and sent.

Merge Letters | Attachments and Saving Single Files
This section covers how to amend and change the order of reports / documents and attachments, and how to email and save all the documents, reports and attachments as a single file.
For further examples of how attachments can be treated, see the Merge Letters FAQ.
- Search or select Merge Letters from Main or Sub-Group.
- Select from the existing list of merge letters or click the Search field to enter the description or comment information to filter the list. Click Select to pick the required document.
- If other document types are required, untick the Merge Letters Only box to display more document types to select.
- If attachments are to be included, click the Attachment button to open the DocMax Add Document window to locate the document and select it. If the document is not already saved in DocMax, a folder location can be added.
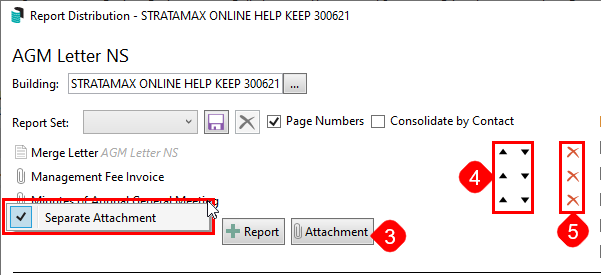
- By default all reports, documents and attachments are sent as a single file. By right-clicking on a document and attachment, and ticking the Separate Attachment sub-menu, documents and attachments can be emailed or saved as a separate files.
- When sending as a single file, the name of the report or document that is at the top of the list is what will be used.
- In order for all the documents and attachments to be visible from within the Roll you must send them as a single file and tick the Save Report box. Additionally, if you'd like the documents and attachments to be merged into a single file in the Roll, you also need to tick the Page Numbers box.
- When documents and attachments are separated, the document will be available to view in the Roll, but the attachment will not, since it is already in DocMax.
- If included as a standard attachment, these can be previewed in DocMax or the email Communication View Log screen.
- Use the up and down arrows to change the order of documents and reports if there are multiple.
- Click the red cross icons to delete reports, documents, or attachments.
- Either click Proceed to include all tagged recipients, or click the magnifying glass on the far right to preview the document/s for that one recipient, and the 'Report Publish' screen will open.
- In the top right of the 'Report Publish' screen, there are a row of buttons:
- The email button will send the documents, reports, and attachments through StrataMax Communication. Be mindful of the Separate Attachment sub-menu in the 'Report Distribution' screen, as this will determine if the reports, documents, and attachments will be emailed as a single or separate attachments.
- The DocMax button will save a copy of the documents, reports, and attachments as a single file in DocMax.
- The Save button will save a copy of the documents, reports, and attachments as a single PDF in Windows.
- Each document, report, and attachment is listed in the 'Report Publish' screen, along with buttons on the far right. However, if the tick in the Separate Attachment sub-menu was removed, only a single document will be listed, using the name of the report or document that is at the top of the list in the 'Report Distribution' screen.


Merge Letters | Email Template Manager
The Merge Letter 'Description' can be included as a merge field available in the Subject and Body of the email, configured from Email Template Manager. This will assist with sending emails that are customised for the correspondence being emailed.
If multiple Merge Letters are being distributed, the first Merge Letter Description will be used. If there is no Merge Letter included in the distribution, and a Report Set has been selected, the Report Set Name will be used.
- Search or select Email Template Manager.
- Select Merge Letter from the Template Type.
- Edit the Email Template Setup to include the field <Report Name>.
- Click Save.
- When distributing a Merge Letter, the Description will be populated where the <Report Name> field has been used.


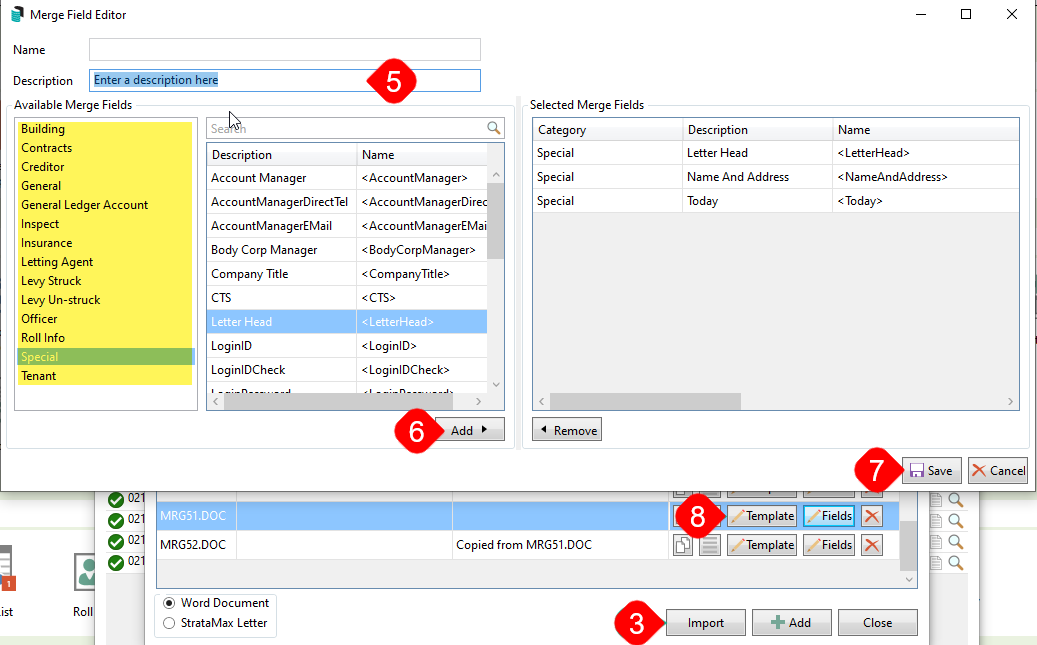
Merge Letters | Creating a New Word Document
To create a new merge letter, follow the below instructions. For a list of all merge fields available, see StrataMax Word Document Merge Fields.
If this is to be applied, the 'Letterhead' merge field must exist in both the Selected Merge Field area and the Word document itself. If it is not to be included, remove it from both areas.
- Search or select Merge Letters from Main or Sub-Group.
- In the 'Report Selection' window, click the Merge Letters button.
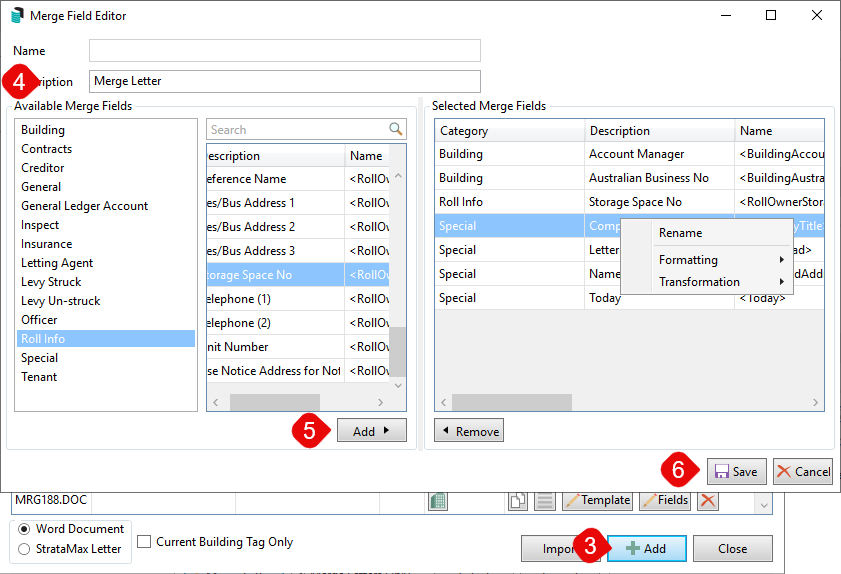
- Click Add to create a new letter, including merge fields.
- Enter the Merge Letter Description (30 character limit).
- Review the list of available merge categories and fields on the left and select the required field by clicking Add. Once added to the Selected Merge Fields on the left, these merge fields can be:
- Renamed by right-clicking on the merge field.
- Formatted, applied around the Boolean, Casing, Dates, Numeric and Time.
- Transformed for using word formulas for Boolean, Less, Plus or Trimming text.
- Once all fields are in the Selected Merge Fields area, click Save.
- Create the required document from the Word document. This may include copying and pasting from another source.
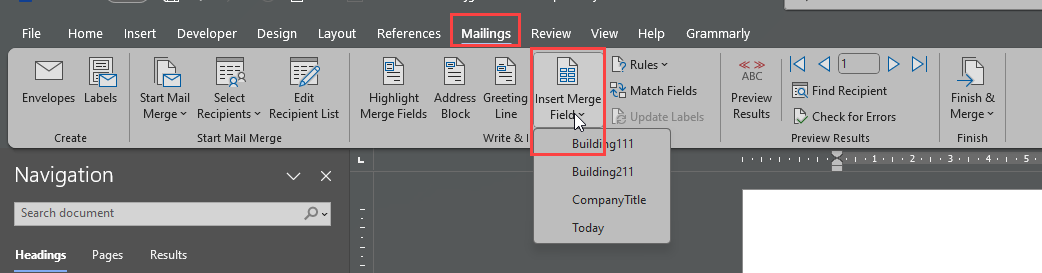
- Review the document using the Mailings tab in Word, Insert Merge Field, and insert the required merge field. Repeat this for each area that requires a merge field.
- Click Save and Exit in Word to have this new merge letter in the list.


Comments can also be added using the Comments icon to define the document or building purpose. Both of these areas will be searchable from the list of Merge Letters.
Merge Letters | Editing a Word Document
For any existing Word document merge letters that need editing, follow the below instructions. For a list of all merge fields available, see StrataMax Word Document Merge Fields.
- Search or select Merge Letters from Main or Sub-Group.
- From the 'Report Selection' window, click Merge Letters.
- Select the letter that requires editing from the Merge Letters List.
- If the letter requires a merge field review, click Fields and insert a new merge field(s) from the list. Click Add or from the Selected Merge Fields screen, and click Remove to remove any unrequired fields. Click Save once the fields have been adjusted.
- Click Template to open the document with Microsoft Word.
- Edit the document as needed using the standard Microsoft Word tools. If amending merge fields, use the Mailings tab, Insert Merge Field area to insert any new fields. To remove unrequired merge fields, select and remove these throughout the document.
- Click Save once completed.
Comments can be added to a document in the 'Merge Letter List' screen by clicking the Comments icon. This could be used to note the letter's purpose or including building-specific text, which can help search for merge letters.

Merge Letters | Invalid or Unknown Merge Fields
If there are any invalid merge fields included in the document, which can occur most commonly from the transition to meaningful merge field names or from the Building Information fields that are no longer available, for example, the Post Code field (now managed via Building Address fields), the below process can be applied to update the merge letter and field editor window.
These will be identified in two ways: from the preview window from the merge letter distribution window and the Merge Field Editor area.


To correct these:
- Search or select Merge Letters from Main or Sub-Group.
- From the Report Selection window, click Merge Letters.
- Select the letter requiring the edit to field information and click Template to open the original document in Microsoft Word.
- Remove the fields that are unknown or invalid. Click Save to remove these fields.
- Using the same letter in the list, click Fields to review the Merge Field Editor Table. From this table, select the category and re-insert the updated merge field. Click Save once complete.
- Click Template to open the Microsoft Word document and edit the document as needed using the standard Microsoft Word tools. If amending merge fields, use the Mailings tab, Insert Merge Field area to insert any new fields. To remove unrequired merge fields, select and remove these throughout the document.
Merge Letters | Copying and Editing a Merge Letter
Copying a document and editing it for a particular purpose can be done with the following instructions. Editing a document is the method for creating a local instance of a merge letter, and comments are available to add to identify the document’s purpose or building number. For a list of all merge fields available, see StrataMax Word Document Merge Fields.
These will be set for a Temporary file, removed on an overnight schedule by default and designed to prevent unnecessary data accumulation.
- Search or select Merge Letters from Main or Sub-Group.
- From the Report Selection window, click Merge Letters.
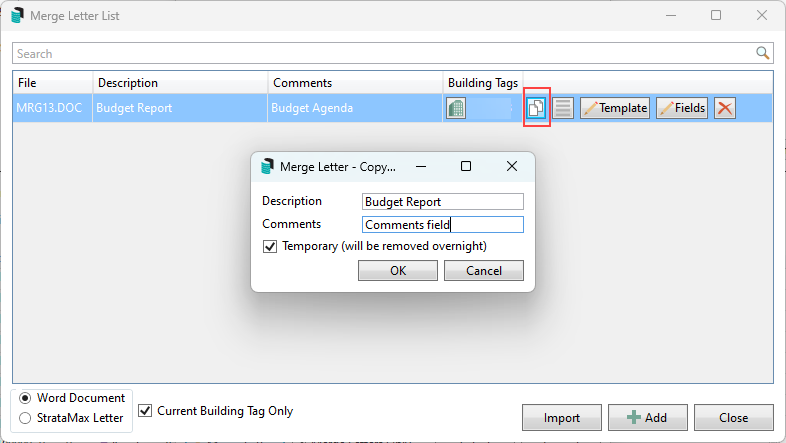
- Select the merge letter to be copied and edited by clicking the Copy and Edit icon.
- Review the Description and Comments fields, changing each as required. Use the Comments icon to add building-specific comments, such as the Building Number and description. This will assist when locating the document from the list of Merge Letters.
- Temporary (will be removed overnight) will be ticked by default.
- Temporary (will be removed overnight) will be ticked by default.
- Click OK to open this document in Word.
- Amend the document as required for the specific purpose, including text, formatting and merge fields.
- Click Save and Close once all relevant areas have been amended in Microsoft Word. This will create a new MRGX.DOC file in the Merge Letter List. Click Close to the Merge Letter List.
- Use the Search field from the Report Selection list and enter either Description or Comments to filter the list. Or scroll to find the merge letter at the bottom of this Report Selection window. Click Select once the letter has been located.
- Review the Distribution Method, checking the cogwheel for each area as needed.
- Use the Post to Print, Email to send StrataMax Communication Email, SMS if enabled to send SMS, and Save Report for DocMax.
Use Preferences: select the delivery preference address for the distribution.
- Use the Post to Print, Email to send StrataMax Communication Email, SMS if enabled to send SMS, and Save Report for DocMax.
- From the Recipient area, un-tag any lots if needed and tick 'Consolidate by Contact' if the merge letter will be distributed to the same name owner (Use Ctrl + X to untag all).
- Click Proceed to preview the distribution from the Report Publish window.
- Review the results, including the Options area (top of the screen), to check the Distribution Method and click Proceed to finalise.


Merge Letters | Deleting a Merge Letter
If Merge Letters are required to be deleted, this should be exercised with caution, as once the document is deleted from this list, it cannot be reinstated. Security Setup options are available to restrict access to deleting merge letters where appropriate.
Before deleting the Merge Letter, it would be recommended to save a copy to DocMax or a folder location should it be required again. Then, it can be imported.
- Search or select Merge Letters from Main or Sub-Group.
- From the Report Selection window, click Merge Letters.
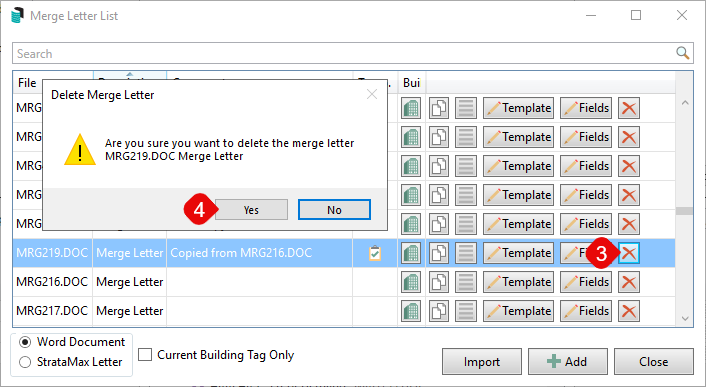
- Select the merge letter to be deleted. Click the red cross and delete icon.
- When prompted Are you sure you want to delete the merge letter MRGX.DOC Merge Letter? Select Yes.
Merge Letters | Importing Merge Letters
If documents must be imported to Merge Letters, including StrataMax merge fields, follow the process below. Using this process can be helpful for multi-drive clients who may want to copy a letter from one drive to another. Another example where this may also assist in importing any internal master templates to access in Merge Letters. For a list of all merge fields available, please see StrataMax Word Document Merge Fields.
- Search or select Merge Letters from Main or Sub-Group.
- In the 'Report Selection' window that appears, click the Merge Letters button.
- Click the Import button, and from the Windows Explorer window, navigate to where the document has been saved.
- Select the document and click Open. This will import the document into StrataMax.
- In the 'Merge Letter List' window, select the document, click the Fields button and add a 'Description' for the merge letter (30 character limit).
- Insert any merge fields required. Any merge fields in the original document must have these same fields available in the Selected Merge Fields area. From the Available Merge Fields, select the merge field required and click Add to make them available in the Selected Merge Fields. Repeat for each merge field.
- Click Save to save the merge field selection.
- Click the Template button to review the document in Microsoft Word and check the formatting, insert merge fields where required. Save and Exit in Word once the document has been checked.

Merge Letters | Importing a Local Deleted Letter
If local merge letters have not migrated or been deleted from the new merge letter interface during any clean-up efforts and the local letter is required to be back in the document list, follow the below instruction. This process is recommended to be completed by the StrataMax Administrator, and caution is exercised when accessing directories.
- Using the network location for the BCM/DOCS directory, select the local building number that the letter will be saved in.
- Search for the .DSC file and open this in Notepad, which will describe any local merge letter.

- Once the MRGX.doc has been identified, open this document and save it as a .docx format.
- Search or select Merge Letters.
- From the Report Selection window, click Merge Letters.
- Click Import, and from the Windows Explorer window, navigate to where the .docx document has been saved.
- Select the document and click Open.
- Review the document by clicking Template, removing any unknown merge fields, and formatting as required. Once complete, click Save.
- Click Fields and insert any new fields. Click Save.
- Click Template to insert these new fields and replace the unknown merge fields.

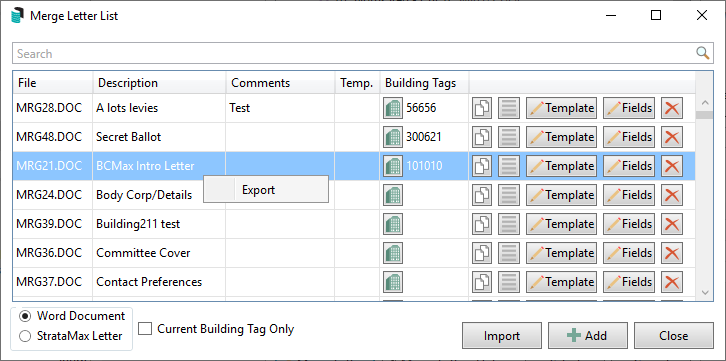
Merge Letters | Exporting Merge Letters
Exporting merge letters can be done, which is helpful for multiple drives. It will allow the letter to be created in one drive, including the merge fields, and easily imported to another.
- Search or select Merge Letters.
- Click the Merge Letters button.
- Right-click on the required letter from the list of merge letters and select Export.
- Save the document to a file location that can be accessed for import.
Merge Letters | Building Tags
Merge letters can be assigned to a specific building. When set with a Building Tag, the particular Merge Letter will only be available for selection from that building. A Merge Letter can be assigned multiple Building Tags if required in more than one building, and a star will be displayed next to the Merge Letter in the Report Selection screen to identify this as a local Building Tag.
Assign a Building Tag
- Search or select Merge Letters from Main or Sub-Group.
- Click the Merge Letter option.
- Locate the Merge Letter and click on the building icon.
- A Building Selection list will appear, locate and tag the required building to be selected and click Select.
- The Building Number will be displayed in the Building Tags column next to the Merge Letter.
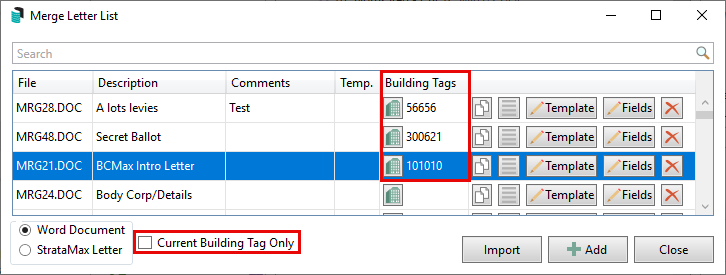
Tick the Current Building Tag only to display Merge Letters applicable to the selected building.
Local Letter View
The view below will display when in the building with a local letter tagged.

Merge Letters | Creating a New StrataMax (.LET) Letter
StrataMax Letters are text documents that are used in other areas of the program to produce merge letters. Some of these areas include the Arrears Cover Letters or legal action area. This area is used for creating or editing existing letters and assigned to the relevant menus for processing. It is a . LET file type.
Please see Notepad .LET Merge Fields for further information on formatting and merge fields available in this area.
- Search or select Merge Letters from Main or Sub-Group.
- From the Report Selection window, click Merge Letters.
- Move the selection in the bottom left from Word Document to StrataMax Letter.
- Click Add to create a new letter. This opens a Notepad window with pre-configured formatting tags for margins and fonts.
- Review the letter's content, insert any text and merge fields as needed.
- Click File > Save, or press Ctrl + S on the keyboard. Close the Notepad file.
- Click the Title field, enter a Description for the letter, and click OK.
- If Comments are required, click the Comments icon and enter these. Click OK.

Merge Letters | Editing and Deleting a StrataMax (.LET) Letter
Editing and deleting an existing StrataMax Letter will require permission to edit and delete the letter in Security Setup. Based on these permissions, letters can be edited using the instructions below. Deleting a letter is done with the red X and confirming you are sure that you want to delete the merge letter. Note that a StrataMax Letter, once deleted, cannot be retrieved. Please consider this before deleting any letters.
Please see Notepad .LET Merge Fields for further information on formatting and merge fields available in this area.
- Search or select Merge Letters from Main or Sub-Group.
- From the Report Selection window, click Merge Letters.
- Move the selection in the bottom left from Word Document to StrataMax Letter.
- Select the letter that requires amendment from the list of existing StrataMax Letters and click Template.
- Review the letter's content, editing any text and merging fields.
- Click File / Save, or click Crtl + S from the keyboard. Close the Notepad file.
- Check any Title and Comments fields as required and add or edit if needed.
Merge Letters | Copying and Editing StrataMax (.LET) Letter
If there is an existing StrataMax Letter that contains merge fields or text that is useful to apply to another merge letter, this can be copied and edited for a new letter. The below instructions will assist with this process.
Please see Notepad .LET Merge Fields for further information on formatting and merge fields available in this area.
- Search or select Merge Letters from Main or Sub-Group.
- From the Report Selection window, click Merge Letters.
- Move the selection in the bottom left from Word Document to StrataMax Letter.
- From the Notepad window, amend any text or merge fields for the new letter that will be available once saved and closed.
- From the list of StrataMax Letter’s the copied letter will be available with Comments confirming which letter this was copied from. Edit these Comments if needed by clicking the Comments icon and amending.
