| The instructions in this article relates to Creditor Maintenance found in StrataMax and GLMax. The icon may be located on your StrataMax Desktop or found using the StrataMax Search. |
Creditor Maintenance is where creditors are managed within a building and the Creditor Master Chart. Each creditor has a 'Contact Card' - the same as in the Roll, and is managed in the same way, containing basic information such as the name, and contact details. If a creditors details stored in the contact card need updating you can search for the contact and update that without the need to go into Creditor Maintenance.
The Creditor Maintenance screen is used to change the settings of the creditor in a specific building, and the creditor's details and settings in the Creditor Master Chart. This is where information and settings are managed for payment, tax, EFT Reference, BPay CRN, insurance, and compliance purposes.
Creditor Maintenance Video
Creditor Maintenance Overview
'Creditors' Window
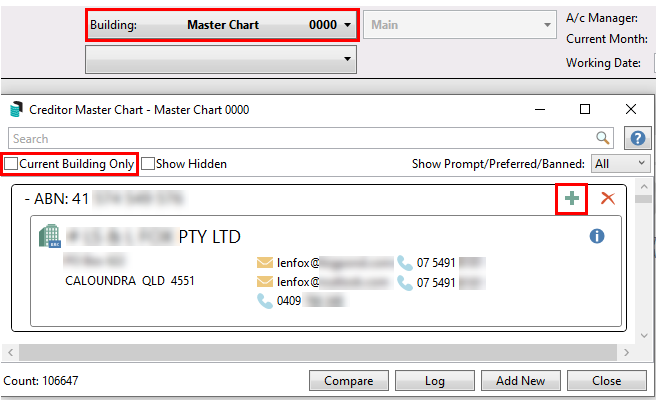
Creditor Maintenance, once opened, displays the 'Creditors' window, with a list of creditors in the current building by default. This section describes the different icons and buttons in this screen.
If you see a yellow notification at the bottom of this screen advising about a duplicate ABN and Location ID, follow the Merge Duplicate Contacts process in Contact Management, specifically using the Creditors with the same ABN + Location ID radio button.


- Use the search field to locate a specific creditor. It will search anywhere in the creditor's name, ABN, ACN or account code (0820...). The red 'X' clears the current search term.
- The 'Include All Buildings / Master Chart' tick box will include all creditors in the Master Chart as well, allowing you to click the green 'plus' icon to add them to the current building (see below).
- There may also be a red 'X' displayed, which can be clicked to delete the creditor from the Creditor Master Chart.
- There may also be a red 'X' displayed, which can be clicked to delete the creditor from the Creditor Master Chart.
- The 'Show Hidden' box can be ticked to display any creditors that have the 'Hide (don't show in selection screens)' tick box enabled.
- The Show Prompt/Preferred/Banned drop-down menu is used to filter accordingly.
- Clicking the Edit (pencil) icon on the creditor will open the 'Creditor Master Charter - Edit' window where the creditor settings and details can be edited/changed.
- Clicking the blue ‘i’ icon will open the 'Contact Details' screen, displaying the creditor contact card. The Edit button at the bottom of the window can then be clicked to edit the details of the creditor.
- The Compare button opens the 'Creditor Compare' window.
- The Log button opens the Log Viewer with the default Category set to 'CreditorMain', which when refreshed, displays all the changes made in the Creditor Maintenance screen.
- The Add From Master Chart button is clicked to add a creditor from the Creditor Master Chart. See Add Creditor to Building From Master Chart.
- The Add New button is clicked to add a creditor. See Add New Creditor to Building and Master Chart.
- This button has a permission in Security Setup, called "Add new creditor".
- Close closes the Creditor Maintenance screen.
- The 'Count' shows the number of creditors in the current list. This is affected by the filters used at the top of this window.

'Creditor Details - Edit' Window
By clicking the Edit (pencil) icon on a creditor in the main 'Creditor Maintenance' window, the 'Creditor Details - Edit' screen appears, displaying fields, settings and tick boxes for the creditor in the selected building as well as the Creditor Master Chart. This section describes the different fields, tick boxes, buttons, menus, and icons.
There are two main sections in the 'Creditor Details - Edit' window:
- 'Creditor in Building......' displays settings for the creditor in the currently selected building only - meaning these settings will not affect the creditor in any other buildings.
- 'Creditor Master Chart' displays settings for the creditor in the master chart - meaning it will affect the creditor across all buildings.
Creditor in Building....
The 'Creditor in Building' section displays settings for the creditor in the currently selected building only. Options that can be set are:
- Account Code: This number was set when the creditor was created.
- Override Payment Method for this building: When ticked it will present the radio buttons to select; 'Cheque,' 'EFT,' 'BPAY,' 'Do Not Auto Pay'.
- EFT Reference: The EFT Reference can be set per Creditor code and per Building. The EFT Reference field is also available in Creditor Invoices, Payment Entry as well as the Payments icon for any Creditor code set to EFT payment method, where it can be edited. The EFT Reference will also appear on the Remittance Advice for the creditor. EFT References can be added for individual Creditor codes that require a specific EFT Reference. The reference is noted on the EFT Payment record when sent to the bank. This setup is always required for payments made to the ATO by EFT.
It is recommended to pay the ATO via BPay with a CRN number to ensure that the funds are correctly allocated when received by the Australian Taxation Office. - BPAY CRN: This will enter the BPAY CRN automatically into the Creditor Invoices screen, and Payment Entry screen. It can still be edited from those screens and validation is in place, checking that the CRN is valid.
- Override OK to Pay for this building: When ticked it will present the radio buttons to select; 'Use Building Setting,' 'Always OK To Pay,' 'On Hold'. This will override the global settings for this creditor
- Override Prompt/Preferred/Banned: When ticked will display the 'Prompt/Preferred/Banned' drop-down menu for selection. This is a per Creditor code setting in the building selected and will override the master Creditor account setting.
- Security Setup permission: 'Prompt/preferred/banned edit' can be set to grant/deny access to this function.
- Hide (Don’t show in the selection screens): Will hide the creditor from the list of creditors when the Creditor Maintenance screen is opened, and the 'Show Hidden' box will need to be ticked to display the creditor.
- Delete Account From Building: Removes the creditor from the current building, but not the Creditor Master Chart. The creditor cannot be deleted if transactions exist for it in the building

Creditor Master Chart
The Creditor Master Chart section allows configuration of the Creditor Master Chart details. Each area for 'Payment,' 'Tax,' 'Insurance,' and 'Compliance' can be expanded or minimized for ease of use by clicking the round arrow button.
- Default Account Code: This is the Master Chart Code for the Creditor and would normally be the same as the building Account Code. The Default Account Code may differ; this occurs when a building has been transferred into your portfolio. When the Default Account Code differs to the building Account Code; data can be edited in either and it will update the other (this removing the need to use Change Codes for the majority of creditors). Refer to the Post Building Transfer article for more information.
- Hide (don't show in master chart selections screens): Will hide the creditor from the master list of creditors when the Creditor Maintenance screen is opened, and the 'Show Hidden' box will need to be ticked to display the creditor.
- Location ID: Free text field for up to thirty characters. For where there are Creditors with the same ABN and different bank account details. Enter any text in this field to differentiate the Creditors, and click out of the field to activate the Save button.
- Comments: Free text field for up to thirty characters.
- Prompt/Preferred/Banned: This field is used to create a preferred list of creditors, or to prevent certain creditors from appearing in various selection lists throughout StrataMax. Creditors that are set to Prompt/Preferred/Banned, will reflect this in the Account Code List screen in Creditor Invoices and TaskMax. This is a Creditor Master Chart setting across the portfolio and if you need to set a Creditor code in one Building, use the Override Prompt/Preferred/Banned for this building setting in the Creditor account for the Building.
- 'Preferred' will show up first in the preferred creditors list.
- 'Banned' will display a prompt when selected, saying the creditor is banned and cannot be used.
- 'Prompt' or 'Preferred & Prompt' will alert the user that this creditor has been marked as prompt and will confirm the user if this creditor should be used.
Security Permission: 'Prompt/preferred/banned edit' can be set to grant/deny access to this function.
Payments
- Payment Methods:
- 'EFT' requires that a BSB and account number be entered into the contact's 'Bank Account' section.
- 'Do not send remittance advice' is optional and will ensure that remittance advice is not emailed to the creditor.
- 'BPAY' requires the 'BPay Biller Code'.
- 'The ‘BPay CRN is different on each bill’ option should only be selected if the CRN changes for every invoice in the building. If the CRN stays the same across all invoices for that creditor (which is the most common case), leave this option un-ticked.
- 'Do not send remittance advice' is optional and will ensure that remittance advice is not emailed to the creditor.
- 'The ‘BPay CRN is different on each bill’ option should only be selected if the CRN changes for every invoice in the building. If the CRN stays the same across all invoices for that creditor (which is the most common case), leave this option un-ticked.
- 'Not yet known' is set as default when no other option is selected when the creditor is set up. Payments for this creditor will also display a warning on the Payments screen.
- 'Do Not Auto Pay' are for creditors who have an External Direct Debit, Periodic Payment or set for internet transfer and will not draw a payment. Creditor Invoices can still be entered, and a Local Bank Legend can be set up in the Bank Reconciliation screen to assist with auto processing and finalising the entry when the funds are direct debited.
- 'EFT' requires that a BSB and account number be entered into the contact's 'Bank Account' section.
- Minimum Payment Amount: Set the minimum payment amount for this creditor.
- Credit Limit:
- OK to Pay determines whether payments are automatically placed on 'Hold', or not. Invoices placed on 'Hold' for this creditor will be uploaded to the Invoice Hub for approval (if enabled in the building). See Set 'OK to Pay' settings for a Creditor Contact for more info.
- 'Use Building Setting' observes the tick box in the 'Creditor Details in Building...' section at the top of the window.
- 'Always OK To Pay' means that any invoices that are saved in Creditor Invoices, will not be placed on hold by default in any building, and not be included in the upload to the Invoice Hub for approval, and be ready to be processed in the Payments screen.
- 'On Hold' means that once invoices for this creditor are saved in Creditor Invoices, they will always be placed on hold by default in any building, and will be included in the upload to the Invoice Hub for approval, and can be viewed or adjusted in the Creditors Management or Search Creditor Invoice Items screens.
Tax
- GST Registered: To be ticked if the creditor is registered for GST.
- ABN Exempt: Should be ticked if the creditor is not registered with an 'Australian Business Number'. Validation applies and ABN Exempt cannot be set if there is a valid ABN entered for the creditor.
- PAYG Tax Rate: Enter a number for the tax rate. Can be left blank if not applicable.
- Accountants Name: Enter the accountant's name if required. Alphanumeric field of thirty character limit.
Insurance
- Workers Compensation: Enter the required details in the 'Insurer', 'Policy Numb', and 'Exp' fields.
- Prof. Indemnity: Enter the required details in the 'Insurer', 'Policy Numb', and 'Exp' fields.
- Public Liability: Enter the required details in the 'Insurer', 'Policy Numb', and 'Exp' fields.
Compliance
- Contractor Industry: Select a contractor industry from the drop-down menu. See Contractor Industry Picklists below to add or remove industries.
- Builders License Details: Free text field for alphanumeric characters to enter any relevant license details.
- License Expiry Date: Select an expiry date from the calendar drop-down menu.
- Work Order Conditions (Acknowledged): Tick or untick as required or appropriate.
- Safe Work Method Statement Received Date: Select the required date from the calendar drop-down menu.
Contractor Industry Picklists
Click the ellipses icon beside Contractor Industry to open the list of contractors, and add or remove industry entries.
Click ‘+ Add’ to add a new industry, or the red ‘X’ to remove unused industries.
Used industries have an asterisk beside them; these cannot be deleted but they can be merged - simply click the red 'X' next to the unwanted industry and then select the industry to merge into when prompted.

Notes
Clicking the Notes button, opens the 'Notes' window where notes can be added, edited, or deleted for the selected creditor.
- When adding or editing a note, you can enter a new or edit an existing Subject and Category, which can be saved for later use from the drop-down menu.
- Once the notes have been entered or edited, close the 'Notes' window and save when prompted.

Add Creditor to Building From Master Chart
These steps run you through adding a creditor from the Master Chart.
- Search or select Creditor Maintenance, and the 'Creditor Master Chart' window appears.
- Click the Add From Master Chart button at the bottom of the window, and the 'Account Code List - Master Chart' window will open.
- Use the Search field if necessary to locate the creditor by name, address or the ABN or ACN can also be searched.
- Select the creditor from the list and click OK.
- Once added, the creditor settings in the building can be edited by clicking the Edit (pencil) icon in the 'Creditor Master Chart' window. Change the settings in the 'Creditor in Building' section at the top of the window (see Creditor Details in Building above).
- Review each of the 'Creditor in Master Chart' sections and amend if necessary:
- Click the Save button.
Add a Creditor from Another Building (incl. to Master Chart)
These steps run you through adding a creditor from another building, which may not be in the Master Chart. This could be used for scenarios where you do not want the Creditor added to the Master Chart however, is used in a small amount of buildings.
Also, if you want to add a creditor from a building to the Creditor Master Chart after the building has been transferred from another StrataMax manager, first open the Master Chart Building, then proceed with the below steps.
- Search or select Creditor Maintenance, and the 'Creditor Master Chart' window appears.
- The Include All Buildings / Master Chart box will be ticked by default - untick the box and the list of creditors will refresh to display creditors from all buildings including the Master Chart.
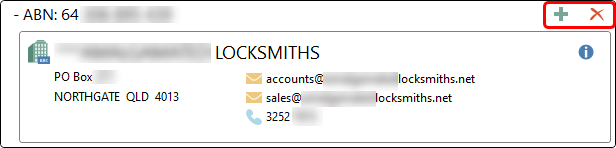
- You can then click the green 'plus' icon ('Add to current building') in the top right of a creditor's contact card.
- The 'Creditor Master Chart - Edit' window will open.
- Configure the 'Creditor in Building' section at the top of the window (see Creditor Details in Building above).
- Review each of the 'Creditor in Master Chart' sections and amend if necessary:
- Click the Save button.
Add New Creditor to Building and Master Chart | Create Contact
- Search or select Creditor Maintenance, and the 'Creditor Master Chart' window appears.
- Click the Add New button at the bottom of the window and the 'Creditor Master Chart - Edit' window will open.
- Configure the 'Creditor in Building' section at the top of the window (see Creditor Details in Building above).
- Click the Create / Select Contact button, and the 'Contact Selection' window will appear.
- Click the Create Contact button, the 'Contact Details' screen will appear.
- By default, the Type will be 'Company' but can be changed to 'Individual'.
- If 'Individual' is selected, you will need to enter Given Names and Surname.
- The Reference Name, Address Title (1), and (2) (based on character length) fields will update automatically after entering the Title, Given Names and Surname (red outlines indicate this).
- Tick the Surname first box to display the surname first in Name and other fields.
- Use the 'switch' button (two blue arrows) to swap the contents of the Given Names and Surname fields.
- Enter the Australian Business Number if required.
- If 'Company' is selected:
- The Reference Name, Address Title (1), and (2) (based on character length) fields will update automatically after entering the Name (red outlines indicate this).
- You can enter an Australian Business Number and Australian Company Number if required. Both fields are validated.
- Click the green plus button to add the Postal Address, Phone Number, and Email Address.
- This can be assigned to its specific purpose if entering an email address. For example, use a specific email address for Levies, Correspondence, Work Orders, Invoice Hub, Committee Correspondence, or Remittance Advice. A separate email can be recorded for each type if needed. If all details should be sent to one email address, this should not be changed.
NOTE: If no email address is recorded for the Creditor account, the Remittance Advice will not be emailed during the global email. If a printed Remittance Advice is required, this is actioned per payment from Payments Management. - Additional phone numbers and email addresses can be added by clicking the green plus button.
- To delete them, click the red minus button.
- A notification icon will appear if a duplicate email address is found in another contact.
- This can be assigned to its specific purpose if entering an email address. For example, use a specific email address for Levies, Correspondence, Work Orders, Invoice Hub, Committee Correspondence, or Remittance Advice. A separate email can be recorded for each type if needed. If all details should be sent to one email address, this should not be changed.
- The Bank Account details need to be entered if the creditor will be using 'EFT' as the 'Payment Method' under 'Payments'.
- This field has a permission called 'Add or edit contact bank account' in Security Setup, under the 'Roll' category.
- If Approve Bank Account Changes has been activated, when a bank account has been edited for a Contact this will need to be approved. Refer to our Bank Account Change Approval article for all the required information.
- If required, a Website address can be entered.
- The Delivery Preferences can be set for the following:
- Correspondence refers to Merge Letters, Meeting Hub documentation, Label Printing (Debtors), and the Service of Notice address field. If blank, the Residential/ Business address is used.
- Levy Notice - this refers to Levy Notices,Arrears Notices,Invoice Printing and Label Printing (Debtors) (Only really used if the contact is a lot owner).
- Utility Bill - If a sub-group is associated with the contact, this area can be set and will include the Utility Billing preference. If this is not linked to the Main Group, the contact preference can be set for each Debtor Maintenance record, and the article on how to complete this is available here. Generally only used for lot owners and tenants.
- Once all details are entered for the contact, click the Save button.
- Review each of the 'Creditor in Master Chart' sections and amend if necessary:
Add New Creditor to Building and Master Chart | Select Contact
- Search or select Creditor Maintenance, and the 'Creditor Master Chart' window appears.
- Click the Add New button at the bottom of the window and the 'Creditor Master Chart - Edit' window will open.
- Configure the 'Creditor in Building' section at the top of the window (see Creditor Details in Building above).
- Click the Create / Select Contact button, and the 'Contact Selection' window will appear.
- Use the Search field to locate the creditor.
- Optionally, you can click the blue ‘i’ icon to open the 'Contact Details' screen, displaying the creditor contact card. The Edit button at the bottom of the window can then be clicked to edit the details of the creditor if necessary.
- Select the creditor in the list, then click the Select button.
- If the contact card does not contain an ABN, you will either need to add one, or tick the ABN Exempt box, under the 'Tax' section - validation applies and ABN Exempt cannot be selected if there is a valid ABN entered for the creditor.
- If the incorrect contact was selected, you must click the Cancel button in the bottom right of the 'Creditor Master Chart - Edit' window then start the process again.
- If you select a contact that is already a creditor, a notification appears saying "This contact is already set as a creditor". Click OK and select a different creditor.
- After the contact has been selected, review each of the 'Creditor in Master Chart' sections and amend if necessary:
- When ready, click the Save button and the 'Creditor Master Chart - Edit' window will close automatically.
Add a Local Creditor to a Building
The instructions below will assist in creating a local creditor for a building without having it available for selection in the Master Chart. An example where this may need to apply includes having a creditor that requires a one-off payment scenario and will not be used in other buildings.
- From the local building, search or select Creditor Maintenance.
- Click Add New.
- Click Create/ Select Contact from the Creditor Master Chart section.
- Click Create Contact to create a new record.
- Enter the field information as required, including ABN and EFT details. Click Save. If no ABN is entered, this will need to be marked as ABN exempt in the Creditor Master Chart area.
- Tick Hide (don't show in master chart selection screens). This will remove the Default Account Code.
- Click Save.

Copy Creditor From Master Chart to Multiple/All Buildings
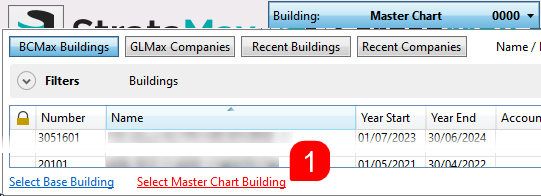
- Click the Building Selector tool and click the 'Select Master Chart Building' link at the bottom.
- Once the Master Chart building is open, search or select Creditor Maintenance.
- Locate the creditor and click the Edit (pencil icon).
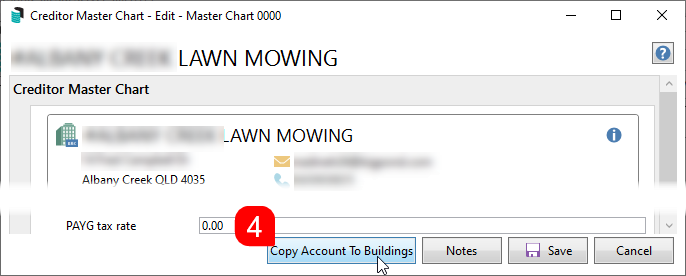
- At the bottom of the screen click the Copy Account To Buildings button.
- When the 'Building Selection' window appears, tag multiple or all buildings and click the Select button.
- Once the copy process has finished a notification will appear verifying that how many buildings the creditor was copied to - click OK.


Edit a Creditor
- Search or select Creditor Maintenance, and the 'Creditor Master Chart' window appears.
- The Include All Buildings / Master Chart tick box will be ticked by default when this window opens, and the list of creditors displayed are limited to the currently selected building only, displayed at the top of the window.
- To edit a creditor that is not in the currently selected building, Creditor Maintenance must be opened from within the Master Chart Building.
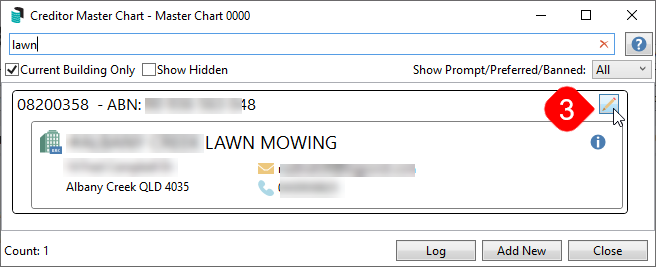
- Use the 'Search' field to locate a the required creditor. It will search anywhere in the creditor's name, ABN, ACN or account code (0820...). The red 'X' clears the current search term.
- After locating the required creditor, click the Edit (pencil) icon on the creditor to open the 'Creditor Master Charter - Edit' window where the creditor settings and details can be edited/changed.
- Configure the 'Creditor in Building' section at the top of the window (see Creditor Details in Building above).
- Review each of the 'Creditor in Master Chart' sections and amend if necessary:
- To edit the details of the creditor's contact card, click the blue ‘i’ icon to open the 'Contact Details' screen, then click the Edit button at the bottom of the window.
- The 'Name' field can be edited by any length as long as the ABN information is not changing.
- By default, the Type will be 'Company' but can be changed to 'Individual'.
- If 'Individual' is selected, you will need to enter Given Names and Surname.
- The Reference Name, Address Title (1), and (2) (based on character length) fields will update automatically after entering the Title, Given Names and Surname (red outlines indicate this).
- Tick the Surname first box to display the surname first in Name and other fields.
- Use the 'switch' button (two blue arrows) to swap the contents of the Given Names and Surname fields.
- Enter the Australian Business Number if required.
- If 'Company' is selected:
- The Reference Name, Address Title (1), and (2) (based on character length) fields will update automatically after entering the Name (red outlines indicate this).
- You can enter an Australian Business Number and Australian Company Number if required. Both fields are validated.
- Click the green plus button to add the Postal Address, Phone Number, and Email Address.
- This can be assigned to its specific purpose if entering an email address. For example, use a specific email address for Levies, Correspondence, Work Orders, Invoice Hub, Committee Correspondence, or Remittance Advice. A separate email can be recorded for each type if needed. If all details should be sent to one email address, this should not be changed.
- Additional phone numbers and email addresses can be added by clicking the green plus button.
- To delete them, click the red minus button.
- A notification icon will appear if a duplicate email address is found in another contact.
- The Bank Account details need to be entered if the creditor will be using 'EFT' as the 'Payment Method' under 'Payments'.
- This field has a permission called 'Add or edit contact bank account' in Security Setup, under the 'Roll' category.
- If Approve Bank Account Changes has been activated, when a bank account has been edited for a Contact this will need to be approved. Refer to our Bank Account Change Approval article for all the required information.
- If required, a Website address can be entered.
- The Delivery Preferences can be set for the following:
- Correspondence refers to Merge Letters, Meeting Hub documentation, Label Printing (Debtors), and the Service of Notice address field. If blank, the Residential/ Business address is used.
- Levy Notice - this refers to Levy Notices,Arrears Notices,Invoice Printing and Label Printing (Debtors) (Only really used if the contact is a lot owner).
- Utility Bill - If a sub-group is associated with the contact, this area can be set and will include the Utility Billing preference. If this is not linked to the Main Group, the contact preference can be set for each Debtor Maintenance record, and the article on how to complete this is available here. Generally only used for lot owners and tenants.
- Once all details have been amended as necessary, click the Save button.
- A 'Save Contact Changes' will appear. Review the details and the positions that the contact holds. Click Confirm if the changes are to be applied, otherwise Cancel.
Creditor Compare
The 'Creditor Compare' window shows duplicate or unused creditors and allows them to be merged, hidden or deleted. This tool is useful if a property has been transferred from another StrataMax manager. In addition to the Creditor Compare option, the field 'Master Chart Status' can be reported on from Search Creditors to review if a creditor account is in the Master Chart.
Creditor Compare | Duplicate Account
- This tick box will display any duplicate creditor accounts with the option to merge the codes.
- Click Merge to Duplicate to merge the selected local code to the new code which will be displayed beside the Merge to Duplicate button.

- This will present the Change Code Number screen so changes can be processed.
- Alternatively, select Hide to hide the account from selection screens.
- Click Close when done.

Creditor Compare | Not Recently Used
- This tick box will display accounts that have not been used for 3 years or more.

- If the account has never been used, the Delete and Hide buttons will be presented.
- The Delete button will delete the account, whilst the Hide button will hide the account from selection screens.
- If the account has been used, then only the Hide button will be visible.
- This will hide the account from selection screens.
- It's also possible to click the Hide Not Recently Used and/or the Delete Where Possible buttons to hide or delete creditor codes in bulk. Use the Delete Where Possible button with extreme caution as this cannot be undone!
- Click Close when done.

Creditor Compare | Account Code Different To Master
- This tick box will show accounts that have a different code in the current building to the code the Creditor Master Chart.
- Click the Merge to Master button to merge the code.

- This will present the Change Code Number screen so changes can be processed.
- Alternatively, select Hide to hide the account from selection screens.
- Click Close when done.

Creditor Compare | No Master Account
- This tick box displays accounts that are in the currently selected building but not in the Creditor Master Chart.

- Accounts not in the Creditor Master Chart can be added using the Creditor Maintenance screen from within the Master Chart Building. See Add a Creditor from Another Building (incl. to Master Chart).