|
|
Levy Management streamlines the process of creating, approving, and issuing levies - either manually or based on the budget. You can also edit or reverse levies, update due dates, and manage the full levy process from start to finish. Once levies are approved, it’s easy to generate transactions, create notices, and distribute them using your building and contact preferences. Be sure to review our Levy Management - Common Processes article outlining the recommended process for managing levies using Budget creation and global distribution.
Levy Management Options
The Options menu provides access to configuration settings and Levy Management tools.
- Search or select Levy Management.
- Click Options to access the following:
Configure

- Levy Income on Discount Date: If set, this will apply income on the Discount Date instead of the Due Date if it is after the due date for newly created levies. This is a Global setting and will impact all users.
- Show Generated Levies on Balance Sheet: Warning: This setting should not be adjusted without speaking with your Accountant and understanding the ramifications.
An existing configuration that will show generated levies on the balance Sheet for GST registered buildings, if set. This is a Global setting and will impact all users.
Security Permission: Configure Show Generated Levies. - Show Generated Levies on Balance sheet for buildings not registered for GST: Warning: This setting should not be adjusted without speaking with your Accountant and understanding the ramifications. An existing configuration that will show generated levies on the balance sheet for buildings not registered for GST, if set. This is a Global setting and will impact all users.
Security Permission: Configure Show Generated Levies. - Show Generated Levies on Balance Sheet override disable for this building: If set, this will override showing Generated Levies on Balance sheet for the selected building. This is a Global setting and will impact all users.
Security Permission: Configure Show Generated Levies. - Update Levy Due Date on Generation if closer than the minimum days from Generation Date: If set this will automatically set the due date as the correct number of days from generation date based on the state legislative requirements for the building. This is a Global setting and will impact all users.
- Minimum days from Generation Date to Due Date (Uses legislation value if larger): This setting becomes enabled when option 5 is set and allows configuration of the number of days from Generation Date to Due Date. If the number of days set here is below the legislative requirement for the state, the state legislation value will be used.
- Set Levy Tag Conditions Start Day: To set the start day for tagging levies for generation (enter 0 for the day of processing).
- Set Levy Tag Conditions: Days to include (enter the number of days from the start day): to set the levies to be tagged for generation based on the number of days from start day.
- Show Summary Totals: If set will show the budget totals for each fund next to the fund name.
- Auto Distribute after Create Transactions/Notice: If ticked, when the Create Transactions & Notice button is clicked, the Report Distribution screen will automatically open with the corresponding levy notices ready to be distributed.
- Close: Closes the Configuration screen.
Merged Notice Setup
Merge Levy Notice Setup is for selecting lot owners, who own multiple lots, such as a Developer, within a selected building to be grouped together on the one levy notice as well as correspondence to be merged to one contact using Report Distribution. Refer to our Merged Levy Notice Setup article.
StrataPay direct debits should not be setup based on a StrataPay number from a merged levy notice. If this is done, only the one lots amount will be debited. If any owner wants to setup a direct debit, the various StrataPay numbers should be provided to the owner.
Split Levy Setup
A levy notice can be split by Levy Invoice Code and sent to another address. For example, this could be used when Admin Fund levies are paid by a third party. This will result in Levy Invoice Code 01 – Admin Fund being shown, with arrears, on a separate Levy Notice.
- Search or select Levy Management.
- Click Options and select Split Levy Setup.
- Click Add to create a new Split Levy Notice Setup, or click the pencil icon to edit or the red cross to delete.
- In the Add Levy Split Setup screen, click the Account Selector to select the Lot Account to be split.
- Click OK.
- In the next screen, select the fund code for the levy that will be sent to the new contact. For example, if the notice for the Insurance fund levy is to be sent to a different contact, select the Invoice Code for the Insurance fund.
- Click Select Contact to select the recipient contact or to create a new contact.
- Click Save.
The record will be displayed in the Levy Notice Split Setup screen. This will show the Account and the Account Name that has been set to split the notice for, the recipient name for the split notice, and the Invoice Code Name that will be included in the Split Notice.
Custom Entitlement Schedules
Custom Entitlement Schedules can be created as local schedules. Typically, custom levies are used when only some lots need to pay for a certain expense in a building, or if certain lots have different charge units. For example, lift maintenance for a commercial lift, or a pool that is used by only 3 out of 10 lots in the building. The custom schedules are also available with a decimal place, replacing what was previously known as the Entitlement Factor in Building Information.
- Search or select Levy Management.
- Click Options and select Custom Entitlement Schedules.
- Click Add in the Custom Entitlement Schedule screen.
- Add a title for the schedule – this field is mandatory and will be validated. Enter the Charge Units as required to each applicable Account No.
- Click Save to update the schedule.
To add charge units in bulk, highlight the first lot to be charged, hold Alt-Shift on the keyboard and highlight the last lot to be charged. Click into the Charge Unit field on the last record and release the Alt-Shift keys. Add the number of charge units for each account into the last record field and press Enter. The number of charge units will be added to each selected lot in bulk.
Copy From Existing Schedule
To create a schedule from an existing schedule, click the Copy From button. This will present options to select existing schedules which can be saved as custom and modified if necessary.
The Used column in the Levy Custom Schedule screen will display Yes If a custom schedule has been used to create levies and No to indicate that a schedule has not been used.
Interest Charge List
The Interest Charge List allows lots and funds (Balance Fields) to be untagged to not calculate or post overdue interest. By default, all lots are automatically tagged in Interest Charge List to calculate and post interest.
An example for use of the Interest Charge List would be for lots owned by the developer which is not to be charged any overdue interest. Lots will need to be re-tagged when interest should begin charging.
- Search or select Levy Management.
- Click Options and select Interest Charge List.
- Untag any lots that are not to be charged interest and click Save.
When the lot changes ownership from the developer to an owner, the lot will need to be re-tagged in order for overdue interest to calculate and post on this lot for the new owner. This will need to be added to your internal processes.
Set Current Levies
Levies selected as current will display on the Levy Management screen by default. For example this can control if any historical levies were required to be displayed.
- Search or select Levy Management.
- Click Options and select Set Current Levies.
- Tag levy periods to be included in the main Levy Management screen and click OK.
Levy Management Overview
The options in Levy Management allow you to create levies for a variety of purposes, including budget-based levies using the Budget Next Year figure from Budget Update (if there is no next year budget, the current year budget is used), prior manager levies for transferred buildings, and interim levies for the next financial year.
You can also create custom entitlement schedules if needed. There are options to reverse or edit levies, View Lot Charges including lot paid dates, and apply configuration settings.
Once levies are added and approved, transactions and notices can be created, and notices distributed using Report Distribution, which supports contact preferences and additional attachments or reports. For Net GST-style buildings, GST will be automatically applied during Levy Year rollover. There are also a number of configuration options available to assist with setting preferences.
Add - Manual
If you are not automatically creating levies based on the budget, or if you are creating a custom or one-off special levy, they can be added in manually. The Levy Invoice Code will need to be created or exist in Levy Invoice Code Setup and have the Type set to 'Special' for a special levy. The create levy screen will open and will be prepopulated with data based on the last levy periods for the fund. This can be edited as required.
- Search or select Levy Management.
- Click Add and select Manual.
- Invoice Code Fund: Click the drop-down selector to set the fund by Invoice code (Sort Order is used for the default).
- Levy Type: Click the drop-down selector to set the levy type. Specific levy types can be set to reflect the nature of the levy. If you are creating a Special levy, the Levy Invoice Code will need to be setup or exist in Levy Invoice Code Setup with the Type as 'Special':
- Regular Levies
- Adjustment Levies (re-issue the same period for a different value)
- Interim Levies
- Prior Manager Levies (if loading levies from another manager who has issued the levies, select Prior Manager - Update Paid to Dates can be used if the Paid Date is required to be entered for the Levy Period, especially when this data is uploaded to Resvu). - Entitlement Schedule: Click the drop-down selector to set the Entitlement Schedule.
- Custom Schedule Setup: Click the ‘Edit/Pencil’ icon to setup a new Custom Schedule.
- Determined Date: Default is today's date and can be edited. This date can be used on Levy Notices, however it should be noted that the Approval date is used for Certificates. Approval date will need to be updated to match the Determined date to appear on Certificates.
- Levy Period: Use the drop-down selectors to open the calendar and set levy period dates.
- Due Date: Levy Notice Due Date. The number of days from creation to due date will be indicated in orange. Due Date = Period Start + Last Levy (Due Date - Period Start) Days. Period dates will also automatically populate based on previous levies that are entered.
- Gross amount per U/E: Add the gross amount per U/E in this field. If more than eight decimal points are added, these will be truncated back to eight in this screen. The gross total amount will be calculated based on this figure and lot entitlements.
- Gross Total Amount: Add the Gross Total Amount. The Gross amount per U/E will be calculated based on this figure and lot entitlements.
- Rate: displays the rate of entitlements & number of entitlements calculation.
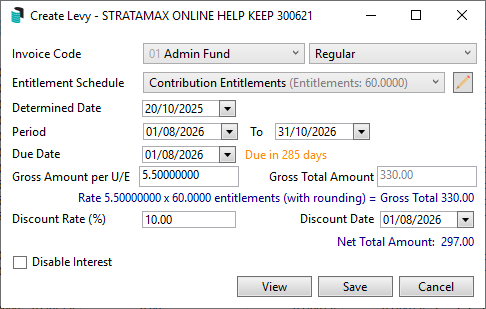
- Discount Rate (%): Set the discount rate in this field.
Note: This field will not be displayed unless a Discount Rate is added. If a Discount Rate is applied, the Discount Due Date will default based on state specific legislation. - View: Click View to see the lot charges based on the new levy setup.
- Click Save to save the new levy. The new levy will be displayed in the Levy Management screen with no Approved or Generated date.

Zero Levy
When creating manual levies there is an option to allow zero-dollar value (0.00) levies to be saved. The levy period can also be produced on the Levy Notice if the configuration is set to allow this. Refer to step 6 below.
- Search or select Levy Management.
- Click Add and select Manual.
- Select the Invoice Code, Entitlement Schedule as required along with the Period To and Due Date.
- Enter Gross Amount per U/E as 0.00 - this will activate the check box titled Zero Levy.
- Tick Zero Levy and click Save.
- To produce a Levy Notice with the zero levy period, refer to Levy Distribution | Configuration.

Add Levies from Budgets
The Add Levies From Budgets screen can be used to create levies based on the figures in the Budget Update screen. Specifically, the income for each trading fund in the Budget This Year column and/or Budget Next Year column. StataMax calculates the annual rate per unit of entitlement (U/E) and distributes it evenly across the number of periods, based on the number of instalments defined for the levy code in Levy Invoice Code Setup. The levies will be created for the Levy Year, which is determined by the user and is displayed in the top left corner of the Levy Management screen. The calculation takes into account any remaining levy periods in the current levy year, so the Levy Year should reflect the levies being proposed at the AGM.
When adding by budget, if the Levy Year includes three quarters based on this year's financial year and one quarter for next year and there is a Next Year Budget, the remaining quarter will be based on the next year budget. So, all four quarters will not always be the same. If a levy period crosses the old and current financial years this will be catered for.
Rate = (Next Year Budget - Outstanding Levy Income / Entitlements / Remaining Instalments)
- Search or select Levy Management.
- Click Add and select By Budget.
- Review the Determination Date: Generally, the date of AGM.
- Levy Year: Tick this option to roll the Levy Year forward. Review / change the start and end dates for the new Levy Year to coincide with the levy periods being raised at the AGM. Refer to Levy Year Rollover section below.
- GST is automatically applied to budget amounts for Net GST style buildings when the levy year is rolled over.
- Calculation: Next Year Budget Approved. Enables levy creation based on the next year's approved budget. If the budget is not yet approved, interim levies will be created instead and can be amended. Tick if the Next Year Budget has been Approved to set the first levy as approved.
- Review Levies / untag Levies: Levies can be untagged in this screen if they should not be included in the current process.
- Hover over a levy to view its calculation details.
- Click Save to store the levies for later approval and generation or click Cancel to close the screen without saving any changes.
- Levy Periods can be edited in the Levy Management screen if any data requires updating.
Example screenshot, highlighting Budget Next Year income for -15000.00:

Screenshot of using Add by Budget:
- 3 instalments were created using the figure in the Budget This Year column in Budget Update for $10,000.00 plus $1,000 GST. This takes into consideration the income, entitlements, and one remaining instalment.
- The following Financial Year is based on $15,000.00, seen in the above screenshot, showing the Budget Next Year column in Budget Update plus $1,500. This also takes into consideration the income, entitlements, and three remaining instalments.

Levy Year Rollover
When using the Add - By Budget option, if the Levy Year requires adjusting so that interim levies can be created, tick the Levy Year Rollover button and adjust the Levy Year using the calendar, or enter the new dates for the levy period creation. If levy year matches financial year, Interim levies may be required to be entered manually after. The financial year is often different to the levy year; the levy year is what levy periods are being proposed at the AGM. You can also adjust the Levy Year forwards or backwards if rolled too far, untick the levy periods if you do not require new levy periods. Please watch our short Levy Year End Rollover video below.
The Levy Year can be edited in the Add By Budget screen by ticking the Levy Year Rollover box, and then editing the dates as required. This is helpful if the levy year has been previously set incorrectly.
- Search or select Levy Management.
- Click Add and select By Budget.
- Tick Levy Year Rollover and change the Levy Year start to match the levy periods being approved at the AGM Meeting. StrataMax will setup any interim levies using the Next Year Budget. If the Next Year Budget is not entered, the Current Year Budget will be used. Tick Next Year Budget Approved if completing the levy entry after the AGM.
- Review Levies / untag Levies: Levies can be untagged in this screen if they should not be included in the current process. Hover over a levy to view its calculation details. Edits can be applied once saved in Levy Management.
- Click Save to store the levies for later approval and generation or click Cancel to close the screen without saving any changes.
Next levy year levies are green in colour to make them more easily identifiable. Historical levies will be coloured grey.

The Levy Year Start Date and Levy Year End Date can be reported on from Search Buildings.

Levy Year Rollover Video
Watch our short video explaining how to adjust the Levy Year.
Approve
Once levies have been created manually or by budget, they need to be Approved (previously known as Strike / Struck).
- Search or select Levy Management.
- Click the Approve button to open the Approval screen.
- Review the Approved Date: This will be Today's date, set the date you'd like to record as the approval date.
- Untag any levies that are not ready for approval.
- Click Approve to finalise and approve the selected levies.
- Click Close to close the screen.

Create Transactions & Notice
After levies are approved, you can generate the related transactions and notices by selecting Create Transactions and Notices. Levies will be tagged for generation based on the Levy Tag Conditions set in your Configuration. This is also where you can review buildings for generation. There is an option to Override Due Date Validation if required, details below.
- Search or select Levy Management.
- Click Create Transactions & Notice.
- Set the date of Generation – defaults to today’s date.
- Set the Adjustment date for Due Date. Can be set manually or will use default days set in configuration or number of days required by legislation if more than the set default number of days.
- Filter levies by due date.
- Select one or more buildings (for Global Levy Generation).
- Tag levies to be created. Review Due date column. If Due Date is before the minimum notice period and you do not wish to adjust the Due Date to be inline with the legislation set, tick Override Due Date Validation. Refer to instructions below.
- To include levy periods not yet Approved, tick Include Not Approved to create transactions and notices.
- Click Start to create transactions and notices for tagged levies. The status column will show a green tick when generated successfully and display any relevant warnings or validation messages.
- Click Close.
- Once notices and transactions have been created, the levy notices can be distributed. The Report Distribution screen will open, however if closed you can access from Reports / Distribute Levies to open the Report Distribution screen and distribute notices using available preferences. Additional Reports & Attachments can be included if required. Refer to Global Distribution below.
- Click Close to exit the screen.

Adjust Due Date if before
If the Due Date of the Levy Period is inside the expected notice date period, there is an option to enter a date so that the Due Date updates to this date. In the example below, the Due Date will adjust from 01/09/2025 to 12/09/2025.

Override Due Date Validation
If the message Due date is before the minimum notice period is listed in the Status, and the Due Date is to remain as set in Levy Management, possibly due to urgent special levy requirements, tick theOverride Due Date Validation box to proceed with the levy generation and Create Transactions & Notice.
Please be aware that this tick box will only be available with the appropriate permission in Security Setup called 'Override Levy Generation Due Date Validation'.

Global Distribution of Levies
Levy Notices that have been generated can be distributed or re-distributed by using the Distribute option. The default Levy Notice email template will be used when Report Distribution is opened from Levy Management. Levy Notices will be stored in DocMax and in the document shortcut within the Roll as well as Stored Reports. The email body included with the Levy Notice can be set or adjusted from Email Template Manager.
Transactions and Levy Notices can be created globally by tagging all or multiple buildings in the Create Transactions and Notice screen.
- Search or select Levy Management.
- Click Create Transactions & Notice.
- Review the Generation Date.
- Review Adjust Due Date if before.
- - If the Due Date is to remain as set in
- Levy Management possibly due to urgent special levy requirements, tick the setting.
- Override Due Date Validation to proceed with the levy generation and Create Transactions & Notice.
- Click the Buildings selection and tag buildings as required.
- Click Select. The buildings will be set for global generation. Levies that fall into the Tag Conditions period will be pre-tagged. Check the Status column for any warnings.
- Click Start to create transactions and notices for tagged levies. The status column will show a green tick when generated successfully, and display any relevant warnings or validation messages.
- Once notices and transactions have been created, they will be distributed if the Auto Distribute after Create Transaction/Notice Setting is configured, or click Distribute to open the Report Distribution screen and distribute notices using available preferences and additional reports if required.

- Review Report Distribution options - additional Reports & Attachments can be included once off or saved as a Report Set for future use.

10. Ensure Save Report is ticked where you can select a DocMax Profile and copies of Levy Notices will be stored here in DocMax, as well as in the Roll Document List in the Roll for each lot. Review all settings before clicking Proceed.
To send a duplicate levy notice to owners where their levy preference is set to email and the agent is receiving levies on the owners behalf, ensure 'Duplicate - Copy to Owner' is ticked within the filters.

Consolidate by Contact: This option will consolidate the Levy Notice and any attachments into one pack for distribution. With this configuration selected, any Contact that owns multiple lots or is receiving notices on behalf of owners (example agents) will deliver one instance, including all documentation batched into report order. For multiple buildings, this Contact will receive one for each.
Please Note: If an Agent is receiving Levy Notices on behalf of 10 lots; one document will be stored against the first lot in DocMax regardless of who owns the lot. It is not recommended to use this setting for global levy distribution.


In the Report Publish window all the documents will start loading. When distributing to a large number of recipients, it can be useful to tick the Auto Proceed on Load Complete box, which automatically proceeds with the distribution once all documents have been processed and loaded in the Report Publish window. This tick box will remain on screen at the bottom in the green progress bar whilst documents are loading. Once they have all finished loading, the tick box will disappear automatically.

Distribute Levies | BING
Distribute Levies uses the Report Distribution method to send Levy Notices (same process as Merge Letters / Meeting Hub).
- The only valid way to send Levy Notices to BING is via the Bing EasyPost API.
- In the Report Distribution screen, ensure the option Use BING for Print is checked.

If the Mailroom option is selected (legacy method), the system will:
- Spawn a separate program per print file (hundreds or more in a large levy run).
- Cause the levies process to crash, resulting in:
- Partial prints received at BING.
- Emails not being sent.
- Require the entire Printing and Emailing process to be repeated.
Distribute Levies | Configuration
- Search or select Levy Management.
- Click Reports.
- Click Distribute Levies and click on the cog wheel to open the Configuration screen. This is where you can set the Template, or set a Local Building Override Template or Letterhead, Levy Notice Text and review additional configuration.
- Show Arrears: Displays amounts that are in arrears. Recommended to be ticked.
- Global Levy Notice Configuration: Shortcut to the Levy Notice Configuration.
- Message Maker: Click to review or configure a message to display on Levy Notices or Arrears Notices distributed from Report Distribution, details on how to action this in the Message Maker article.
- Require Postal Address Even For Email: A postal address is included on a Levy Notice where there are split contacts with the same email address and Levy Notice preference is set to email. This setting will use the first contact postal address for display on the Levy Notice when emailing (Global Setting).
- Show Zero Amount Levies: If a Zero Levy (0.00) has been created, this can be Approved and Generated and printed on a Levy Notice. This setting will show zero amount levies on the Levy Notice when issued from Levy Management / Distribution (Global Setting).
- Last Generated Instead of Tag Days: Allows a levy notice to be produced showing the last generated levies regardless of the set tag conditions in Levy Management. This is particularly useful when sending Welcome Packs where the last generated levies fell outside the tag conditions dates. We recommend that this setting be saved for Change of Ownership and Change of Details Report sets if there is a Levy Notice included to ensure a notice is produced for Welcome Packs and Change of Details.
NOTE: This setting will not affect notices when running from Levy Management after Generating Levies which will produce notices based on levies generated using set tag conditions.


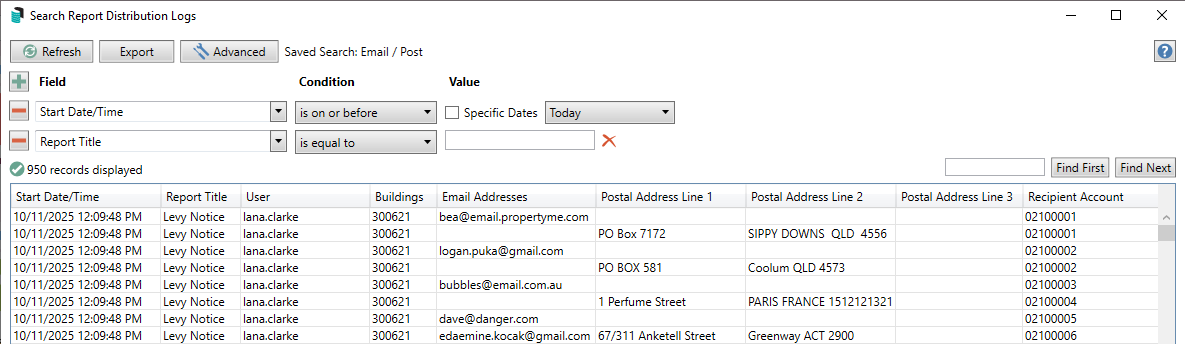
Distribute Levies | Log
In the report distribution logs there is the ability to include the Email or Postal Address of where Levy Notices were sent and to also Resume a levy run. This log is helpful to identify if a particular Levy Notice was emailed or posted. From the Advanced button, add in the fields Email Addresses and Postal Address Line 1, 2 and 3 and Recipient Account to report on this detail. View our Report Distribution article on how to review the log and redistribute levy notices.
- Search or select Levy Management.
- Click Reports and Distribute Levies.
- Select Logs.
- From Advanced button select Columns tab and include Recipient Account, Email Addresses and Postal Line 1, 2 & 3 in the Display Columns and Refresh.
- Click Print to produce the information into a PDF report or Export to open into Excel.
Levy Management | Reports
The Reports menu provides access to Report Distribution to Distribute Levy Notices, run the Levy Register Report and Levy Generation Schedule.
Levy Register
The Levy Register Report opens the Levy Register Report in Report Distribution, and provides the ability to generate the default (Current) Levy Register, report for Proposed Levies and report for Account Groups. There is also the option to select Accounts and produce the Levy Register for individual lot accounts. The Levy Register Summary Report can also be included and saved as a Report Set.
- Search or select Levy Management.
- Click Reports.
- Select Levy Register.
- Click the template cog to see report settings and templates (for example, Proposed Levies).
- Click Accounts to select an individual Lot if required.
- The Levy Register Summary Report can also be included if required; click Report and select Levy Register Summary.
- Click Proceed.

Levy Register - Quarterly Report
The Levy Register - Quarterly Report shows levies by each lot and quarterly period. This report can be produced in Report Distribution and provides the ability to generate the default Levy Register (Quarterly), there is an option to produce this report for Proposed Levies Only. Produce a Levy Register - Quarterly is for when a quarterly view of levies for lots is needed.
- Search or select Levy Management.
- Click Reports.
- Select Levy Register - Quarterly.
- Click the template cog to see report settings and templates (for example, Proposed Levies Only, untick for Approved Levies).
- Click Accounts to select an individual Lot if required.
- Click Proceed.

 Example of Levy Register - Quarterly Report
The Register Summary Report
The Levy Register Summary can be produced to summarise the levies for the building and be used to confirm the amount being raised for each levy period. This report can produce the approved or proposed levies to excel based on the configuration. Produce a Levy Register Summary when you need to confirm the amounts being raised for a levy period.
- Search or select Levy Management.
- In the top left of the window, click Reports > Levy Register Summary.
- Click the template cog to see report settings and templates (for example, Proposed Levies Only, untick for Approved Levies).
- Click Excel Export to produce the report to Excel, or Proceed to screen.
Levy Generation Schedule
The Levy Generation Schedule provides a consolidated view of levies recorded in StrataMax across the selected buildings based on the selected style of reporting. This report also may help to determine where future levies have not yet been entered and buildings with no levies at all.
What is the Levy Generation Schedule used for?
- Review levy periods and due dates, including levy description.
- Check generation and printed status.
- Detect missing or future levies (identified in light grey and with ****).
- Show buildings with no levy data.
How is the Levy Generation Schedule produced?
- Search or select Levy Management.
- In the top left of the window, click Reports > Levy Generation Schedule.
- In the Levy Generation Schedule (Report Distribution) window, it is important to click the cog wheel to check the report settings and templates to ensure it is fit for the purpose of producing the report:


- Days To Show (Due Before Today): Enter the number of days to include levies with due dates this many days in the past, before today's date.
- Days To Show (Due After Today): Enter the number of days to include levies with due dates this many days in the future, after today's date. If producing this report as part of issuing levies globally, it is recommended to match the same number of days in the Levy Management > Options > Configuration, in the field Days to Include.
- Click the Style drop down menu to select the appropriate report; Not Generated, Approved Not Generated, etc.
- Use the Account Managers ellipsis [...] button to select and filter by an Account Manager if required. Click red X to remove.
- Use the Selected Buildings ellipsis [...] button to select and filter the required buildings (if not selected, then the report will include all buildings.
- Select the required template from the Template drop-down menu.
- From the Template (Local Building Override) drop-down menu, a local template can be used instead of the global template, which will only be used when a single building is selected for this report.
- Click Close to close the Configuration window.
- Review the rest of the settings, such as Distribution Method and Recipients, etc. then click either Proceed to open the Report Publish screen where the report is previewed or click Excel Export to open the report in Excel.


Levy Generation Schedule | Future Levies
Expected future levies, identified in light grey and with '*****' may also display on the report. It will display for the current expected period, based on the previous year’s levy period and due date.
This is an indication to check the building and confirm the expected levy period:
- Exists but may be a different due date or setup.
- Is missing, possibly due to a recent or pending AGM (to be entered soon).
This is information only, if the Levy Management is correct, then no further action is required, however review of the above may highlight that levies need to be entered.
Example - Levies for the highlighted Building were issued for 01/09/2025 - 30/11/2025 - prior year, please check for the same levies and period for 01/09/2026 - 30/11/2026, in Levy Management as these may yet to be entered or have already been entered, but have a different due date in the current year.


Edit Levy
Sometimes it's required to edit an existing levy. This can be done for levies that have or haven't been approved, and levies that have or haven't been generated and issued. When editing a levy, interest and discounts will not change, in order to reverse interest or discounts the levy will need to be reversed or Debtor Adjustments can be used. When editing a levy to zero, or to another amount, a reversal will be completed, creating a credit levy of the original levy with a new number. Reversed/ Edited (cancelled) levies will be displayed in red in Levy Management and are hidden unless Show Historical Levies is ticked. Reversed/ edited levies are also hidden from Ledger Cards and the replacement levy will display.
- Search or select Levy Management.
- Highlight the levy period to be adjusted.
- Click Edit button.
- Adjust levy period details as required.
- Click Save.

Reverse Levy
There may be times when a levy is required to be reversed entirely, or for a complete replacement of a levy period, date and discount. Firstly check if the levy has a discount as this will affect how you proceed. Edit Levy should be used in most instances and is recommended. When reversing a levy, a reversal will be completed, creating a credit levy of the original levy with a new number. Add Levy - Manual can be used to enter a replacement levy if required. Reversed/ Edited (cancelled) levies will be displayed in red in Levy Management and are hidden unless Show Historical Levies is ticked. Reversed/ edited levies are also hidden from Ledger Cards and the replacement levy will display. There is a Security permission for 'Reverse Levy' which can be set.
Please note: Using Edit to adjust a Levy, is the recommended process rather than a reversal.
- Search or select Levy Management.
- Highlight the levy period to be reversed and click Reverse.
- If the levy period has a Discount Rate a prompt to reverse the discount will display, select Yes or No.
- A credit levy will be created in Levy Management for the reversal.


Yes = Any receipts to lots with a discount for the levy period will be reversed (Recommended).
No = Discount will remain on the lot. If later decided that the discount should be reversed, this will need to be removed using Debtor Adjustments.
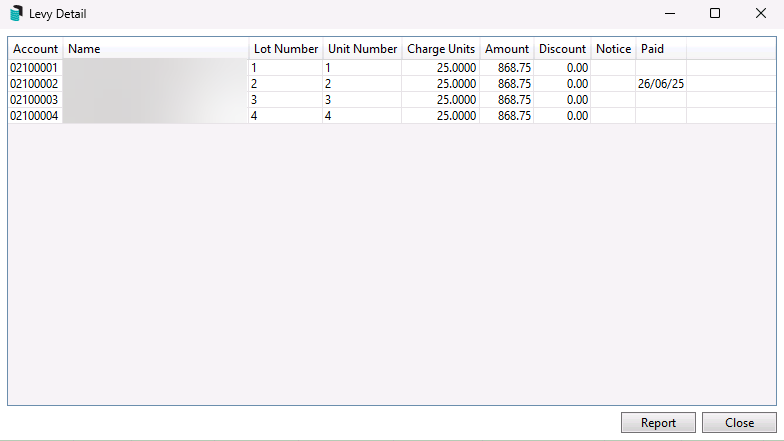
View Lot Charges | Levy Charge Schedule
A Levy Charge Schedule report can be viewed listing each Lot Account, Charge Unit, Gross Amount, Net Amount / Discount and the Date Paid.
- Search or select Levy Management.
- Highlight the levy period to be viewed.
- Click View Lot Charges to view the Levy Detail of each Lot Account, including the Date Paid for the Lot.
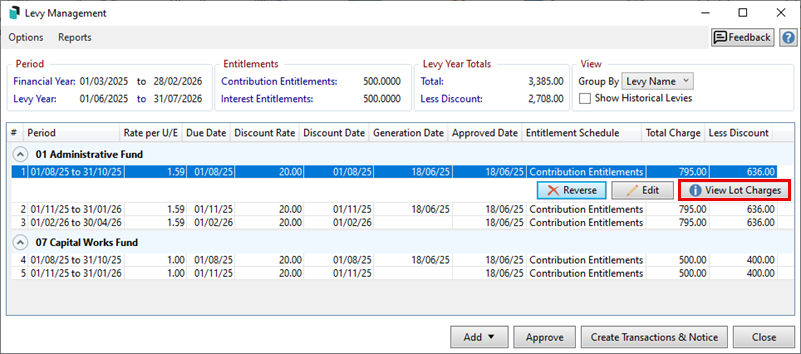
- Click Report to produce a Levy Charge Schedule report for the selected levy period.
- When The Levy Charge Schedule window (Report Distribution) opens, click the cog to the right of the report name to review and amend settings and the template as needed.
- Templates are available with or without Notice and Paid dates.
- Click Excel Report to produce the report in Excel, or Proceed to preview the report in the Report Publish window.


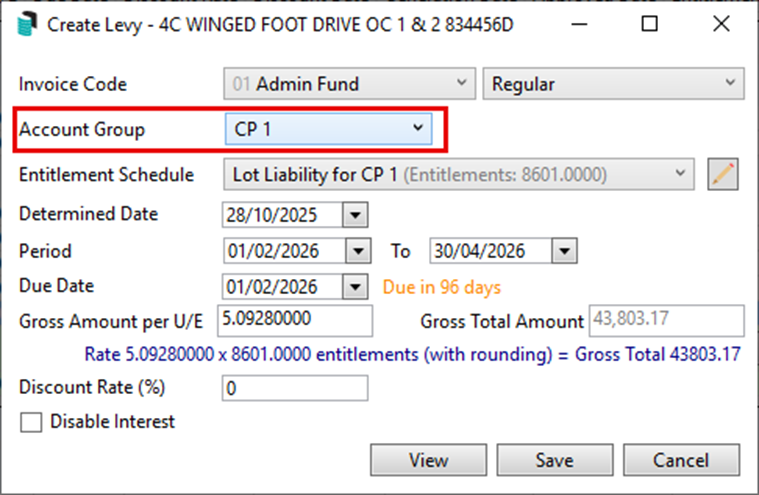
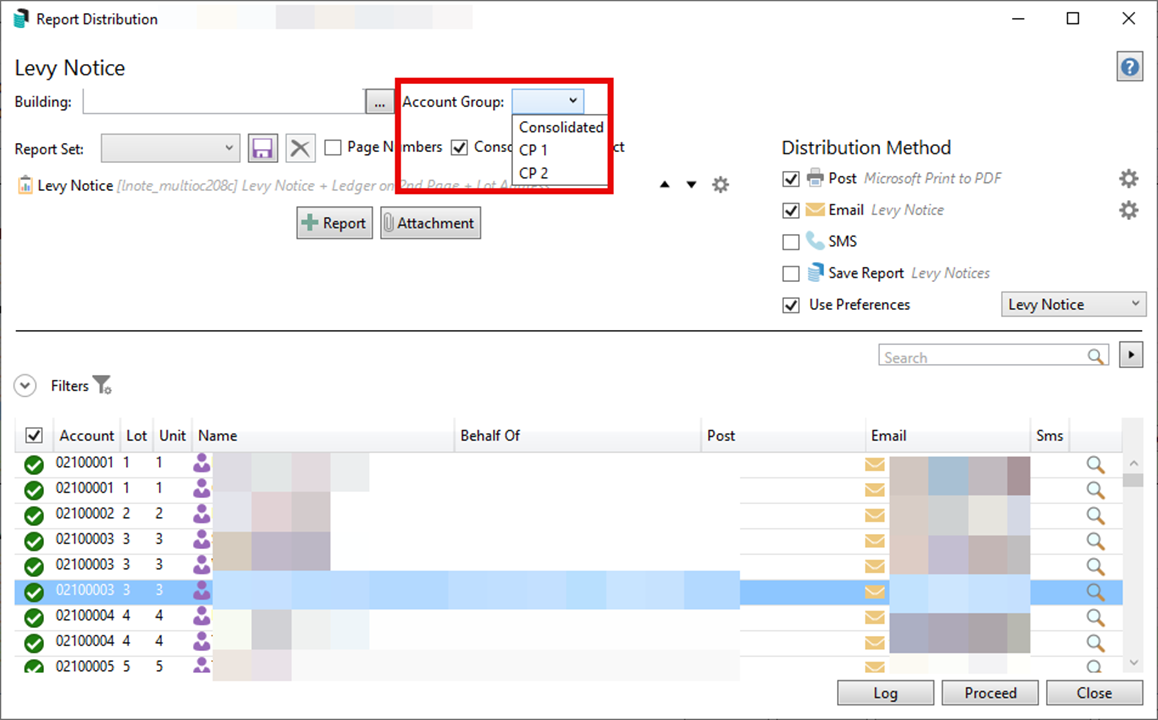
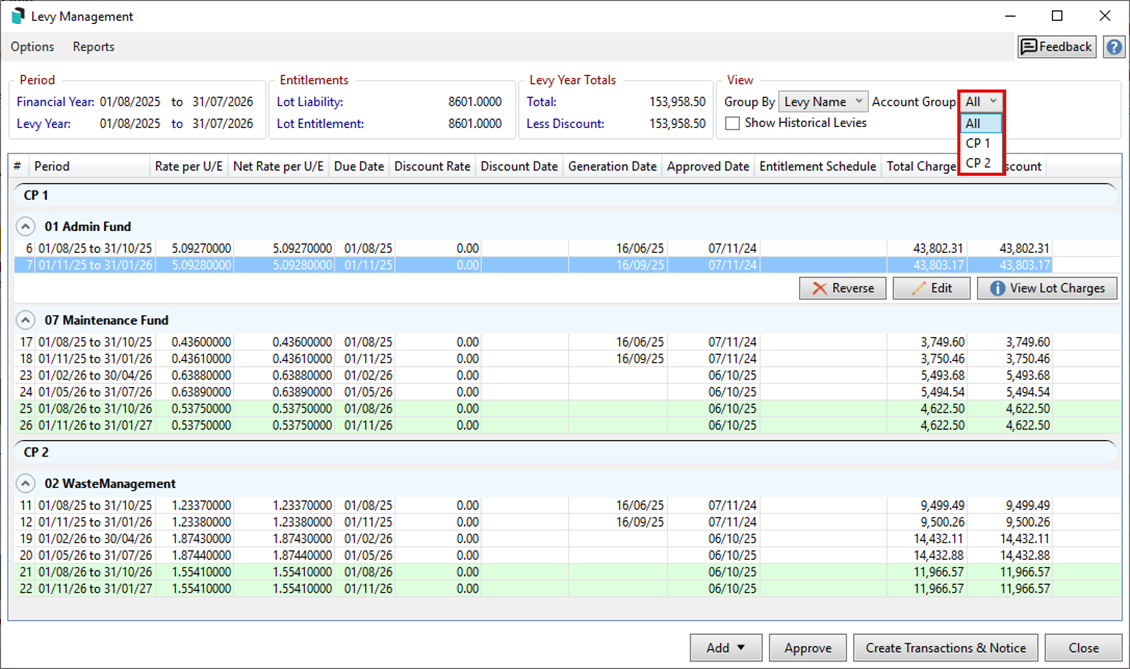
Multi Owners Corporation (OC)
The levy functionality for a Multi Owners Corporation (OC), configured in Account Group Setup, is the same as any Plan. There is an Account Group selector available in the following areas:
- Levy Management
- Add - Manual
- Distribute Levies
- Levy Register
- Levy Register (Quarterly)
- Levy Register Summary
- Levy Generation Schedule
Add - Manual Levy