This article covers the process of refunding an overpayment on a current account in the Utility Sub-Group, or a credit on an account after a final bill has been issued (Second Debtor Account). The payment will be drawn for the amount of the overpayment or credit balance on the account.
Refund Clearing Account Set Up
- From the Utility Sub-Group, search or select Utility Billing.
- Click File > Configure.
- Ensure the Refund Clearing Account has been set.
- Close.

Setting Debtor with BSB and Account Details for Refund
Depending on where the credit sits with the debtor, which area is used to add the BSB, and account details for the contact will be determined. If the contact has been issued a final bill and moved into the Debtor (Second Debtor) with the credit, then use this icon to edit the contact information, or if the credit remains on a contact that is still being billed for utilities, use this Debtor Maintenance icon to access the contact information.
- Search or select Debtor Maintenance OR Debtor (Second Debtor) from the Sub-Group.
- Search for the required contact from the list of existing debtors.
- Click the blue i icon and click the edit button to add the BSB and Account details.
- Click Save and and Close.

Creating a Utility Refund
- In the Utility Billing menu, click GoTo > Refunds.
- Select the Setup Tab.
- Review the setup for EFT templates, printers, and codes as required. Once these have been set the first time, they should be held for future refunds.
- Tick the Include Current Accounts box. This will need to be done each time a refund is required.

- Select the Refunds tab.
- Select the debtor who requires the refund, and click EFT Setup button, and tick Direct Debit. Click Save / Close.
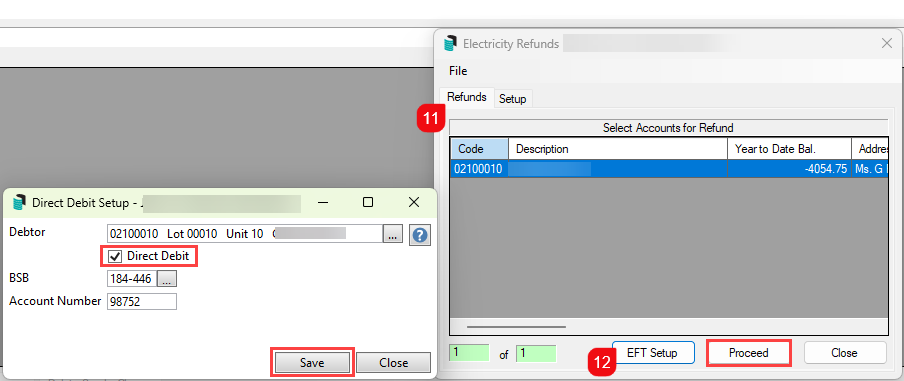
- Click Proceed > OK, then Close.
- Search or select EFT Manager, and finalise this EFT payment.

Reversing a Refund
If, for any reason, the refund drawn needs to be reversed so it can be reapplied, for example, if it has drawn a cheque due to the EFT flag not being set, the steps below can be applied.
- Search or select Payments Management.
- Locate the debtor from the table of payments.
- Click the orange reverse icon or the button at the bottom, Reverse.
- Click Reverse from the Reverse Payment screen to confirm.
- If needed, re-apply the refund referring to the Creating Utility Refund steps above.

