The Branding page allows you to tailor the visual identity of the StrataMax Portal for each office (BCMax drive) with custom branding elements. By default, the StrataMax logo and colour scheme are applied, and the user can personalise this. This article outlines how to add, edit, and delete branding, as well as customise visual elements such as logos, background images, and colour themes.
Add Custom Branding
To add custom branding for an office:
- Access the StrataMax Portal.
- If multiple offices are available, select the correct office from the ‘My Office / Properties’ list.
- Click on Customise and select Branding.
Logo
- Access the StrataMax Portal.
- If multiple offices are available, select the correct office from the ‘My Office / Properties’ list.
- Click on Customise and select Branding.
- To upload a logo, click Select Image in the Logo field and choose your image. The logo will require a jpg or png extension and the image should be a max width 250px and max height 60px, if larger this will be scaled automatically.
Page Background
- Access the StrataMax Portal.
- If multiple offices are available, select the correct office from the ‘My Office / Properties’ list.
- Click on Customise and select Branding.
- If you wish to upload a Page Background image, click on the ‘Select Image’ button in the ‘Page Background’ field and navigate to the relevant image.
Colour Management
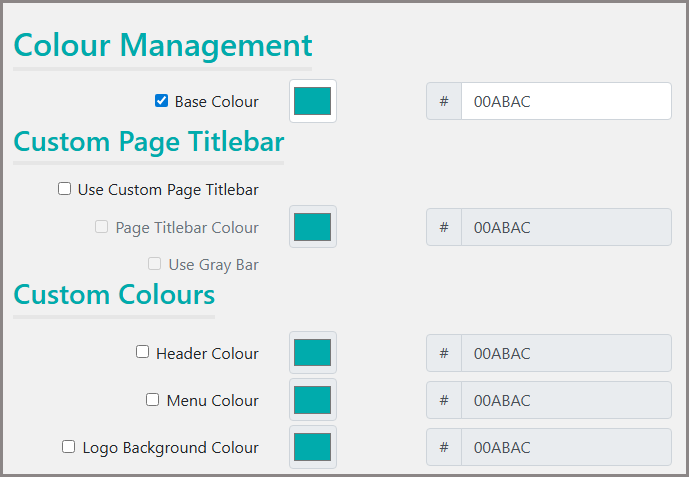
When defining branding, set a ‘Base Colour’. When this is done, the colour selections for the following fields will be defaulted to the selected Base Colour:
- The ‘Page Titlebar Colour’
- The ‘Header Colour’
- The ‘Menu Colour’
- The ‘Logo Background Colour’
The following areas can be easily customised, and if preferred, saved along the way:
- Base Colour
- Page Titlebar Colour
- Header Colour
- Menu Colour
- Logo Background Colour
To override the default colour in any Colour Field, the user should:
- Check the checkbox next to the relevant colour field.
- Click the colour box, generating the colour selector tool.
- Using the up / down toggle select colour code type, or use the eyedropper to select custom colour:
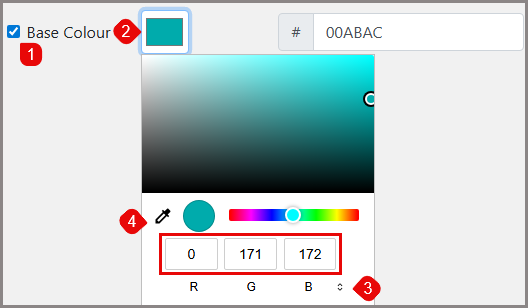
- Enter the HEX colour code in the field provided, or
- Enter the RGB colour code in the fields provided, or
- Enter the HSL values, or
- Drag the colour picker (eye dropper icon) to the correct colour. The colour picker can be used to select colour from other viewable sources, i.e. Marketing information, Websites, colour charts etc (click Esc to exit the colour picker).
The colour code then populates in the '#' box, providing easy reference for further colour field changes requiring the same colour if applicable.

Once the ‘Base Colour’ is set, the user can opt to customise other colour fields:
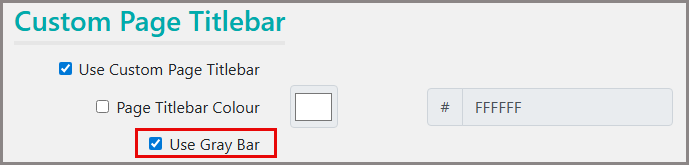
The ‘Page Titlebar Colour’ checkbox will be displayed in the ‘Custom Colours’ section, and will default to White. The user can override the colour of the Page Titlebar by checking the ‘Use Custom Page Titlebar’ checkbox, checking the ‘Page Titlebar Colour’, and changing the default colour using the steps above.
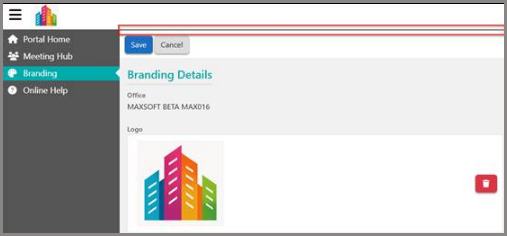
When the ‘Use Custom Page Titlebar’ (under Page Titlebar) is checked, and you wish to use the ‘Use Gray Bar' separator field:
- The ‘Use Gray Bar' separator (under Page Titlebar)’ checkbox will be displayed and unchecked by default. This field can be used to indicate whether the user wants a grey separator bar to be displayed between the Page Titlebar and the Page Actions, as shown below.
- The ‘Header Colour’ will default to the colour selected in the ‘Base Colour’ field. The user can override the colour of the Headers by using the steps shown above.
- The ‘Menu Colour’ will default to the colour selected in the ‘Base Colour’ field. The user can override the colour of Menu selections by using the steps shown above.
- The ‘Logo Background Colour’ will default to the colour selected in the ‘Page Titlebar Colour’ field. The user can override the colour of the Logo Background using the steps shown above.
Once colour changes are complete, click on the Save button.
Note:
When the checkbox next to any of the colour parameters are unchecked and/or the Logo or Background image is removed from the applicable field, the default StrataMax branding will be applied.
Edit Custom Branding
To edit custom branding for an office:
- Access the StrataMax Portal.
- If multiple offices are available, select the correct office from the ‘My Office / Properties’ list.
- Click on ‘Customise’ and select ‘Branding’.
- Select the Branding record that should be edited.
- Make changes to the relevant fields.
- Click on the Save button.
Delete Custom Branding
To delete custom branding for an office:
- Access the StrataMax Portal.
- If multiple offices are available, select the correct office from the ‘My Office / Properties’ list.
- Click on Customise and select Branding.
- Select the Branding record that should be removed.
- Click on the Delete button on the confirmation pop-up.